前言
分布式事务由来
随着微服务的发展,原来的单体应用被拆分成微服务应用,原来的三个模块被 拆分成三个独立的应用,分别使用三个独立的数据源,业务操作需要调用三个服务来完成.此时每个服务内部的数据一致性由本地事务来保证,但是全局数据一致性问题没法保证
Seata
简介
Seata 是一款开源的分布式事务解决方案,致力于在微服务架构下提供高性能和简单易用的分布式事务服务。在 Seata 开源之前,Seata 对应的内部版本在阿里经济体内部一直扮演着分布式一致性中间件的角色,帮助经济体平稳的度过历年的双11,对各BU业务进行了有力的支撑。经过多年沉淀与积累,商业化产品先后在阿里云、金融云进行售卖。2019.1 为了打造更加完善的技术生态和普惠技术成果,Seata 正式宣布对外开源,未来 Seata 将以社区共建的形式帮助其技术更加可靠与完备。
官网地址:http://seata.io/zh-cn/
Seata组成
1+3的套件组成
Transaction ID XID : 全局唯一事务ID
Seata三套件:
-
TC (Transaction Coordinator) - 事务协调者
维护全局和分支事务的状态,驱动全局事务提交或回滚。 -
TM (Transaction Manager) - 事务管理器
定义全局事务的范围:开始全局事务、提交或回滚全局事务。 -
RM (Resource Manager) - 资源管理器
管理分支事务处理的资源,与TC交谈以注册分支事务和报告分支事务的状态,并驱动分支事务提交或回滚。
处理过程
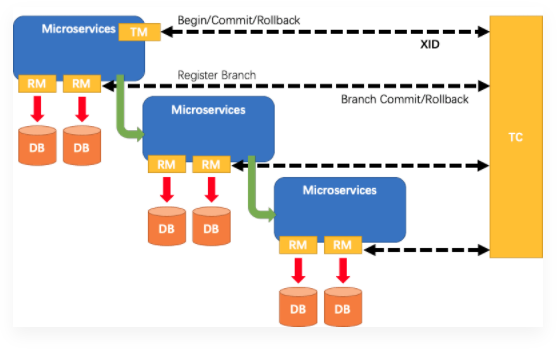
- TM向TC申请开启一个全局事务,全局事务创建成功并生成一个全局唯一的XID;
- XID在微服务调用链路的上下文中传播;
- RM向TC注册分支事务,将其纳入XID对应全局事务的管辖;
- TM向TC发起针对XID的全局提交或回滚决议;
- TC调度XID下管辖的全部分支事务完成提交或回滚请求。
怎么玩
- 本地@Transactional
- 全局@GlobalTransactional
Seata-Server安装
- 官网下载安装包
- seate-server解压到指定目录进入conf目录下,修改
file.conf配置文件 - MySQL数据库新建库seate
- 修改seataconf目录下的
registry.conf配置文件 - 先启动Nacos端口号8848
- 再启动seata-server
Seata下载
下载地址:https://github.com/seata/seata/releases
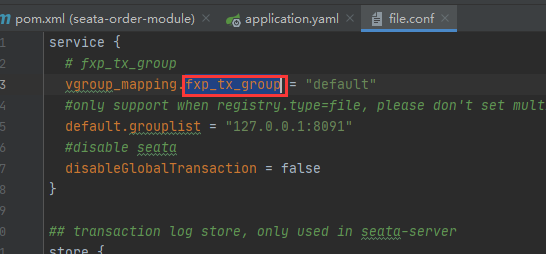
file.conf配置文件配置
主要修改:自定义事务组名称+事务日志存储模式为db+数据库链接信息
service模块
service {
  #transaction service group mapping 自定义事务组名称
  vgroup_mapping.my_test_tx_group = "fxp_tx_group"
  #only support when registry.type=file, please don't set multiple addresses
  default.grouplist = "127.0.0.1:8091"
  #disable seata
  disableGlobalTransaction = false
}
存储模块
store {
  ## store mode: file、db 从文件换成db
  mode = "db"

  ## file store property
  file {
    ## store location dir
    dir = "sessionStore"
  }

  ## database store property
  db {
    ## the implement of javax.sql.DataSource, such as DruidDataSource(druid)/BasicDataSource(dbcp) etc.
    datasource = "dbcp"
    ## mysql/oracle/h2/oceanbase etc. 修改自己的数据库 账户 密码
    db-type = "mysql"
    driver-class-name = "com.mysql.jdbc.Driver"
    url = "jdbc:mysql://127.0.0.1:3306/seata"
    user = "root"
    password = "root"
  }
创建数据库并建表
创建seata数据库
-- the table to store GlobalSession data
drop table if exists `global_table`;
create table `global_table` (
  `xid` varchar(128)  not null,
  `transaction_id` bigint,
  `status` tinyint not null,
  `application_id` varchar(32),
  `transaction_service_group` varchar(32),
  `transaction_name` varchar(128),
  `timeout` int,
  `begin_time` bigint,
  `application_data` varchar(2000),
  `gmt_create` datetime,
  `gmt_modified` datetime,
  primary key (`xid`),
  key `idx_gmt_modified_status` (`gmt_modified`, `status`),
  key `idx_transaction_id` (`transaction_id`)
);

-- the table to store BranchSession data
drop table if exists `branch_table`;
create table `branch_table` (
  `branch_id` bigint not null,
  `xid` varchar(128) not null,
  `transaction_id` bigint ,
  `resource_group_id` varchar(32),
  `resource_id` varchar(256) ,
  `lock_key` varchar(128) ,
  `branch_type` varchar(8) ,
  `status` tinyint,
  `client_id` varchar(64),
  `application_data` varchar(2000),
  `gmt_create` datetime,
  `gmt_modified` datetime,
  primary key (`branch_id`),
  key `idx_xid` (`xid`)
);

-- the table to store lock data
drop table if exists `lock_table`;
create table `lock_table` (
  `row_key` varchar(128) not null,
  `xid` varchar(96),
  `transaction_id` long ,
  `branch_id` long,
  `resource_id` varchar(256) ,
  `table_name` varchar(32) ,
  `pk` varchar(36) ,
  `gmt_create` datetime ,
  `gmt_modified` datetime,
  primary key(`row_key`)
);
registry.conf文件配置
配置nacos连接 从file改成nacos
# 配置nacos连接 从file改成nacos
registry {
  # file 、nacos 、eureka、redis、zk、consul、etcd3、sofa
  type = "nacos"

# 改成localhost:8848
  nacos {
    serverAddr = "localhost:8848"
    namespace = ""
    cluster = "default"
  }
  eureka {
    serviceUrl = "http://localhost:8761/eureka"
    application = "default"
    weight = "1"
  }
启动Seata-Server启动
- 先启动Nacos
- 再启动Seata-Server
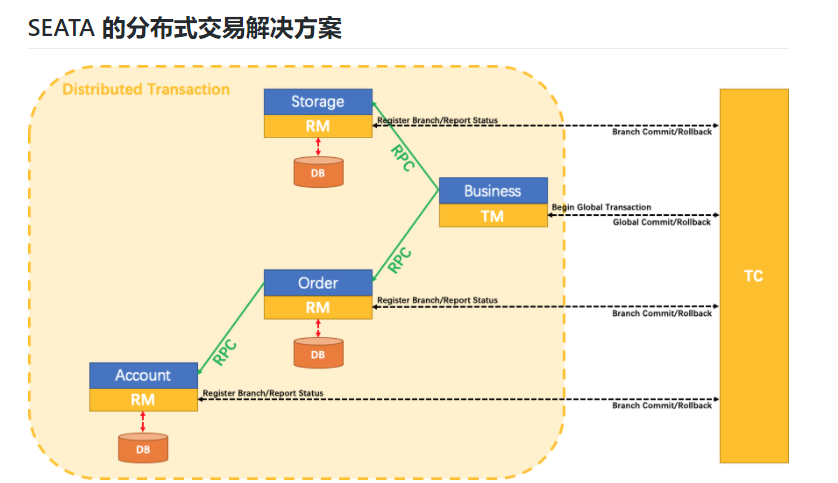
快速上手
我们以官网的分布式交易案例为例
测试环境准备
以下演示都需要先启动Nacos后启动Seata 保证两个都OK
分布式事务业务说明
这里我们会创建三个服务,一个订单服务。一个库存服务。一个账户服务。
当用户下单时,会在订单服务中创建一个订单,然后通过远程调用库存服务来扣减下单商品的库存,再通过远程调用账户服务来扣减用户账户里面的余额,
最后在订单服务中修改订单状态为已完成。
该操作跨越三个数据库,有两次远程调用。很明显会有分布式事务问题。
下订单->减库存->改状态
创建业务数据库
- seata_order:存储订单的数据库
- seata_storage:存储库存的数据库
- seata_account:存储账户信息的数据库

业务数据库下创建对应业务表
- seata_order库创建t_order表
CREATE TABLE t_order(
    id INT(11) NOT NULL AUTO_INCREMENT PRIMARY KEY ,
    user_id BIGINT(11) DEFAULT NULL COMMENT '用户id',
    product_id BIGINT(11) DEFAULT NULL COMMENT '产品id',
    count INT(11) DEFAULT NULL COMMENT '数量',
    money DECIMAL(11,0) DEFAULT NULL COMMENT '金额',
    status INT(1) DEFAULT NULL COMMENT '订单状态:0创建中,1已完结'
)ENGINE=InnoDB AUTO_INCREMENT=7 CHARSET=utf8;
- seata_storage库下创建t_storage表
CREATE TABLE t_storage(
    id BIGINT(11) NOT NULL AUTO_INCREMENT PRIMARY KEY ,
    product_id BIGINT(11) DEFAULT NULL COMMENT '产品id',
    total INT(11) DEFAULT NULL COMMENT '总库存',
    used INT(11) DEFAULT NULL COMMENT '已用库存',
    residue INT(11) DEFAULT NULL COMMENT '剩余库存'
)ENGINE=InnoDB AUTO_INCREMENT=7 CHARSET=utf8;
INSERT INTO t_storage(id, product_id, total, used, residue) VALUES(1,1,100,0,100);
- seata_account库下创建t_account表
CREATE TABLE t_account(
    id BIGINT(11) NOT NULL AUTO_INCREMENT PRIMARY KEY ,
    user_id BIGINT(11) DEFAULT NULL COMMENT '用户id',
    total DECIMAL(10,0) DEFAULT NULL COMMENT '总额度',
    used DECIMAL(10,0) DEFAULT NULL COMMENT '已用额度',
    residue DECIMAL(10,0) DEFAULT 0 COMMENT '剩余可用额度'
)ENGINE=InnoDB AUTO_INCREMENT=7 CHARSET=utf8;
INSERT INTO t_account(id, user_id, total, used, residue) VALUES(1,1,1000,0,1000);
按照三个库创建对应的回滚日志表
在官网下载的压缩包里conf/db_undo_log.sql
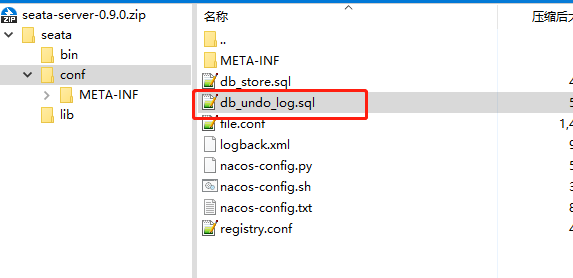
三个库中分别执行:
-- the table to store seata xid data
-- 0.7.0+ add context
-- you must to init this sql for you business databese. the seata server not need it.
-- 此脚本必须初始化在你当前的业务数据库中,用于AT 模式XID记录。与server端无关(注:业务数据库)
-- 注意此处0.3.0+ 增加唯一索引 ux_undo_log
drop table `undo_log`;
CREATE TABLE `undo_log` (
  `id` bigint(20) NOT NULL AUTO_INCREMENT,
  `branch_id` bigint(20) NOT NULL,
  `xid` varchar(100) NOT NULL,
  `context` varchar(128) NOT NULL,
  `rollback_info` longblob NOT NULL,
  `log_status` int(11) NOT NULL,
  `log_created` datetime NOT NULL,
  `log_modified` datetime NOT NULL,
  `ext` varchar(100) DEFAULT NULL,
  PRIMARY KEY (`id`),
  UNIQUE KEY `ux_undo_log` (`xid`,`branch_id`)
) ENGINE=InnoDB AUTO_INCREMENT=1 DEFAULT CHARSET=utf8;
业务微服务准备
业务需求
下订单->减库存->扣余额->改状态
创建Maven父级工程
导入依赖
 <!--父级项目-->
    <dependencyManagement>
        <dependencies>
            <!--springCloud-->
            <dependency>
                <groupId>org.springframework.cloud</groupId>
                <artifactId>spring-cloud-dependencies</artifactId>
                <version>Greenwich.RELEASE</version>
                <type>pom</type>
                <scope>import</scope>
            </dependency>
            <!--springCloudAlibaba-->
            <dependency>
                <groupId>com.alibaba.cloud</groupId>
                <artifactId>spring-cloud-alibaba-dependencies</artifactId>
                <version>2.1.0.RELEASE</version>
                <type>pom</type>
                <scope>import</scope>
            </dependency>
            <!--springBoot-->
            <dependency>
                <groupId>org.springframework.boot</groupId>
                <artifactId>spring-boot-dependencies</artifactId>
                <version>2.1.4.RELEASE</version>
                <type>pom</type>
                <scope>import</scope>
            </dependency>
        </dependencies>
    </dependencyManagement>
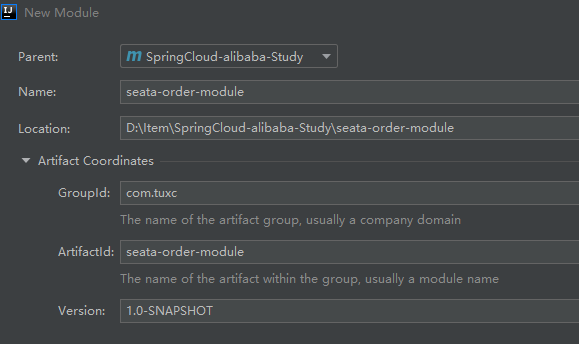
新建订单Module
创建项目
导入依赖
    <dependencies>
        <!--nacos-->
        <dependency>
            <groupId>com.alibaba.cloud</groupId>
            <artifactId>spring-cloud-starter-alibaba-nacos-discovery</artifactId>
        </dependency>
        <!--seata-->
        <dependency>
            <groupId>com.alibaba.cloud</groupId>
            <artifactId>spring-cloud-starter-alibaba-seata</artifactId>
            <exclusions>
                <exclusion>
                    <groupId>io-seata</groupId>
                    <artifactId>seata-all</artifactId>
                </exclusion>
            </exclusions>
        </dependency>
        <!--自己用的seata-server版本是多少 这里就写多少-->
        <dependency>
            <groupId>io.seata</groupId>
            <artifactId>seata-all</artifactId>
            <version>1.0.0</version>
        </dependency>
        <dependency>
            <groupId>org.springframework.cloud</groupId>
            <artifactId>spring-cloud-starter-openfeign</artifactId>
        </dependency>
        <dependency>
            <groupId>org.springframework.boot</groupId>
            <artifactId>spring-boot-starter-web</artifactId>
        </dependency>
        <dependency>
            <groupId>org.projectlombok</groupId>
            <artifactId>lombok</artifactId>
        </dependency>
        <!--mysql-->
        <dependency>
            <groupId>mysql</groupId>
            <artifactId>mysql-connector-java</artifactId>
            <scope>runtime</scope>
        </dependency>
        <!--mybatis-->
        <dependency>
            <groupId>org.mybatis.spring.boot</groupId>
            <artifactId>mybatis-spring-boot-starter</artifactId>
            <version>1.3.2</version>
        </dependency>
        <!-- druid -->
        <dependency>
            <groupId>com.alibaba</groupId>
            <artifactId>druid</artifactId>
            <version>1.1.22</version>
        </dependency>
    </dependencies>
统一的结果集返回
@Data
@AllArgsConstructor
@NoArgsConstructor
@Accessors(chain = true)
public class CommonResult<T> {

  private Integer code;
  private String message;
  private T data;

  public CommonResult(Integer code,  String message){
    this(code, message, null);
  }
}
创建order实体类
@Data
@AllArgsConstructor
@NoArgsConstructor
@Accessors(chain = true)
public class Order {

  private Long id;
  private Long userId;
  private Long productId;
  private Integer count;
  private BigDecimal money;
  private Integer status;
}
编写yaml配置文件
server:
  port: 2001

spring:
  application:
    name: order-order-service
  cloud:
    alibaba:
      seata:
        # seata自定义事务组名称
        tx-service-group: fxp_tx_group
    nacos:
      discovery:
        server-addr: localhost:8848
  #数据源
  datasource:
    driver-class-name: com.mysql.cj.jdbc.Driver
    url: jdbc:mysql://localhost:3306/seata_order?useUnicode=true&useSSL=false&characterEncoding=utf8&serverTimezone=Asia/Shanghai
    username: root
    password: root
    type: com.alibaba.druid.pool.DruidDataSource

mybatis:
  mapper-locations: classpath*:/mapper/**Mapper.xml

feign:
  hystrix:
    enabled: false

logging:
  level:
    com.tuxc: DEBUG
在resource目录下创建mapper/OrderMapper.xml
<?xml version="1.0" encoding="UTF-8"?>
<!DOCTYPE mapper PUBLIC "-//mybatis.org//DTD Mapper 3.0//EN" "http://mybatis.org/dtd/mybatis-3-mapper.dtd">
<mapper namespace="com.tuxc.dao.OrderDao">

</mapper>
在resource目录下创建file.conf,registry.conf文件
也就是将之前我们改的文件复制到resource目录下即可
修改我们刚才定义的事务名称
编写Dao
@Mapper
public interface OrderDao {
  // 创建订单
  void create(Order order);
  // 修改订单
  void updateStatusByUserId(@Param("id") Long id, @Param("status") Integer status);
  // 查询订单
  Order selectById(@Param("id") Long id);
  // 查询全部订单
  List<Order> selectAll();
}
<?xml version="1.0" encoding="UTF-8"?>
<!DOCTYPE mapper PUBLIC "-//mybatis.org//DTD Mapper 3.0//EN" "http://mybatis.org/dtd/mybatis-3-mapper.dtd">
<mapper namespace="com.tuxc.dao.OrderDao">

    <insert id="create">
         insert into t_order(id, userId, productId, count, money, status) values (null, #{order.userId}, #{order.productId}, #{order.count}, #{order.money}, #{order.status})
    </insert>

    <update id="updateStatusByUserId">
        update t_order set status = 1 where user_id = #{userId}  and status = #{status}
    </update>

    <select id="selectById" resultType="com.tuxc.entity.Order">
        select id, userId, productId, count, money, status from t_order where id = #{id}
    </select>

    <select id="selectAll" resultType="com.tuxc.entity.Order">
        select id, userId, productId, count, money, status from t_order
    </select>

</mapper>
编写OrderService
public interface OrderService {
  // 创建
  Order create(Order order);
  // 修改
  Order updateStatusByUserId(Long userId, Integer status);
  // 查询订单
  Order findById(Long id);
  // 查询全部订单
  List<Order> findAll();
}
编写AccountService
@FeignClient(value = "seata-account-service")
public interface AccountService {
  @PostMapping(value = "/account/decrease")
  CommonResult decrease(@RequestParam("userId") Long userId, @RequestParam("money") BigDecimal money);
}
编写StorageService
@FeignClient(value = "seata-storage-service")
public interface StorageService {
  @PostMapping(value = "/storage/decrease")
  CommonResult decrease(@RequestParam("productId") Long productId, @RequestParam("count") Integer count);
}
编写service实现类
@Service
@Slf4j
public class OrderServiceImpl implements OrderService{

  @Resource
  private OrderDao orderDao;
  @Resource
  private StorageService storageService;
  @Resource
  private AccountService accountService;

  @Override
  public Order create(Order order) {
    log.info("订单开始");
    orderDao.create(order);
    log.info("订单微服务开始调用库存");
    storageService.decrease(order.getProductId(), order.getCount());
    log.info("订单金额开始扣减");
    accountService.decrease(order.getUserId(), order.getMoney());
    log.info("订单状态开始修改");
    orderDao.updateStatusByUserId(order.getUserId(), 0);
    log.info("订单结束");
    return order;
  }

  @Override
  public Order updateStatusByUserId(Long userId, Integer status) {
    orderDao.updateStatusByUserId(userId, status);
    return null;
  }

  @Override
  public Order findById(Long id) {
    return orderDao.selectById(id);
  }

  @Override
  public List<Order> findAll() {
    return orderDao.selectAll();
  }
}
编写controller
@RestController
public class OrderController {
  @Autowired
  private OrderService orderService;
  @GetMapping("/order/create")
  public CommonResult create(Order order){
    orderService.create(order);
    return new CommonResult(200, "订单创建成功!");
  }
}
编写主启动类
@EnableFeignClients
@EnableDiscoveryClient
@SpringBootApplication
public class OrderSeataApplication {
  public static void main(String[] args) {
    SpringApplication.run(OrderSeataApplication.class, args);
  }
}
新建库存Module
业务大致相同 自行编写
新建账户Module
业务大致相同 自行编写
@GlobalTransactional
我们只需要使用一个 @GlobalTransactional 注解在业务方法上:
   // name 保证唯一性即可 rollbackFor 遇到什么异常回滚 noRollbackFor 遇到什么错不回滚
    @GlobalTransactional(name = "ftp_global_order", rollbackFor = Exception.class, noRollbackFor = RuntimeException.class)
    public void purchase(String userId, String commodityCode, int orderCount) {
        ......
    }
Seata原理分析
2019年1月蚂蚁金服和阿里巴巴共同开源的分布式事务解决方案
再看看TC/TM/RM三大组件
TC: seata-server seata服务器–全局协调者
TM: @GlobalTransactional–事务的发起方
RM: 一个数据库就是一个RM–事务参与方
Seata事务模式
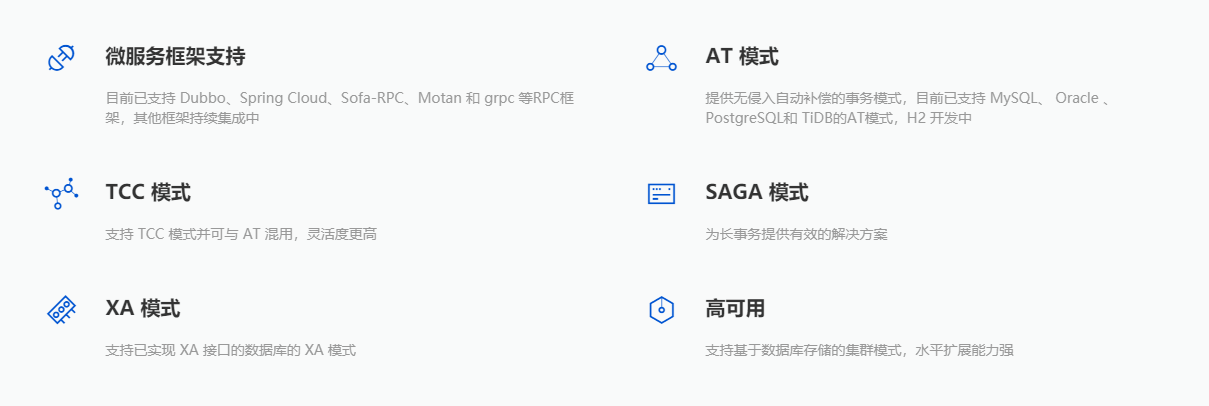
Seata默认采用AT模式
AT模式
两阶段提交协议的演变:
- 一阶段:业务数据和回滚日志记录在同一个本地事务中提交,释放本地锁和连接资源。
- 二阶段:
提交异步化,非常快速地完成。
回滚通过一阶段的回滚日志进行反向补偿。
最后
以上就是现代野狼最近收集整理的关于SpringCloud Alibaba学习笔记(三)Seata前言SeataSeata-Server安装快速上手的全部内容,更多相关SpringCloud内容请搜索靠谱客的其他文章。


发表评论 取消回复