开发中需要通过Java调用FFmpeg的dll文件,进行音视频的编解码工作,直接采用jni的方式太过麻烦,如果采用jna(Java Native Access)访问FFmpeg的dll文件工作量太多,现在经过测试采用一种简单的方案:在VS2012中使用FFmpeg的dll库进行音视频编解码开发,然后打包为dll文件,然后在eclipse使用jna访问这个dll文件。
VS2012中使用FFmpeg开发音视频编解码
一、下载文件
[下载地址][1]
注意版本号和位数,对应自身操作系统的(32bit or 64bit)
需要下载Builds(Dev)和Builds(Shared)。
Builds(Dev):包含了所需要的.h头文件和.lib库文件
Builds(Shared):包含了所需要的dll文件。
二、vs2012配置
include路径:C:UsersZhanDesktopffmpeg-3.3.3-win64-devinclude
lib路径:C:UsersZhanDesktopffmpeg-3.3.3-win64-devlib
dll路径:C:UsersZhanDesktopffmpeg-3.3.3-win64-sharedbin
1.创建项目
首先需要创建一个VS项目
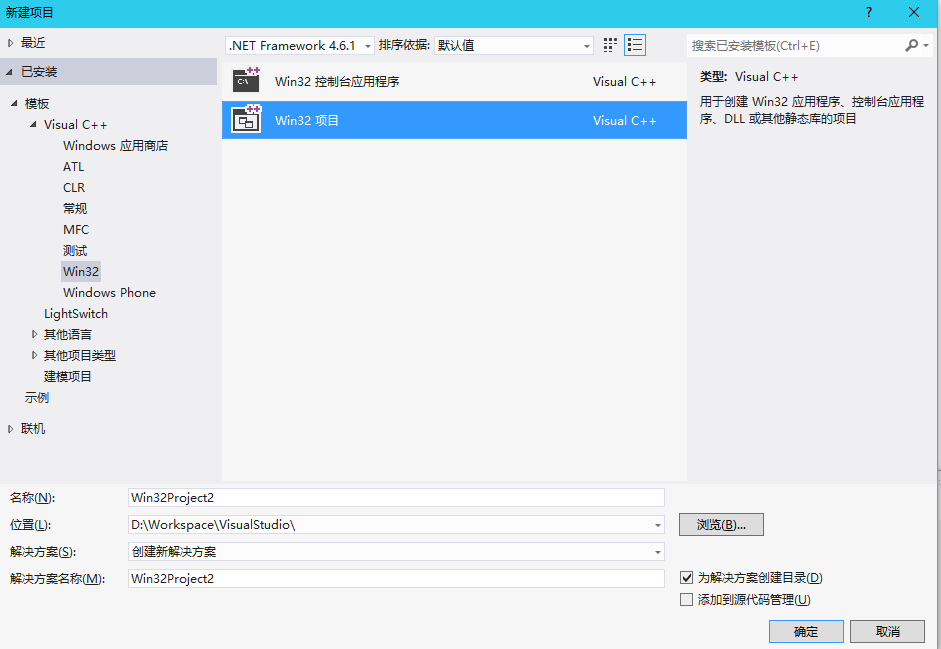
首先创建一个win32项目
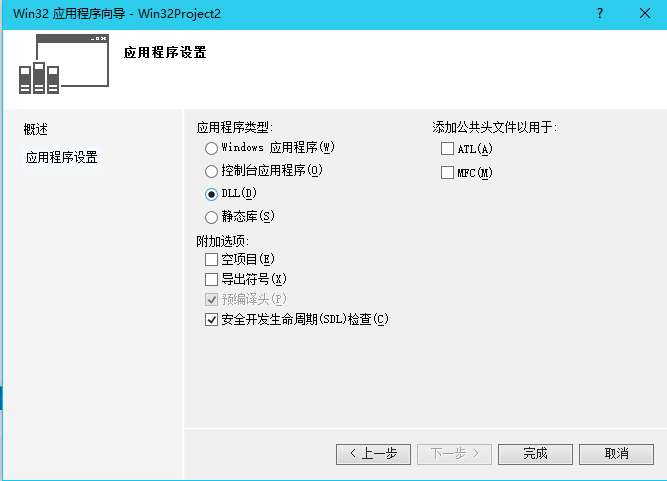
记得选择dll
然后生成项目
2.配置库文件和连接器
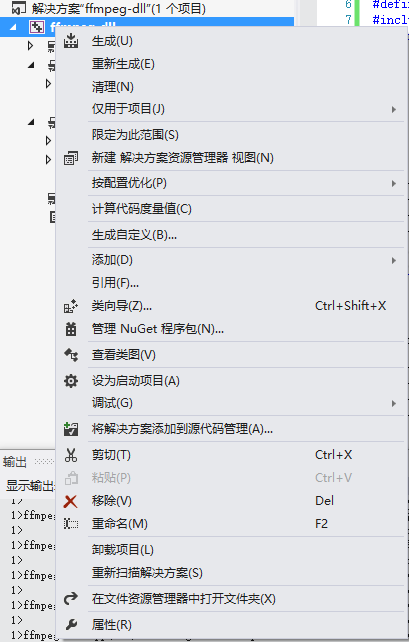
如图,右键项目名称,点击属性
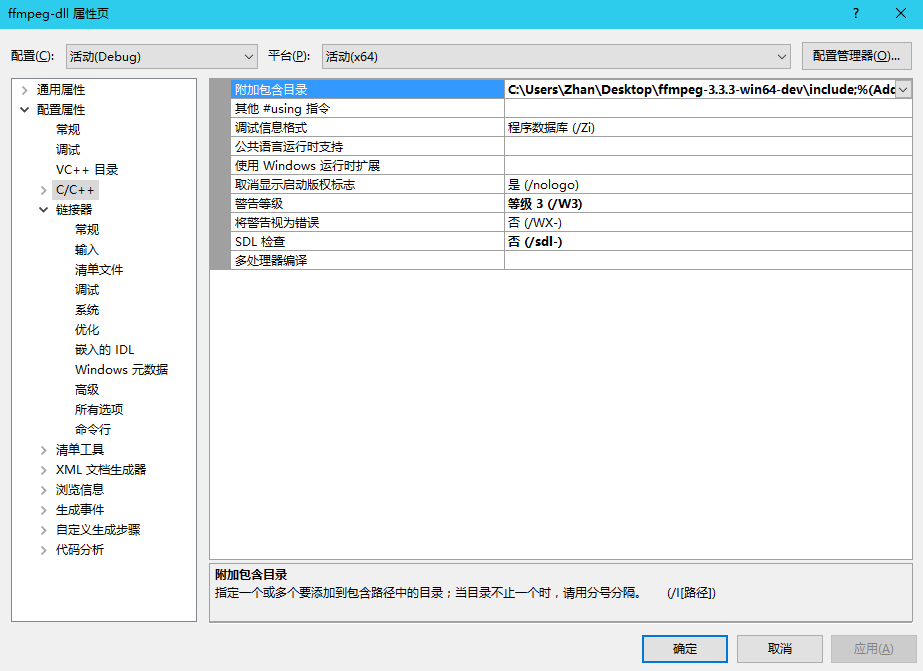
在附加包目录添加include路径
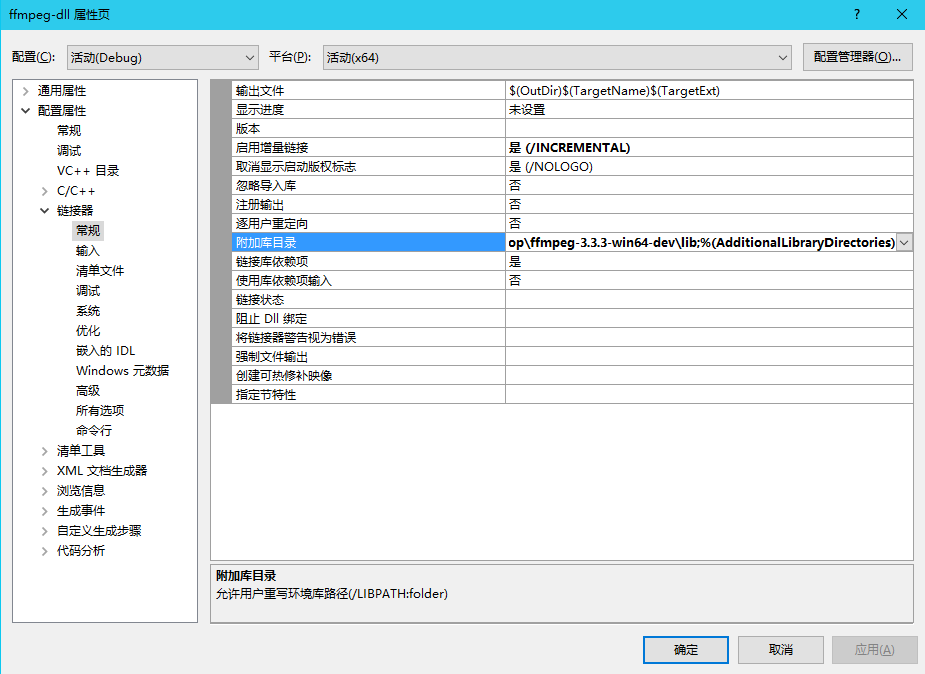
在附加库目录添加lib路径
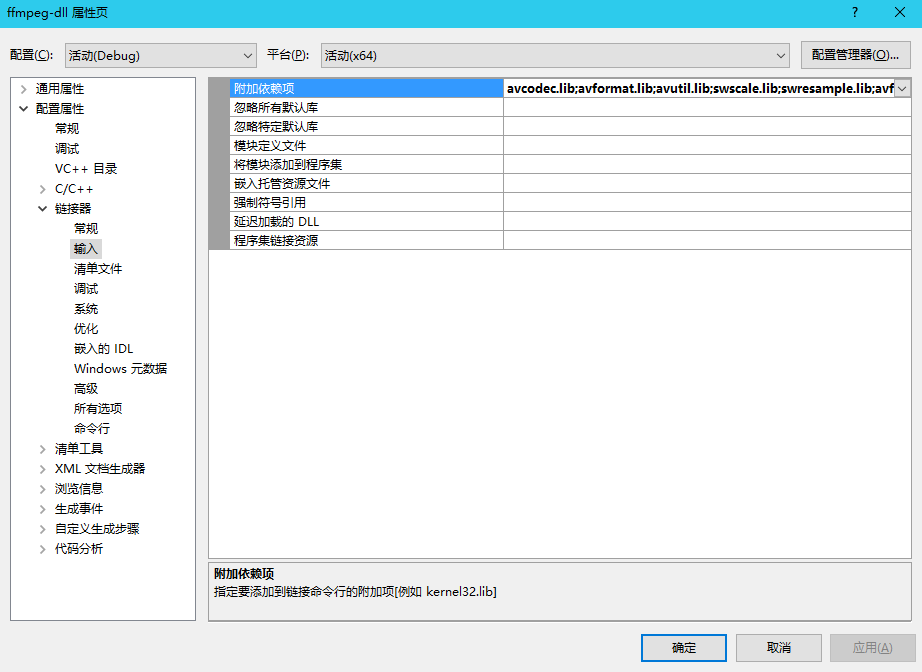
在附加依赖性添加avcodec.lib;avformat.lib;avutil.lib;swscale.lib;swresample.lib;avfilter.lib;swscale.lib (需要用到库文件对应添加)
dll文件拷贝到项目的目录中
3.编写代码
在项目的cpp添加代码
#include <stdio.h>
#include "stdafx.h"
#define MYLIBAPI  extern   "C"   __declspec( dllexport )

//添加要用的就好
extern "C"
{
    #include <libavcodecavcodec.h>
    #include <libavformatavformat.h>
    #include <libswscaleswscale.h>
    #include <libavutilpixfmt.h>
    #include <libavutilimgutils.h>
};

MYLIBAPI int main_hello();

 int main_hello()
{
    AVFormatContext *pFormatCtx = NULL;
    AVCodecContext *pCodecCtx = NULL;
    AVCodec *pCodec;
    AVDictionaryEntry *dict = NULL;

    int iHour, iMinute, iSecond, iTotalSeconds;//HH:MM:SS
    int videoIndex, audioIndex;

    //替换为自己的目录
    char *fileName = "D:\test\sintel.mp4";


    av_register_all();//注册所有组件

    if (avformat_open_input(&pFormatCtx, fileName, NULL, NULL) != 0)//打开输入视频文件
    {
        printf("Couldn't open input stream.n");
        return -1;
    }

    if (avformat_find_stream_info(pFormatCtx, NULL) < 0)
    {
        printf("Couldn't find stream information.n");
        return -1;
    }

    videoIndex = -1;
    for (int i = 0; i < pFormatCtx->nb_streams/*视音频流的个数*/; i++)
    {
        if (pFormatCtx->streams[i]/*视音频流*/->codecpar->codec_type == AVMEDIA_TYPE_VIDEO)//查找音频
        {
            videoIndex = i;
            break;
        }
    }
    if (videoIndex == -1)
    {
        printf("Couldn't find a video stream.n");
        return -1;
    }
   pCodecCtx = pFormatCtx->streams[videoIndex]->codec;   //指向AVCodecContext的指针
    pCodec = avcodec_find_decoder(pCodecCtx->codec_id);  //指向AVCodec的指针.查找解码器
    if (pCodec == NULL)
    {
        printf("Codec not found.n");
        return -1;
    }
    //打开解码器
    if (avcodec_open2(pCodecCtx, pCodec, NULL) < 0)
    {
        printf("Could not open codec.n");
        return -1;
    }

    audioIndex = -1;
    for (int i = 0; i < pFormatCtx->nb_streams; i++)
    {
        if (pFormatCtx->streams[i]->codec->codec_type == AVMEDIA_TYPE_AUDIO)
        {
            audioIndex = i;
            break;
        }
    }

    if (audioIndex == -1)
    {
        printf("Couldn't find a audio stream.n");
        return -1;
    }


    //打印结构体信息

    puts("AVFormatContext信息:");
    puts("---------------------------------------------");
    printf("文件名:%sn", pFormatCtx->filename);
    iTotalSeconds = (int)pFormatCtx->duration/*微秒*/ / 1000000;
    iHour = iTotalSeconds / 3600;//小时
    iMinute = iTotalSeconds % 3600 / 60;//分钟
    iSecond = iTotalSeconds % 60;//秒
    printf("持续时间:%02d:%02d:%02dn", iHour, iMinute, iSecond);
    printf("平均混合码率:%d kb/sn", pFormatCtx->bit_rate / 1000);
    printf("视音频个数:%dn", pFormatCtx->nb_streams);
    puts("---------------------------------------------");

    puts("AVInputFormat信息:");
    puts("---------------------------------------------");
    printf("封装格式名称:%sn", pFormatCtx->iformat->name);
    printf("封装格式长名称:%sn", pFormatCtx->iformat->long_name);
    printf("封装格式扩展名:%sn", pFormatCtx->iformat->extensions);
    printf("封装格式ID:%dn", pFormatCtx->iformat->raw_codec_id);
    puts("---------------------------------------------");

    puts("AVStream信息:");
    puts("---------------------------------------------");
    printf("视频流标识符:%dn", pFormatCtx->streams[videoIndex]->index);
    printf("音频流标识符:%dn", pFormatCtx->streams[audioIndex]->index);
    printf("视频流长度:%d微秒n", pFormatCtx->streams[videoIndex]->duration);
    printf("音频流长度:%d微秒n", pFormatCtx->streams[audioIndex]->duration);
    puts("---------------------------------------------");

    puts("AVCodecContext信息:");
    puts("---------------------------------------------");
    printf("视频码率:%d kb/sn", pCodecCtx->bit_rate / 1000);
    printf("视频大小:%d * %dn", pCodecCtx->width, pCodecCtx->height);
    puts("---------------------------------------------");

    puts("AVCodec信息:");
    puts("---------------------------------------------");
    printf("视频编码格式:%sn", pCodec->name);
    printf("视频编码详细格式:%sn", pCodec->long_name);
    puts("---------------------------------------------");

    printf("视频时长:%d微秒n", pFormatCtx->streams[videoIndex]->duration);
    printf("音频时长:%d微秒n", pFormatCtx->streams[audioIndex]->duration);
    printf("音频采样率:%dn", pFormatCtx->streams[audioIndex]->codecpar->sample_rate);
    printf("音频信道数目:%dn", pFormatCtx->streams[audioIndex]->codecpar->channels);

    puts("AVFormatContext元数据:");
    puts("---------------------------------------------");
    while (dict = av_dict_get(pFormatCtx->metadata, "", dict, AV_DICT_IGNORE_SUFFIX))
    {
        printf("[%s] = %sn", dict->key, dict->value);
    }
    puts("---------------------------------------------");

    puts("AVStream视频元数据:");
    puts("---------------------------------------------");
    dict = NULL;
    while (dict = av_dict_get(pFormatCtx->streams[videoIndex]->metadata, "", dict, AV_DICT_IGNORE_SUFFIX))
    {
        printf("[%s] = %sn", dict->key, dict->value);
    }
    puts("---------------------------------------------");

    puts("AVStream音频元数据:");
    puts("---------------------------------------------");
    dict = NULL;
    while (dict = av_dict_get(pFormatCtx->streams[audioIndex]->metadata, "", dict, AV_DICT_IGNORE_SUFFIX))
    {
        printf("[%s] = %sn", dict->key, dict->value);
    }
    puts("---------------------------------------------");


    av_dump_format(pFormatCtx, -1, fileName, 0);
    printf("nn编译信息:n%snn", avcodec_configuration());

    avcodec_free_context(&pCodecCtx);
    //avcodec_close(pCodecCtx);
    avformat_close_input(&pFormatCtx);
    return 0;
}
注意 要在jna中使用dll中的方法的话,需加下面两行代码,提供对外的声明,不加的话jna找不到方法
#define MYLIBAPI  extern   "C"   __declspec( dllexport )
MYLIBAPI int main_hello();
4.编译代码和bug
生成->生成解决方案
成功:

FFmpeg被声明为已否决的解决方案:

这个是“FFmpeg被声明为已否决”这个问题出现的解决方案:SDL检查关掉,这样error被降低为warning 。
FFmpeg视频编解码库,无法解析的外部符号:
下载的是64位的dev和shared版,而编译时时32位的需要设置一下

配置管理器
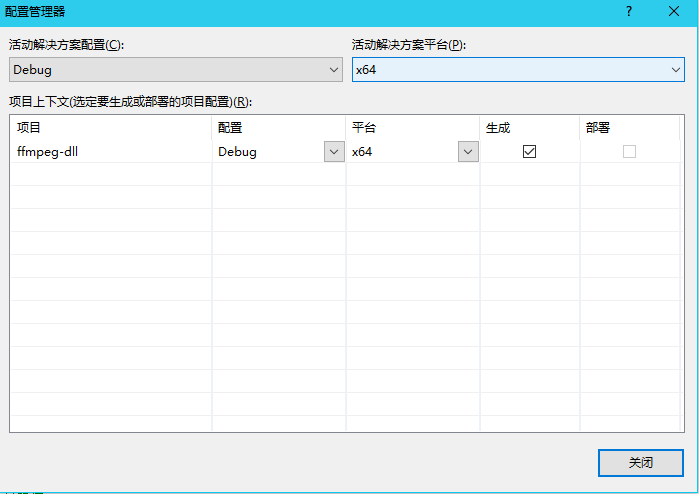
设置为64位的
找不到inttypes.h文件的问题:
若报错:inttypes.h找不到,去网上下载,或是去vs2013,vs2015中拷贝VS目录下:VCincludeinttypes.h
即可解决问题。
##Eclipse中使用JNA调用生成的dll文件
####1.新建工程
打开eclipse新建一个Java project, 把前面生成的dll和ffmpeg的dll拷贝到工程的目录下bin目录下,然后黏贴下去就可以了, 然后[下载jna.jar][2]文件,build path到这个工程中
####2.JNAImp.Java
loadLibrary第一个参数就是dll的名字,第二个就是当前接口的.class类型,接口里面的方法名要跟C的接口方法名一致
package jni;

import com.sun.jna.Library;
import com.sun.jna.Native;
import com.sun.jna.win32.StdCallLibrary;


public interface JNAImp extends Library {
	JNAImp instanceDll  = (JNAImp)Native.loadLibrary("ffmpeg-dll",JNAImp.class);
	// This is the standard, stable way of mapping, which supports extensive
    // customization and mapping of Java to native types.

	public int  main_hello();
}
####3.调用测试
package jni;

import com.sun.jna.Library;
import com.sun.jna.Native;
import com.sun.jna.Platform;
public class FFmpegUtil {


   // public native static int yuvToH264(String input_jstr, String output_jstr, int w_jstr, int h_jstr, int num_jstr);


    public static void main(String[] args)
    {
    	 int a = JNAImp.instanceDll.main_hello();
    	 System.out.print(a);
    }

}
####4.可能存在问题:
1.找不到dll,确认dll是否移动到正确目录下或是dll版本是否正确,jdk的版本和dll版本需要统一
2.找不到方法,确认是否添加一下代码
#define MYLIBAPI  extern   "C"   __declspec( dllexport )
MYLIBAPI int main_hello();
3.dll能找到,方法能找到,方法参数(Java到c++转换)是否正确
参考资料:
http://blog.csdn.net/gwd1154978352/article/details/55097376
http://blog.csdn.net/jswawawa/article/details/53738554
http://blog.csdn.net/chenkent888/article/details/10712851
http://www.bubuko.com/infodetail-2357641.html
https://stackoverflow.com/questions/26102115/error-when-using-logmanager-l4j2-with-java-8-java-lang-reflect-annotatedeleme
https://www.cnblogs.com/lgh1992314/p/5834634.html
[1]: https://ffmpeg.zeranoe.com/builds/
[2]: https://download.csdn.net/download/baidu_32237719/10290703
欢迎关注我的公众号,持续分析优质技术文章

最后
以上就是酷酷绿茶最近收集整理的关于VS2012中使用FFmpeg开发音视频编解码,在Eclipse中使用JNA调用生成的dll文件的全部内容,更多相关VS2012中使用FFmpeg开发音视频编解码,在Eclipse中使用JNA调用生成内容请搜索靠谱客的其他文章。


发表评论 取消回复