Caffeine背景
Caffeine 是基于 JAVA 8 的高性能缓存库。并且在 spring5 (springboot 2.x) 后,spring 官方放弃了 Guava,而使用了性能更优秀的 Caffeine 作为默认缓存组件。
Caffeine wiki
Caffeine配置参数
图片来源
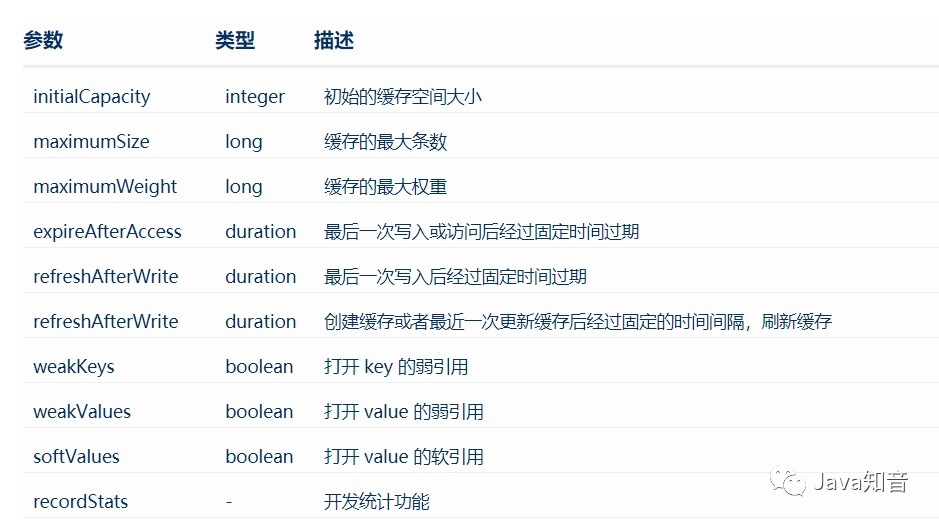
Caffeine配置参数时可以直接调用对应的方法进行设置,同时也提供了一个简单的字符格式配置,由CaffeineSpec负责解析。这里的字符串语法是一系列由逗号隔开的键值对组成,其中每个键值对对应一个配置方法。但是这里的字符配置不支持需要对象来作为参数的配置方法。
 // 这个运行时会报错,maximumSize与maximumWeight不能一起使用
 Cache<Object, Object> cache = Caffeine.from ("maximumSize=10,maximumWeight=10").build ();
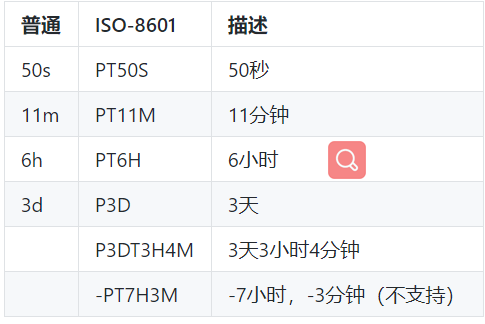
持续时间可以通过在一个integer类型之后跟上一个"d",“h”,“m”,或者"s"来分别表示天,小时,分钟或者秒。另外,从2.8.7版本开始,ISO-8601标准的字符串也将被支持来配置持续时间,并通过Duration.parse来进行解析。出于表示缓存持续时间的目的,这里不支持配置负的持续时间,并将会抛出异常。两种持续时间表示格式的示例如下所示。
注意:maximumSize 和 maximumWeight 不可以同时使用。weakValues 和 softValues 不可以同时使用。
Caffeine简单使用
缓存添加
Caffeine添加缓存的策略分为4种:手动加载,自动加载,手动异步加载和自动异步加载。构建缓存分为两种,同步缓存Cache和异步缓存AsyncCache。它们之间有几个方法,方法签名相同,作用类似,只是返回值不同,这里单独列出来说明一下。
V getIfPresent(@NonNull @CompatibleWith("K") Object key);
--------
CompletableFuture<V> getIfPresent(@NonNull @CompatibleWith("K") Object key);
方法释义:它们会根据缓存key查找对应缓存,缓存存在直接返回,不存在,返回null
V get(@NonNull K key, @NonNull Function<? super K, ? extends V> mappingFunction);
Map<K, V> getAll(@NonNull Iterable<? extends @NonNull K> keys,
      @NonNull Function<Iterable<? extends @NonNull K>, @NonNull Map<K, V>> mappingFunction);
--------
CompletableFuture<V> get(@NonNull K key,
      @NonNull Function<? super K, ? extends V> mappingFunction);
CompletableFuture<Map<K, V>> getAll(@NonNull Iterable<? extends @NonNull K> keys,
      @NonNull Function<Iterable<? extends @NonNull K>, @NonNull Map<K, V>> mappingFunction);
方法释义:这两个方法分别为单个查找和批量查找。根据缓存key查找对应缓存,缓存存在直接返回,不存在,则根据function创建,缓存后返回。
ConcurrentMap<@NonNull K, @NonNull V> asMap();
--------
ConcurrentMap<@NonNull K, @NonNull CompletableFuture<V>> asMap();
方法释义:通过这个方法可以看出来Caffeine底层缓存是通过ConcurrentMap实现的,这里直接暴露出来给我们使用,
需要小心,因为对它的任何修改将直接影响到缓存。根据ConcurrentMap获取的迭代器是弱一致性的,并不能保证其他线程的修改会在迭代器中展示。
		<!--我使用的springBoot版本为2.3.4.RELEASE -->
        <dependency>
            <groupId>com.github.ben-manes.caffeine</groupId>
            <artifactId>caffeine</artifactId>
        </dependency>
- 手动加载
	@Test
    public void test(){
        Cache<Object, Object> cache = Caffeine.newBuilder ()
                .expireAfterWrite (10, TimeUnit.SECONDS)
                .maximumSize (10)
                .build ();
        // 添加或者更新一个缓存元素
        cache.put("hello", "world");
        // 查找一个缓存元素, 没有查找到的时候返回null
        System.out.println (cache.getIfPresent("hello"));
        // 移除一个缓存元素
        cache.invalidate("hello");
        Object hello = cache.get ("hello", k -> String.format ("没有找到对应的键值%s", k));
        System.out.println (hello);
    }
- 自动加载
    @Test
    public void test4(){
        LoadingCache<Object, Object> cache = Caffeine.newBuilder ()
                .expireAfterWrite (5, TimeUnit.SECONDS)
                .maximumSize (20)
                .build (new CacheLoader<Object, Object> () {
                    // 如果key对应的缓存不存在,将调用load方法来生成缓存元素
                    @Override
                    public @Nullable Object load(@NonNull Object o) throws Exception {
                        System.out.println ("加载缓存中" + o.toString ());
                        return o.toString () + System.currentTimeMillis ();
                    }
                    // 如果没有重写 loadAll 方法则默认的 loadAll 回循环调用 load 方法
                    // 在批量检索比单个查找更有效率的场景下,你可以覆盖并开发CacheLoader.loadAll 方法来使你的缓存更有效率。
                    /*@Override
                    public @NonNull Map<Object, Object> loadAll(@NonNull Iterable<?> keys) throws Exception {
                        return null;
                    }*/
                });
        cache.get ("hello1");
        System.out.println (cache.get ("hello1"));
        cache.get ("hello2");
        cache.get ("hello3");
        cache.getAll (Arrays.asList ("hello4","hello5","hello6"));
    }
// 测试结果
加载缓存中hello1
hello11606209690594
加载缓存中hello2
加载缓存中hello3
加载缓存中hello4
加载缓存中hello5
加载缓存中hello6
- 手动异步加载
@Test
    public void test5() throws InterruptedException {
        ThreadPoolExecutor poolExecutor = new ThreadPoolExecutor (2, 5, 0L, TimeUnit.MILLISECONDS, new LinkedBlockingQueue<Runnable> ());
        AsyncCache<Object, Object> asyncCache = Caffeine.newBuilder ()
                .expireAfterWrite (10, TimeUnit.SECONDS)
                .maximumSize (10)
                // 默认的线程池实现是 ForkJoinPool.commonPool()
                .executor (poolExecutor)
                .buildAsync ();
        //
        CompletableFuture<Object> future = asyncCache.get ("hello", o -> {
            try {
                Thread.sleep (5000);
            } catch (InterruptedException e) {
                e.printStackTrace ();
            }
            return o.toString () + System.currentTimeMillis ();
        });
        // 将在启动后第6秒打印 hello1606212949380
        future.thenAccept (System.out::println);
        Thread.sleep (6000);
    }
- 自动异步加载:也就是在手动异步加载的基础上使用CacheLoader,实际上源码将CacheLoader向上造型为AsyncCacheLoader。
Caffeine使缓存失效可以通过手动移除(即调用invalidate相关方法),也可以通过策略移除,策略分为3种。
| 驱逐策略 | 对应方法 |
|---|---|
| 基于容量 | maximumSize / maximumWeight |
| 基于引用 | weakKeys / weakValues / softValues |
| 基于时间 | expireAfterAccess /expireAfterWrite / expireAfter |
基于容量即达到我们设定的值的大小后,将采取相关算法移除缓存,权重的话我们需要提供缓存元素的权重值,通过weigher设定;
基于引用,首先需要明白什么是弱引用,什么是软引用,只被软引用关联对象的生命周期是当内存空间不足,执行垃圾回收时,才会进行回收的一种引用,而只被弱引用关联对象只能活到下一次垃圾回收。使用这种策略时,是让垃圾回收器帮忙移除缓存。另外,官方文档种指出使用软引用比较影响性能,建议我们使用基于缓存容量的策略。还有一点,在判断缓存key是否相同时,将不再基于equals方法,而是==。
基于时间也很好理解,无非是指定多长时间,或者读写多长时间后。
缓存驱逐
以上3种驱逐策略当满足指定条件后并不会马上移除缓存,我们可以通过removalListener定义一个移除监听器在一个元素被移除的时候进行相应的操作,通过测试我发现满足指定驱逐条件后,当再次访问缓存时,会进行移除。如果想要立即移除的话,可以通过调用invalidate相关方法。
	@Test
    public void test6() {
        FakeTicker ticker = new FakeTicker ();
        Cache<Object, Object> cache = Caffeine.newBuilder ()
                .expireAfterAccess (5, TimeUnit.SECONDS)
                .maximumSize (2).ticker (ticker).removalListener(new RemovalListener<Object, Object>() {
                    @Override
                    public void onRemoval(@Nullable Object k, @Nullable Object v, @NonNull RemovalCause removalCause) {
                        System.out.println("缓存失效了 removed " + k + " cause " + removalCause.toString());
                    }
                })
                .build ();
        // 添加或者更新一个缓存元素
        cache.put("hello", "world");
        // 通过这个可以避免等待5秒才触发驱逐策略
        ticker.advance (5, TimeUnit.SECONDS);
        //System.out.println (cache.get ("hello", k -> String.format ("没有找到对应的键值%s", k)));
    }
    class FakeTicker implements Ticker {
        private final AtomicLong nanos = new AtomicLong();

        public FakeTicker advance(long time, TimeUnit timeUnit) {
            nanos.addAndGet(timeUnit.toNanos(time));
            return this;
        }

        @Override
        public long read() {
            return this.nanos.get();
        }
    }
缓存更新
缓存更新策略提供了一个方法refreshAfterWrite,在写操作之后的一段时间后允许key对应的缓存元素进行刷新,但是只有在这个key被真正查询到的时候才会正式进行刷新操作。记住,refreshAfterWrite需要配合LoadingCache或AsyncLoadingCache使用,否则会报错。
	@Test
    public void test8() {
    	// 这个类在上面的demo里面有
        FakeTicker ticker = new FakeTicker ();
        LoadingCache<Object, Object> cache = Caffeine.newBuilder ()
                .refreshAfterWrite (5, TimeUnit.SECONDS)
                .maximumSize (2).ticker (ticker)
                .build (new CacheLoader<Object, Object> () {
                    // 如果key对应的缓存不存在,将调用load方法来生成缓存元素
                    @Override
                    public @Nullable Object load(@NonNull Object o) throws Exception {
                        System.out.println ("加载缓存中" + o.toString ());
                        return o.toString () + System.currentTimeMillis ();
                    }
                });
        // 添加或者更新一个缓存元素
        cache.put("hello", "world");
        System.out.println (cache.getIfPresent ("hello"));
        // 这里必须设置成大于5s,才允许对缓存进行刷新操作
        ticker.advance (6, TimeUnit.SECONDS);
        // 这里查询返回的值依然是world,但是打印出加载缓存中
        System.out.println (cache.getIfPresent ("hello"));
        // 这里再次查询返回新值
        System.out.println (cache.getIfPresent ("hello"));
        // 显式调用这个方法后,再次查询会马上返回新值
        //cache.refresh ("hello");
        //System.out.println (cache.getIfPresent ("hello"));
    }
动态调整策略
基于容量
	@Test
    public void test12() {
        Cache<Object, Object> cache = Caffeine.newBuilder ()
                .maximumSize (2)
                .build ();
        cache.policy ().eviction ().ifPresent (eviction ->{
        	// 调整缓存最大条数为原来的两倍
            eviction.setMaximum (2 * eviction.getMaximum());
        });
        cache.put("hello", "world");
        cache.put("hello1", "world");
        cache.put("hello2", "world");
        cache.put("hello3", "world");
        System.out.println (cache.getIfPresent ("hello2"));
        System.out.println (cache.getIfPresent ("hello3"));
    }
    输出: world
    	   world
``
基于时间

```java
 	@Test
    public void test11() {
        FakeTicker ticker = new FakeTicker ();
        Cache<Object, Object> cache = Caffeine.newBuilder ()
                .maximumSize (2)
                .expireAfterAccess (5, TimeUnit.SECONDS)
                .ticker (ticker)
                .build ();
        cache.put("hello", "world");
        cache.policy ().expireAfterAccess ().ifPresent (expiration -> {
            // ageOf(key, TimeUnit)方法提供了查看缓存元素在expireAfterAccess,expireAfterWrite或者 refreshAfterWrite 策略下的空闲时间的途径
            System.out.println (expiration.ageOf ("hello",TimeUnit.SECONDS).getAsLong ());
            // 缓存中的元素最大可持续时间可以通过getExpiresAfter(TimeUnit)方法获取
            System.out.println (expiration.getExpiresAfter (TimeUnit.SECONDS));
            // 可以动态调整时间
            expiration.setExpiresAfter (2, TimeUnit.SECONDS);
        });
        ticker.advance (2, TimeUnit.SECONDS);
        // 此时缓存失效
        System.out.println (cache.getIfPresent ("hello"));
    }
统计指标
可以通过调用Cache#stats返回一个指标对象CacheStats。在CacheStats里有很多统计好的属性可以查阅,这里就不展示了。
了解Caffeine的实现原理
Caffine Cache 在算法上的优点
springBoot中使用Caffeine作为缓存
yaml配置
spring:
	cache:
      type: caffeine
      cache-names: teacher
      caffeine:
        spec: maximumSize=500,expireAfterAccess=600s
Java配置
@EnableCaching
@Configuration
public class CacheConfig {
    /**
     * 配置缓存管理器
     */
    @Bean
    public CacheManager cacheManager() {
        CaffeineCacheManager cacheManager = new CaffeineCacheManager();
        cacheManager.setCaffeine(Caffeine.newBuilder()
                // 设置最后一次写入或访问后经过固定时间过期
                .expireAfterAccess(60, TimeUnit.SECONDS)
                // 初始的缓存空间大小
                .initialCapacity(100)
                // 缓存的最大条数
                .maximumSize(1000));
        return cacheManager;
    }

}
至于缓存使用我在另一篇博客里面有终结
最后
以上就是过时网络最近收集整理的关于学习Caffeine的全部内容,更多相关学习Caffeine内容请搜索靠谱客的其他文章。


发表评论 取消回复