我是靠谱客的博主 闪闪仙人掌,这篇文章主要介绍python 时间序列预测 —— XGBoost数据集导入包读取文件拆分训练集和测试集从日期中提取特征训练 XGBoost展示结果分析误差,现在分享给大家,希望可以做个参考。
文章目录
- 数据集
- 导入包
- 读取文件
- 拆分训练集和测试集
- 从日期中提取特征
- 训练 XGBoost
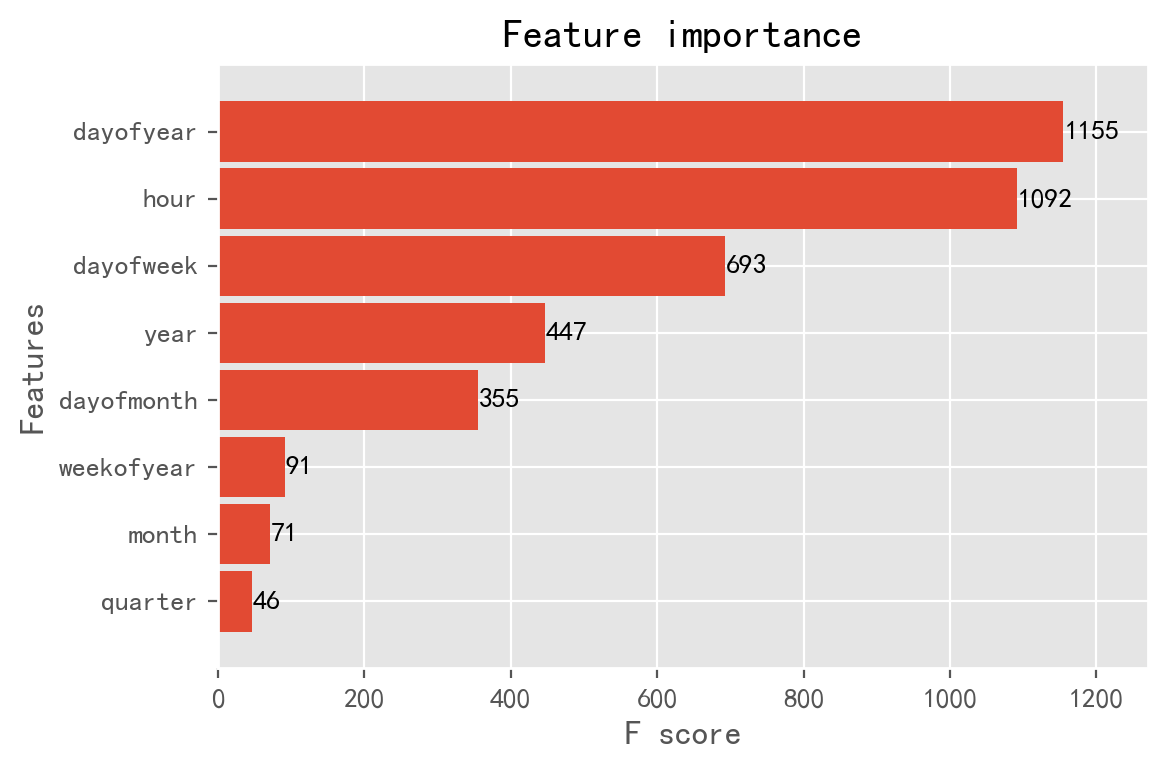
- 查看特征的重要程度
- 预测准确度的指标
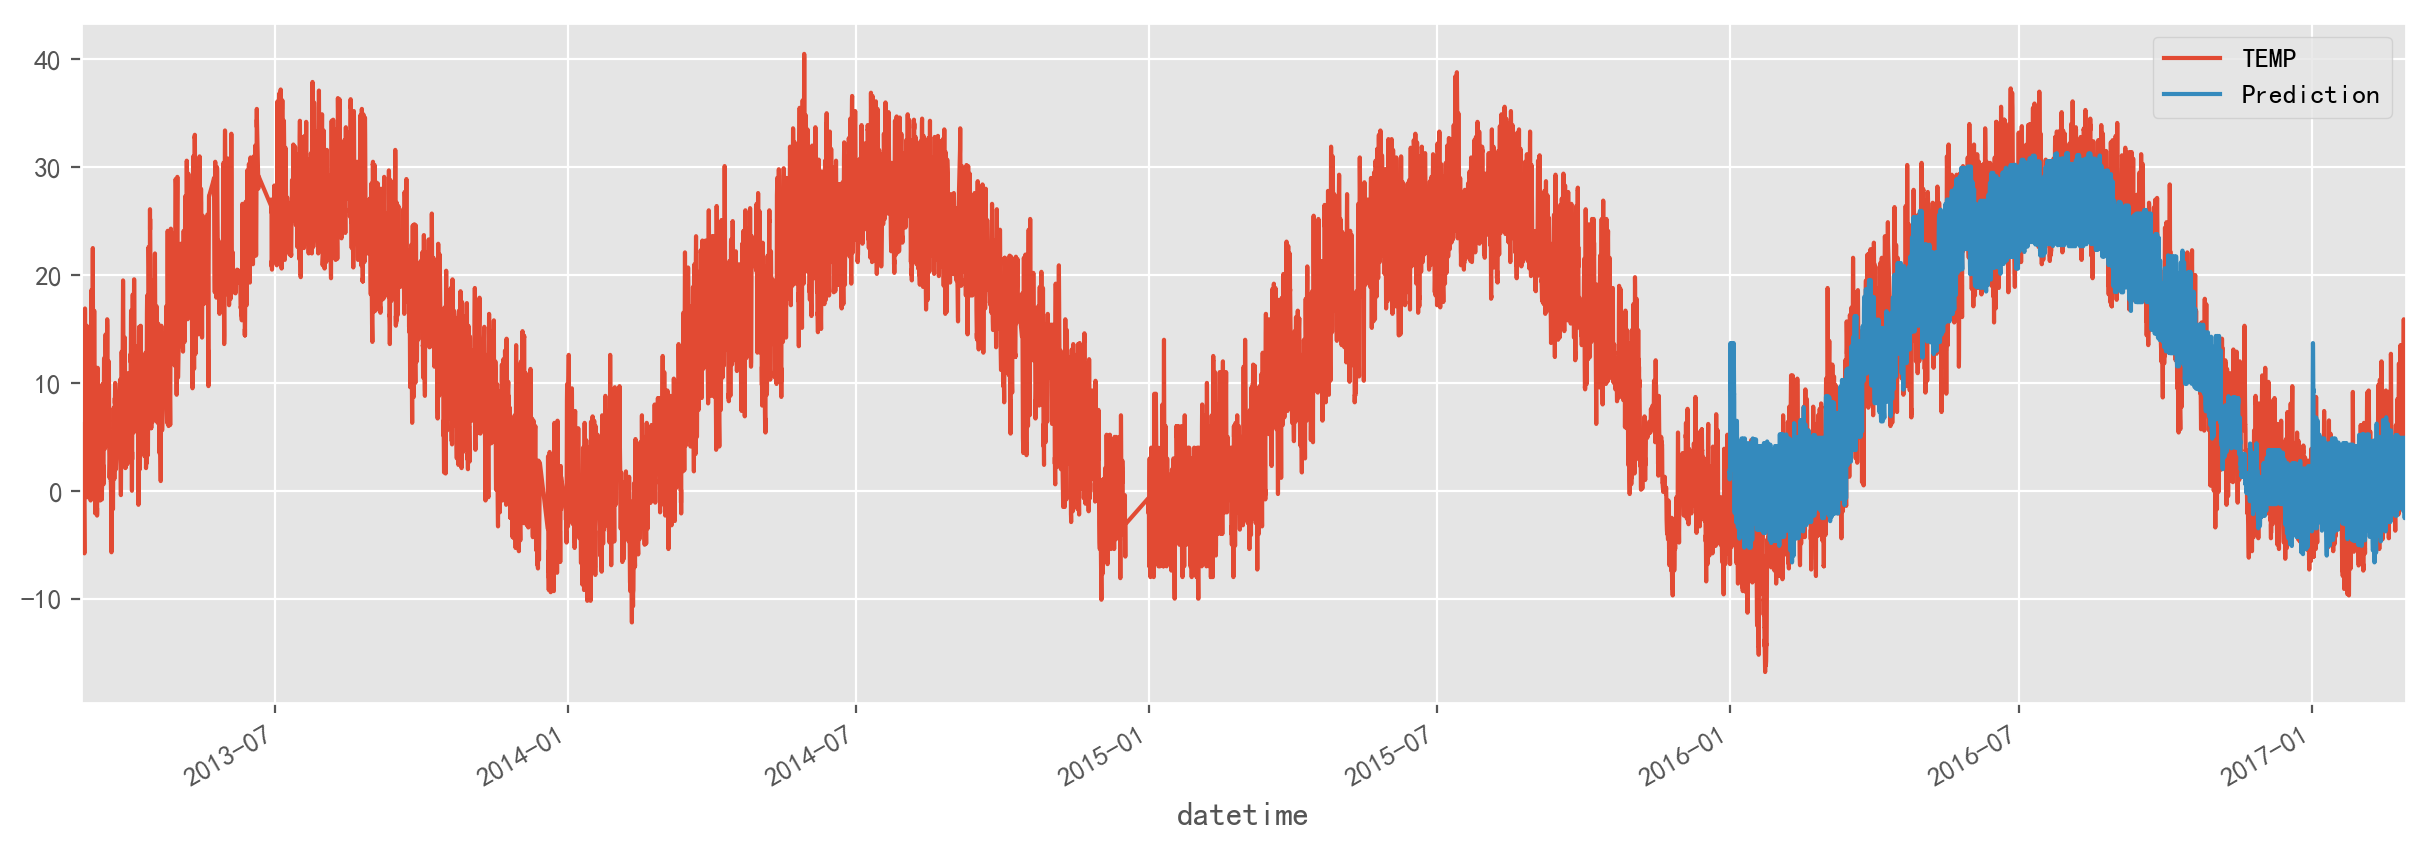
- 展示结果
- 分析误差
- 预测最好的几天
- 预测最差的几天
数据集
这里使用的数据是奥体中心四年的气温数据:

导入包
import numpy as np
import pandas as pd
import matplotlib.pyplot as plt
import xgboost as xgb
import glob
from sklearn.metrics import mean_squared_error, mean_absolute_error

%matplotlib inline
plt.rcParams['font.sans-serif'] = 'SimHei'  #显示中文
plt.rcParams['axes.unicode_minus'] = False  #显示负号
plt.rcParams['figure.dpi'] = 200  # 图像分辨率
plt.rcParams['text.color'] = 'black'  # 文字颜色
plt.style.use('ggplot')
print(plt.style.available)  # 可选的plt绘图风格
'''
['bmh', 'classic', 'dark_background', 'fast', 'fivethirtyeight', 'ggplot', 'grayscale', 'seaborn-bright', 'seaborn-colorblind', 'seaborn-dark-palette', 'seaborn-dark', 'seaborn-darkgrid', 'seaborn-deep', 'seaborn-muted', 'seaborn-notebook', 'seaborn-paper', 'seaborn-pastel', 'seaborn-poster', 'seaborn-talk', 'seaborn-ticks', 'seaborn-white', 'seaborn-whitegrid', 'seaborn', 'Solarize_Light2', 'tableau-colorblind10', '_classic_test']
'''
读取文件
实际上使用的数据集是奥体中心监测点记录的空气污染物指标的时间序列数据集,这里只用其中的气温数据来演示。
import glob

csv_files = glob.glob('PRSA_data_*.csv')

df = pd.read_csv(csv_files[0],
                 index_col='No',
                 parse_dates={'datetime': [1,2,3,4]},
                 date_parser=lambda x: pd.datetime.strptime(x, '%Y %m %d %H')
                )

df.set_index('datetime',inplace=True)
df.head()

df.dropna(axis=0, how='any', inplace=True)
df.info()
'''
<class 'pandas.core.frame.DataFrame'>
DatetimeIndex: 31815 entries, 2013-03-01 00:00:00 to 2017-02-28 23:00:00
Data columns (total 13 columns):
PM2.5      31815 non-null float64
PM10       31815 non-null float64
SO2        31815 non-null float64
NO2        31815 non-null float64
CO         31815 non-null float64
O3         31815 non-null float64
TEMP       31815 non-null float64
PRES       31815 non-null float64
DEWP       31815 non-null float64
RAIN       31815 non-null float64
wd         31815 non-null object
WSPM       31815 non-null float64
station    31815 non-null object
dtypes: float64(11), object(2)
memory usage: 3.4+ MB
'''
df.describe()

拆分训练集和测试集
只用其中的气温数据,拆分训练集和测试集
temp = df[['TEMP']]
split_date = '2016-01'
temp_train = temp.loc[temp.index <= split_date].copy()
temp_test = temp.loc[temp.index > split_date].copy()
_ = temp_test.rename(columns={'TEMP': 'TEST SET'})
    .join(temp_train.rename(columns={'TEMP': 'TRAINING SET'}),how='outer')
    .plot(figsize=(20,5), title='Temperature', style='.')

从日期中提取特征
def create_features(df, label=None):
    """
    Creates time series features from datetime index
    """
    df['date'] = df.index
    df['hour'] = df['date'].dt.hour
    df['dayofweek'] = df['date'].dt.dayofweek
    df['quarter'] = df['date'].dt.quarter
    df['month'] = df['date'].dt.month
    df['year'] = df['date'].dt.year
    df['dayofyear'] = df['date'].dt.dayofyear
    df['dayofmonth'] = df['date'].dt.day
    df['weekofyear'] = df['date'].dt.weekofyear

    X = df[['hour','dayofweek','quarter','month','year',
           'dayofyear','dayofmonth','weekofyear']]
    if label:
        y = df[label]
        return X, y
    return X

X_train, y_train = create_features(temp_train, label='TEMP')
X_test, y_test = create_features(temp_test, label='TEMP')
训练 XGBoost
reg = xgb.XGBRegressor(n_estimators=100)
reg.fit(X_train, y_train,
        eval_set=[(X_train, y_train), (X_test, y_test)],
        early_stopping_rounds=50,
       verbose=False) # Change verbose to True if you want to see it train
'''
XGBRegressor(base_score=0.5, booster=None, colsample_bylevel=1,
       colsample_bynode=1, colsample_bytree=1, gamma=0, gpu_id=-1,
       importance_type='gain', interaction_constraints=None,
       learning_rate=0.300000012, max_delta_step=0, max_depth=6,
       min_child_weight=1, missing=nan, monotone_constraints=None,
       n_estimators=100, n_jobs=0, num_parallel_tree=1,
       objective='reg:squarederror', random_state=0, reg_alpha=0,
       reg_lambda=1, scale_pos_weight=1, subsample=1, tree_method=None,
       validate_parameters=False, verbosity=None)
'''
查看特征的重要程度
_ = xgb.plot_importance(reg, height=0.9)
预测准确度的指标
def mean_absolute_percentage_error(y_true, y_pred):
    """Calculates MAPE given y_true and y_pred"""
    y_true, y_pred = np.array(y_true), np.array(y_pred)
    return np.mean(np.abs((y_true - y_pred) / y_true)) * 100
mse = mean_squared_error(y_true=temp_test['TEMP'], y_pred=temp_test['Prediction'])
# 14.718074529657168
mae = mean_absolute_error(y_true=temp_test['TEMP'], y_pred=temp_test['Prediction'])
# 2.9980725916891813
mape = mean_absolute_percentage_error(y_true=temp_test['TEMP'], y_pred=temp_test['Prediction'])
# inf
# 因为 y_true 中含有 0
展示结果
temp_test['Prediction'] = reg.predict(X_test)
temp_all = pd.concat([temp_test, temp_train], sort=False)
_ = temp_all[['TEMP','Prediction']].plot(figsize=(15, 5))
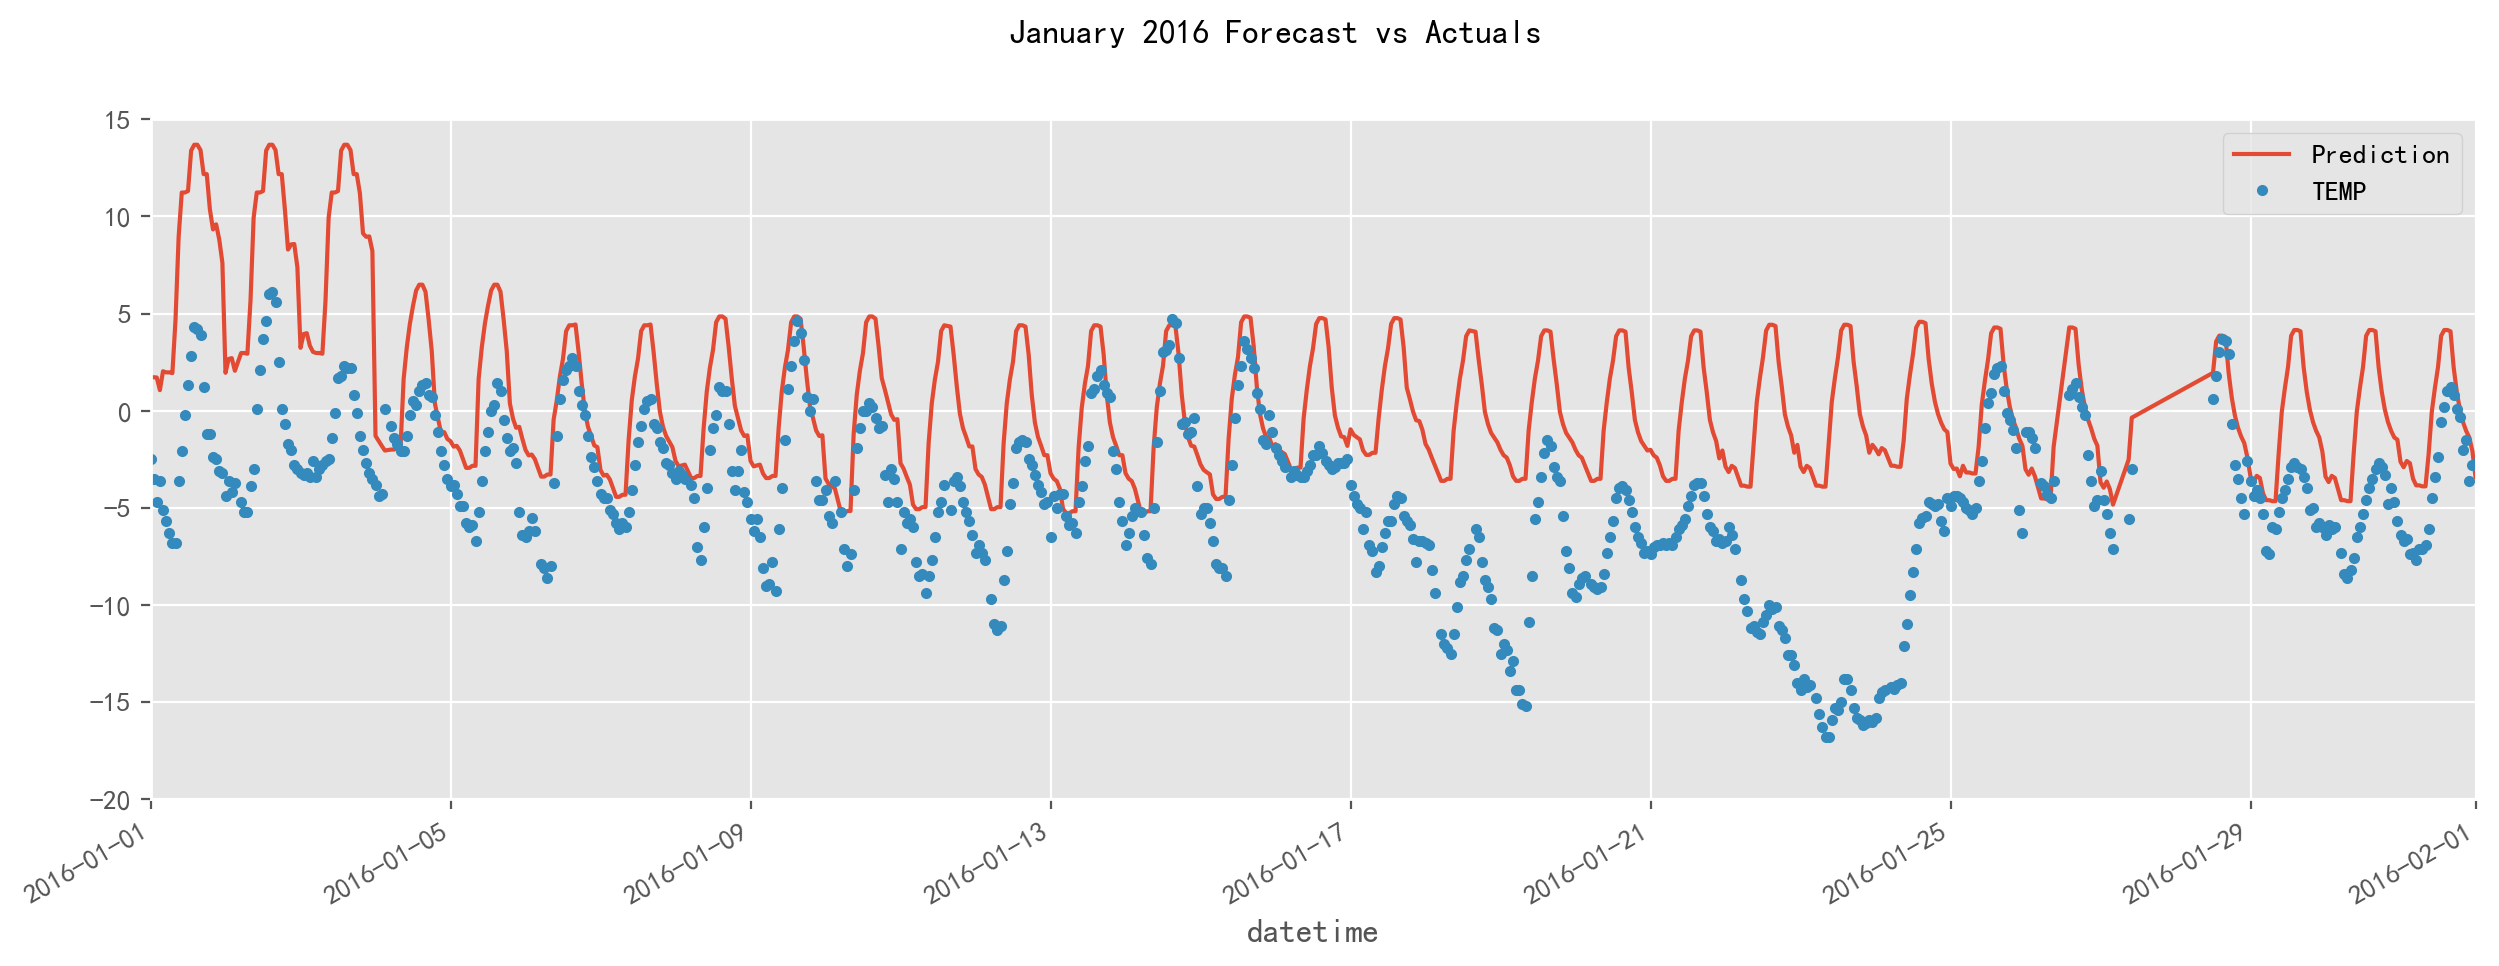
测试集第一个月的结果
f, ax = plt.subplots(1)
f.set_figheight(5)
f.set_figwidth(15)
_ = temp_all[['Prediction','TEMP']].plot(ax=ax, style=['-','.'])
ax.set_xbound(lower='2016-01-01', upper='2016-02-01')
ax.set_ylim(-20, 15)
plot = plt.suptitle('January 2016 Forecast vs Actuals')
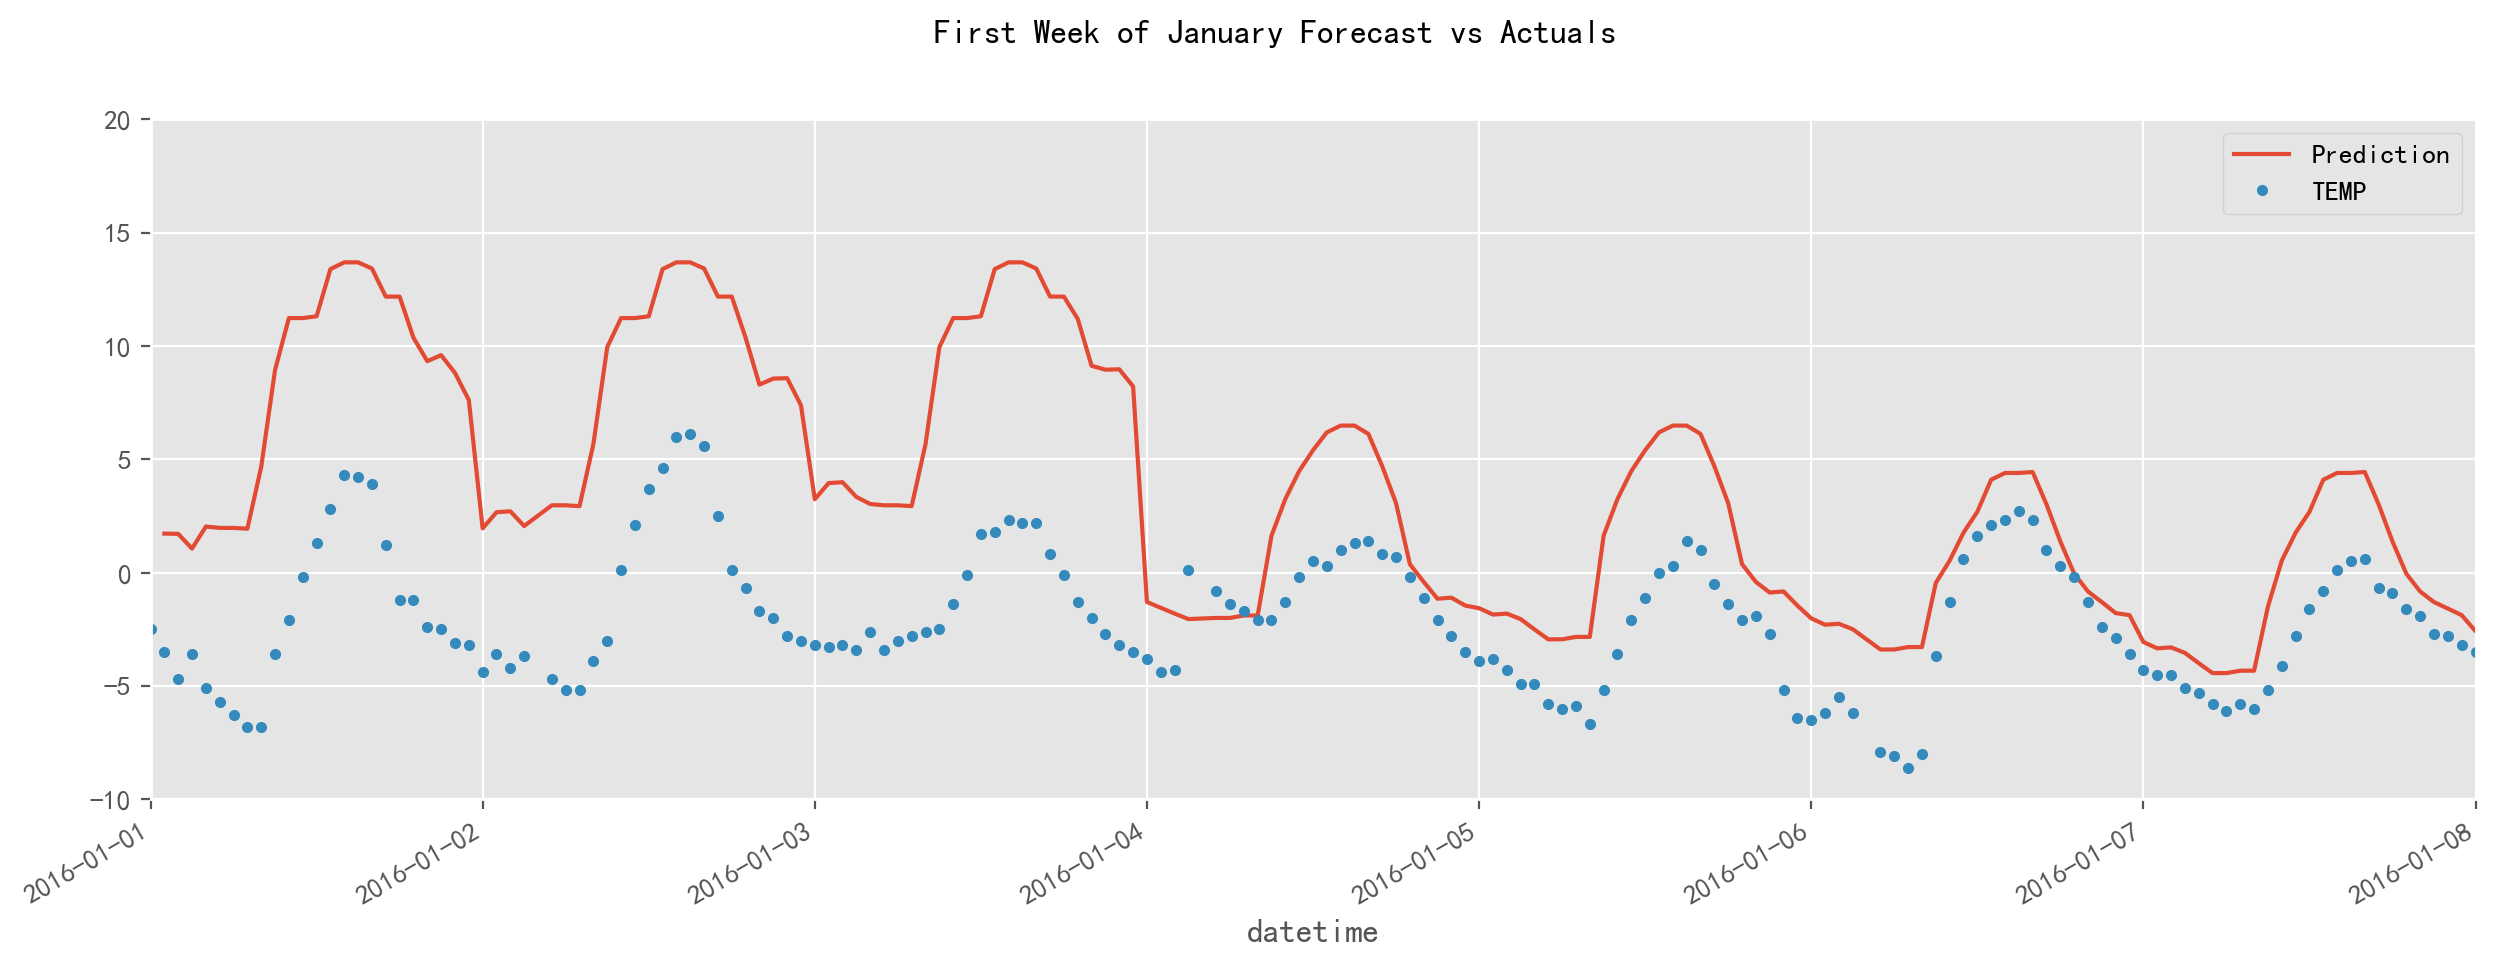
测试集第一周的结果
f, ax = plt.subplots(1)
f.set_figheight(5)
f.set_figwidth(15)
_ = temp_all[['Prediction','TEMP']].plot(ax=ax, style=['-','.'])
ax.set_xbound(lower='2016-01-01', upper='2016-01-08')
ax.set_ylim(-10, 20)
plot = plt.suptitle('First Week of January Forecast vs Actuals')
分析误差
temp_test['error'] = temp_test['TEMP'] - temp_test['Prediction']
temp_test['abs_error'] = temp_test['error'].apply(np.abs)
error_by_day = temp_test.groupby(['year','month','dayofmonth'])
    .mean()[['TEMP','Prediction','error','abs_error']]
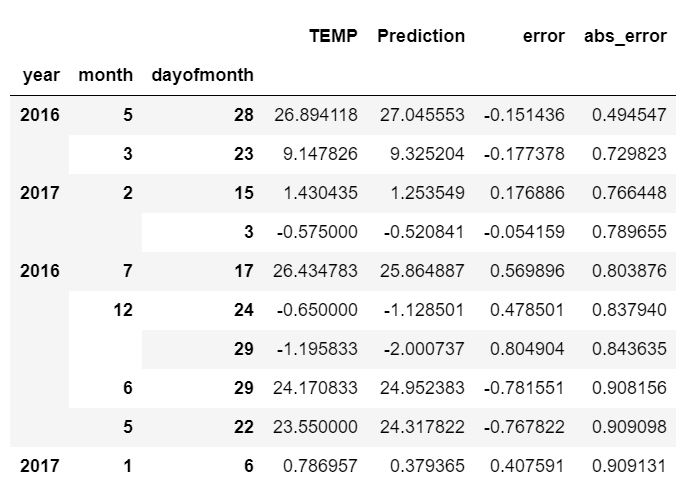
预测最好的几天
error_by_day.sort_values('abs_error', ascending=True).head(10)
画个图看看
f, ax = plt.subplots(1)
f.set_figheight(5)
f.set_figwidth(10)
_ = temp_all[['Prediction','TEMP']].plot(ax=ax, style=['-','.'])
ax.set_ylim(10, 40)
ax.set_xbound(lower='2016-5-27', upper='2016-5-29')
plot = plt.suptitle('May 28, 2016 - Best Predicted Day')
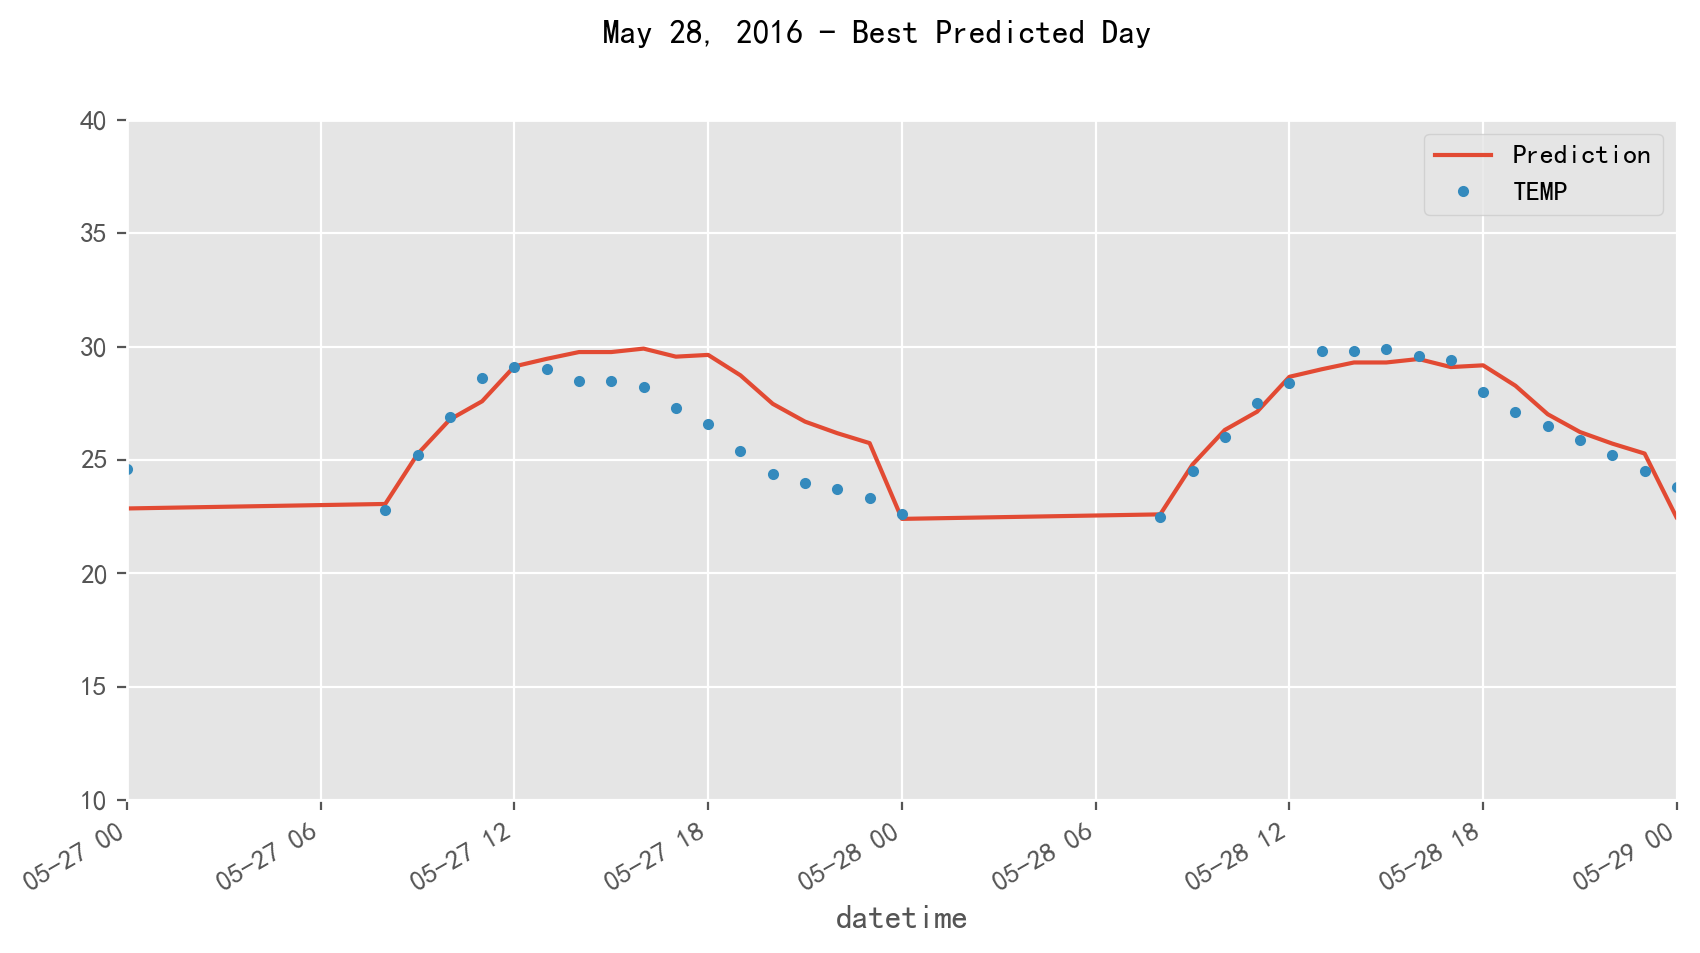
原来是因为数据缺失了,剔除空值的时候干的
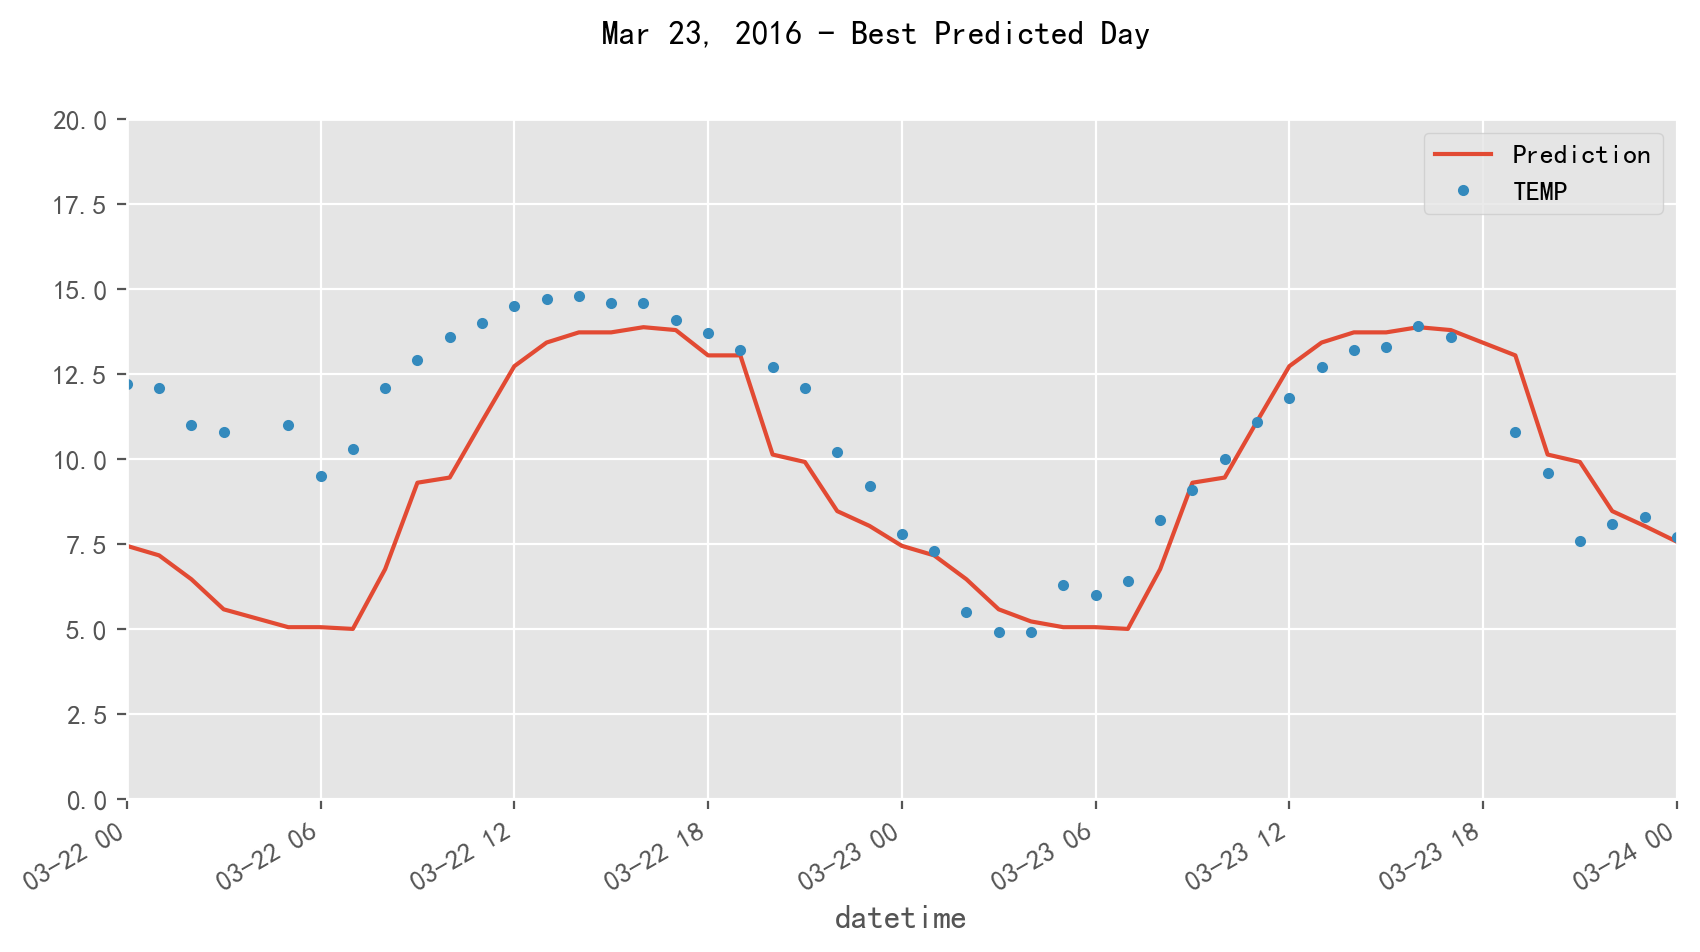
这个不算数,看看下一个
f, ax = plt.subplots(1)
f.set_figheight(5)
f.set_figwidth(10)
_ = temp_all[['Prediction','TEMP']].plot(ax=ax, style=['-','.'])
ax.set_ylim(0, 20)
ax.set_xbound(lower='2016-3-22', upper='2016-3-24')
plot = plt.suptitle('Mar 23, 2016 - Best Predicted Day')
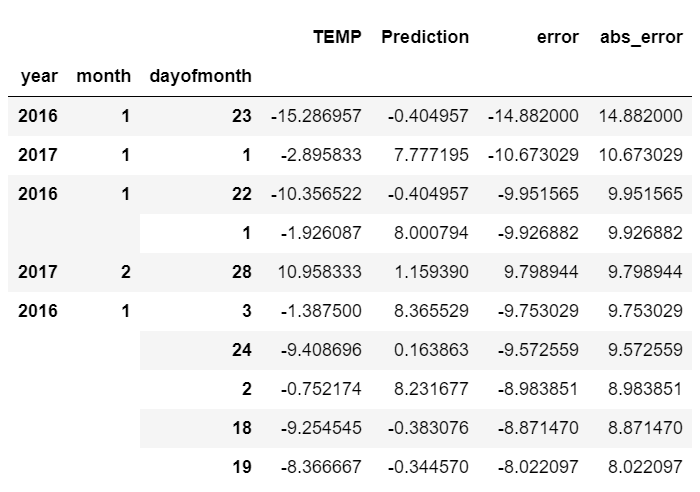
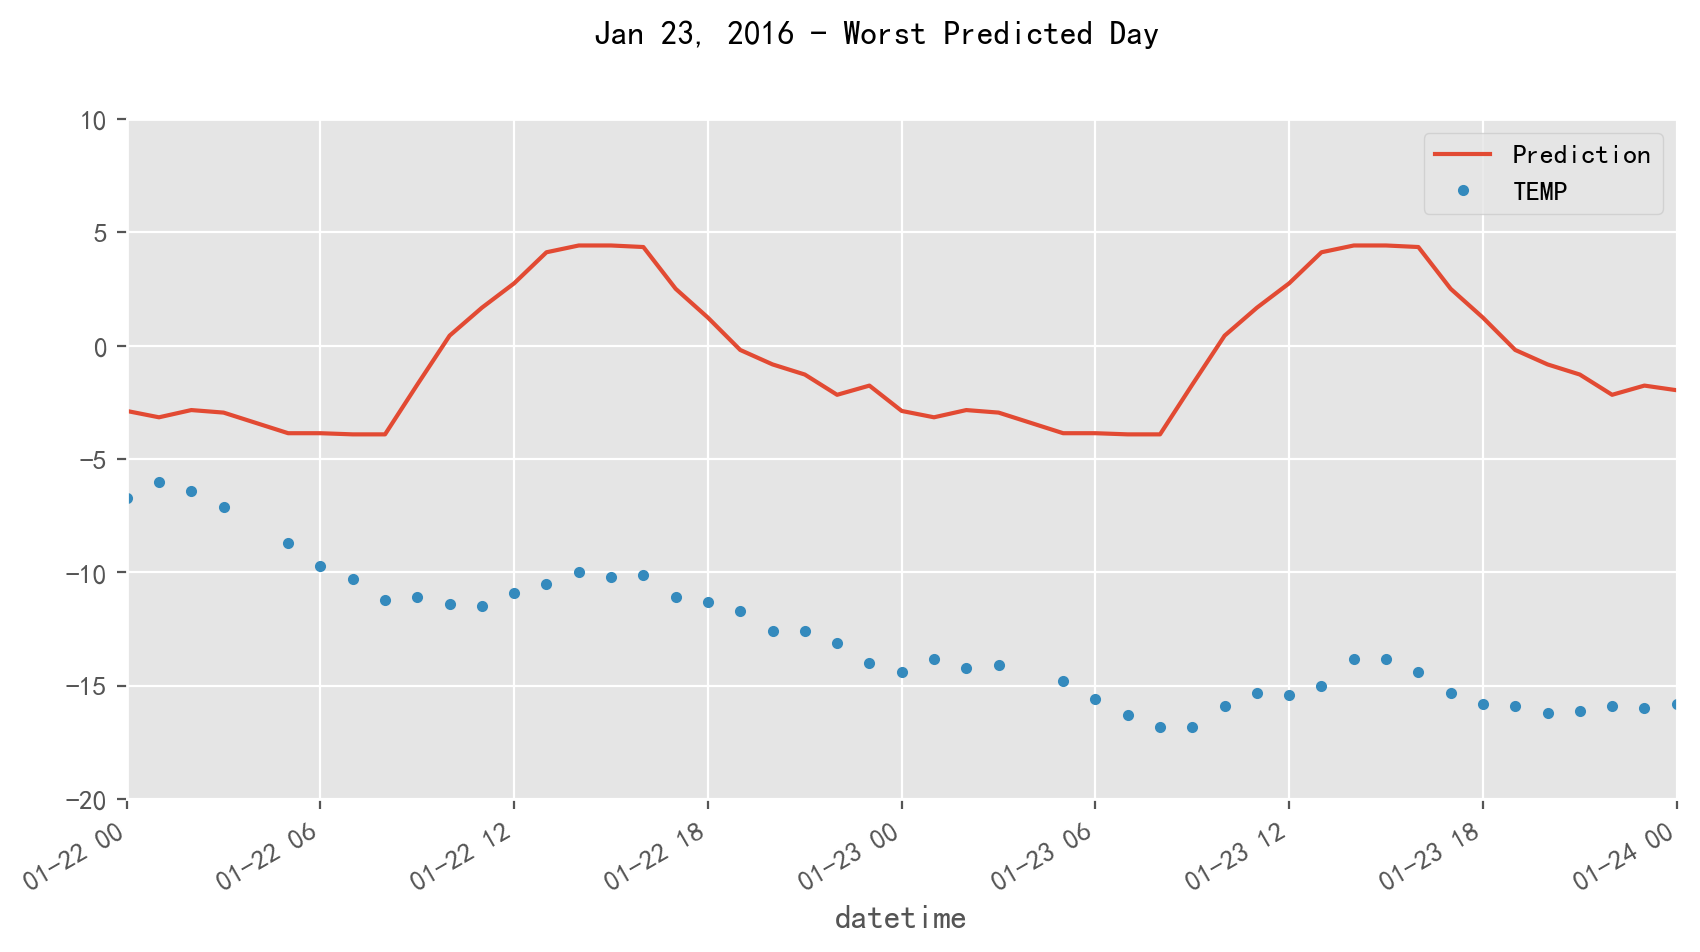
预测最差的几天
error_by_day.sort_values('abs_error', ascending=False).head(10)
f, ax = plt.subplots(1)
f.set_figheight(5)
f.set_figwidth(10)
_ = temp_all[['Prediction','TEMP']].plot(ax=ax, style=['-','.'])
ax.set_ylim(-20, 10)
ax.set_xbound(lower='2016-1-22', upper='2016-1-24')
plot = plt.suptitle('Jan 23, 2016 - Worst Predicted Day')
最后
以上就是闪闪仙人掌最近收集整理的关于python 时间序列预测 —— XGBoost数据集导入包读取文件拆分训练集和测试集从日期中提取特征训练 XGBoost展示结果分析误差的全部内容,更多相关python内容请搜索靠谱客的其他文章。
本图文内容来源于网友提供,作为学习参考使用,或来自网络收集整理,版权属于原作者所有。


发表评论 取消回复