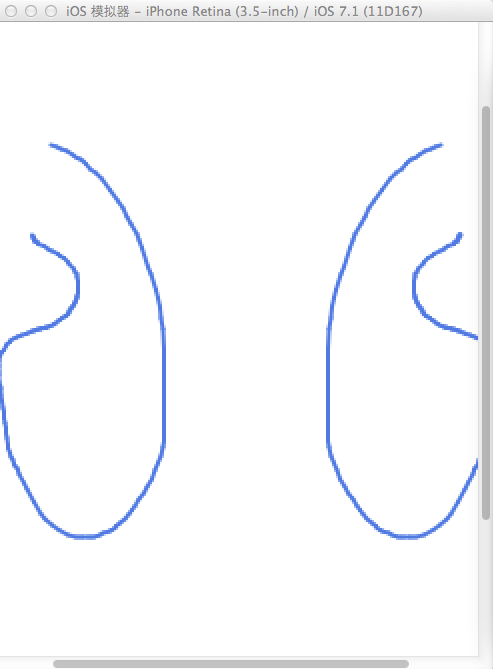
定义一个UIView:主要是在这个View里面加一个UIImageView,画图都在这个UIImageView里面进行
@property(nonatomic) CGPoint prePoint;
//手指在进入move事件之前的那个点
@property(nonatomic) CGPoint oppsitePoint;
//手指在进入move事件之前的那个点
@property(nonatomic, retain) UIImageView* drawImage;
- (id)initWithFrame:(CGRect)frame
{
self = [super initWithFrame:frame];
if (self) {
// Initialization code
self.drawImage = [[UIImageView alloc] initWithImage:nil];
self.drawImage.frame = self.frame;
[self addSubview:_drawImage];
}
return self;
}
然后处理手指的事件
#pragma mark - deal touch
-(void) touchesBegan:(NSSet *)touches withEvent:(UIEvent *)event{
NSLog(@"touchesBegan");
//下面两句知道手指在屏幕上的点的信息
UITouch* touch = [touches anyObject];
CGPoint point = [touch locationInView:self];
if (touch) {
self.prePoint = point;
_oppsitePoint = point;
_oppsitePoint.x = 320.0f - point.x;
}
}
-(void) touchesMoved:(NSSet *)touches withEvent:(UIEvent *)event{
NSLog(@"touchesMoved");
UITouch* touch = [touches anyObject];
if (touch) {
CGPoint point = [touch locationInView:self];
UIGraphicsBeginImageContext(self.frame.size);
[_drawImage.image drawInRect:CGRectMake(0, 0, _drawImage.frame.size.width, _drawImage.frame
.size.height)];
CGContextSetLineCap(UIGraphicsGetCurrentContext(), kCGLineCapRound);
CGContextSetLineWidth(UIGraphicsGetCurrentContext(), 2.0f);
CGContextSetRGBStrokeColor(UIGraphicsGetCurrentContext(),0.314, 0.486, 0.859, 1.0);
CGContextBeginPath(UIGraphicsGetCurrentContext());
CGContextMoveToPoint(UIGraphicsGetCurrentContext(), _prePoint.x, _prePoint.y);
CGContextAddQuadCurveToPoint(UIGraphicsGetCurrentContext(), _prePoint.x, _prePoint.y, point.x, point.y);
CGContextMoveToPoint(UIGraphicsGetCurrentContext(), _oppsitePoint.x, _oppsitePoint.y);
CGContextAddQuadCurveToPoint(UIGraphicsGetCurrentContext(), _oppsitePoint.x, _oppsitePoint.y, 320.0f - point.x, point.y);
// CGContextAddLineToPoint(UIGraphicsGetCurrentContext(), point.x, point.y);
CGContextStrokePath(UIGraphicsGetCurrentContext());
_drawImage.image = UIGraphicsGetImageFromCurrentImageContext();
UIGraphicsEndImageContext();
_prePoint = point;
_oppsitePoint = point;
_oppsitePoint.x = 320.0f - point.x;
}
}
-(void)touchesEnded:(NSSet *)touches withEvent:(UIEvent *)event{
NSLog(@"touchesEnded");
//这段的作用是如果在屏幕上点击可以画出点
UIGraphicsBeginImageContext(self.frame.size);
[_drawImage.image drawInRect:CGRectMake(0, 0, _drawImage.frame.size.width, _drawImage.frame
.size.height)];
CGContextSetLineCap(UIGraphicsGetCurrentContext(), kCGLineCapRound);
CGContextSetLineWidth(UIGraphicsGetCurrentContext(), 3.0f);
CGContextSetRGBStrokeColor(UIGraphicsGetCurrentContext(),0.314, 0.486, 0.859, 1.0);
CGContextBeginPath(UIGraphicsGetCurrentContext());
CGContextMoveToPoint(UIGraphicsGetCurrentContext(), _prePoint.x, _prePoint.y);
CGContextAddLineToPoint(UIGraphicsGetCurrentContext(), _prePoint.x, _prePoint.y);
CGContextStrokePath(UIGraphicsGetCurrentContext());
_drawImage.image = UIGraphicsGetImageFromCurrentImageContext();
UIGraphicsEndImageContext();
self.isTouch = NO;
}

最后
以上就是怕黑书包最近收集整理的关于ios创建画笔的例子(双笔画效果)的全部内容,更多相关ios创建画笔内容请搜索靠谱客的其他文章。
本图文内容来源于网友提供,作为学习参考使用,或来自网络收集整理,版权属于原作者所有。


发表评论 取消回复