Nginx轻松上手
- 准备环境
- 部署安装
- 源码安装
- yum安装
- nginx配置文件
- 简单使用
- 虚拟主机与域名解析
- 反向代理
- 负载均衡
- 动静分离
- nginx+keepalived高可用
准备环境
| Linux操作系统 | IP地址 | 功能 |
|---|---|---|
| Centos7 | 192.168.1.20 | nginx_server+keepalived |
| Centos7 | 192.168.1.21 | nginxbackup+keepalived |
| Centos7 | 192.168.1.22 | woker2 |
| Centos7 | 192.168.1.23 | woker3 |
部署安装
源码安装
四台机全部安装
1.下载nginx压缩包
	wget -c http://nginx.org/download/nginx-1.16.1.tar.gz

2.解压缩nginx包
	tar -zxvf nginx-1.20.2.tar.gz

3.进入nginx目录
	cd nginx-1.20.2

4.安装依赖关系包
	yum install gcc*

5.测试依赖关系并指定安装目录
	./configure --prefix=/usr/local/nginx

6.编译并安装
	make && make install

7.封装nginx服务
	vi /usr/lib/systemd/system/nginx.service

[Unit]
Description=nginx - web server
After=network.target remote-fs.target nss-1ookup.target

[Service]
Type=forking
PIDFi1e=/usr/local/nginx/1ogs/nginx.pid
ExecStartPre=/usr/local/nginx/sbin/nginx -t -c /usr/local/nginx/conf/nginx.conf
ExecStart=/usr/local/nginx/sbin/nginx -c /usr/local/nginx/conf/nginx.conf
ExecReload=/usr/local/nginx/sbin/nginx -s reload
ExecStop=/usr/local/nginx/sbin/nginx -s stop
ExecQuit=/usr/local/nginx/sbin/nginx -s quit
PrivateTmp=true

[Install]
WantedBy=multi-user.target

8,自启动nginx
	systemctl start nginx && systemctl enable nginx


/usr/local/nginx/			主要文件目录
	html					web展示页面
	logs					日志
	conf					配置文件
yum安装
1.添加epel源
	yum install -y https://dl.fedoraproject.org/pub/epel/epel-release-latest-7.noarch.rpm

2.安装nginx
	yum install nginx -y

3.查看安装目录
	rpm -ql nginx
nginx配置文件
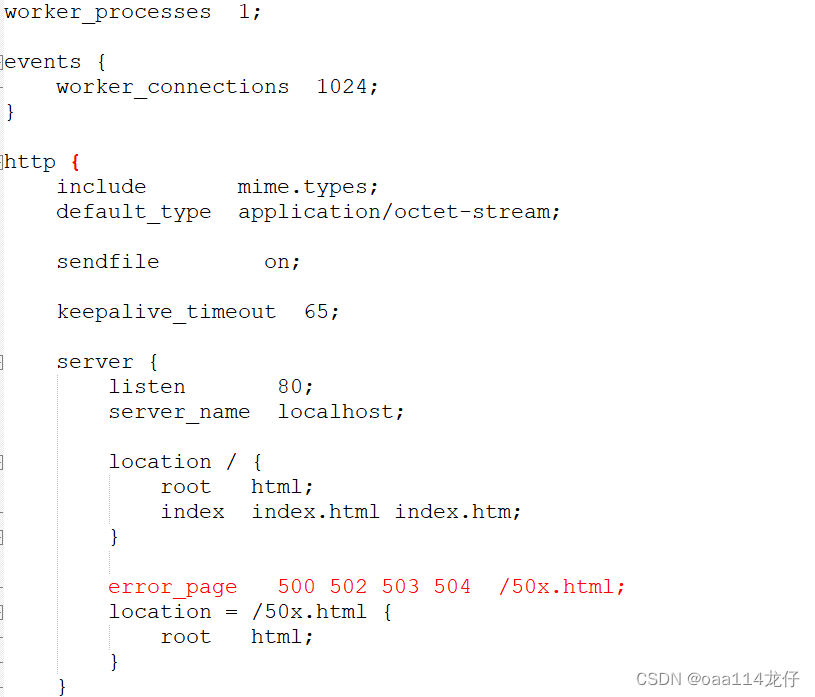
最小配置
worker_processes
worker_processes 1; 默认为1,表示开启一个业务进程

worker_connections
worker_connections 1024; 单个业务进程可接受连接数

include mime.types;
include mime.types; 引入http mime类型

default_type application/octet-stream;
default_type application/octet-stream; 如果mime类型没匹配上,默认使用二进制流的方式传输。

sendfile on;
sendfile on; 使用linux的 sendfile(socket, file, len) 高效网络传输,也就是数据0拷贝。

keepalive timeout;
keepalive timeout	65:保持连接的时间

server
server {};一个server代表一个主机

location
location {};web访问路径

简单使用
虚拟主机与域名解析
使用机器 192.168.1.20

1.在windows主机中添加hosts解析 C:WindowsSystem32driversetchosts
	192.168.1.20	test.com

2.百度访问test,com

3.创建分站点目录
	cd /
		mkdir www
			cd  www/
				mkdir www
				mkdir vod

4.创建分站点目录文件
	cd /www/www
		vi index.html
			this is web

	cd /www/vod
		vi index.html
			this is vod

5,编辑nginx.conf配置
    server {
        listen       80;
        server_name  localhost;

        location / {
            root   /www/www;
            index  index.html index.htm;
        }

        error_page   500 502 503 504  /50x.html;
        location = /50x.html {
            root   html;
        }
    }

    server {
        listen       88;
        server_name  localhost;

        location / {
            root   /www/vod;
            index  index.html index.htm;
        }

        error_page   500 502 503 504  /50x.html;
        location = /50x.html {
            root   html;
        }
    }

6.百度访问
	test.com
	test.com:88
反向代理
使用机器 192.168.1.20

1.关键字:proxy_pass
	可将请求转向某个网页或者某个地址,在location标签下使用

请求代理至192.168.1.21
	server {
        listen       80;
        server_name  localhost;

        location / {
        	proxy_pass http://192.168.1.21;
        }
百度访问192.168.1.20查看

2.关键字:upstream
	定义一组服务器地址,在http标签下定义

请求代理至192.168.1.21/22/23
  	upstream httpds{
      server 192.168.1.21:80;
  	  server 192.168.1.22:80;
      server 192.168.1.23:80;
	}

     location / {
        proxy_pass http://httpds;
        }
负载均衡
使用机器 192.168.1.20

1.关键字: weight
权重数,谁大谁就优先使用,在upstream下的server参数里使用

	upstream httpds{
   	  server 192.168.1.21:80 weight=8;
  	  server 192.168.1.22:80 weight=5;
  	  server 192.168.1.23:80 weight=2;
  	  }

2.关键字: backup
备用机器,当其他机器全都不能使用才使用此机器

	upstream httpds{
   	  server 192.168.1.21:80 weight=8;
  	  server 192.168.1.22:80 backup;
  	  server 192.168.1.23:80 down;
  	  }
动静分离
关键字:增加 location 标签来访问静态资源

配置反向代理
	location / {
		proxy_pass http://127.0.0.1:8080;
		root html;
		index index.html index.htm;
}

增加每一个location
	location /css {
		root /usr/local/nginx/static;
		index index.html index.htm;
	}

	location /images {
		root /usr/local/nginx/static;
		index index.html index.htm;
	}

	location /js {
		root /usr/local/nginx/static;
		index index.html index.htm;
	}

将静态资源拉到对应的html目录下
标签可使用正则表达式
	location ~*/(css|img|js) {
		root /usr/local/nginx/static;
		index index.html index.htm;
	}
nginx+keepalived高可用
使用机器
192.168.1.20 主
192.168.1.21 备

1.主备安装keepalived
	yum install keepalived -y

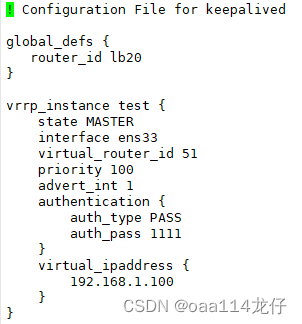
2.主修改配置文件
	vi /etc/keepalived/keepalived.conf

	router_id lb20 		 : 标识本节点的字条串,可自定义名称
	vrrp_instance test   : 定义虚拟路由,可自定义名称
	state MASTER         : 主节点为 MASTER, 对应的备份节点为 BACKUP
	interface ens33		 : 虚拟网卡的接口,与本机的一样
	virtual_router_id 51 : 虚拟路由的 ID 号,主备必须一样,代表在一个组
	priority 100		 : 节点优先级, 值范围 0-254, MASTER 要比 BACKUP 高
	advert_int 1		 : 组播信息发送间隔,两个节点设置必须一样, 默认 1s
	authentication		 : 验证信息,可以默认
	virtual_ipaddress	 : 虚拟 IP 池,两个节点必须一样

3.备修改配置文件
	vi /etc/keepalived/keepalived.conf

! Configuration File for keepalived

global_defs {
   router_id lb21
}

vrrp_instance test {
    state BACKUP
    interface ens33
    virtual_router_id 51
    priority 50
    advert_int 1
    authentication {
        auth_type PASS
        auth_pass 1111
    }
    virtual_ipaddress {
        192.168.1.100
    }
}

4.主备都开启keepalived
	systemctl start keepalived.service

5.浏览器访问 192.168.1.100 测试

6.down 掉主机器再次访问 192.168.1.100

7.编写脚本检测nginx进程是否运行,如果不运行就down掉本机器的keepalived
#!/bin/bash
A=`ps -C nginx –no-header |wc -l`
if [ `ps -C nginx --no-header |wc -l` -eq 0 ];then
        killall keepalived
fi
最后
以上就是酷酷小刺猬最近收集整理的关于Nginx轻松上手的全部内容,更多相关Nginx轻松上手内容请搜索靠谱客的其他文章。
本图文内容来源于网友提供,作为学习参考使用,或来自网络收集整理,版权属于原作者所有。


发表评论 取消回复