一、下面会用到RecyclerView,在app/build.gradle的dependencies添加依赖库
implementation 'androidx.recyclerview:recyclerview:1.1.0'二、activity_main.xml:编写主界面
<?xml version="1.0" encoding="utf-8"?>
<LinearLayout xmlns:android="http://schemas.android.com/apk/res/android"
    android:layout_width="match_parent"
    android:layout_height="match_parent"
    android:orientation="vertical"
    android:backgroundTint="#d8e0e8"
    >

    <!--指定宽度为match_parent,由于图片的宽度不足以填满整个屏幕的宽度
    整张图片被均匀地拉伸,效果非常差

    这时可以使用Nine-Patch来进行改善-->

    <androidx.recyclerview.widget.RecyclerView
        android:id="@+id/msg_recycler_view"
        android:layout_width="match_parent"
        android:layout_height="0dp"
        android:layout_weight="1"
        />

    <LinearLayout
        android:layout_width="match_parent"
        android:layout_height="wrap_content"
        >

        <EditText
            android:id="@+id/input_text"
            android:layout_width="0dp"
            android:layout_height="match_parent"
            android:layout_weight="1"
            android:hint="Type something here"
            android:maxLines="2"
            />

        <Button
            android:id="@+id/send"
            android:layout_width="wrap_content"
            android:layout_height="wrap_content"
            android:text="Send"
            />

    </LinearLayout>


</LinearLayout>
三、Msg类:消息的实体类
package com.example.uibestpractice;

public class Msg {

    public static final int TYPE_RECEIVED=0;

    public static final int TYPE_SEND=1;

    private String content;

    private int type;

    public Msg(String content,int type){
        this.content=content;
        this.type=type;
    }

    public String getContent() {
        return content;
    }

    public int getType() {
        return type;
    }
}
四、msg_item.xml:编写RecyclerView子项的布局
<?xml version="1.0" encoding="utf-8"?>
<!--RecyclerView子项的布局-->
<LinearLayout xmlns:android="http://schemas.android.com/apk/res/android"
    android:orientation="vertical"
    android:layout_width="match_parent"
    android:layout_height="wrap_content"
    android:padding="10dp">

    <LinearLayout
        android:id="@+id/left_layout"
        android:layout_width="wrap_content"
        android:layout_height="wrap_content"
        android:layout_gravity="left"
        android:background="@drawable/message_left">

        <TextView
            android:id="@+id/left_msg"
            android:layout_width="wrap_content"
            android:layout_height="wrap_content"
            android:layout_gravity="center"
            android:layout_margin="10dp"
            android:textColor="#000"/>

    </LinearLayout>

    <!-- android:layout_gravity="left" 收到的消息居左对齐   -->

    <LinearLayout
        android:id="@+id/right_layout"
        android:layout_width="wrap_content"
        android:layout_height="wrap_content"
        android:layout_gravity="right"
        android:background="@drawable/message_right">

        <TextView
            android:id="@+id/right_msg"
            android:layout_width="wrap_content"
            android:layout_height="wrap_content"
            android:layout_gravity="center"
            android:layout_margin="10dp"
            android:textColor="#000"
            />

    </LinearLayout>

    <!-- android:layout_gravity="right" 发出的消息居右对齐   -->

</LinearLayout>
五、MsgAdapter:RecyclerView的适配器
package com.example.uibestpractice;

import androidx.annotation.NonNull;
import androidx.appcompat.app.AppCompatActivity;
import androidx.recyclerview.widget.RecyclerView;

import android.os.Bundle;
import android.view.LayoutInflater;
import android.view.View;
import android.view.ViewGroup;
import android.widget.LinearLayout;
import android.widget.TextView;

import org.w3c.dom.Text;

import java.util.List;

public class MsgAdapter extends RecyclerView.Adapter<MsgAdapter.ViewHolder> {

    private List<Msg> mMsgList;

    /**
     * 内部类
     */
    static class ViewHolder extends RecyclerView.ViewHolder {


        LinearLayout leftLayout;
        LinearLayout rightLayout;
        TextView leftMsg;
        TextView rightMsg;

        public ViewHolder(@NonNull View itemView) {
            super(itemView);

            leftLayout=(LinearLayout) itemView.findViewById(R.id.left_layout);
            rightLayout=(LinearLayout)itemView.findViewById(R.id.right_layout);

            leftMsg=(TextView)itemView.findViewById(R.id.left_msg);
            rightMsg=(TextView)itemView.findViewById(R.id.right_msg);
        }
    }


    public MsgAdapter(List<Msg> msgList){
        mMsgList = msgList;
    }
    @NonNull
    @Override
    public ViewHolder onCreateViewHolder(@NonNull ViewGroup parent, int viewType) {
        View view= LayoutInflater.from(parent.getContext()).inflate(R.layout.msg_item,parent,false);
        return new ViewHolder(view);
    }

    @Override
    public void onBindViewHolder(@NonNull ViewHolder holder, int position) {

        Msg msg=mMsgList.get(position);

        /*
        如果是收到的消息,则显示左边的消息布局,将右边的消息布局隐藏
         */
        if(msg.getType()==Msg.TYPE_RECEIVED){
            holder.leftLayout.setVisibility(View.VISIBLE);
            holder.rightLayout.setVisibility(View.GONE);
            holder.leftMsg.setText(msg.getContent());
        }
        /*
        如果是发出的消息,则显示右边的消息布局,将左边的消息布局隐藏
         */
        else{
            holder.rightLayout.setVisibility(View.VISIBLE);
            holder.leftLayout.setVisibility(View.GONE);
            holder.rightMsg.setText(msg.getContent());
        }

    }

    @Override
    public int getItemCount() {
        return mMsgList.size();
    }


}
六、MainActivity:为RecyclerView初始化一些数据,给发送按钮加入事件响应
package com.example.uibestpractice;

import androidx.appcompat.app.AppCompatActivity;
import androidx.recyclerview.widget.LinearLayoutManager;
import androidx.recyclerview.widget.RecyclerView;

import android.os.Bundle;
import android.view.View;
import android.widget.Button;
import android.widget.EditText;

import java.util.ArrayList;
import java.util.List;

/**
 * 可以为RecyclerView初始化一些数据
 */
public class MainActivity extends AppCompatActivity {

    //消息List
    private List<Msg> msgList=new ArrayList<>();

    private EditText inputText;
    private Button send;
    private RecyclerView msgRecyclerView;
    private MsgAdapter adapter;

    @Override
    protected void onCreate(Bundle savedInstanceState) {
        super.onCreate(savedInstanceState);
        setContentView(R.layout.activity_main);

        //初始化数据
        initMsgs();

        //获取控件EditText Button RecyclerView
        inputText = (EditText)findViewById(R.id.input_text);
        send = (Button)findViewById(R.id.send);
        msgRecyclerView=(RecyclerView)findViewById(R.id.msg_recycler_view);


        //this--->MainActivity
        //context:上下文,初始化时,用于构造方法内部加载资源
        LinearLayoutManager layoutManager=new LinearLayoutManager(this);

        msgRecyclerView.setLayoutManager(layoutManager);

        adapter=new MsgAdapter(msgList);

        msgRecyclerView.setAdapter(adapter);

        //注册点击事件
        send.setOnClickListener(new View.OnClickListener() {
            @Override
            public void onClick(View v) {

                //获取在EditText输入的内容
                String content=inputText.getText().toString();

                //如果内容不为空
                if(!"".equals(content)){

                    //将消息初始化为发送消息
                    Msg msg=new Msg(content,Msg.TYPE_SEND);

                    //添加数据
                    msgList.add(msg);

                    //当有新消息时,刷新Lis†View中的显示
                    adapter.notifyItemInserted(msgList.size()-1);

                    //将ListView定位到最后一行
                    msgRecyclerView.scrollToPosition(msgList.size()-1);

                    //清空输入框的内容
                    inputText.setText("");
                }
            }
        });


    }


    /*
    初始化几条数据,用于在RecyclerView中显示
     */
    private void initMsgs() {

        Msg msg1=new Msg("Hello guy.",Msg.TYPE_RECEIVED);
        msgList.add(msg1);

        Msg msg2=new Msg("Hello. Who is that?",Msg.TYPE_SEND);
        msgList.add(msg2);

        Msg msg3=new Msg("This is Tom. Nice talking to you.",Msg.TYPE_RECEIVED);
        msgList.add(msg3);

    }

}
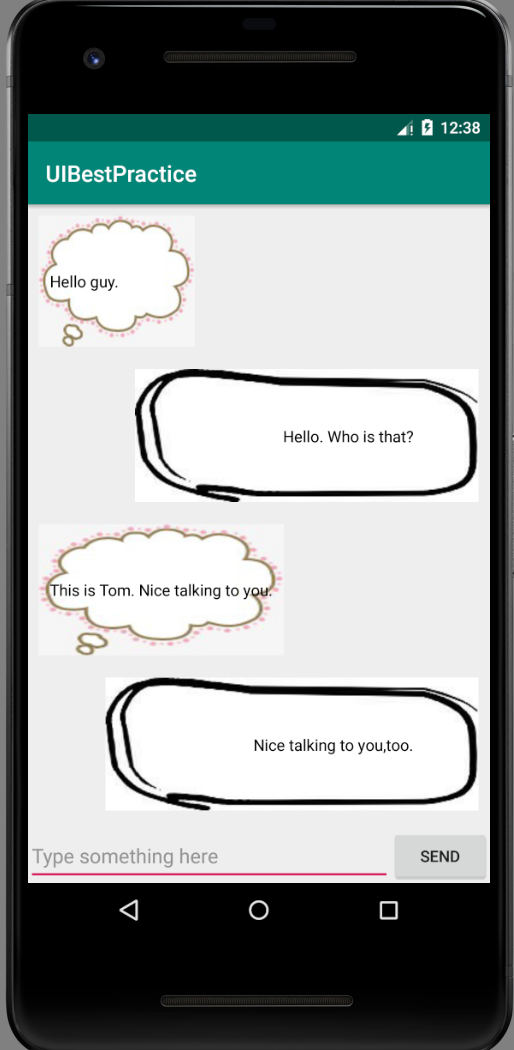
七、效果图
最后
以上就是活泼斑马最近收集整理的关于Android之UIBestPractice的全部内容,更多相关Android之UIBestPractice内容请搜索靠谱客的其他文章。
本图文内容来源于网友提供,作为学习参考使用,或来自网络收集整理,版权属于原作者所有。


发表评论 取消回复