一、前言
目前前端对后端的接口调用,流行携带 token 的无状态 http 请求,token是一种具有有效期的字符串,使用 Redis 来存取,可以说是无缝对接。而 token 有多种类型,如普通用户端的 userToken、管理员端的 adminToken,须分库进行存储(Redis默认 16 个库),这对权限认证区分时会用到,这就涉及到 SpringDataRedis 数据库切换的问题。
二、正文
之前使用 SpringBoot 1.x 对应的 SpringDataRedis,其连接使用的 Redis 主流是 jedis,指定数据库进行 Redis 存储相当简单
@Autowired
private StringRedisTemplate stringRedisTemplate;

JedisConnectionFactory jedisConnectionFactory = (JedisConnectionFactory) stringRedisTemplate.getConnectionFactory();
jedisConnectionFactory.setDatabase(1);
而现在使用 SpringBoot 2.x,其连接 Redis 主流是 Lettuce,上述操作已经过时了,同时,每次切换数据库都会影响整个项目的 StringRedisTemplate。如何使用新版 SpringDataRedis 的同时,每次操作 StringRedisTemplate 时不用重新设置操作的数据库呢?比较妥的方案是 自定义多个 xxxRedisTemplate !
1.RedisConfig
在本类中,我们配置了:
- 2个 Redis 的 Connection,对应 2 个 RedisTemplate
- 1 个默认的 RedisTemplate(强求的,不配会报错)
package com.cun.redis;


import org.springframework.beans.factory.annotation.Qualifier;
import org.springframework.boot.autoconfigure.EnableAutoConfiguration;
import org.springframework.boot.autoconfigure.data.redis.RedisAutoConfiguration;
import org.springframework.boot.autoconfigure.data.redis.RedisReactiveAutoConfiguration;
import org.springframework.context.annotation.Bean;
import org.springframework.context.annotation.Configuration;
import org.springframework.context.annotation.Primary;
import org.springframework.data.redis.connection.RedisStandaloneConfiguration;
import org.springframework.data.redis.connection.lettuce.LettuceConnectionFactory;
import org.springframework.data.redis.core.RedisTemplate;

@Configuration
@EnableAutoConfiguration(exclude = {RedisAutoConfiguration.class, RedisReactiveAutoConfiguration.class}) // 注意exclude
public class RedisConfig {

    @Bean("userTokenRedisConnection")
    public LettuceConnectionFactory userTokenRedisConnection() {
        RedisStandaloneConfiguration server = new RedisStandaloneConfiguration();
        server.setHostName("120.10.10.130");
        server.setDatabase(10); // 指定数据库!
        server.setPort(6378);
        return new LettuceConnectionFactory(server);
    }

    @Bean("adminTokenRedisConnection")
    public LettuceConnectionFactory adminTokenRedisConnection() {
        RedisStandaloneConfiguration server = new RedisStandaloneConfiguration();
        server.setHostName("120.10.10.130");
        server.setDatabase(11); // 指定数据库!
        server.setPort(6378);
        return new LettuceConnectionFactory(server);
    }

    @Bean("adminTokenRedisTemplate")
    public RedisTemplate<String, String> adminTokenRedisTemplate() {
        RedisTemplate<String, String> template = new RedisTemplate<String, String>(); //只能对字符串的键值操作
        template.setConnectionFactory(adminTokenRedisConnection());
        return template;
    }

    @Bean("userTokenRedisTemplate")
    public RedisTemplate<String, String> userTokenRedisTemplate() {
        RedisTemplate<String, String> template = new RedisTemplate<String, String>(); //只能对字符串的键值操作
        template.setConnectionFactory(userTokenRedisConnection());
        return template;
    }

    @Bean("redisTemplate")
    public RedisTemplate<String, String> redisTemplate() {
        RedisTemplate<String, String> template = new RedisTemplate<String, String>(); //只能对字符串的键值操作
        template.setConnectionFactory(userTokenRedisConnection());
        return template;
    }
}
2.SpringDataRedisApplicationTests
本测试类,我们测试了我们的目标是否达成——在库10 存 2 个 userToken,在 库 11 存 3 个 adminToken。
package com.cun;

import org.junit.jupiter.api.Test;
import org.springframework.boot.test.context.SpringBootTest;
import org.springframework.data.redis.core.RedisTemplate;

import javax.annotation.Resource;

/**
 * 官方文档:https://docs.spring.io/spring-data/redis/docs/2.2.7.RELEASE/reference/html/#reference
 */
@SpringBootTest
class SpringDataRedisApplicationTests {

    @Resource(name = "userTokenRedisTemplate")
    private RedisTemplate<String, String> userTokenRedisTemplate;

    @Resource(name = "adminTokenRedisTemplate")
    private RedisTemplate<String, String> adminTokenRedisTemplate;

    @Test
    void contextLoads() {

        /* 用户token */
        userTokenRedisTemplate.opsForValue().set("0243358fed674c79ce249d88e4334926", "userId_10001");
        userTokenRedisTemplate.opsForValue().set("0737a9b95a501f5464b3835cf5d7dacb", "userId_10002");

        /* 管理员token */
        adminTokenRedisTemplate.opsForValue().set("12b217cf6724474b1a781616fb021365", "adminId_10001");
        adminTokenRedisTemplate.opsForValue().set("1fdf7deac423c77efcf72aea196ad300", "adminId_10002");
        adminTokenRedisTemplate.opsForValue().set("2ba307112b47562c9ae6fe8dc1b70668", "adminId_10003");

    }

}
效果如下图
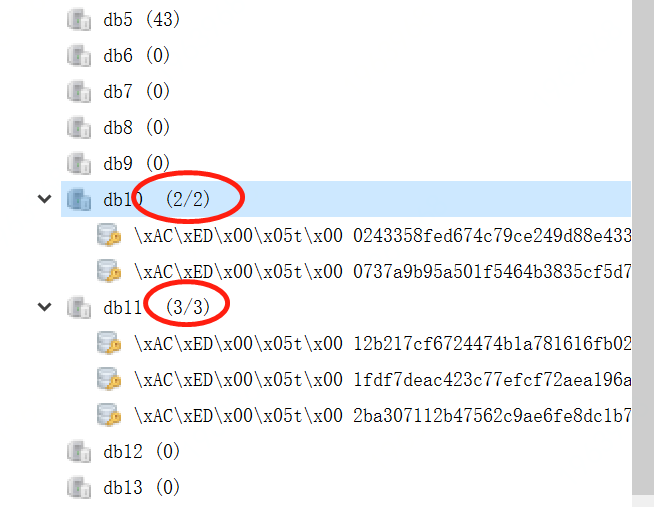
由上图,我们得知,我们的目标是达成!
全部代码: https://github.com/larger5/SpringDataRedis
三、结尾
参考:
SpringBoot系列教程之RedisTemplate 基本配置说明文档
SpringDataRedis官方文档
最后
以上就是含蓄心情最近收集整理的关于SpringDataRedis 中自定义多个 RedisTemplate 实现 Redis 多数据源切换使用一、前言二、正文三、结尾的全部内容,更多相关SpringDataRedis内容请搜索靠谱客的其他文章。


发表评论 取消回复