好了,通过上一讲,对于android,我们已经能使前后台的数据贯通了,这就相当于我们打通了从前端到后台的数据部分。那么这一讲我们来看看怎么样将这条路拓宽一点,让我们在android的开发中快速能够不受其他知识的干扰,将我们的探索范围集中在我们要使用的技术重点上,而不是漫无目标的探索。
怎么做呢?
我们知道,在项目开发中,项目初期最重要的是页面的展示,一般我们先要把控件在页面上按照UI设计师的要求,摆放到位,这样能尽快让客户确定他们想要的软件是否长的可爱,如果不可爱,客户会对我们提出修改要求,这样可以将项目风险控制在前期,避免进一步扩大。于是我们在打通数据从前台到后台的关节之后,第一件要做的事一般是需要写一些重要的页面,看看一些必用不可的控件都是怎么用的,能不更能满足我们表现上的要求,这样才能尽快将页面原型开发出来,让客户实实在在看到我们将来的产品长的是什么样子。
下面就通过一个常用的列表页面的开发过程来看看怎么样做。
先看看效果:

这是在设计器里面的效果。具体操作是这样的:
1、在res下建立drawable文件夹,把原来做的这个图标放进去:

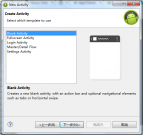
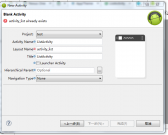
2、在项目上点右键,依次选择“新建——其他——Android Activity”,打开Activity新建面板:


点击完成建立ListActivity。
3、activity_list.xml文件内容为:
<RelativeLayout xmlns:android="http://schemas.android.com/apk/res/android"
xmlns:tools="http://schemas.android.com/tools"
android:layout_width="match_parent"
android:layout_height="match_parent"
android:paddingBottom="@dimen/activity_vertical_margin"
android:paddingLeft="@dimen/activity_horizontal_margin"
android:paddingRight="@dimen/activity_horizontal_margin"
android:paddingTop="@dimen/activity_vertical_margin"
tools:context=".ListActivity" >
<RelativeLayout
android:id="@+id/project_find_panel"
android:layout_width="fill_parent"
android:layout_height="50dp"
android:gravity="center">
<EditText
android:id="@+id/project_edit_text"
android:layout_width="170dp"
android:layout_height="40dp"
android:inputType="text"
android:paddingRight="50dp"
android:layout_centerInParent="true"
>
</EditText>
<ImageView
android:id="@+id/project_find"
android:layout_width="40dp"
android:layout_height="40dp"
android:layout_centerInParent="true"
android:layout_toRightOf="@id/project_edit_text"
android:src="@drawable/find"
android:contentDescription="点击搜索"/>
</RelativeLayout>
<LinearLayout
android:layout_width="fill_parent"
android:layout_height="wrap_content"
android:layout_alignParentBottom="true"
android:layout_alignParentLeft="true"
android:layout_alignParentRight="true"
android:layout_below="@+id/project_find_panel"
android rientation="vertical" >
<ListView
android:id="@+id/project_list"
android:layout_width="match_parent"
android:layout_height="wrap_content" >
</ListView>
</LinearLayout>
</RelativeLayout>
在这里稍微讲解一下关于布局的几个比较重要的设置:
id为
project_find_panel的
RelativeLayout的几个属性比较重要。
android:layout_width="fill_parent" 意思是:
RelativeLayout需要拉伸到父容器的宽度。
android:layout_height="50dp"
意思是:
RelativeLayou的高度是50dp。有兴趣可以去查查dp的单位,他是会在智能设备上忽略具体屏幕像素而进行显示的,比px要智能点。
android:gravity="center"
意思是:
RelativeLayou里面的元素需要居中显示。这样,我们放到里面的
EditText就能居中显示了。
按钮
ImageView的
android:layout_toRightOf="@id/project_edit_text"属性,意思是说他需要位于id是
project_edit_text的控件的右边。有这几个属性,能确保不管屏幕有多大,输入框和查找按钮始终在屏幕的居中对齐。
4、好了,我们给listview绑定上数据。
先建立列表项的格式文件:reslayoutcontrol_project_list.xml:
<LinearLayout xmlns:android="http://schemas.android.com/apk/res/android"
android rientation="horizontal"
android:layout_width="fill_parent"
android:layout_height="fill_parent"
android:minHeight="50sp"
android:paddingLeft="10dp"
android:paddingRight="10dp"
android:paddingBottom="10dp"
android:gravity="top"
>
<LinearLayout android rientation="vertical"
android:layout_width="wrap_content"
android:layout_height="wrap_content"
android:gravity="center">
<TextView android:id="@+id/project_list_item_info"
android:layout_width="wrap_content"
android:layout_height="wrap_content"
android:textColor="#000000"
android:textSize="18sp"
android:layout_marginTop="10dp"
android:layout_gravity="center_horizontal"/>
</LinearLayout>
</LinearLayout>
在ListActivity.java增加代码:
package com.example.test;
import java.util.ArrayList;
import java.util.HashMap;
import android.os.Bundle;
import android.app.Activity;
import android.view.Menu;
import android.widget.ListView;
import android.widget.SimpleAdapter;
public class ListActivity extends Activity {
@Override
protected void onCreate(Bundle savedInstanceState) {
super.onCreate(savedInstanceState);
setContentView(R.layout.activity_list);
loadData();
}
private void loadData() {
// TODO 自动生成的方法存根
ArrayList<HashMap<String, Object>> listItem = new ArrayList<HashMap<String, Object>>();
for(int i=0;i<20;i++){
HashMap<String, Object> map = new HashMap<String, Object>();
map.put("ItemText", "没有找到你所查找的数据");
listItem.add(map);
}
ListView list=(ListView)findViewById(R.id.project_list);
//生成适配器的Item和动态数组对应的元素
SimpleAdapter listItemAdapter = new SimpleAdapter(ListActivity.this,listItem,//数据源
R.layout.control_project_list,//ListItem的XML实现
//动态数组与ImageItem对应的子项
new String[] { "ItemText"},
//ImageItem的XML文件里面的一个ImageView,两个TextView ID
new int[] {R.id.project_list_item_info}
);
//添加并且显示
list.setDividerHeight(0);
list.setAdapter(listItemAdapter);
}
@Override
public boolean onCreateOptionsMenu(Menu menu) {
// Inflate the menu; this adds items to the action bar if it is present.
getMenuInflater().inflate(R.menu.list, menu);
return true;
}
}
5、为了能进去,在MainActivity.java中增加个按钮。:
protected void onCreate(Bundle savedInstanceState) {
super.onCreate(savedInstanceState);
setContentView(R.layout.activity_main);
Button button=(Button)findViewById(R.id.button1);
myHandler=new MyHandler();
button.setOnClickListener(new OnClickListener(){
@Override
public void onClick(View arg0) {
loadData(MainActivity.this,myHandler);
}
});
Button button2=(Button)findViewById(R.id.button2);
button2.setOnClickListener(new OnClickListener() {
@Override
public void onClick(View arg0) {
Intent intent = new Intent();
intent.setClass(MainActivity.this, ListActivity.class);
startActivity(intent);
}
});
}
activity_main.xml文件:
<RelativeLayout xmlns:android="http://schemas.android.com/apk/res/android"
xmlns:tools="http://schemas.android.com/tools"
android:layout_width="match_parent"
android:layout_height="match_parent"
android:paddingBottom="@dimen/activity_vertical_margin"
android:paddingLeft="@dimen/activity_horizontal_margin"
android:paddingRight="@dimen/activity_horizontal_margin"
android:paddingTop="@dimen/activity_vertical_margin"
tools:context=".MainActivity" >
<TextView
android:id="@+id/textView1"
android:layout_width="wrap_content"
android:layout_height="wrap_content"
android:text="@string/hello_world" />
<Button
android:id="@+id/button1"
android:layout_width="wrap_content"
android:layout_height="wrap_content"
android:layout_alignLeft="@+id/textView1"
android:layout_below="@+id/textView1"
android:layout_marginTop="28dp"
android:text="Button" />
<Button
android:id="@+id/button2"
android:layout_width="wrap_content"
android:layout_height="wrap_content"
android:layout_alignLeft="@+id/button1"
android:layout_below="@+id/button1"
android:layout_marginTop="17dp"
android:text="打开列表" />
</RelativeLayout>
6、好了,跑起来看看。

代码源文件:
 test.rar(1.53 MB, 下载次数: 69)
7、引入项目有时候会报错,说明一下,在引入项目过后,点击属性,需要在Android面板中将目标版本改为4.0以上。
最后
以上就是温婉砖头最近收集整理的关于从探索Android开发看新技术的研究的全部内容,更多相关从探索Android开发看新技术内容请搜索靠谱客的其他文章。


发表评论 取消回复