相对布局RelativeLayout
层布局FrameLayout
绝对布局AbsoluteLayout
网格布局GridLayout。
其中,表格布局是线性布局的子类。网格布局是android 4.0后新增的布局。
在手机程序设计中,绝对布局基本上不用,用得相对较多的是线性布局和相对布局。
(一)线性布局LinearLayout
线性布局在开发中使用最多,具有垂直方向与水平方向的布局方式,通过设置属性“android:orientation”控制方向,属性值垂直(vertical)和水平(horizontal),默认水平方向。
android:gravity:内部控件对齐方式,常用属性值有center、center_vertical、center_horizontal、top、bottom、left、right等。
这个属性在布局组件RelativeLayout、TableLayout中也有使用,FrameLayout、AbsoluteLayout则没有这个属性。
center:居中显示,这里并不是表示显示在LinearLayout的中心,当LinearLayout线性方向为垂直方向时,center表示水平居中,但是并不能垂直居中,此时等同于center_horizontal的作用;同样当线性方向为水平方向时,center表示垂直居中,等同于center_vertical。
top、bottom、left、right顾名思义为内部控件居顶、低、左、右布局。
这里要与android:layout_gravity区分开,layout_gravity是用来设置自身相对于父元素的布局。
android:layout_weight:权重,用来分配当前控件在剩余空间的大小。
使用权重一般要把分配该权重方向的长度设置为零,比如在水平方向分配权重,就把width设置为零。
先来看一下效果:

下面来看看代码:
<LinearLayout xmlns:android=“http://schemas.android.com/apk/res/android”
xmlns:tools=“http://schemas.android.com/tools”
android:id="@+id/LinearLayout1"
android:layout_width=“match_parent”
android:layout_height=“match_parent”
android:orientation=“vertical”
tools:context=" r e l a t i v e P a c k a g e . {relativePackage}. relativePackage.{activityClass}" >
<EditText
android:id="@+id/edit"
android:layout_width=“match_parent”
android:layout_height=“wrap_content” />
<LinearLayout
android:layout_width=“match_parent”
android:layout_height=“wrap_content”
android:orientation=“horizontal”
android:gravity=“center” >
<Button
android:id="@+id/button"
android:layout_width=“wrap_content”
android:layout_height=“wrap_content”
android:text=“确定”/>
<Button
android:id="@+id/button1"
android:layout_width=“wrap_content”
android:layout_height=“wrap_content”
android:text=“取消” />
<LinearLayout
android:layout_width=“match_parent”
android:layout_height=“wrap_content”
android:orientation=“horizontal” >
<TextView
android:layout_width=“wrap_content”
android:layout_height=“200dp”
android:layout_weight=“1”
android:background="#ff0000"
android:text=“红色”/>
<TextView
android:layout_width=“wrap_content”
android:layout_height=“200dp”
android:layout_weight=“1”
android:background="#00ff00"
android:text=“绿色”/>
<TextView
android:layout_width=“wrap_content”
android:layout_height=“200dp”
android:layout_weight=“1”
android:background="#0000ff"
android:text=“蓝色”/>
<TextView
android:layout_width=“wrap_content”
android:layout_height=“200dp”
android:layout_weight=“2”
android:background="#00ffff"
android:text=“青色”/>
(二)相对布局****RelativeLayout
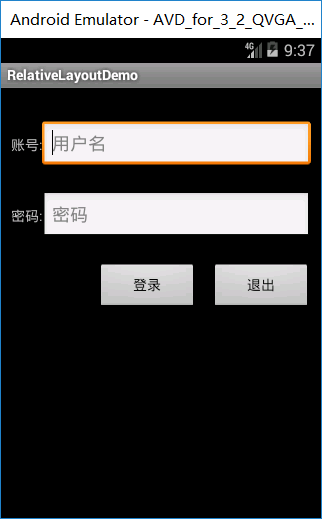
相对布局可以让子控件相对于兄弟控件或父控件进行布局,可以设置子控件相对于兄弟控件或父控件进行上下左右对齐。
RelativeLayout能替换一些嵌套视图,当我们用LinearLayout来实现一个简单的布局但又使用了过多的嵌套时,就可以考虑使用RelativeLayout重新布局。
相对布局就是一定要加Id才能管理。
RelativeLayout中子控件常用属性:
1、相对于父控件,例如:android:layout_alignParentTop=“true”
android:layout_alignParentTop 控件的顶部与父控件的顶部对齐;
android:layout_alignParentBottom 控件的底部与父控件的底部对齐;
android:layout_alignParentLeft 控件的左部与父控件的左部对齐;
android:layout_alignParentRight 控件的右部与父控件的右部对齐;
2、相对给定Id控件,例如:android:layout_above=“@id/**”
android:layout_above 控件的底部置于给定ID的控件之上;
android:layout_below 控件的底部置于给定ID的控件之下;
android:layout_toLeftOf 控件的右边缘与给定ID的控件左边缘对齐;
android:layout_toRightOf 控件的左边缘与给定ID的控件右边缘对齐;
android:layout_alignBaseline 控件的baseline与给定ID的baseline对齐;
android:layout_alignTop 控件的顶部边缘与给定ID的顶部边缘对齐;
android:layout_alignBottom 控件的底部边缘与给定ID的底部边缘对齐;
android:layout_alignLeft 控件的左边缘与给定ID的左边缘对齐;
android:layout_alignRight 控件的右边缘与给定ID的右边缘对齐;
3、居中,例如:android:layout_centerInParent=“true”
android:layout_centerHorizontal 水平居中;
android:layout_centerVertical 垂直居中;
android:layout_centerInParent 父控件的中央;
先来看一下效果:

版本低了,文本框可以在AndroidManifest.xml里更改主体:

下面来看看代码:
<RelativeLayout xmlns:android=“http://schemas.android.com/apk/res/android”
xmlns:tools=“http://schemas.android.com/tools”
android:layout_width=“match_parent”
android:layout_height=“match_parent”
android:padding=“10dp”
tools:context=" r e l a t i v e P a c k a g e . {relativePackage}. relativePackage.{activityClass}" >
<TextView
android:id="@+id/text1"
android:layout_width=“wrap_content”
android:layout_height=“wrap_content”
android:layout_alignBaseline="@+id/et1"
android:text="@string/username" />
<EditText
android:id="@+id/et1"
android:layout_width=“match_parent”
android:layout_height=“wrap_content”
android:layout_toRightOf="@id/text1"
android:layout_marginTop=“23dp”
android:inputType=“text”
android:maxLines=“12”
android:hint=“用户名” />
<TextView
android:id="@+id/text2"
android:layout_width=“wrap_content”
android:layout_height=“wrap_content”
android:layout_alignBaseline="@+id/et2"
android:text="@string/pwd" />
<EditText
android:id="@+id/et2"
android:layout_width=“match_parent”
android:layout_height=“wrap_content”
android:layout_below="@id/et1"
android:layout_marginTop=“23dp”
android:inputType=“text”
android:maxLines=“12”
android:layout_toRightOf="@id/text2"
android:hint=“密码” />
<Button
android:id="@+id/button1"
android:layout_width=“100dp”
android:layout_height=“wrap_content”
android:layout_alignBaseline="@+id/button2"
android:layout_alignBottom="@+id/button2"
android:layout_marginRight=“14dp”
android:layout_toLeftOf="@+id/button2"
android:text=“登录” />
<Button
android:id="@+id/button2"
android:layout_width=“100dp”
android:layout_height=“wrap_content”
android:layout_alignRight="@+id/et2"
android:layout_below="@+id/et2"
android:layout_marginTop=“23dp”
android:text=“退出” />
(三)层布局FrameLayout
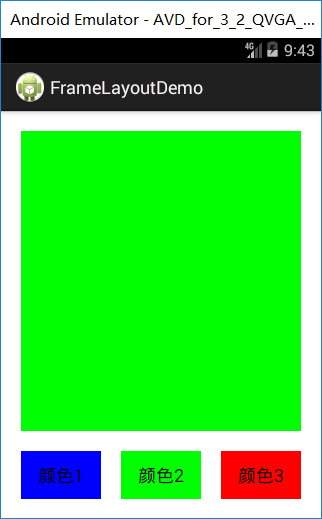
帧布局或叫层布局,从屏幕左上角按照层次堆叠方式布局,后面的控件覆盖前面的控件。
该布局在开发中设计地图经常用到,因为是按层次方式布局,我们需要实现层面显示的样式时就可以
采用这种布局方式,比如我们要实现一个类似百度地图的布局,我们移动的标志是在一个图层的上面。
在普通功能的软件设计中用得也不多。层布局主要应用就是地图方面。
上面有三层颜色,点击下面的案列上面会出现对应的样式

activity_main.xml中代码:
<LinearLayout xmlns:android=“http://schemas.android.com/apk/res/android”
xmlns:tools=“http://schemas.android.com/tools”
android:id="@+id/LinearLayout1"
android:layout_width=“match_parent”
android:layout_height=“match_parent”
android:orientation=“vertical”
tools:context=" r e l a t i v e P a c k a g e . {relativePackage}. relativePackage.{activityClass}" >
<FrameLayout
android:id="@+id/frame"
android:layout_width=“match_parent”
android:layout_margin=“20dp”
android:layout_height=“wrap_content” >
<TextView
android:id="@+id/text1"
android:layout_width=“match_parent”
android:layout_height=“300dp”
android:background="#0000ff" />
<TextView
android:id="@+id/text2"
android:layout_width=“match_parent”
android:layout_height=“300dp”
android:background="#00ff00" />
<TextView
android:id="@+id/text3"
android:layout_width=“match_parent”
android:layout_height=“300dp”
android:background="#ff0000" />
<LinearLayout
android:id="@+id/linear"
android:layout_width=“match_parent”
android:layout_height=“wrap_content”
android:orientation=“horizontal” >
<Button
android:id="@+id/button1"
android:layout_width=“wrap_content”
android:layout_height=“wrap_content”
android:layout_weight=“1”
android:layout_marginLeft=“20dp”
android:background="#0000ff"
android:text=“颜色1”/>
<Button
android:id="@+id/button2"
android:layout_width=“wrap_content”
android:layout_height=“wrap_content”
android:layout_weight=“1”
android:layout_marginRight=“20dp”
android:layout_marginLeft=“20dp”
android:background="#00ff00"
android:text=“颜色2”/>
<Button
android:id="@+id/button3"
android:layout_width=“wrap_content”
android:layout_height=“wrap_content”
android:layout_weight=“1”
android:background="#ff0000"
android:layout_marginRight=“20dp”
android:text=“颜色3”/>
MainActivity.java中代码:
public class MainActivity extends Activity {
private FrameLayout frame;
private TextView text1;
private TextView text2;
private TextView text3;
private Button button1;
private Button button2;
private Button button3;
private OnClickListener listener = new OnClickListener() {
@Override
public void onClick(View v) {
switch (v.getId()) {
case R.id.button1:
//删除
frame.removeView(text1);
//创建
frame.addView(text1);
break;
case R.id.button2:
frame.removeViewInLayout(text2);
frame.addView(text2);
break;
case R.id.button3:
frame.removeViewInLayout(text3);
frame.addView(text3);
break;
default:
break;
}
}
};
@Override
protected void onCreate(Bundle savedInstanceState) {
super.onCreate(savedInstanceState);
setContentView(R.layout.activity_main);
frame = (FrameLayout) findViewById(R.id.frame);
text1 = (TextView) findViewById(R.id.text1);
text2 = (TextView) findViewById(R.id.text2);
text3 = (TextView) findViewById(R.id.text3);
button1 = (Button) findViewById(R.id.button1);
button2 = (Button) findViewById(R.id.button2);
button3 = (Button) findViewById(R.id.button3);
button1.setOnClickListener(listener);
button2.setOnClickListener(listener);
button3.setOnClickListener(listen
《Android学习笔记总结+最新移动架构视频+大厂安卓面试真题+项目实战源码讲义》
**开源项目:【qq.cn.hn/FTe】 **
er);
}
}
(四)绝对布局AbsoluteLayout
绝对布局中将所有的子元素通过设置android:layout_x 和 android:layout_y属性,将子元素的坐标位置固定下来,即坐标(android:layout_x, android:layout_y) ,layout_x用来表示横坐标,layout_y用来表示纵坐标。屏幕左上角为坐标(0,0),横向往右为正方,纵向往下为正方。实际应用中,这种布局用的比较少,因为Android终端一般机型比较多,各自的屏幕大小。分辨率等可能都不一样,如果用绝对布局,可能导致在有的终端上显示不全等。所有基本不会使用,这里就不多介绍了。
(五)表格布局TableLayout
表格布局,适用于多行多列的布局格式,每个TableLayout是由多个TableRow组成,一个TableRow就表示TableLayout中的每一行,这一行可以由多个子元素组成。实际上TableLayout和TableRow都是LineLayout线性布局的子类。但是TableRow的参数android:orientation属性值固定为horizontal,且android:layout_width=MATCH_PARENT,android:layout_height=WRAP_CONTENT。所以TableRow实际是一个横向的线性布局,且所以子元素宽度和高度一致。
注意:在TableLayout中,单元格可以为空,但是不能跨列,意思是只能不能有相邻的单元格为空。
TableLayout常用属性:
android:shrinkColumns:设置可收缩的列,内容过多就收缩显示到第二行
android:stretchColumns:设置可伸展的列,将空白区域填充满整个列
android:collapseColumns:设置要隐藏的列
列的索引从0开始,shrinkColumns和stretchColumns可以同时设置。
子控件常用属性:
android:layout_column:第几列
android:layout_span:占据列数

更多学习和讨论,欢迎加入我们!
有许多来自一线的技术大牛,也有在小厂或外包公司奋斗的码农,我们致力打造一个平等,高质量的Android交流圈子,不一定能短期就让每个人的技术突飞猛进,但从长远来说,眼光,格局,长远发展的方向才是最重要的。
这里有2000+小伙伴,让你的学习不寂寞~·
bleLayout和TableRow都是LineLayout线性布局的子类。但是TableRow的参数android:orientation属性值固定为horizontal,且android:layout_width=MATCH_PARENT,android:layout_height=WRAP_CONTENT。所以TableRow实际是一个横向的线性布局,且所以子元素宽度和高度一致。
注意:在TableLayout中,单元格可以为空,但是不能跨列,意思是只能不能有相邻的单元格为空。
TableLayout常用属性:
android:shrinkColumns:设置可收缩的列,内容过多就收缩显示到第二行
android:stretchColumns:设置可伸展的列,将空白区域填充满整个列
android:collapseColumns:设置要隐藏的列
列的索引从0开始,shrinkColumns和stretchColumns可以同时设置。
子控件常用属性:
android:layout_column:第几列
android:layout_span:占据列数
[外链图片转存中…(img-rCd0l77v-1641553421076)]
更多学习和讨论,欢迎加入我们!
有许多来自一线的技术大牛,也有在小厂或外包公司奋斗的码农,我们致力打造一个平等,高质量的Android交流圈子,不一定能短期就让每个人的技术突飞猛进,但从长远来说,眼光,格局,长远发展的方向才是最重要的。
这里有2000+小伙伴,让你的学习不寂寞~·
本文已被CODING开源项目:《Android学习笔记总结+移动架构视频+大厂面试真题+项目实战源码》收录
最后
以上就是机智小懒虫最近收集整理的关于Android——六大基本布局总结,Android开发者的全部内容,更多相关Android——六大基本布局总结内容请搜索靠谱客的其他文章。


发表评论 取消回复