Centos7 下安装freeswitch 1.9 +x264+odbc mysql
- 前期准备
- 安装lua5.2及以上版本
- 安装mod_av支持的lib
- 安装odbc
- 安装php--为freeswitch后期扩展开发预备
- 编译freeswitch 1.9
- configure中间出现的错误:
- make中间出现的错误:
- 在fs上开启rport功能
- 设置rtp自动调整功能
- 防火墙和NAT设置
- 加载mod_av
- 连接MySQL数据库
- 支持视频通话
前期准备
yum install net-tools
关闭防火墙
//临时关闭
systemctl stop firewalld
//禁止开机启动
systemctl disable firewalld
setenforce 0
借用1.6版本的部分依赖库,懒得区分什么是刚需,copy一下直接贴过来了
yum install -y http://files.freeswitch.org/freeswitch-release-1-6.noarch.rpm epel-release

yum install -y git gcc-c++ autoconf automake libtool wget python ncurses-devel zlib-devel libjpeg-devel openssl-devel e2fsprogs-devel sqlite-devel libcurl-devel pcre-devel speex-devel ldns-devel libedit-devel libxml2-devel libyuv-devel opus-devel libvpx-devel libvpx2* libdb4* libidn-devel unbound-devel libuuid-devel lua-devel libsndfile-devel yasm-devel
安装lua5.2及以上版本
1.CentOS7默认已经安装了5.1.4 然并卵,freeswitch1.4以后就需要5.2以上lua来支持了,不然后期调试mysql lua会带来恶心的感觉。
①查看当前lua版本号:
lua -v

Lua 5.1.4  Copyright (C) 1994-2008 Lua.org, PUC-Rio
②查看lua和luac的位置:
which lua luac

/usr/bin/lua
/usr/bin/luac
2.编译Lua5.3版本
①下载lua-5.3.5.tar.gz
②make linux
出现错误:lua.c:80:31: fatal error: readline/readline.h: No such file or directory
表示需要安装依赖库:yum install readline-devel
③make install
cd src && mkdir -p /usr/local/bin /usr/local/include /usr/local/lib /usr/local/man/man1 /usr/local/share/lua/5.3 /usr/local/lib/lua/5.3
cd src && install -p -m 0755 lua luac /usr/local/bin
cd src && install -p -m 0644 lua.h luaconf.h lualib.h lauxlib.h lua.hpp /usr/local/include
cd src && install -p -m 0644 liblua.a /usr/local/lib
cd doc && install -p -m 0644 lua.1 luac.1 /usr/local/man/man1
可以看到,lua和luac被安装到了/usr/local/bin中
④lua -v查看版本,发现还是旧的版本,那我们就将/usr/bin中的lua和luac删除,然后将/usr/local/bin中的lua和luac创建一个ln到/usr/bin中即可
cd /usr/bin

rm -rf lua luac

ln -s /usr/local/bin/lua /usr/bin/lua

ln -s /usr/local/bin/luac /usr/bin/luac

lua -v

Lua 5.3.3  Copyright (C) 1994-2016 Lua.org, PUC-Rio
安装mod_av支持的lib
要支持h264视频通话,所以需要单独安装
mod_av 依赖libav, libav需要 x264 lib才能支持h264。
先下载源码
https://libav.org/
https://download.videolan.org/pub/videolan/x264/snapshots/
cd /usr/loca/src
git clone https://git.videolan.org/git/x264.git
wget https://libav.org/releases/libav-12.3.tar.gz
tar -zxvf libav-12.3.tar.gz
因为编译x264会提示
Found no assembler
Minimum version is nasm-2.13
所以需要手动安装 nasm 因为centos7自带的版本不够,
下载一个顺眼的版本 来三部曲安装吧
https://www.nasm.us/pub/nasm/releasebuilds/
wget https://www.nasm.us/pub/nasm/releasebuilds/2.14/nasm-2.14.tar.gz
tar -zxvf nasm-2.14.tar.gz
cd nasm-2.14
./configure
make
make install
cd ../x264
./configure --enable-shared --enable-static --disable-opencl
make
make install
cp /usr/local/lib/pkgconfig/x2* /usr/lib64/pkgconfig #否则libav在configure时会提示ERROR:x264 not found
libav编译时出错:
libavcodec/libx264.c: In function ‘X264_frame’:
libavcodec/libx264.c:246:9: error: ‘x264_bit_depth’ undeclared (first use in this function)
if (x264_bit_depth > 8)
^
libavcodec/libx264.c:246:9: note: each undeclared identifier is reported only once for each function it appears in
libavcodec/libx264.c: In function ‘X264_init_static’:
libavcodec/libx264.c:707:9: error: ‘x264_bit_depth’ undeclared (first use in this function)
if (x264_bit_depth == 8)
看了一圈没几个正经解决方案,参考x264对ffmpeg的补丁解决 http://git.videolan.org/?p=ffmpeg.git;a=patch;h=2a111c99a60fdf4fe5eea2b073901630190c6c93
 static av_cold void X264_init_static(AVCodec *codec)
 {
-    if (x264_bit_depth == 8)
+    if (X264_BIT_DEPTH == 8)
         codec->pix_fmts = pix_fmts_8bit;
-    else if (x264_bit_depth == 9)
+    else if (X264_BIT_DEPTH == 9)
         codec->pix_fmts = pix_fmts_9bit;
-    else if (x264_bit_depth == 10)
+    else if (X264_BIT_DEPTH == 10)
         codec->pix_fmts = pix_fmts_10bit;
}
cd ../libav-12.3
./configure --enable-shared --enable-libx264 --enable-gpl
make
make install
cp /usr/local/lib/pkgconfig/*.pc /usr/lib64/pkgconfig/
cp -f /usr/local/lib/* /usr/lib64/
增加mod_nuimrcp模块
编辑 vim ./build/modules.conf.in
修改 #applications/mod_av为applications/mod_av
修改 #asr_tts/mod_unimrcp 为 asr_tts/mod_unimrcp
安装odbc
因为后面会涉及到odbc的安装,所以先安装odbc
yum install -y unixODBC unixODBC-devel mysql-connector-odbc
安装完成后编辑/etc/odbcinst.ini
# Example driver definitions

# Driver from the postgresql-odbc package
# Setup from the unixODBC package
[PostgreSQL]
Description     = ODBC for PostgreSQL
Driver          = /usr/lib/psqlodbcw.so
Setup           = /usr/lib/libodbcpsqlS.so
Driver64        = /usr/lib64/psqlodbcw.so
Setup64         = /usr/lib64/libodbcpsqlS.so
FileUsage       = 1


# Driver from the mysql-connector-odbc package
# Setup from the unixODBC package
[MySQL]
Description     = ODBC for MySQL
Driver          = /usr/lib64/libmyodbc5.so
Setup           = /usr/lib64/libodbcmyS.so
Driver64        = /usr/lib64/libmyodbc5.so
Setup64         = /usr/lib64/libodbcmyS.so
FileUsage       = 1
编辑/etc/odbc.ini
[freeswitch]
Description=MySQL realtime database
Driver=/usr/lib64/libmyodbc5.so
SERVER =数据库地址
PORT =3306
DATABASE = freeswitch
OPTION  =67108864
CHARSET = UTF8
USER = 数据库账号
PASSWORD = 数据库密码
Threading = 0
输入:isql -v freeswitch测试是否能够连通
安装php–为freeswitch后期扩展开发预备
rpm -Uvh https://dl.fedoraproject.org/pub/epel/epel-release-latest-7.noarch.rpm

rpm -Uvh https://mirror.webtatic.com/yum/el7/webtatic-release.rpm

//查看
yum search php72w
//安装php以及扩展
yum install php72w php72w-fpm php72w-cli php72w-common php72w-devel php72w-gd php72w-pdo php72w-mysql php72w-mbstring php72w-bcmath
编译freeswitch 1.9
configure中间出现的错误:
configure: error: “Cannot build without libtiff (does your system require a libtiff-devel package?)”
yum install -y libtiff-devel
make中间出现的错误:
making all mod_signalwire
make[4]: Entering directory `/usr/local/src/freeswitch/src/mod/applications/mod_signalwire'
Makefile:916: *** You must install libks to build mod_signalwire.  Stop.
make[4]: Leaving directory `/usr/local/src/freeswitch/src/mod/applications/mod_signalwire'
make[3]: *** [mod_signalwire-all] Error 1
本来想粗暴注释掉mod_signalwire解决,但逃避不是办法,解决一下吧
需要安装 libks 和 signalwire-c
https://github.com/signalwire/libks
https://github.com/signalwire/signalwire-c
libks需要cmake (Minimum version 3.6.2),比较坑,所以手动安装cmake
https://cmake.org/files/ 这里是编译安装,也可以自己下载编译好的直接用
https://cmake.org/files/v3.13/cmake-3.13.3-Linux-x86_64.tar.gz 建议直接下载编译好的,编译时间很恶心
yum install libatomic.x86_64   #libks还会提示少libatomic

cd /usr/local/src
wget https://cmake.org/files/v3.13/cmake-3.13.3.tar.gz
tar -zxvf cmake-3.13.3.tar.gz
cd cmake-3.13.3
./bootstrap
gmake
make install

cd /usr/local/src
git clone https://github.com/signalwire/libks.git
cd libks
cmake .
make
make install
 cp /usr/lib/pkgconfig/libks.pc /usr/lib64/pkgconfig/   #这个比较坑爹,不然还是还找不到libks模块
cd /usr/local/src
git clone https://github.com/signalwire/signalwire-c.git
cd signalwire-c
cmake .
make
make install
cp /usr/local/lib/pkgconfig/*.pc /usr/lib64/pkgconfig/
cp -f /usr/local/lib/* /usr/lib64/
cd /usr/local/freeswitch
./bootstrap.sh -j
./configure --enable-core-odbc-support  #如果读者不想使用mysql管理,只需要执行./configure即可
make
make install

ln -sf /usr/local/freeswitch/bin/freeswitch /usr/local/bin/
ln -sf /usr/local/freeswitch/bin/fs_cli /usr/local/bin/

//安装声音文件
make cd-sounds-install
make cd-moh-install
在fs上开启rport功能
<paramname="NDLB-force-rport" value="true"/>
设置rtp自动调整功能
<paramname="disable-rtp-auto-adjust" value="false"/>
防火墙和NAT设置
云端映射/nat设置
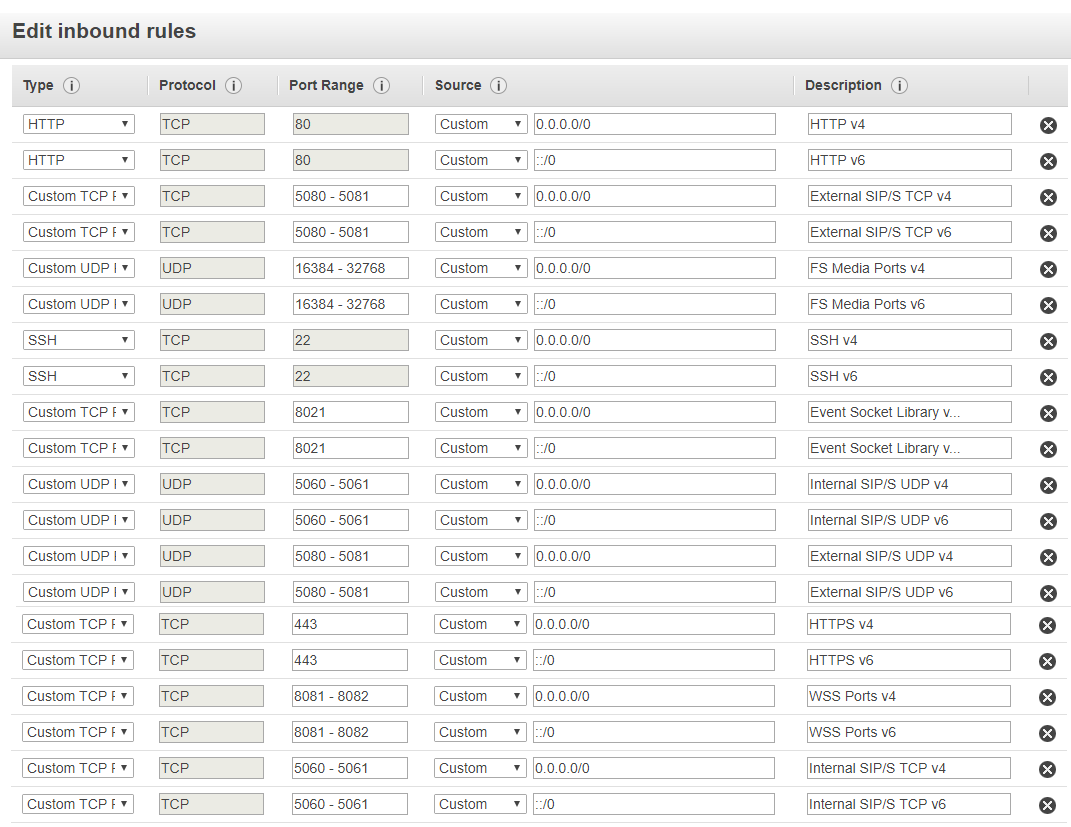 需要打开的端口:
udp     16384:32768
udp     4569
udp     5060
tcp     5060
udp     5080
tcp     5080
tcp     8000
udp     8000
配置conf/autoload_configs/verto.conf.xml
<param name="ext-rtp-ip" data="外网ip">
配置conf/sip_profiles/internal.xml
<param name="aggressive-nat-detection" value="true"/>
<param name="multiple-registrations" value="true"/>
<param name="ext-rtp-ip" value="外网ip"/>
<param name="ext-sip-ip" value="外网ip"/>
<param name="NDLB-received-in-nat-reg-contact" value="true"/>
<param name="NDLB-force-rport" value="true"/>
<param name="NDLB-broken-auth-hash" value="true"/>
<param name="enable-timer" value="false"/>
<param name="auth-calls" value="true"/>
配置conf/sip_profiles/external.xml
<param name="aggressive-nat-detection" value="true"/>
<param name="ext-rtp-ip" value="外网ip"/>
<param name="ext-sip-ip" value="外网ip"/>
<param name="NDLB-force-rport" value="true"/>
配置conf/autoload_configs/switch.conf.xml
<param name="rtp-start-port" value="16384"/>
<param name="rtp-end-port" value="32768"/>
加载mod_av
启动freeswitch,在控制命令中输入:
load mod_av
或者修改/usr/local/freeswitch/conf/autoload_configs下的modules.conf.xml
取消掉mod_av的注释即可(该方法是修改启动时加载项,修改后重启FreeSwitch即可)
进入/usr/local/freeswitch/bin目录下
./freeswitch -nonat
连接MySQL数据库
FreeSwitch默认是使用的SQLite数据库,这里我们将使用MySQL数据库来管理FreeSwitch中的账户,并实现账户之间能够互相拨打电话。
首先进入到/usr/local/freeswitch/conf/autoload_configs目录下,编辑lua.conf.xml文件
在<setting> 标签下添加如下的代码:
    <param name="xml-handler-script" value="gen_dir_user_xml.lua"/>
    <param name="xml-handler-bindings" value="directory"/>
然后在/usr/local/freeswitch/scripts/下创建gen_dir_user_xml.lua文件
freeswitch.consoleLog("notice", "Debug from gen_dir_user_xml.lua, provided params:n" .. params:serialize() .. "n")

local req_domain = params:getHeader("domain")
local req_key = params:getHeader("key")
local req_user = params:getHeader("user")
local dbh = freeswitch.Dbh("freeswitch","sip","password")

if dbh:connected() == false then
freeswitch.consoleLog("notice", "gen_dir_user_xml.lua cannot connect to database" .. dsn .. "n")
return
end
XML_STRING =
[[<?xml version="1.0" encoding="UTF-8" standalone="no"?>
<document type=" freeswitch/xml">
<section name="directory">
<domain name="]] .. req_domain .. [[">
<user id="]] .. req_user .. [[">
<params>
<param name="password" value=" FreeSwitch+ysyhL9T"/>
<param name="dial-string" value="{sip_invite_domain=${dialed_domain},
presence_id=${dialed_user}@${dialed_domain}}${sofia_contact(${dialed_user}@${dialed_domain})}"/>
</params>
<variables>
<variable name="user_context" value="default"/>
</variables>
</user>
</domain>
</section>
</document>]]
local my_query = string.format("select pass_word,user_context from users where sip_id='%s' limit 1", req_user)
assert (dbh:query(my_query, function(u) -- there will be only 0 or 1 iteration (limit 1)
freeswitch.consoleLog("NOTICE",u.pass_word.."n")
XML_STRING =
[[<?xml version="1.0" encoding="UTF-8" standalone="no"?>
<document type=" freeswitch/xml">
<section name="directory">
<domain name="]] .. req_domain .. [[">
<user id="]] .. req_user .. [[">
<params>
<param name="password" value="]] .. u.pass_word .. [["/>
<param name="dial-string" value="{sip_invite_domain=${dialed_domain},
presence_id=${dialed_user}@${dialed_domain}}${sofia_contact(${dialed_user}@${dialed_domain})}"/>
</params>
<variables>
<variable name="user_context" value="]] .. u.user_context .. [["/>
</variables>
</user>
</domain>
</section>
</document>]]
end))
编辑/usr/local/freeswitch/conf/directory/default.xml
删除如下代码
    <group name="default">
        <users>
          <X-PRE-PROCESS cmd="include" data="default/*.xml"/>
        </users>
     </group>
MySQL数据库中,创建freeswitch数据库,添加如下的表,并插入元素:
CREATE DATABASE IF NOT EXISTS freeswitch default charset utf8 COLLATE utf8_general_ci;

drop table if exists `users`;

CREATE TABLE IF NOT EXISTS `users` (
    `user_id` int(11) NOT NULL AUTO_INCREMENT,
    `domain` varchar(90) NOT NULL COMMENT '域',
    `sip_id` varchar(90) NOT NULL COMMENT '音视频聊天ID',
    `mail_box` varchar(90) NOT NULL COMMENT '邮箱',
    `number_alias` varchar(90) NOT NULL COMMENT '',
    `pass_word` varchar(255) NOT NULL COMMENT '密码',
    `dial_string` varchar(90) NOT NULL COMMENT '',
    `user_context` varchar(90) NOT NULL COMMENT '',
    `author_id` int(11) NOT NULL COMMENT '作者',
    `create_time` int(11) NOT NULL COMMENT '创建时间',
    `del_time` int(11) NOT NULL COMMENT '删除时间',
    `handler_id` int(11) NOT NULL COMMENT '处理人',
PRIMARY KEY (`user_id`),
KEY `sip_id` (`sip_id`),
KEY `author_id` (`author_id`),
KEY `create_time` (`create_time`),
KEY `del_time` (`del_time`),
KEY `handler_id` (`handler_id`)
) ENGINE=InnoDB DEFAULT CHARSET=utf8 ROW_FORMAT=DYNAMIC COMMENT='用户';

INSERT INTO `users` VALUES
    (1, '', '8001', '', '', '2345', '', 'default', 0, unix_timestamp(now()), 0, 0),
    (2, '', '8002', '', '', '2345', '', 'default', 0, unix_timestamp(now()), 0, 0),
    (3, '', '8003', '', '', '2345', '', 'default', 0, unix_timestamp(now()), 0, 0),
    (4, '', '8004', '', '', '2345', '', 'default', 0, unix_timestamp(now()), 0, 0);
修改拨号计划
编辑/usr/local/freeswitch/conf/dialplan/default.xml
    <extension name="Local_Extension2">
        <condition field="destination_number" expression="^([0-9][0-9][0-9][0-9])$">
            <action application="export" data="dialed_extension=$1"/>
            <action application="set" data="call_timeout=10"/>
            <action application="set" data="hangup_after_bridge=true"/>
            <action application="set" data="continue_on_fail=false"/>
            <action application="bridge" data="user/${dialed_extension}@${domain_name}"/>
        </condition>
    </extension>
PS:该行代码需要放在’<context name=“default”>’ 后面
在FreeSwitch控制台按F6或者输入reloadxml,此时可以使用X-Lite或者Zoiper进行测试:
账号1输入8003,密码12345,Domain输入虚拟机的IP地址
账号2输入8004,密码12345,Domain输入虚拟机的IP地址
测试互打是否能够通话。
支持视频通话
编辑/usr/local/freeswitch/conf/vars.xml
    <X-PRE-PROCESS cmd="set" data="global_codec_prefs=OPUS,G722,PCMU,PCMA,VP8,H263,H264"/>
    <X-PRE-PROCESS cmd="set" data="outbound_codec_prefs=OPUS,G722,PCMU,PCMA,VP8,H263,H264"/>
编辑/usr/local/freeswitch/conf/sip_profiles/internal.xml文件 如下:
<param name="inbound-proxy-media" value="true"/>
fsctl shutdown 控制台退出并关闭
在FreeSwitch控制台按F6或者输入reloadxml即可支持视频通话功能。
测试时使用linphone,X-Lite或者Zoiper,通话时选择视频通话,即可。
参考文章:
https://blog.csdn.net/jiajiren11/article/details/79269031
https://blog.csdn.net/jiayangang/article/details/79367757
https://blog.csdn.net/u011745859/article/details/82150814
https://blog.csdn.net/u011745859/article/details/81941674
https://www.bbsmax.com/A/MAzAL8Med9/
https://blog.csdn.net/yeqiufeng/article/details/81838461
https://blog.csdn.net/Dreamcode/article/details/8458974
https://www.cnblogs.com/chevin/p/6229739.html
最后
以上就是淡然超短裙最近收集整理的关于Centos7 下安装freeswitch 1.9 +x264+odbc mysql的全部内容,更多相关Centos7内容请搜索靠谱客的其他文章。


发表评论 取消回复