首先创建一个springboot的项目,不细说网上有
在进行整合swagger2的时候,引入swagger2的jar
        <!-- swagger2-->
        <dependency>
            <groupId>io.springfox</groupId>
            <artifactId>springfox-swagger2</artifactId>
            <version>2.7</version>
        </dependency>

        <!-- swagger2-UI-->
        <dependency>
            <groupId>io.springfox</groupId>
            <artifactId>springfox-swagger-ui</artifactId>
            <version>2.7</version>
        </dependency>
引入swagger2的jar包之后,我们需要配置一个swagger2的配置类,来声明一些swagger2的配置信息
SwaggerConfig.java
import io.swagger.annotations.ApiOperation;
import org.springframework.context.annotation.Bean;
import org.springframework.context.annotation.Configuration;
import springfox.documentation.builders.ApiInfoBuilder;
import springfox.documentation.builders.PathSelectors;
import springfox.documentation.builders.RequestHandlerSelectors;
import springfox.documentation.service.ApiInfo;
import springfox.documentation.service.Contact;
import springfox.documentation.spi.DocumentationType;
import springfox.documentation.spring.web.plugins.Docket;
import springfox.documentation.swagger2.annotations.EnableSwagger2;
/**
* Swagger2的接口配置
*
* @author Lion Li
*/
@Configuration
@EnableSwagger2
public class SwaggerConfig {
/**
* 创建API
*/
@Bean
public Docket createRestApi() {
return new Docket(DocumentationType.SWAGGER_2)
// 详细定制
.apiInfo(apiInfo())
.select()
// 指定当前包路径 (扫描所有带ApiOperation注解的类)
.apis(RequestHandlerSelectors.withMethodAnnotation(ApiOperation.class))
// 扫描所有
//.apis(RequestHandlerSelectors.any())
.paths(PathSelectors.any())
.build();
}
/**
* 添加摘要信息
*/
private ApiInfo apiInfo() {
// 用ApiInfoBuilder进行定制
return new ApiInfoBuilder()
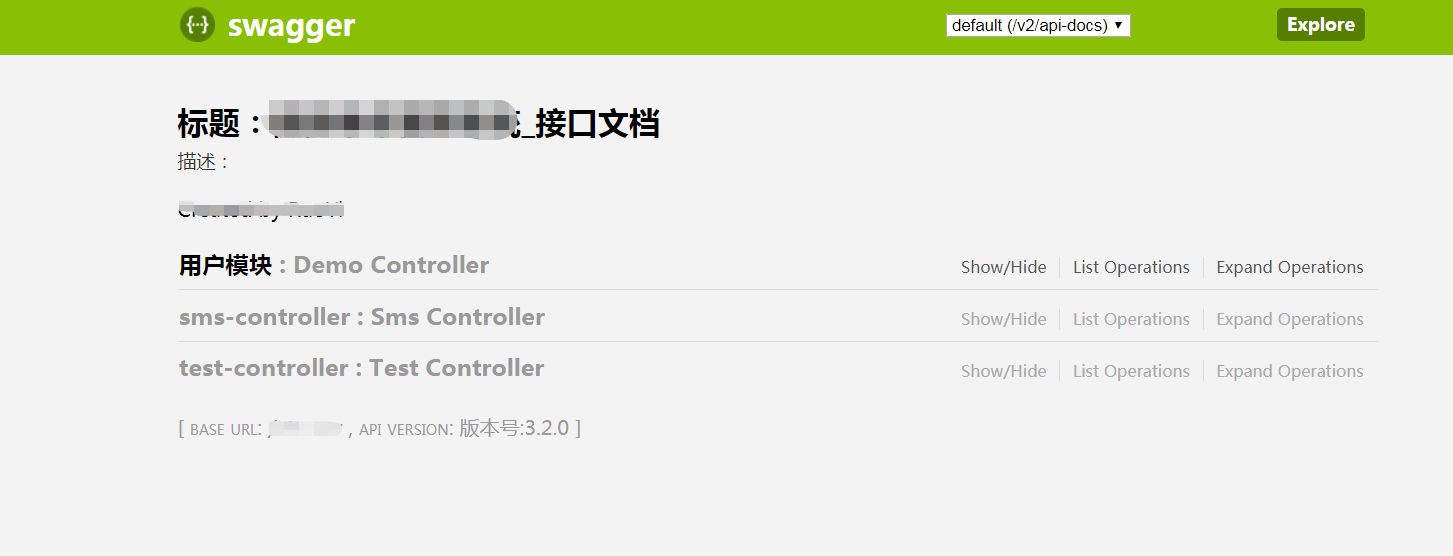
.title("标题:XXXX_接口文档")
.description("描述:XXX项目文档")
.contact(new Contact(项目名称, null, null))
.version("版本号:"+项目版本号)
.build();
}
}生成后
swagger2就已经配置完毕了。接下来你只需要在你的接口上配置你想要显示的信息即可。
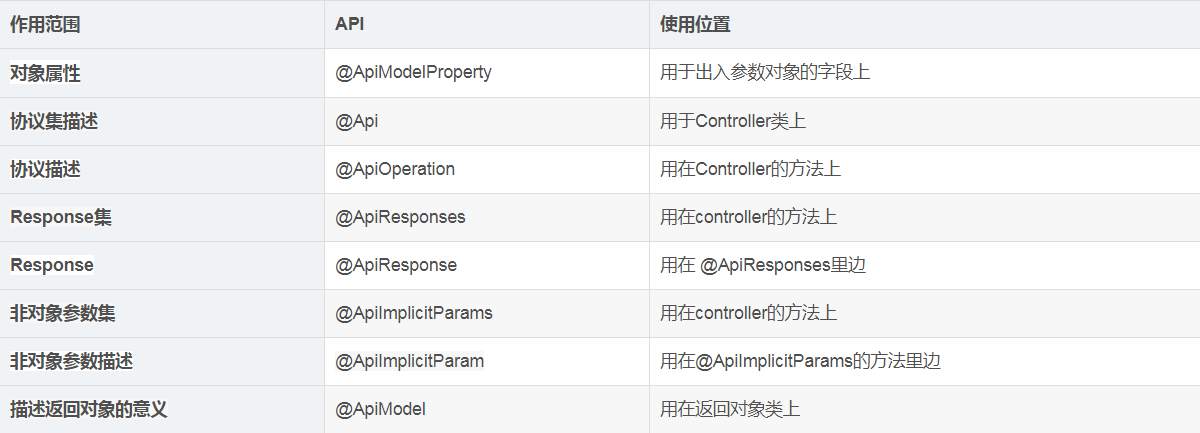
关于其中@Api和@ApiOperation等的详细解释如下:
关于参数的详细解释
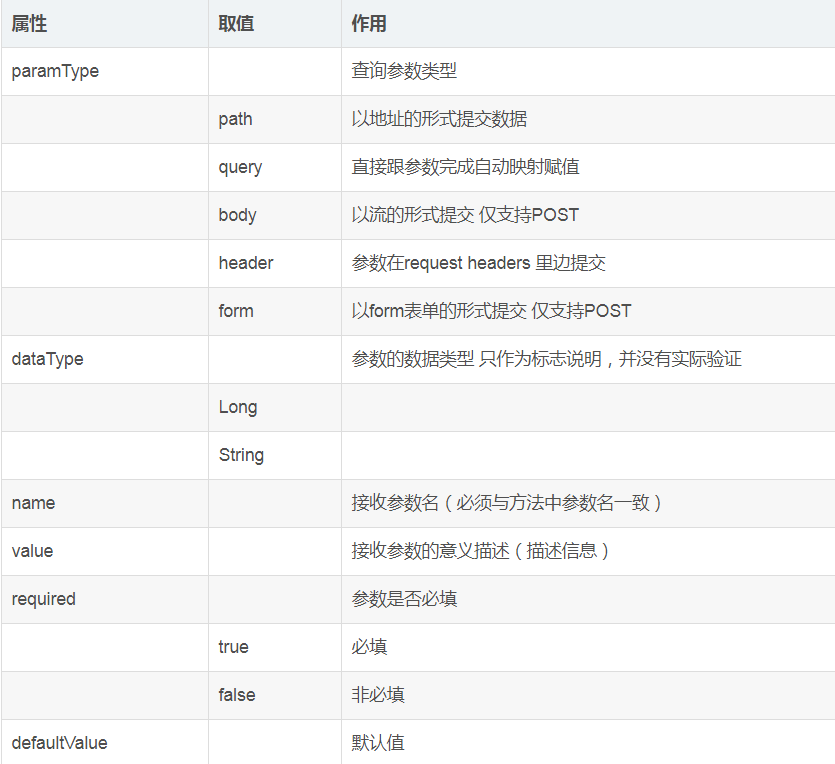
用在 @ApiResponses里边
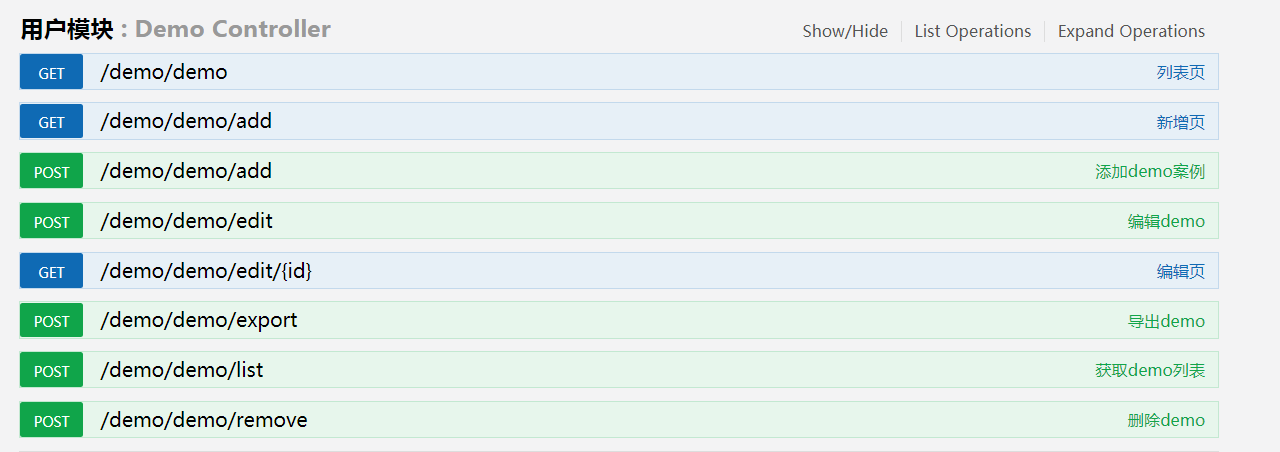
下面是具体demo类
DemoController.java
/**
* 测试 控制层
*
* @author Lion Li
* @date 2019-04-02
*/
@Api(value = "user",tags = "用户模块")
@Controller
@RequestMapping("/demo/demo")
public class DemoController {
private String prefix = "demo/demo";
private final IDemoService demoService;
@Autowired
public DemoController(IDemoService demoService) {
this.demoService = demoService;
}
/**
* 列表页
*/
@GetMapping
@ApiOperation(value = "列表页")
public String demo(){
return prefix + "/demo";
}
/**
* 新增页
*/
@GetMapping("/add")
@ApiOperation(value = "新增页")
public String add(){
return prefix + "/add";
}
/**
* 编辑页
*/
@GetMapping("/edit/{id}")
@ApiOperation(value = "编辑页")
public String edit(@PathVariable("id") Integer id, ModelMap mmap){
Demo demo = demoService.getById(id);
mmap.put("demo", demo);
return prefix + "/edit";
}
/**
* 查询测试列表
*/
@PostMapping("/list")
@ResponseBody
@ApiOperation(value = "获取demo列表")
public Result list(Demo demo){
startPage();
List<Demo> list = demoService.list(demo);
return Result.success(getDataTable(list));
}
/**
* 新增保存测试
*/
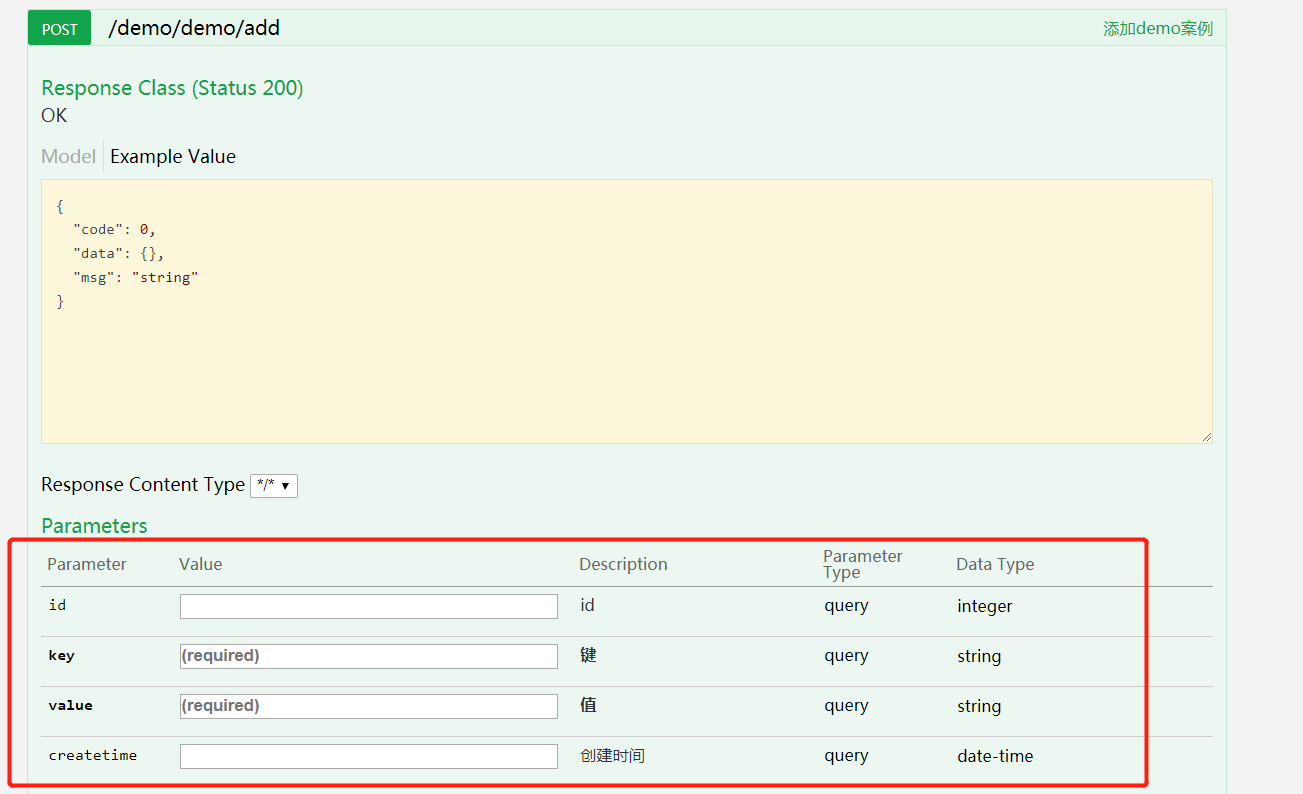
@PostMapping("/add")
@ResponseBody
@ApiOperation(value = "添加demo案例")
public Result addSave(Demo demo){
demoService.save(demo);
return Result.success();
}
/**
* 修改保存测试
*/
@PostMapping("/edit")
@ResponseBody
@ApiOperation(value = "编辑demo")
public Result editSave(Demo demo){
demoService.updateById(demo);
return Result.success();
}
/**
* 删除测试
*/
@PostMapping( "/remove")
@ResponseBody
@ApiOperation(value = "删除demo")
@ApiImplicitParam(name = "ids", value = "需要删除的id串", required = true, dataType = "String")
public Result remove(String ids){
Long[] longIds = Convert.toLongArray(ids);
demoService.removeByIds(Arrays.asList(longIds));
return Result.success();
}
/**
* 导出测试列表
*/
@PostMapping("/export")
@ResponseBody
@ApiOperation(value = "导出demo")
public Result export(Demo demo){
List<Demo> list = demoService.list(demo);
ExcelUtil<Demo> util = new ExcelUtil<>(Demo.class);
util.exportExcel(list, "demo");
return Result.success();
}
}生成后
Demo.java 实体类编写(这里采用了lombok,简化了实体类代码)
/**
 * 测试表 demo_demo
 *
 * @author Lion Li
 * @date 2019-04-02
 */
// swagger注解声明model
@ApiModel
// lombok注解(具体功能自行百度)
@EqualsAndHashCode(callSuper = true)
@ToString
@Data
@Accessors(chain = true)
// 数据库表名映射
@TableName("demo_demo")
public class Demo {
    private static final long serialVersionUID = 1L;

    @TableId
    @ApiModelProperty(value = "id")
    private Integer id;

    /**
     * 键
     */
    @ApiModelProperty(value = "键",required = true)
    private String key;
    /**
     * 值
     */
    @ApiModelProperty(value = "值",required = true)
    private String value;
    /**
     * 创建时间
     */
    @ApiModelProperty(value = "创建时间")
    private Date createtime;
}
生成后
最后
以上就是自信嚓茶最近收集整理的关于SpringBoot 2.X 整合 Swagger2 自动生成文档的全部内容,更多相关SpringBoot内容请搜索靠谱客的其他文章。
本图文内容来源于网友提供,作为学习参考使用,或来自网络收集整理,版权属于原作者所有。


发表评论 取消回复