从本篇博文开始,详细讲解JAVA IO流的基本操作,力求每一个例子都给大家一个DEMO,在最终完成的时候,我会贴出最终的源码,方便大家交流学习。
上一篇博文中转载了大神的博文和图片,非常好!
文章链接如下:Java IO流
下面一个个的用实例进行讲解每个IO流的基本用法。
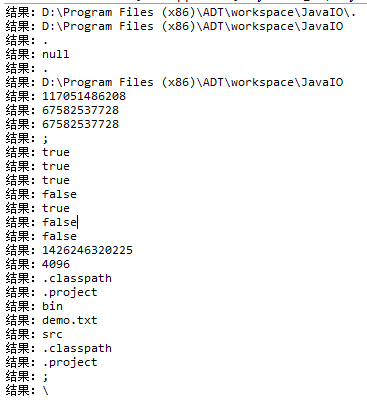
1 File文件
public static void main(String[] args) throws IOException {
File file = new File(".");
myPrint(file.getAbsoluteFile().getAbsolutePath());
myPrint(file.getCanonicalPath());
myPrint(file.getName());
myPrint(file.getParent());
myPrint(file.getPath());
myPrint(file.getCanonicalFile().getPath());
myPrint(file.getTotalSpace()+"");
myPrint(file.getFreeSpace()+"");
myPrint(file.getUsableSpace()+"");
myPrint(File.pathSeparator);
myPrint(file.canRead()+"");
myPrint(file.canWrite()+"");
myPrint(file.exists()+"");
myPrint(file.isAbsolute()+"");
myPrint(file.isDirectory()+"");
myPrint(file.isFile()+"");
myPrint(file.isHidden()+"");
myPrint(file.lastModified()+"");
myPrint(file.length()+"");
String[] strings = file.list();
for (String string : strings) {
myPrint(string);
}
String[] strings2 = file.list(new FilenameFilter() {
@Override
public boolean accept(File dir, String name) {

return name.startsWith(".");
}
});
for (String string : strings2) {
myPrint(string);
}
myPrint(File.pathSeparatorChar+"");
myPrint(File.separatorChar+"");
}
private static void myPrint(String str){
System.out.println("结果:"+str);
}
File类大家应该经常见到,也经常使用,所以请大家务必熟练。在这里只是列出了部分File的方法,不过都比较简单。大家用到的时候可以参考API即可。
2 FileWriter
public static void main(String[] args) {
String filestr = "D:\Program Files (x86)\ADT\workspace\JavaIO\demo.txt";
FileWriter fileWriter = null;
try{
fileWriter = new FileWriter(filestr);
fileWriter.write("long Yin is a good good boy! Handsome!^_^");
} catch (IOException e) {
e.printStackTrace();
}finally{
if (fileWriter != null) {
try {
fileWriter.close();
} catch (IOException e) {
e.printStackTrace();
}
}
}
}
结果:
3 FileRead
public class FileReaderTest {
/**
* @param args
*/
public static void main(String[] args) {
String path = "D:\Program Files (x86)\ADT\workspace\JavaIO\demo.txt";
Method1(path);
Method2(path);
}
//读取单个字符
一个一个字符的读取
private static void Method2(String path) {
FileReader fileReader;
try {
fileReader = new FileReader(path);
int temp1 = fileReader.read();
PrintMeth((char)temp1+"");
int temp2 = fileReader.read();
PrintMeth((char)temp2+"");
int temp3 = fileReader.read();
PrintMeth((char)temp3+"");
} catch (Exception e) {
}finally{
if (fileReader != null) {
try {
fileReader.close();
} catch (IOException e) {
e.printStackTrace();
}
}
}
}
//利用缓冲进行读取
最常见的方式
private static void Method1(String path) {
FileReader fileReader;
try {
fileReader = new FileReader(path);
int i = 0;
char[] buf = new char[5];
while ((i= fileReader.read(buf))>0) {
PrintMeth(new String(buf));
}
} catch (Exception e) {
}
}finally{
if (fileReader != null) {
try {
fileReader.close();
} catch (IOException e) {
e.printStackTrace();
}
}
}
private static void PrintMeth(String str){
System.out.println(str);
}
}
方法一结果:
方法二结果:

学习了FileReader 和FileWriter之后,我们可以实现文本文件的复制功能。大家可以考虑使用多种方法实现。
4 利用字符缓冲流进行文件的复制
public class BufferedReaderBufferedWriterTest {
/**
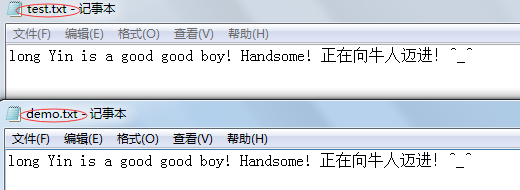
* 利用缓冲字符流实现文本文件的复制功能
* 从demo.txt文件的内容复制到test.txt文件中
* @param args
*/
public static void main( String[] args){
FileReader fileReader = null;
FileWriter fileWriter = null;
BufferedReader bufferedReader = null;
BufferedWriter bufferedWriter = null;
String path1 = "D:\Program Files (x86)\ADT\workspace\JavaIO\demo.txt";
String path2 = "D:\Program Files (x86)\ADT\workspace\JavaIO\test.txt";
try {
fileReader = new FileReader(path1);
fileWriter = new FileWriter(path2);
bufferedReader = new BufferedReader(fileReader);
bufferedWriter = new BufferedWriter(fileWriter);
String temp;
while ((temp = bufferedReader.readLine()) != null) {
//下面两个写入的方法都是可以的
//
bufferedWriter.write(temp);
bufferedWriter.append(temp);
bufferedWriter.flush();//务必记得调用flush方法写入磁盘
}
} catch (Exception e) {
}finally{
//此处不再需要捕捉FileReader和FileWriter对象的异常
//关闭缓冲区就是关闭缓冲区中的流对象
if (bufferedReader != null) {
try {
bufferedReader.close();
} catch (IOException e) {
// TODO Auto-generated catch block
e.printStackTrace();
}
}
if (bufferedWriter != null) {
try {
bufferedWriter.close();
} catch (IOException e) {
// TODO Auto-generated catch block
e.printStackTrace();
}
}
}
}
}结果如图:
5 FileOutputStream字节流写入
public class FileOutputStreamTest {
/**字节流写入操作
* @param args
*/
public static void main(String[] args) {
String path = "D:\Program Files (x86)\ADT\workspace\JavaIO\demo.txt";
FileOutputStream fileOutputStream = null;
try {
fileOutputStream = new FileOutputStream(path);
//
fileOutputStream.write(int b)
//
fileOutputStream.write(byte[] b)
//
fileOutputStream.write(byte[] b, off, len)
//上面三个方法是利用fileOutputStream进行写入的三个重载的方法
//测试第一个方法
//
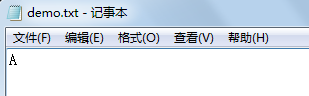
fileOutputStream.write(65);//结果是下面结果图中的第一幅图
//测试第二个方法
//
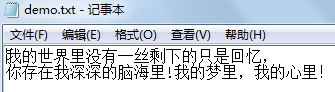
fileOutputStream.write(("我的世界里没有一丝剩下的只是回忆," +
//
"rn你存在我深深的脑海里!我的梦里,我的心里!").getBytes());//结果是下面结果图中的第二幅图
//测试第三个方法
byte[] by = ("我的世界里没有一丝剩下的只是回忆," +
"rn你存在我深深的脑海里!我的梦里,我的心里!").getBytes();
fileOutputStream.write(by, 0, by.length);//结果和上一个方法相同
} catch (Exception e) {
}finally{
if (fileOutputStream != null) {
try {
fileOutputStream.close();
} catch (Exception e2) {
}
}
}
}
}结果如图:

6 FileInputStream字节流的读取操作
public class FileInputStreamTest {
/**FileInputStream字节流的读取操作
* @param args
*/
public static void main(String[] args) {
FileInputStream fileInputStream = null;
String path = "D:\Program Files (x86)\ADT\workspace\JavaIO\demo.txt";
try {
fileInputStream = new FileInputStream(path);
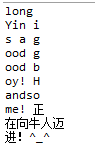
PrintStr(String.valueOf(fileInputStream.read()));//一次读取一个字节,读到末尾返回-1表示结束
//结果输出为:239
表示读取第一个字符的第一个字节
字节转化为整数表示
byte[] b = new byte[5];
while (fileInputStream.read(b)>0) {
fileInputStream.read(b);//读取数据存储在b字节数组中
PrintStr(new String(b));
}
} catch (Exception e) {
}finally{
if (fileInputStream != null) {
try {
fileInputStream.close();
} catch (Exception e2) {
// TODO: handle exception
}
}
}
}
private static void PrintStr(String str){
System.out.print(str);
}
}结果图:
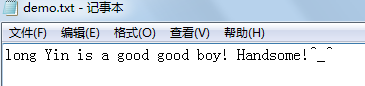
demo.txt文件的内容如图:
代码运行结果:

你可能奇怪怎么出现了乱码的情况。原因在于demo.txt里面存储的是字符,而读取使用的是FileInputStream字节流,一个字节一个字节的读取再转化为字符串输出,必然引起乱码的情况。你会说不是有汉字输出吗?那只能说是碰巧的情况下,相邻的两个字节读取到了,拼在一起显示了出来。
所以推荐做法是:如果是文本文件,读取和写入操作使用字符流
其他文件,读取和写入操作使用字节流。
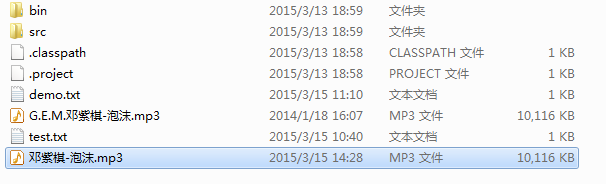
6 二进制文件的复制
/**
* 二进制文件的复制
* @author Administrator
* 2015年3月15日 14:21:20
*/
public class BinaryFileToCopy {
public static void main(String[] args) {
String path = "D:\Program Files (x86)\ADT\workspace\JavaIO\G.E.M.邓紫棋-泡沫.mp3";
String pathCopy = "D:\Program Files (x86)\ADT\workspace\JavaIO\邓紫棋-泡沫.mp3";
FileInputStream fileInputStream = null;
FileOutputStream fileOutputStream = null;
try {
fileInputStream = new FileInputStream(path);
fileOutputStream = new FileOutputStream(pathCopy);
byte[] by = new byte[1024];
while (fileInputStream.read(by)>0) {
fileOutputStream.write(by);
}
} catch (Exception e) {
}finally{
if (fileInputStream != null) {
try {
fileInputStream.close();
} catch (Exception e2) {
// TODO: handle exception
}
}
if (fileOutputStream != null) {
try {
fileOutputStream.close();
} catch (Exception e2) {
// TODO: handle exception
}
}
}
}
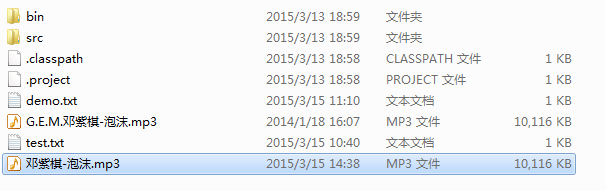
}结果如图
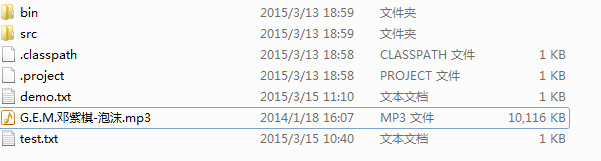
运行程序之后
7 利用字节流缓冲流进行二进制文件的复制
public class BufferedInputStreamOutputStreamToCopy {
/**
* 利用字节流缓冲流进行二进制文件的复制
* @param args
*/
public static void main(String[] args) {
String path = "D:\Program Files (x86)\ADT\workspace\JavaIO\G.E.M.邓紫棋-泡沫.mp3";
String pathCopy = "D:\Program Files (x86)\ADT\workspace\JavaIO\邓紫棋-泡沫.mp3";
FileInputStream fileInputStream = null;
FileOutputStream fileOutputStream = null;
BufferedInputStream bufferedInputStream = null;
BufferedOutputStream bufferedOutputStream = null;
try {
fileInputStream = new FileInputStream(path);
fileOutputStream = new FileOutputStream(pathCopy);
bufferedInputStream = new BufferedInputStream(fileInputStream);
bufferedOutputStream = new BufferedOutputStream(fileOutputStream);
byte[] by = new byte[1024];
while (bufferedInputStream.read(by)>0) {
bufferedOutputStream.write(by);
bufferedOutputStream.flush();
}
} catch (Exception e) {
}finally{
if (bufferedInputStream != null) {
try {
bufferedInputStream.close();
} catch (Exception e2) {
}
}
if (bufferedOutputStream != null) {
try {
bufferedOutputStream.close();
} catch (Exception e2) {
}
}
}
}
}
结果和上面直接使用字节流进行二进制文件的复制一样
利用缓冲可以提高效果,不再频繁的读取磁盘写入磁盘,而是一次性读取1K大小的数据,缓存起来在写入磁盘。
如果有什么问题或者错误,请大家留言!谢谢~~~
源码下载。
最后
以上就是痴情小土豆最近收集整理的关于java IO流详解(一)的全部内容,更多相关java内容请搜索靠谱客的其他文章。


发表评论 取消回复