前一阵刚研究了shiro框架,现在再来研究一下SpringSecurity。
SpringSecurity是由spring团队开发的,为web应用安全性提供了完整的解决方案的框架。
目录
- 本文目的
- 依赖
- 登录认证及授权
- 认证授权代码:
- 配置类
- 单点登录
- 前后端分离返回json数据
- 登录成功
- 登录失败
- 登出
- 未认证的请求
- 访问无权限的请求
- 配置类
- 其他
- 配置无需认证的请求
- 接口返回结果过滤
- 定制个性化user类
本文目的
SpringSecurity自身携带登录页面,并且在拦截未认证的请求时默认会重定向至登录页面,但是这种模式不能满足现在的前后端分离的架构,所以我们希望在登录、拦截未认证请求和登出时,向前端返回包含状态编码和消息的json数据。
还有另一个目的就是,生产环境上都是多点部署,更何况如今已是分布式和微服务大行其道,如何做到一次登录,多点访问,也是我们这篇文章需要解决的问题。
依赖
<dependency>
	<groupId>org.springframework.boot</groupId>
	<artifactId>spring-boot-starter-security</artifactId>
</dependency>
<dependency>
	<groupId>org.springframework.boot</groupId>
	<artifactId>spring-boot-starter-web</artifactId>
</dependency>
<dependency>
    <groupId>org.springframework.boot</groupId>
    <artifactId>spring-boot-starter-data-redis</artifactId>
</dependency>
<dependency>
    <groupId>org.springframework.session</groupId>
    <artifactId>spring-session-data-redis</artifactId>
</dependency>
<dependency>
	<groupId>com.alibaba</groupId>
	<artifactId>fastjson</artifactId>
	<version>1.2.76</version>
</dependency>
登录认证及授权
在这里需要实现UserDetailsService接口,并实现loadUserByUsername方法,在这个方法里我们需要根据userName参数查询系统中的用户信息,当用户不存在时抛出UsernameNotFoundException异常,然后将查询出的用户名密码信息和查询出的权限信息保存进user对象中返回,然后SpringSecurity会根据返回的对象判断此次登录是否验证成功,之后user对象会被保存到SpringSecurity上下文中,在其他位置可在上下文中查询到user对象。
认证授权代码:
package com.training.springsecurity.go.component;

import com.training.springsecurity.go.business.entity.RoleInfo;
import com.training.springsecurity.go.business.entity.UserInfo;
import com.training.springsecurity.go.business.service.UserAuthService;
import org.springframework.beans.factory.annotation.Autowired;
import org.springframework.security.core.userdetails.User;
import org.springframework.security.core.GrantedAuthority;
import org.springframework.security.core.authority.AuthorityUtils;
import org.springframework.security.core.userdetails.UserDetails;
import org.springframework.security.core.userdetails.UserDetailsService;
import org.springframework.security.core.userdetails.UsernameNotFoundException;
import org.springframework.security.crypto.bcrypt.BCryptPasswordEncoder;
import org.springframework.stereotype.Component;

import java.util.List;

@Component("userDetailsService")
public class LocalUserDetailService implements UserDetailsService {
    @Autowired
    private UserAuthService userAuthService;

    @Override
    public UserDetails loadUserByUsername(String userName) throws UsernameNotFoundException {
        UserInfo userInfo = userAuthService.getUserInfoByName(userName);
        if(userInfo == null){
            throw new UsernameNotFoundException("不是人");
        }
        List<RoleInfo> roleInfoByUserName = userAuthService.getRoleInfoByUserName(userName);
        StringBuilder sb = new StringBuilder();
        for(RoleInfo r : roleInfoByUserName){
            sb.append(r.getRoleName()+",");
        }
        if(sb.length() > 0){
            sb.deleteCharAt(sb.length() - 1);
        }
        String roleNames = sb.toString();
        List<GrantedAuthority> auths = AuthorityUtils.commaSeparatedStringToAuthorityList(roleNames);
        User user = new User(userName, new BCryptPasswordEncoder().encode(userInfo.getPwd()), auths);

        return user;
    }
}
配置类
要想让自定义的登录认证及授权的代码生效,我们需要将代码配置起来。
配置类需要继承WebSecurityConfigurerAdapter,接下来我们将反复提及这个配置类,所以接下来统称其为配置类。
@Configuration
public class SecurityConfigure extends WebSecurityConfigurerAdapter {
	@Autowired
    @Qualifier("userDetailsService")
    private UserDetailsService userDetailsService;
    /**
     * 编码工具
     * @return
     */
    @Bean
    public PasswordEncoder passwordEncoder(){
        return new BCryptPasswordEncoder();
    }

    protected void configure(AuthenticationManagerBuilder auth) throws Exception {
        auth.userDetailsService(userDetailsService).passwordEncoder(passwordEncoder());
    }
}
至此就可以实现基本的本地用户的登录认证及授权功能了。
但只是基本,在测试的过程中,我们输入错误的用户名时,我们理想中应该抛出UsernameNotFoundException,但实际却不是,而是BadCredentialsException,这是为什么呢,我们明明在代码中写了当找不到用户时就抛出UsernameNotFoundException,实际却没有。
通过查看堆栈,跟踪代码,我发现了一段程序如下
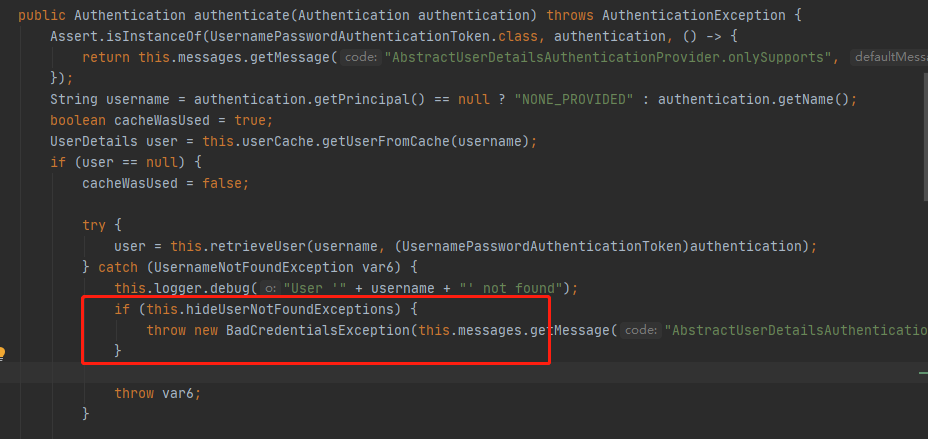
也就是说,当hideUserNotFoundExceptions的值为false的时候,我们就能如愿的抛出我们想要的异常了。通过跟踪代码得知,这段程序所属的类的子类是DaoAuthenticationProvider,所以我们只需要在配置类中,将hideUserNotFoundExceptions的值设置为false即可。
故配置类中增加如下代码:
	/**
     * 配置不隐藏用户没找到的异常
     * 配置UserDetailsService实现类逻辑
     * 配置密码编码工具
     * @return
     */
    @Bean
    public DaoAuthenticationProvider daoAuthenticationProvider(){
        DaoAuthenticationProvider daoAuthenticationProvider = new DaoAuthenticationProvider();
        daoAuthenticationProvider.setHideUserNotFoundExceptions(false);
        daoAuthenticationProvider.setUserDetailsService(userDetailsService);
        daoAuthenticationProvider.setPasswordEncoder(passwordEncoder());
        return daoAuthenticationProvider;
    }
重启,测试,发现还是不对。继续跟踪代码发现认证方法走了两次,其中一次hideUserNotFoundExceptions还是true。
后来通过查找资料和实验发现,认证方法执行两次的原因是配置类中的daoAuthenticationProvider()和configure(AuthenticationManagerBuilder auth)方法重复配置了userDetailsService。
注释掉configure(AuthenticationManagerBuilder auth)配置之后就好了
@Configuration
public class SecurityConfigure extends WebSecurityConfigurerAdapter {
	@Autowired
    @Qualifier("userDetailsService")
    private UserDetailsService userDetailsService;
    /**
     * 编码工具
     * @return
     */
    @Bean
    public PasswordEncoder passwordEncoder(){
        return new BCryptPasswordEncoder();
    }

    /*protected void configure(AuthenticationManagerBuilder auth) throws Exception {
        auth.userDetailsService(userDetailsService).passwordEncoder(passwordEncoder());
    }*/

	/**
     * 配置不隐藏用户没找到的异常
     * 配置UserDetailsService实现类逻辑
     * 配置密码编码工具
     * @return
     */
    @Bean
    public DaoAuthenticationProvider daoAuthenticationProvider(){
        DaoAuthenticationProvider daoAuthenticationProvider = new DaoAuthenticationProvider();
        daoAuthenticationProvider.setHideUserNotFoundExceptions(false);
        daoAuthenticationProvider.setUserDetailsService(userDetailsService);
        daoAuthenticationProvider.setPasswordEncoder(passwordEncoder());
        return daoAuthenticationProvider;
    }
}
单点登录
实现单点登录可以有很多方式,我们这里整合的是redis,拜springboot所赐的便利条件,这里我们需要做的事情并不复杂
首先在application.properties文件中配置redis的基本信息:
spring.redis.host=你的redis地址
spring.redis.port=端口
spring.redis.database=2 #选择数据库,我这边是前两个都有用所以我用了第三个
然后再在配置类中增加如下配置:
/**
 * 配置整合redis共享session时使用
 */
@Autowired
private FindByIndexNameSessionRepository sessionRepository;

/**
 * 配置共享session
 * @return
 */
@Bean
public SpringSessionBackedSessionRegistry sessionRegistry(){
    return new SpringSessionBackedSessionRegistry(this.sessionRepository);
}

@Override
protected void configure(HttpSecurity http) throws Exception {
   // 同一个用户只能有一个session,后登录的会挤掉之前登录的
  http.sessionManagement().maximumSessions(1).sessionRegistry(sessionRegistry());
}
分别以80和81端口启动服务,在80端口登录后,在同一浏览器访问81端口的自定义的请求可以访问成功,然后再打开另一个浏览器(我是一个Chrome一个IE)登录,然后返回之前的浏览器访问自定义的请求显示不允许访问。
前后端分离返回json数据
我们需要分别对登录成功、登录失败、登出、未认证访问请求和访问无权限的请求返回json数据
我们先逐个说明每个部分的定制,然后再统一说明配置类该如何配置
登录成功
实现AuthenticationSuccessHandler接口:
package com.training.springsecurity.go.component;

import com.alibaba.fastjson.JSONObject;
import com.training.springsecurity.go.business.entity.LocalUserDetails;
import com.training.springsecurity.go.business.entity.RestResult;
import org.springframework.security.core.Authentication;
import org.springframework.security.core.context.SecurityContextHolder;
import org.springframework.security.web.authentication.AuthenticationSuccessHandler;
import org.springframework.stereotype.Component;

import javax.servlet.ServletException;
import javax.servlet.http.HttpServletRequest;
import javax.servlet.http.HttpServletResponse;
import java.io.IOException;
import java.io.PrintWriter;
import java.util.HashMap;
import java.util.Map;

@Component
public class CustomizeAuthenticationSuccessHandler implements AuthenticationSuccessHandler {
    @Override
    public void onAuthenticationSuccess(HttpServletRequest httpServletRequest, HttpServletResponse httpServletResponse, Authentication authentication) throws IOException, ServletException {
        /*LocalUserDetails principal = (LocalUserDetails) SecurityContextHolder.getContext().getAuthentication().getPrincipal();*/

        RestResult restResult = new RestResult(0, "登录成功");
        /*Map<String,String> map = new HashMap<>();
        map.put("name", principal.getName());
        map.put("IDCard", principal.getIDCard());
        restResult.setData(map);*/
        httpServletResponse.setContentType("text/json;charset=utf-8");
        PrintWriter writer = httpServletResponse.getWriter();
        writer.print(JSONObject.toJSONString(restResult));
        writer.close();
        writer.flush();
    }
}
(RestResult是自己创建的类,不是框架里的)
登录失败
实现AuthenticationFailureHandler接口:
package com.training.springsecurity.go.component;

import com.alibaba.fastjson.JSONObject;
import com.training.springsecurity.go.business.entity.RestResult;
import org.springframework.security.core.AuthenticationException;
import org.springframework.security.web.authentication.AuthenticationFailureHandler;
import org.springframework.stereotype.Component;

import javax.servlet.ServletException;
import javax.servlet.http.HttpServletRequest;
import javax.servlet.http.HttpServletResponse;
import java.io.IOException;
import java.io.PrintWriter;

@Component
public class CustomizeAuthenticationFailureHandler implements AuthenticationFailureHandler {
    @Override
    public void onAuthenticationFailure(HttpServletRequest httpServletRequest, HttpServletResponse httpServletResponse, AuthenticationException e) throws IOException, ServletException {
        String msg = e.getMessage();
        RestResult restResult = new RestResult(-1, msg);
        httpServletResponse.setContentType("text/json;charset=utf-8");
        PrintWriter writer = httpServletResponse.getWriter();
        writer.print(JSONObject.toJSONString(restResult));
        writer.close();
        writer.flush();
    }
}
登出
实现LogoutSuccessHandler接口:
package com.training.springsecurity.go.component;

import com.alibaba.fastjson.JSONObject;
import com.training.springsecurity.go.business.entity.RestResult;
import org.springframework.security.core.Authentication;
import org.springframework.security.web.authentication.logout.LogoutSuccessHandler;
import org.springframework.stereotype.Component;

import javax.servlet.ServletException;
import javax.servlet.http.HttpServletRequest;
import javax.servlet.http.HttpServletResponse;
import java.io.IOException;
import java.io.PrintWriter;

@Component
public class CustomizeLogoutSuccessHandler implements LogoutSuccessHandler {
    @Override
    public void onLogoutSuccess(HttpServletRequest httpServletRequest, HttpServletResponse httpServletResponse, Authentication authentication) throws IOException, ServletException {
        RestResult restResult = new RestResult(0,"登出成功");
        httpServletResponse.setContentType("text/json;charset=utf-8");
        PrintWriter writer = httpServletResponse.getWriter();
        writer.print(JSONObject.toJSONString(restResult));
        writer.close();
        writer.flush();
    }
}
未认证的请求
实现AuthenticationEntryPoint接口:
package com.training.springsecurity.go.component;

import com.alibaba.fastjson.JSONObject;
import com.training.springsecurity.go.business.entity.RestResult;
import org.springframework.security.core.AuthenticationException;
import org.springframework.security.web.AuthenticationEntryPoint;
import org.springframework.stereotype.Component;

import javax.servlet.ServletException;
import javax.servlet.http.HttpServletRequest;
import javax.servlet.http.HttpServletResponse;
import java.io.IOException;
import java.io.PrintWriter;

@Component
public class CustomizeAuthenticationEntryPoint implements AuthenticationEntryPoint {

    @Override
    public void commence(HttpServletRequest httpServletRequest, HttpServletResponse httpServletResponse, AuthenticationException e) throws IOException, ServletException {
        RestResult restResult = new RestResult(-1, "请先登录");
        httpServletResponse.setContentType("text/json;charset=utf-8");
        PrintWriter writer = httpServletResponse.getWriter();
        writer.print(JSONObject.toJSONString(restResult));
        writer.close();
        writer.flush();
    }
}
访问无权限的请求
实现AccessDeniedHandler接口:
package com.training.springsecurity.go.component;

import com.alibaba.fastjson.JSONObject;
import com.training.springsecurity.go.business.entity.RestResult;
import org.springframework.security.access.AccessDeniedException;
import org.springframework.security.web.access.AccessDeniedHandler;
import org.springframework.stereotype.Component;

import javax.servlet.ServletException;
import javax.servlet.http.HttpServletRequest;
import javax.servlet.http.HttpServletResponse;
import java.io.IOException;
import java.io.PrintWriter;

@Component
public class CustomizeAccessDeniedHandler implements AccessDeniedHandler {
    @Override
    public void handle(HttpServletRequest httpServletRequest, HttpServletResponse httpServletResponse, AccessDeniedException e) throws IOException, ServletException {
        RestResult restResult = new RestResult(-3, "权限不足");
        httpServletResponse.setContentType("text/json;charset=utf-8");
        PrintWriter writer = httpServletResponse.getWriter();
        writer.print(JSONObject.toJSONString(restResult));
        writer.close();
        writer.flush();
    }
}
这块还得说一下限定权限的请求方法怎么写,我们可以应用一个SpringSecurity的一个注解来完成权限的限定:
@GetMapping("/hello")
@PreAuthorize("hasAnyRole('ROLE_selector')")
public String hello(){
    return "Hello Security";
}
特别说一下这个角色名称的字符串,必须得用**ROLE_**开头,否则不会生效的,授权时使用的角色名称也是如此
配置类
配置类增加如下配置:
/**
 * 未登录时发送请求拦截回调
 */
@Autowired
private AuthenticationEntryPoint authenticationEntryPoint;

/**
 * 登录成功回调
 */
@Autowired
private AuthenticationSuccessHandler authenticationSuccessHandler;

/**
 * 登录失败时回调
 */
@Autowired
private AuthenticationFailureHandler authenticationFailureHandler;

/**
 * 登出成功时回调
 */
@Autowired
private LogoutSuccessHandler logoutSuccessHandler;

/**
 * 403时回调
 */
@Autowired
private AccessDeniedHandler accessDeniedHandler;

@Override
protected void configure(HttpSecurity http) throws Exception {

	//登出配置
    http.logout().logoutSuccessHandler(logoutSuccessHandler).deleteCookies("SESSION").permitAll();
	//认证及权限配置
    http.formLogin()
            .successHandler(authenticationSuccessHandler)
            .failureHandler(authenticationFailureHandler)
            .and().authorizeRequests()
            .anyRequest().authenticated()
            .and().exceptionHandling().authenticationEntryPoint(authenticationEntryPoint)
            .and().csrf().disable(); //关闭跨域防护
    http.exceptionHandling().accessDeniedHandler(accessDeniedHandler);
    // 同一个用户只能有一个session
    http.sessionManagement().maximumSessions(1).sessionRegistry(sessionRegistry());
}
测试未登录访问:
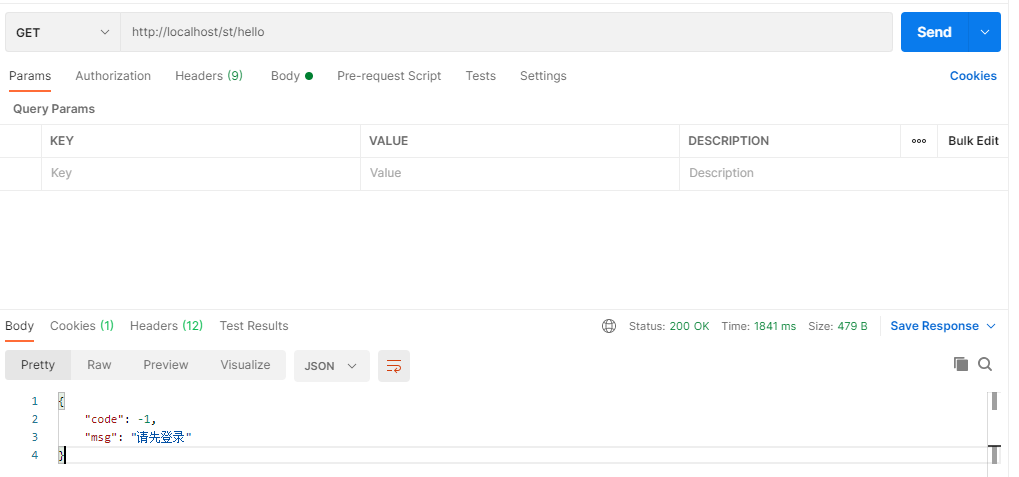
成功
测试登录:
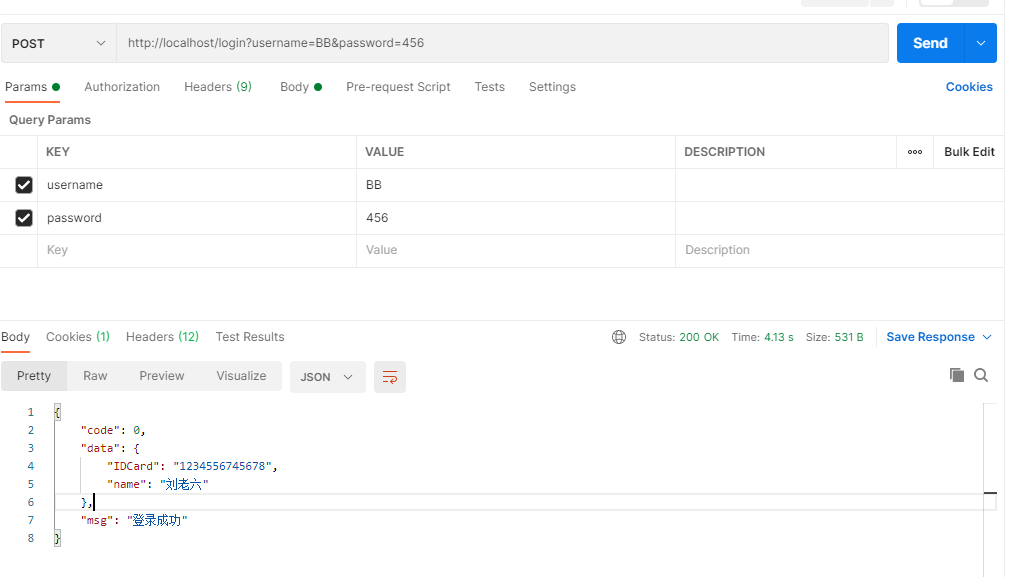
输入错误的用户名
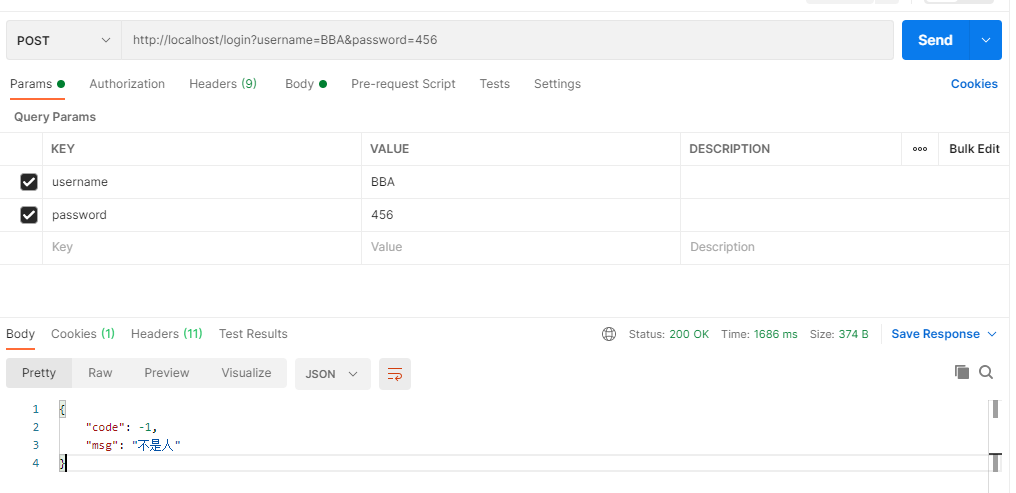
成功
登录后测试权限不足的请求
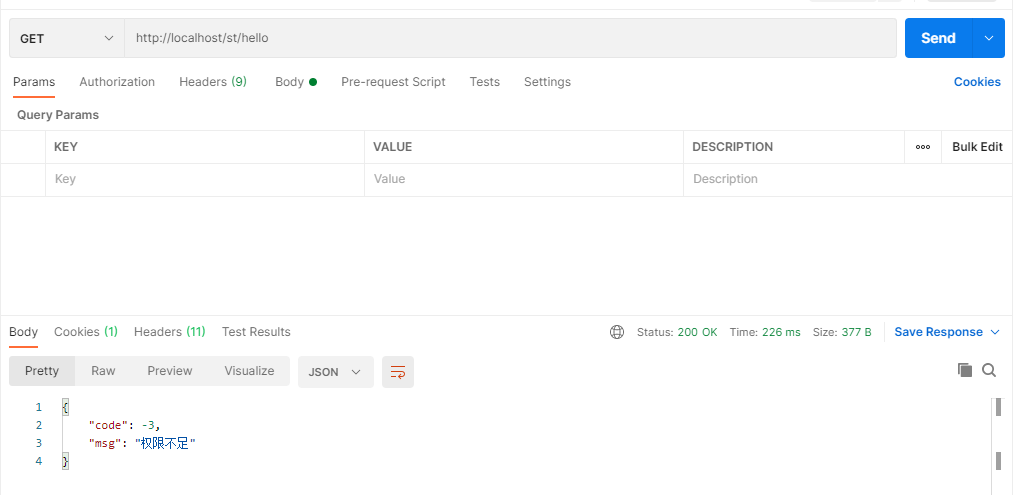
成功
测试登出:
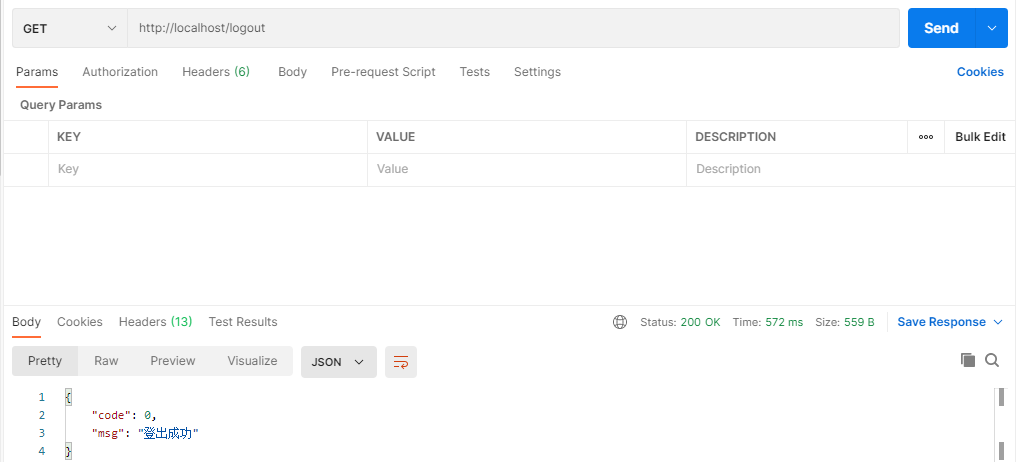
成功
其他
配置无需认证的请求
配置类中增加配置:
@Override
public void configure(WebSecurity web) throws Exception {
     web.ignoring().antMatchers("/st/staticRequest");
}
接口返回结果过滤
返回结果中只有小强
@GetMapping("/getUserInfoList")
@PostFilter("filterObject.userName == '小强'")
public List<UserInfo> getUserInfoList(){
    List<UserInfo> list = new ArrayList<>();
    list.add(new UserInfo("小明","123"));
    list.add(new UserInfo("小强","123"));
    list.add(new UserInfo("小红","123"));
    return list;
}
定制个性化user类
之前我们提到过User这个类,在认证授权的方法中最终返回的就是这个类的对象,并存储至上下文中。但是这个类包含关于用户的内容太少了,只有用户名、密码和角色信息,好在我们可以对其扩展。
package com.training.springsecurity.go.business.entity;

import lombok.Data;
import org.springframework.security.core.GrantedAuthority;
import org.springframework.security.core.userdetails.User;

import java.util.Collection;

@Data
public class LocalUserDetails extends User {
    private String name;
    private String IDCard;

    public LocalUserDetails(String username, String password, Collection<? extends GrantedAuthority> authorities){
        super(username, password, authorities);
    }
}
可以看到我们扩展了两个属性,一个是name一个是IDCard
然后我们改造LocalUserDetailService的登录认证方法loadUserByUsername,使之返回LocalUserDetails的对象,并为扩展属性赋值
LocalUserDetails localUserDetails = new LocalUserDetails(userName, new BCryptPasswordEncoder().encode(userInfo.getPwd()), auths);
localUserDetails.setName("刘老六");
localUserDetails.setIDCard("1234556745678");
return localUserDetails;
然后我们编写一个在上下文中获取LocalUserDetails对象的请求方法:
@GetMapping("/getCurrentUser")
public LocalUserDetails getCurrentUser(){
    LocalUserDetails user = (LocalUserDetails)SecurityContextHolder.getContext().getAuthentication().getPrincipal();

    return user;
}
测试之:
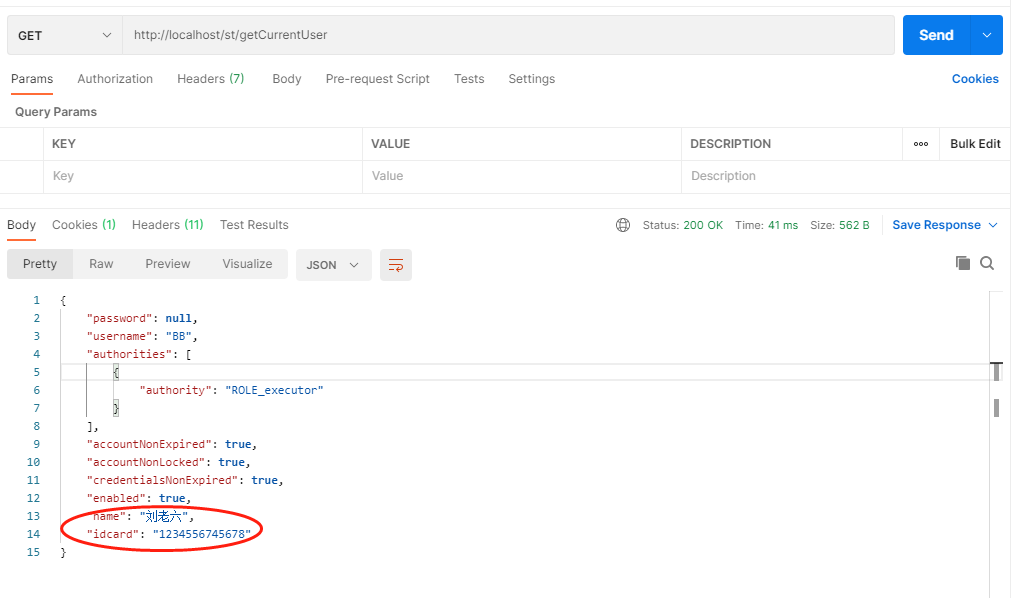
可以看到我们自定义的扩展信息被查出来了。
还有一个细节,就是password显示的是null,但之前的测试我们也看到了,输入的密码并不为空,之所以显示为null,我相信这应该是springsecurity做出的防御措施
最后
以上就是潇洒夕阳最近收集整理的关于SpringSecurity整合Redis实现单点登录及认证返回json数据本文目的依赖登录认证及授权单点登录前后端分离返回json数据其他结尾的全部内容,更多相关SpringSecurity整合Redis实现单点登录及认证返回json数据本文目内容请搜索靠谱客的其他文章。


发表评论 取消回复