#define WindowWidth  400
#define WindowHeight 400
#define WindowTitle  "OpenGL纹理测试"

#include <GL/glut.h>
#include <stdio.h>
#include <stdlib.h>

//定义两个纹理对象编号
GLuint texGround;
GLuint texWall;

#define BMP_Header_Length 54  //图像数据在内存块中的偏移量
int angle = 0;   //旋转角度

// 将立方体的八个顶点保存到一个数组里面
static const GLfloat vertex_list[][3] = {
    -0.5f, -0.5f, -0.5f,
     0.5f, -0.5f, -0.5f,
    -0.5f,  0.5f, -0.5f,
     0.5f,  0.5f, -0.5f,
    -0.5f, -0.5f,  0.5f,
     0.5f, -0.5f,  0.5f,
    -0.5f,  0.5f,  0.5f,
     0.5f,  0.5f,  0.5f,
};
//绘制次序
static const GLint index_list[][4] = {
    0, 2, 3, 1,
    0, 4, 6, 2,
    0, 1, 5, 4,
    4, 5, 7, 6,
    1, 3, 7, 5,
    2, 6, 7, 3,
};
//纹理绘制次序
static const GLfloat coord_list[][2] = {
    0,0,
    0,1,
    1,1,
    1,0,
};
// 函数power_of_two用于判断一个整数是不是2的整数次幂
int power_of_two(int n)
{
        if( n <= 0 )
                return 0;
        return (n & (n-1)) == 0;
}

/* 函数load_texture
* 读取一个BMP文件作为纹理
* 如果失败,返回0,如果成功,返回纹理编号
*/
GLuint load_texture(const char* file_name)
{
        GLint width, height, total_bytes;
        GLubyte* pixels = 0;
        GLuint last_texture_ID=0, texture_ID = 0;

        // 打开文件,如果失败,返回
        FILE *pFile;
        int err=fopen_s(&pFile,file_name, "rb");
        if (err != 0){ return 0;}

        // 读取文件中图象的宽度和高度
        fseek(pFile, 0x0012, SEEK_SET);
        fread(&width, 4, 1, pFile);
        fread(&height, 4, 1, pFile);
        fseek(pFile, BMP_Header_Length, SEEK_SET);

        // 计算每行像素所占字节数,并根据此数据计算总像素字节数
        {
                GLint line_bytes = width * 3;
                while( line_bytes % 4 != 0 )
                        ++line_bytes;
                total_bytes = line_bytes * height;
        }

        // 根据总像素字节数分配内存
        pixels = (GLubyte*)malloc(total_bytes);
        if( pixels == 0 )
        {
                fclose(pFile);
                return 0;
        }

        // 读取像素数据
        if( fread(pixels, total_bytes, 1, pFile) <= 0 )
        {
                free(pixels);
                fclose(pFile);
                return 0;
        }

        // 对就旧版本的兼容,如果图象的宽度和高度不是的整数次方,则需要进行缩放
        // 若图像宽高超过了OpenGL规定的最大值,也缩放
        {
                GLint max;
                glGetIntegerv(GL_MAX_TEXTURE_SIZE, &max);
                if( !power_of_two(width)
                        || !power_of_two(height)
                        || width > max
                        || height > max )
                {
                        const GLint new_width = 256;
                        const GLint new_height = 256; // 规定缩放后新的大小为边长的正方形
                        GLint new_line_bytes, new_total_bytes;
                        GLubyte* new_pixels = 0;

                        // 计算每行需要的字节数和总字节数
                        new_line_bytes = new_width * 3;
                        while( new_line_bytes % 4 != 0 )
                                ++new_line_bytes;
                        new_total_bytes = new_line_bytes * new_height;

                        // 分配内存
                        new_pixels = (GLubyte*)malloc(new_total_bytes);
                        if( new_pixels == 0 )
                        {
                                free(pixels);
                                fclose(pFile);
                                return 0;
                        }

                        // 进行像素缩放
                        gluScaleImage(GL_RGB,
                                width, height, GL_UNSIGNED_BYTE, pixels,
                                new_width, new_height, GL_UNSIGNED_BYTE, new_pixels);

                        // 释放原来的像素数据,把pixels指向新的像素数据,并重新设置width和height
                        free(pixels);
                        pixels = new_pixels;
                        width = new_width;
                        height = new_height;
                }
        }

        // 分配一个新的纹理编号
        glGenTextures(1, &texture_ID);
        if( texture_ID == 0 )
        {
                free(pixels);
                fclose(pFile);
                return 0;
        }

        // 绑定新的纹理,载入纹理并设置纹理参数
        // 在绑定前,先获得原来绑定的纹理编号,以便在最后进行恢复
        GLint lastTextureID=last_texture_ID;
        glGetIntegerv(GL_TEXTURE_BINDING_2D, &lastTextureID);
        glBindTexture(GL_TEXTURE_2D, texture_ID);
        glTexParameteri(GL_TEXTURE_2D, GL_TEXTURE_MIN_FILTER, GL_LINEAR);
        glTexParameteri(GL_TEXTURE_2D, GL_TEXTURE_MAG_FILTER, GL_LINEAR);
        glTexParameteri(GL_TEXTURE_2D, GL_TEXTURE_WRAP_S, GL_REPEAT);
        glTexParameteri(GL_TEXTURE_2D, GL_TEXTURE_WRAP_T, GL_REPEAT);
        glTexEnvf(GL_TEXTURE_ENV, GL_TEXTURE_ENV_MODE, GL_REPLACE);
        glTexImage2D(GL_TEXTURE_2D, 0, GL_RGB, width, height, 0,GL_BGR_EXT, GL_UNSIGNED_BYTE, pixels);
        glBindTexture(GL_TEXTURE_2D, lastTextureID);  //恢复之前的纹理绑定
        free(pixels);
        return texture_ID;
}
//绘画
void display(void)
{
         设置视角
        //glMatrixMode(GL_PROJECTION);
        //glLoadIdentity();
        //gluPerspective(75, 1, 1, 21);
        //glMatrixMode(GL_MODELVIEW);
        //glLoadIdentity();
        //gluLookAt(-4, 7,7, 0, 0, 0, 0, 0, 1);
        //glRotatef(30.0, 1.0, 1.0, 0.0);//旋转一下便于查看
        glLoadIdentity(); //加载单位矩阵
        glRotatef(angle,1.0f, 1.0f, 1.0f); //旋转
        // 清除屏幕
        glClear(GL_COLOR_BUFFER_BIT | GL_DEPTH_BUFFER_BIT);

        //绘制出来的图形就只有正面,并且只显示边线,不进行填充。
        //glFrontFace(GL_CCW);//逆时针
        //glCullFace(GL_BACK);
        //glEnable(GL_CULL_FACE);
        //glPolygonMode(GL_FRONT_AND_BACK, GL_LINE);

         // 绘制的时候代码很简单
        // 加载纹理
        glBindTexture(GL_TEXTURE_2D, texWall);
        glBegin(GL_QUADS);
        for(int i=0; i<6; ++i){
                // 有六个面,循环六次
                for(int j=0; j<4; ++j){
                        // 每个面有四个顶点,循环四次
                        //纹理
                        glTexCoord2f(coord_list[j][0],coord_list[j][1]);
                        //正方体
                        glVertex3fv(vertex_list[index_list[i][j]]);
                }
        }

        glEnd();
        glutSwapBuffers();
}
void OnTimer(int value)
{
        //改变角度
        angle += 1;
        angle%=360;
    glutPostRedisplay();//重画
    glutTimerFunc(16, OnTimer, 1);
}

int main(int argc, char* argv[])
{
        // GLUT初始化
        glutInit(&argc, argv);
        glutInitDisplayMode(GLUT_DOUBLE | GLUT_RGBA);
        glutInitWindowPosition(100, 100);
        glutInitWindowSize(WindowWidth, WindowHeight);
        glutCreateWindow(WindowTitle);
        glEnable(GL_DEPTH_TEST);
        glEnable(GL_TEXTURE_2D);    // 启用纹理
        texWall = load_texture("E:/pic/wenli.bmp");//加载纹理文件
        glutDisplayFunc(&display);//注册函数
        glutTimerFunc(16, OnTimer, 1);//计时器定时运行 60FPS
        glutMainLoop(); //循环调用
        return 0;
}
注意此处需要修改为本地图片地址 texWall = load_texture("E:/pic/wenli.bmp");//加载纹理文件
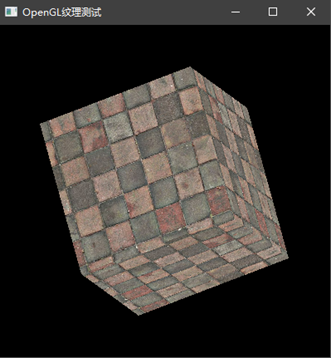
运行结果:
最后
以上就是能干冬瓜最近收集整理的关于OpenGL实现正方体贴纹理 并自动旋转的全部内容,更多相关OpenGL实现正方体贴纹理内容请搜索靠谱客的其他文章。
本图文内容来源于网友提供,作为学习参考使用,或来自网络收集整理,版权属于原作者所有。

![[C++] 井字棋游戏源码](https://www.shuijiaxian.com/files_image/reation/bcimg5.png)


发表评论 取消回复