为了方便大家学习,现与我爱蓝牙网联合推出【QCC300x/CSR867x/QCC30xx/QCC51xx开发板】。
技术交流QQ群号:743434463
开发板会员QQ群号:725398389(凭订单号入群,赠独家学习资料)
——————————正文分割线———————————–
1. 引言
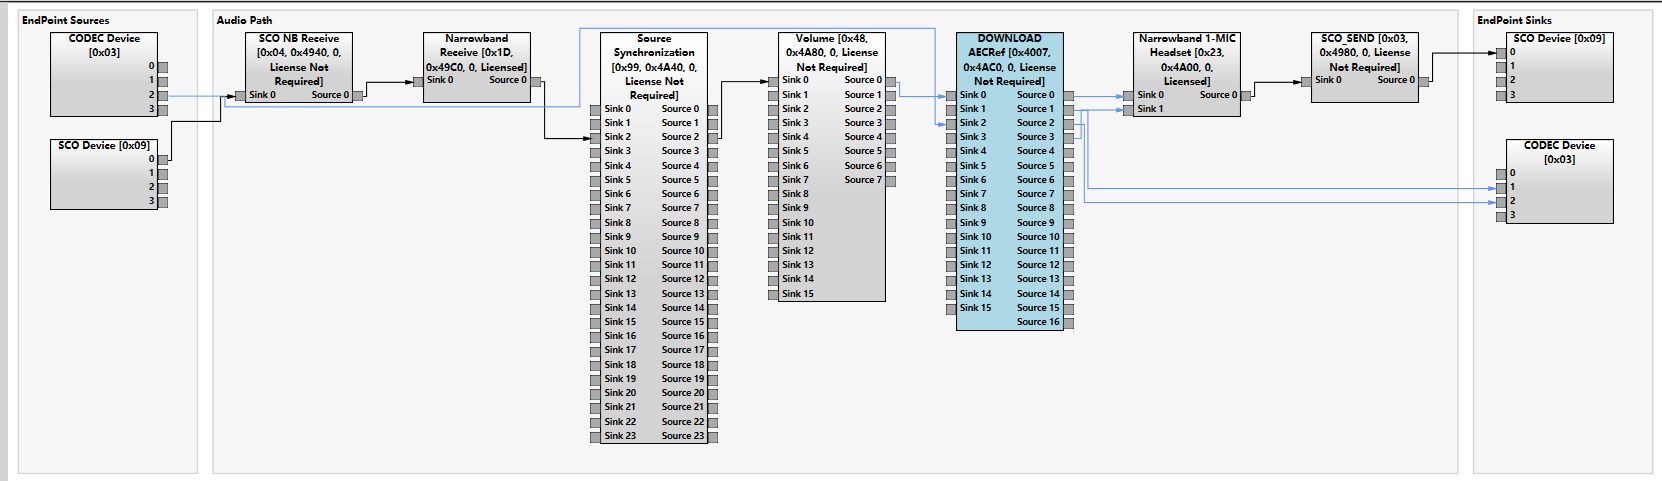
最近有项目需要定制修改QCC512x的cvc audio chain。自ADK6起,cvc音频链路开始通过kymera audio chain机制生成,可在QACT中查看生成的链路视图:
2. audio chain基本构成
在"chain.h"中,描述了chain的数据结构:
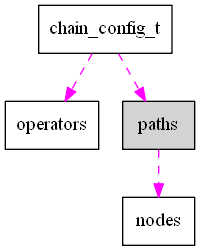
- operators:描述了chain中包含的capability及其配置。每个capability以role作为指代,用于区分chain中相同的capability。
- path & nodes:描述了音频流通过operators的路径配置。
下文给出包含3个path、3个operator的chain:

蓝色箭头路径起始于一个外部输入sink,经过operatorA->operatorB,到达operatorC后路径结束,对应的代码描述如下:
{
    blue_role,          // a value uniquely identifying this path within the context of the chain
    path_with_input,    // this path forms and input of the chain, but terminates internaly within the chain
    3,                  // the path has 3 nodes
    -> {                // address of an array containing the following 3 node structures:
        {Operator A role, left input terminal, left output terminal},
        {Operator B role, left input terminal, left output terminal},
        {Operator C role, left input terminal, ignored value}
    }
}
红色箭头路径代表OperatorC本身可以作为一个source,作为其他路径的输入。
3. 构建cvc audio chain
3.1. 准备chain config
以1-mic headset cvc为例,其chain的配置代码如下:
static const chain_config_t audio_voice_hfp_config_1mic_nb_hs =
    MAKE_CHAIN_CONFIG_WITH_PATHS(chain_id_cvc_common, audio_ucid_hfp_cvc_headset, ops_nb_1mic_hs, paths);
3.1.1. 配置operator
#define CVC_OPS_NB
   MAKE_OPERATOR_CONFIG_PRIORITY_MEDIUM(capability_id_none, receive_role),
   MAKE_OPERATOR_CONFIG_PRIORITY_HIGH(capability_id_none, send_role),
   MAKE_OPERATOR_CONFIG_PRIORITY_MEDIUM(capability_id_cvc_receive_nb, cvc_receive_role),
   MAKE_OPERATOR_CONFIG(capability_id_none, rate_adjustment_send_role)

static operator_config_t ops_nb_1mic_hs[] =
{
   CVC_OPS_NB,
   MAKE_OPERATOR_CONFIG_PRIORITY_LOWEST(capability_id_cvc_hs_1mic_nb, cvc_send_role)
};
- chain包含了5个operators
- 其中receive_role、send_role、rate_adjustment_send_role没有指定capability,将在代码中动态配置
- 其余cvc_receive_role、cvc_send_role指定了cvc capability

3.1.2. 配置path
static const operator_path_t paths[] =
{
   {path_receive, path_with_in_and_out, ARRAY_DIM((receive)), receive},
   {path_send_mic1, path_with_in_and_out, ARRAY_DIM((send_mic1)), send_mic1},
   {path_send_mic2, path_with_input, ARRAY_DIM((send_mic2)), send_mic2},
   {path_aec_ref, path_with_input, ARRAY_DIM((aec_ref)), aec_ref}
};

static const operator_path_node_t receive[] =
{
   {receive_role, 0, 0},
   {cvc_receive_role, 0, 0},
};

static const operator_path_node_t send_mic1[] =
{
   {cvc_send_role, 1, 0},
   {rate_adjustment_send_role, 0, 0},
   {send_role, 0, 0}
};

static const operator_path_node_t send_mic2[] =
{
   {cvc_send_role, 2, UNCONNECTED},
};

static const operator_path_node_t aec_ref[] =
{
   {cvc_send_role, 0, UNCONNECTED}
};
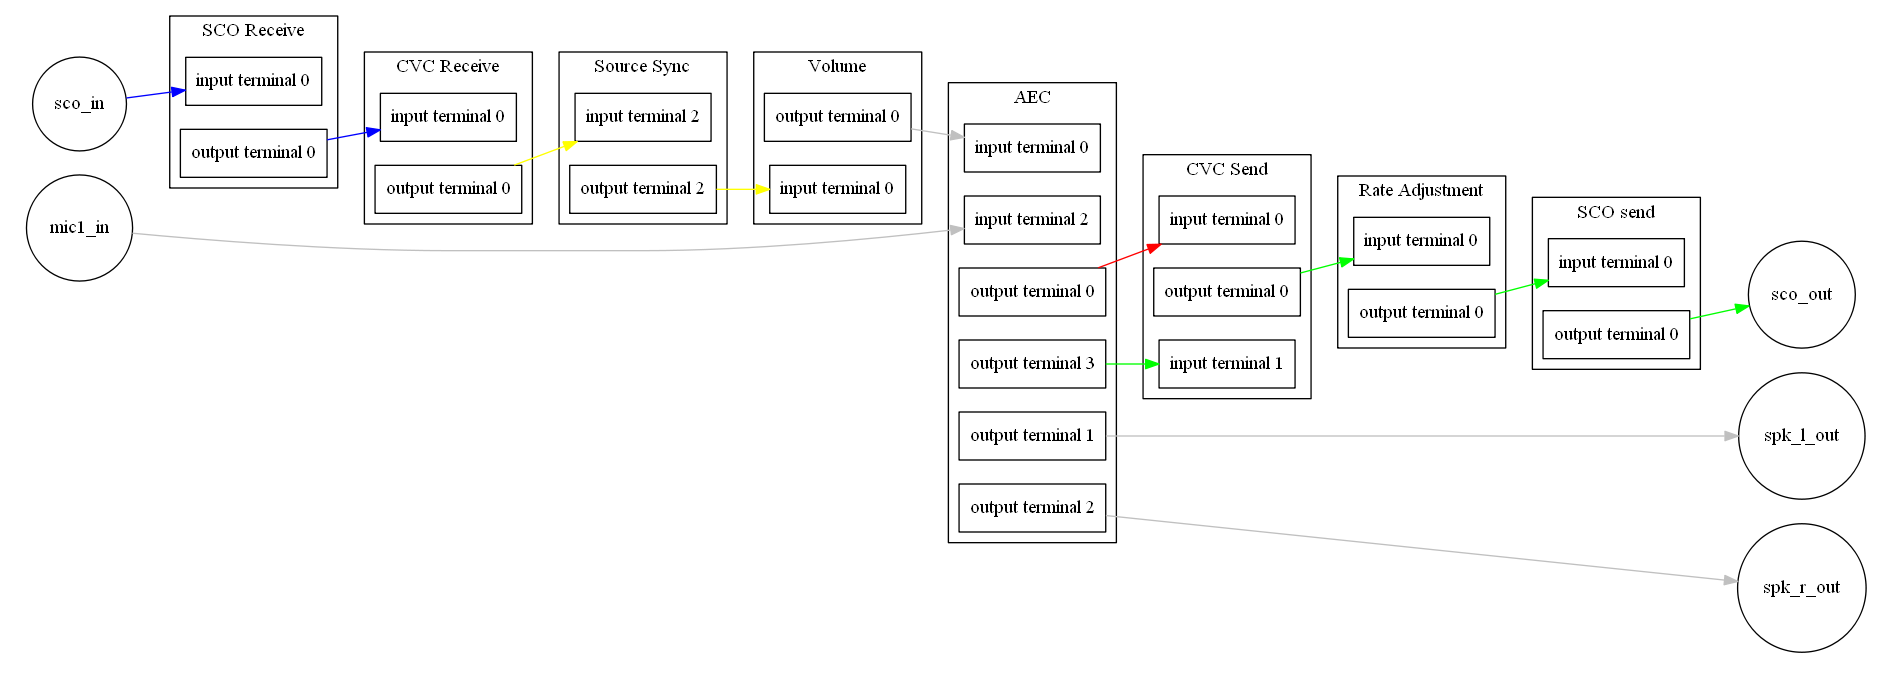
上述代码包含4条路径和4个节点,画出路径后,可以看到cvc的基本框架:
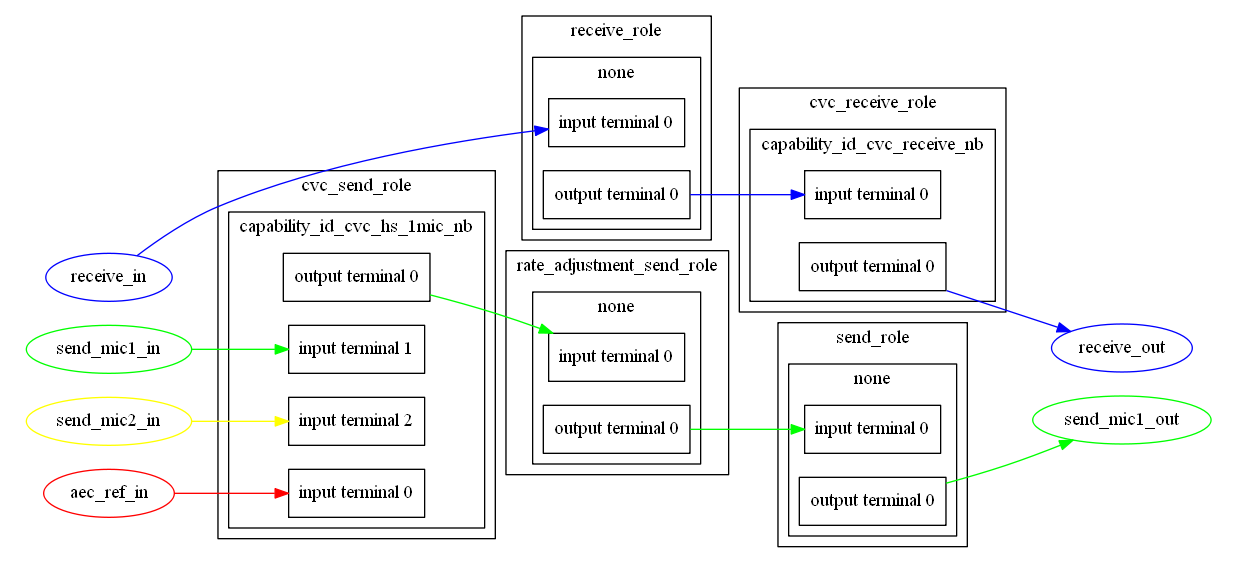
- 蓝色路径:接收到手机的SCO通道数据,调用SCO decode解码->调用cvc receive nb处理->spk输出
- 绿色路径:接收到mic1的ADC数据,调用cvc 1mic nb处理->调用采样率匹配处理->通过SCO通道输出给手机
- 红色路径:接收到回声消除参考输入数据,作为cvc 1mic nb处理的另一个输入,不需要输出。
3.2. 准备filter config
对于receive_role、send_role、rate_adjustment_send_role来说,虽然两者在chain config中没有指定capability,但是代码中可利用filtering机制动态确定:
static operator_config_t hfp_nb[] =
{
    MAKE_OPERATOR_CONFIG_PRIORITY_MEDIUM(capability_id_sco_receive, audio_voice_receive_role),
    MAKE_OPERATOR_CONFIG_PRIORITY_HIGH(capability_id_sco_send, audio_voice_send_role)
};

static operator_config_t* getOperatorFilter(bool wideband)
{
    return (wideband ? hfp_wb : hfp_nb);
}

static operator_filters_t* getFilters(bool wideband)
{
    operator_filters_t* filters = (operator_filters_t*)calloc(1,sizeof(operator_filters_t));

    filters->num_operator_filters = 2;
    filters->operator_filters = getOperatorFilter(wideband);

    return filters;
}

operator_filters_t* filter = getFilters(AudioVoiceCommonIsWideband(plugin->encoder));
3.3. 创建并运行chain
在准备好chain config和filter config后,即可调用初始的api生成audio chain:
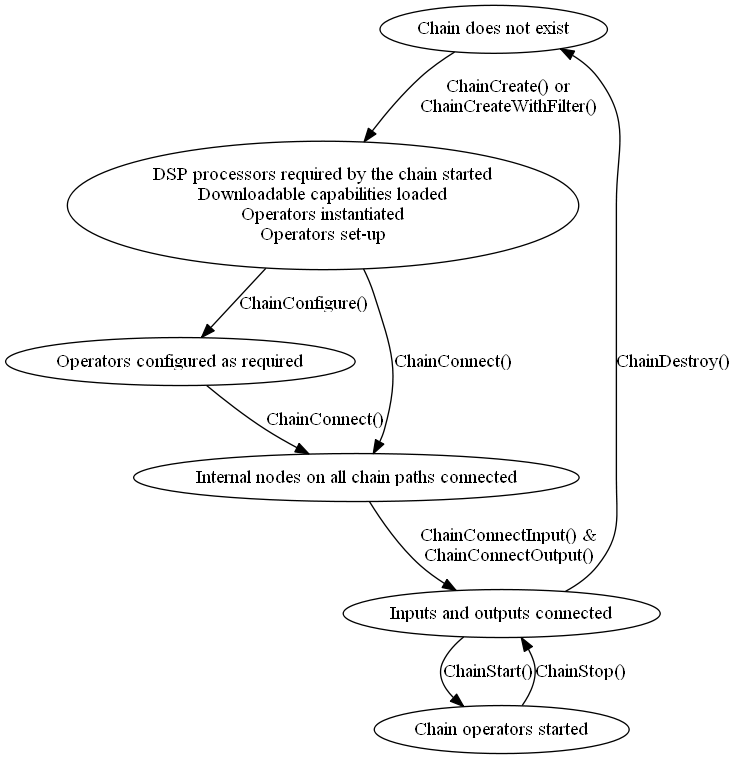
可以看到cvc的代码中也体现了这个流程:
// 创建cvc的基本chain,包含ChainCreateWIthFilter()、ChainConfigure()、ChainConnect()
createOperators(ctx, filters);

// 连接sco_receive端口的输出、source sync、volume、AEC这三个capability与cvc基本chain,包含ChainConnectInput() & ChainConnectOutput()
if(connectSource(ctx))
{
    uint16 sample_rate = GetLinkEncodingTypeSampleRate(ctx->encoder);

    AudioHardwareSetMicUse(audio_hw_voice_call);
    PanicFalse(AudioHardwareConnectInput(sample_rate));

    // 连接mic硬件接口的输出与基本chain的输入
    connectMicrophones(ctx);

    // 连接cvc基本chian的输出与sco_send端口的输入
    if(connectSink(ctx))
    {
        // 连接AEC的输出与基本chain的输入
        connectAecReference(ctx);

        // 启动chain的运行,包含ChainStart()
        startChain(task, ctx);
        return;
    }
}
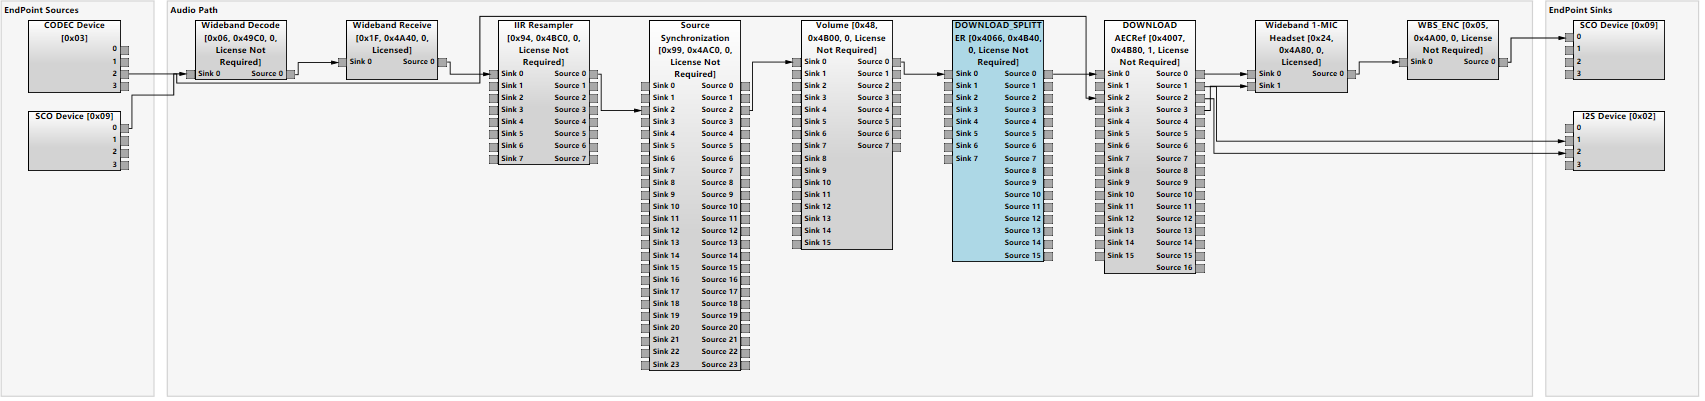
将上述代码用graphviz工具描述,得出完整的cvc链路如下:
4. 尝试一点小改动
为了检验对上述知识的理解是否准确,我在volume和AEC之间插入一个splitter模块来做一个简单的测验。
首先增加一个rx_splitter_role:
typedef enum _audio_mixer_speaker_roles
{
    media_volume_role,
    speaker_peq_role,
    stereo_to_mono_role,
    crossover_role,
    master_volume_role,
    compander_role,
    post_processing_role,
    rx_splitter_role
} audio_mixer_speaker_roles_t;
然后新建一个operator对应splitter capability,并将splitter插入到既有的链路中:
static const operator_config_t speaker_ops_low_power[] =
{
    MAKE_OPERATOR_CONFIG(capability_id_volume, media_volume_role),
    MAKE_OPERATOR_CONFIG(capability_id_splitter, rx_splitter_role)
};

static const operator_path_node_t left_low_power[] =
{
    {media_volume_role,    VOLUME_INPUT_MAIN1, VOLUME_OUTPUT1},
    {rx_splitter_role,    0, 0}
};
进入通话模式后,可以看到splitter处在volume和AEC之间,与我们的预期相符:
5. 总结
通过对cvc audio chain的学习,我认为它相较于旧版867x的音频框架有几个明显的优点:
- 去掉了dsp工程,整个音频链路由代码动态生成
- 算法模块可封装成capability,方便第三方集成和调用
- 加入了任务调度,算法模块运行在线程中,可根据需求设定优先级
- dsp运行时可以动态调整链路上的算法模块,更换或移除个别算法模块不影响整个框架运行
在熟悉了cvc audio chain后,可尝试集成第三方语音处理算法或增加更多输入输出通道,使我们有机会为客户提供更高附加值的技术服务。
最后
以上就是粗暴高跟鞋最近收集整理的关于QCC51xx学习笔记:理解CVC Audio Chain1. 引言2. audio chain基本构成3. 构建cvc audio chain4. 尝试一点小改动5. 总结的全部内容,更多相关QCC51xx学习笔记:理解CVC内容请搜索靠谱客的其他文章。


发表评论 取消回复