VR ROM要在HAL层兼容MPU6500芯片的Sensor模块借此机会从FWK到HAL 到Driver分析了Sensor模块
首先看APP--》HAL
1:底层数据如何实时上报给APP?
2:SensorService怎么跟HAL交互?
3:SensorEventListener本质是什么
下面是我的结论:
1APP注册监听对象
2每个监听对象在FWK都有一个包含管道通信功能的Receiver对象被注册
3SnesorService.cpp开了线程不停的poll HAL层数据,一旦得到数据就写入管道,然后Receiver通过Native Looper 机制收到数据通过JNI调用监听对象的回调实现实时获得数据的功能
核心技术难点,看具体逻辑前可以准备下面的知识点就很方便了
1进程通信方式:Binder C++实现系统Service 通过JNI进行函数调用
2Linux Poll机制:HAL层Poll数据给Service 不停Poll驱动的Sensor数据
3Linux Pipe管道通信机制:Service poll数据后写入管道
4Native Looper机制:Service写入数据到管道,怎么通知监听Sensor的对象
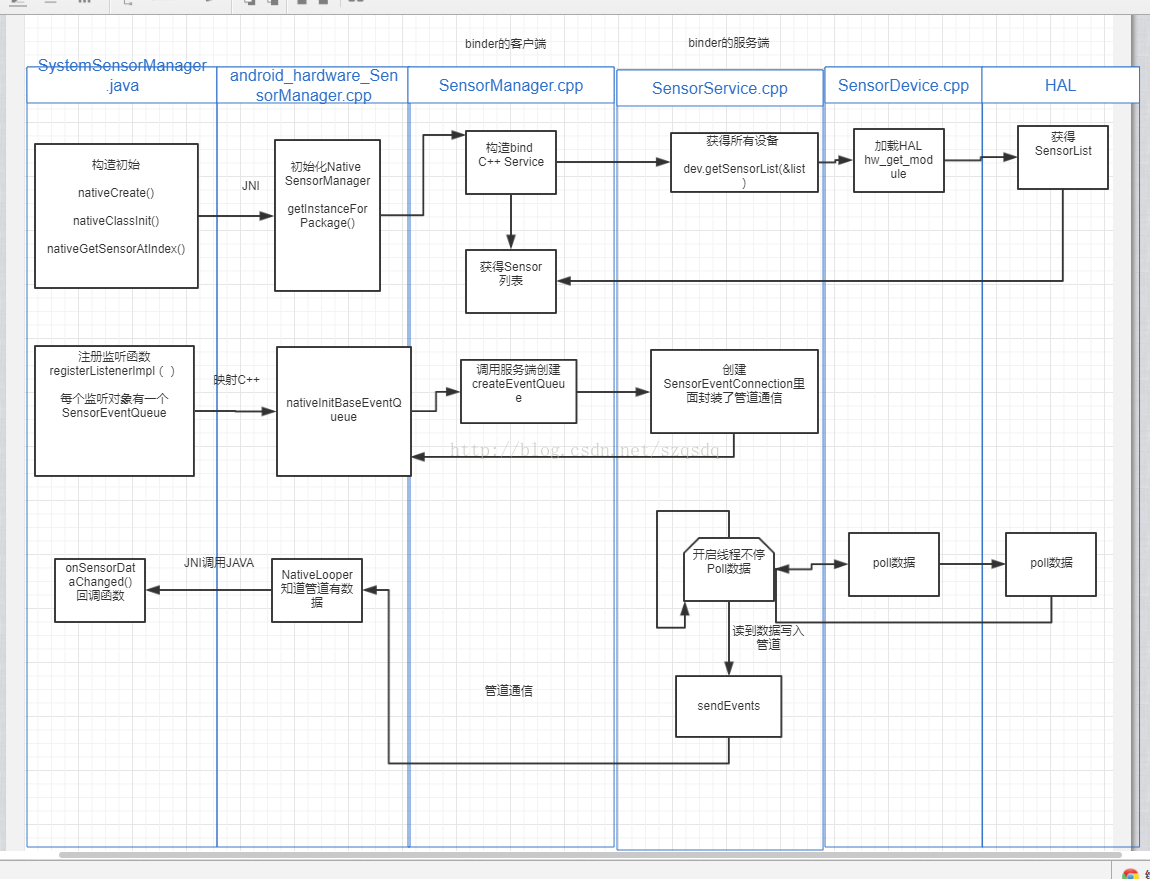
上面就是具体的时序图了
核心类SensorService.cpp分析
为C++系统Service实现的接口如下:
class ISensorServer : public IInterface
{
public:
    DECLARE_META_INTERFACE(SensorServer);

    virtual Vector<Sensor> getSensorList(const String16& opPackageName) = 0;
    virtual sp<ISensorEventConnection> createSensorEventConnection(const String8& packageName,
             int mode, const String16& opPackageName) = 0;
    virtual int32_t isDataInjectionEnabled() = 0;
};

// ----------------------------------------------------------------------------

class BnSensorServer : public BnInterface<ISensorServer>
{
public:
    virtual status_t    onTransact( uint32_t code,
                                    const Parcel& data,
                                    Parcel* reply,
                                    uint32_t flags = 0);
};

// ----------------------------------------------------------------------------
}; // namespace android
getSensorList获得所有设备
createSensorEventConnection创建通信管道
class SensorService : public BinderService<SensorService>,//创建的时候注册到ServiceManager public BnSensorServer,//实现接口 protected Thread//继承线程
在onfirstRef()里面初始化sensordevice.cpp
void SensorService::onFirstRef()
{
    char value[PROPERTY_VALUE_MAX];
    property_get("ro.target.product", value, "0");
    if(!strcmp("box",value))
    {
        ALOGD("----box product do not have sensor,skip----");
        return;
    }
    SensorDevice& dev(SensorDevice::getInstance());                             //这里创建了SensorDevice.cpp
    //.................................
    if (dev.initCheck() == NO_ERROR) {
        sensor_t const* list;
        ssize_t count = dev.getSensorList(&list);
        if (count > 0) {

            mInitCheck = NO_ERROR;
            mAckReceiver = new SensorEventAckReceiver(this);
            mAckReceiver->run("SensorEventAckReceiver", PRIORITY_URGENT_DISPLAY);
            run("SensorService", PRIORITY_URGENT_DISPLAY);            //这里开启线程循环调用自己的loop()函数
        }
    }
}
因为sensorservice继承了thread,会不停的循环执行threadLoop()函数去poll数据
bool SensorService::threadLoop()
{

    SensorDevice& device(SensorDevice::getInstance());
    const size_t vcount = mVirtualSensorList.size();

    const int halVersion = device.getHalDeviceVersion();
    do {
        ssize_t count = device.poll(mSensorEventBuffer, numEventMax);        //device.cpp poll数据
        if (count < 0) {
            ALOGE("sensor poll failed (%s)", strerror(-count));
            break;
        }
        size_t numConnections = activeConnections.size();
        for (size_t i=0 ; i < numConnections; ++i) {
            if (activeConnections[i] != 0) {
                activeConnections[i]->sendEvents(mSensorEventBuffer, count, mSensorEventScratch,   //将数据写入管道
                        mMapFlushEventsToConnections);
                }
            }
        }

        if (mWakeLockAcquired && !needsWakeLock) {
            setWakeLockAcquiredLocked(false);
        }
    } while (!Thread::exitPending());

    ALOGW("Exiting SensorService::threadLoop => aborting...");
    abort();
    return false;
}
sensordevice.cpp封装了加载HAL层和调用HAL层的API
根据HAL 标准找到Sensor的操作接口
Module定义
struct sensors_module_t HAL_MODULE_INFO_SYM = {
	common: {
	tag:
		HARDWARE_MODULE_TAG,
		version_major: 1,
		version_minor: 0,
	id:
		SENSORS_HARDWARE_MODULE_ID,
		name: "Invensense module",
		author: "Invensense Inc.",
	methods:
		&sensors_module_methods,
	dso: NULL,
	reserved: {0}
	},
	get_sensors_list: sensors__get_sensors_list,
	set_operation_mode: NULL,
};
static struct hw_module_methods_t sensors_module_methods = {
		open: open_sensors
}
操作接口
static int open_sensors(const struct hw_module_t* module, const char* id,

struct hw_device_t** device)
{
	FUNC_LOG;
	int status = -EINVAL;
	sensors_poll_context_t *dev = new sensors_poll_context_t();

    memset(&dev->device, 0, sizeof(sensors_poll_device_t));

    dev->device.common.tag = HARDWARE_DEVICE_TAG;
    dev->device.common.version  = 0;
    dev->device.common.module   = const_cast<hw_module_t*>(module);
    dev->device.common.close    = poll__close;
    dev->device.activate        = poll__activate;
    dev->device.setDelay        = poll__setDelay;
    dev->device.poll            = poll__poll;

    *device = &dev->device.common;
    status = 0;

	return status;
}
Driver提供read write ioctl poll API来帮助用户空间与内核空间进行设备节点的数据交互
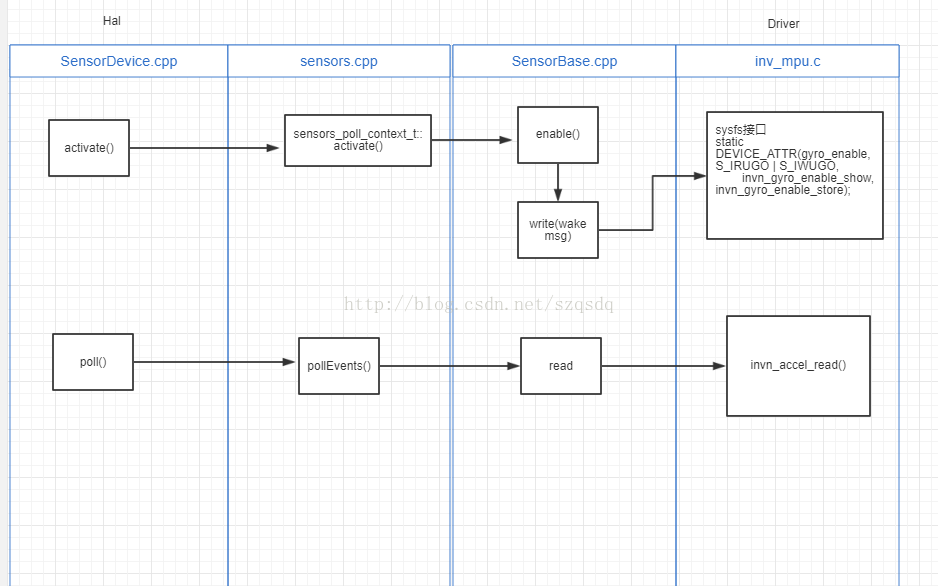
Sensor构造的时候会打开对应的属性节点
InvnAccelSensor::InvnAccelSensor()
    : SensorBase(NULL, "/dev/invn_accel"),
      mHasPendingEvent(false)
{
	memset(mPendingEvent.data, 0, sizeof(mPendingEvent.data));
	mPendingEvent.version = sizeof(sensors_event_t);
	mPendingEvent.sensor = ID_A;
	mPendingEvent.type = SENSOR_TYPE_ACCELEROMETER;
	mPendingEvent.acceleration.status = SENSOR_STATUS_ACCURACY_HIGH;

    ALOGD("InvnTAG %s,data_fd = %d",  __func__, data_fd);

     if (data_fd > 0) {
        sprintf(sysfs_path, "/sys/class/misc/invn_accel/");
        sysfs_path_len = strlen(sysfs_path);
		ALOGD("InvnTAG %s:%s",  __func__,sysfs_path);
    }
}
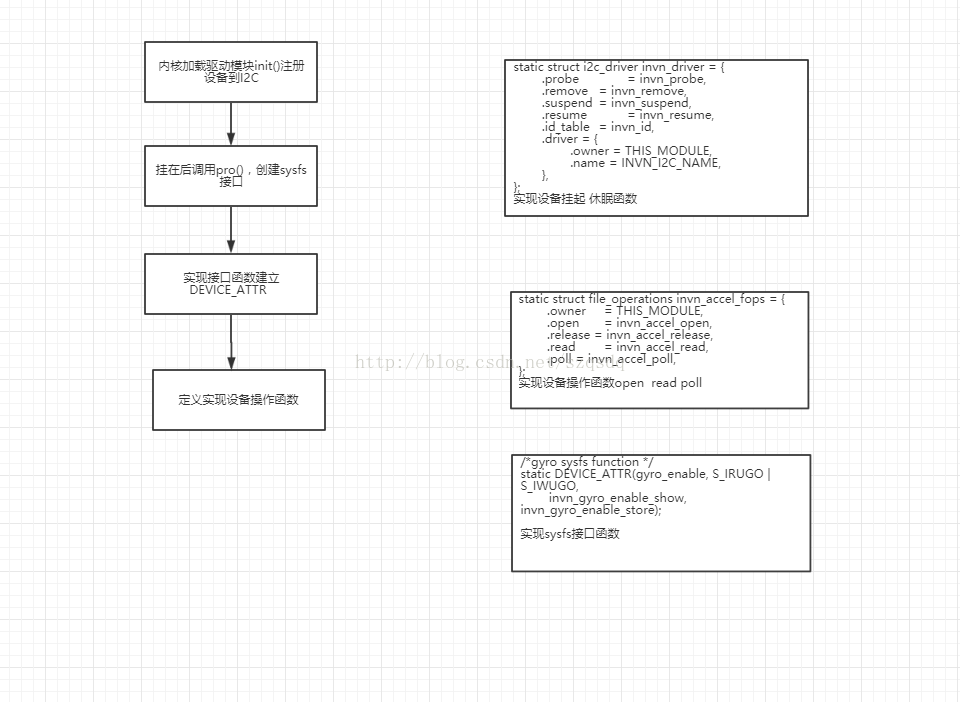
驱动模块加载流程
最后
以上就是深情酒窝最近收集整理的关于Android Sensor从FWK到HAL至Driver纵线分析处理的全部内容,更多相关Android内容请搜索靠谱客的其他文章。


发表评论 取消回复