1.了解PCI总线
说到网络设备驱动,就不得不说PCI总线,但是这个话题可深可浅,而且网上的资料也是一大堆(比如),但是对于我们来说,目前并不需要掌握很深,下面是网上找的两张最基本的PCI工作结构图,虽然PCI总线上可以挂接不同种类的设备,但我们这里只要了解网络设备就够了,所以我更偏好第二张图,它够简单,也够直观。
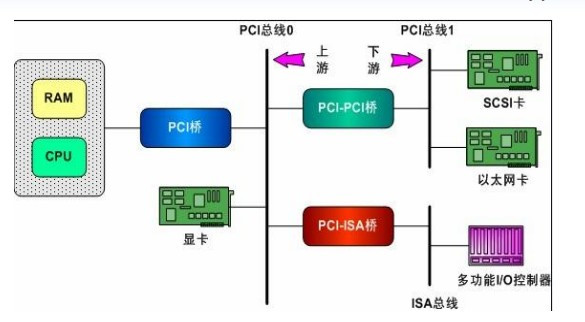
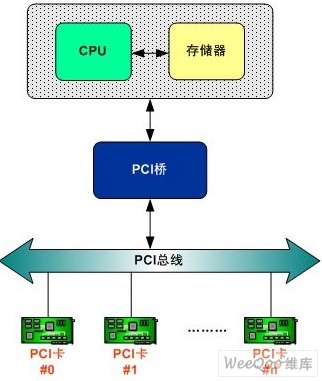
关于PCI总线,这里主要介绍三个结构体,一个是struct bus_type, 一个是struct pci_bus,另外一个是struct pci_dev. 根据前面的经验我们可以想象,bus_type组成一条链表用于标识不同的总线编号,在每一条总线上面挂着一条以pci_dev为对象的链表,表示该总线上挂载的设备。当一个外接设备插入到PCI总线上的时候,就会触发相应的机制将这个设备注册到pci_dev对应的链表里面,这样驱动程序加载的时候就会到这个总线上去匹配,当匹配成功的时候,表示设备和驱动建立了联系。
为了验证自己的猜想,我们到代码里面找依据, 首先我们先掌握总线设备相关的知识,再来来看struct bus_type结构体:
struct bus_type {
        const char              *name;  //总线的名称,比如PCI,I2C
        const char              *dev_name; //设备名称
        struct device           *dev_root;  //父设备名称
        struct device_attribute *dev_attrs;     /* use dev_groups instead */
        const struct attribute_group **bus_groups;
        const struct attribute_group **dev_groups;
        const struct attribute_group **drv_groups;

        int (*match)(struct device *dev, struct device_driver *drv); //将驱动和设备进行匹配
        int (*uevent)(struct device *dev, struct kobj_uevent_env *env);  //事件处理函数,比如插入,拔出,修改环境变量等事件将调用它进行处理
        int (*probe)(struct device *dev);  //当新的设备插入或者新的驱动被加载,就会调用它去探测对应的设备或驱动,如果插入的是设备,它会去找驱动,如果
加载的是驱动,它会去找设备,最终是调用match函数去实现的

       int (*remove)(struct device *dev);
        void (*shutdown)(struct device *dev);

        int (*online)(struct device *dev);
        int (*offline)(struct device *dev);

        int (*suspend)(struct device *dev, pm_message_t state); //省电模式
        int (*resume)(struct device *dev);  //进入睡眠模式

        int (*num_vf)(struct device *dev); //这个总线上的设备最大支持多少虚拟功能

        const struct dev_pm_ops *pm; //电源管理

        const struct iommu_ops *iommu_ops; //IOMMU管理

        struct subsys_private *p;  // private data很重要的私有数据,每一个总线都不一样,里面有两条很重要的链表,driver和device链表
        struct lock_class_key lock_key; //锁
};
在第一篇文章中有介绍(学习Linux-4.12内核网路协议栈(1.1)——系统的初始化(do_initcalls)),开机的时候会进行一系列的初始化,其中就包括PCI总线和PCI驱动的初始化,它是调用__initcall_pci_driver_init2进行pci_bus_type的初始化的:
1450 struct bus_type pci_bus_type = {
1451     .name       = "pci",
1452     .match      = pci_bus_match,
1453     .uevent     = pci_uevent,
1454     .probe      = pci_device_probe,   //驱动加载的时候被调用
1455     .remove     = pci_device_remove,
1456     .shutdown   = pci_device_shutdown,
1457     .dev_groups = pci_dev_groups,
1458     .bus_groups = pci_bus_groups,
1459     .drv_groups = pci_drv_groups,
1460     .pm     = PCI_PM_OPS_PTR,
1461     .num_vf     = pci_bus_num_vf,
1462 };
1463 EXPORT_SYMBOL(pci_bus_type);
1464
1465 static int __init pci_driver_init(void)
1466 {
1467     return bus_register(&pci_bus_type);
1468 }
1469 postcore_initcall(pci_driver_init);
虽然完成了初始化,但是这里没有提到一个很重要的私有数据的初始化,struct subsys_private,现在来看看这个私有数据:
/**
 * struct subsys_private - structure to hold the private to the driver core portions of the bus_type/class structure.
 *
 * @subsys - the struct kset that defines this subsystem
 * @devices_kset - the subsystem's 'devices' directory
 * @interfaces - list of subsystem interfaces associated
 * @mutex - protect the devices, and interfaces lists.
 *
 * @drivers_kset - the list of drivers associated
 * @klist_devices - the klist to iterate over the @devices_kset
 * @klist_drivers - the klist to iterate over the @drivers_kset
 * @bus_notifier - the bus notifier list for anything that cares about things
 *                 on this bus.
 * @bus - pointer back to the struct bus_type that this structure is associated
 *        with.
 *
 * @glue_dirs - "glue" directory to put in-between the parent device to
 *              avoid namespace conflicts
 * @class - pointer back to the struct class that this structure is associated
 *          with.
 *
 * This structure is the one that is the actual kobject allowing struct
 * bus_type/class to be statically allocated safely.  Nothing outside of the
 * driver core should ever touch these fields.
 */


struct subsys_private {
        struct kset subsys;
        struct kset *devices_kset;
        struct list_head interfaces;
        struct mutex mutex;

        struct kset *drivers_kset; //由已关联驱动组成的链表,这些驱动表示和设备完成了绑定
        struct klist klist_devices;  //所有检测到的属于该总线的设备列表,但他们未必有和驱动绑定
        struct klist klist_drivers;   //所有加载的属于该总线的驱动,但他们未必有和设备绑定
        struct blocking_notifier_head bus_notifier;
        unsigned int drivers_autoprobe:1;
        struct bus_type *bus;

        struct kset glue_dirs;
        struct class *class;
};
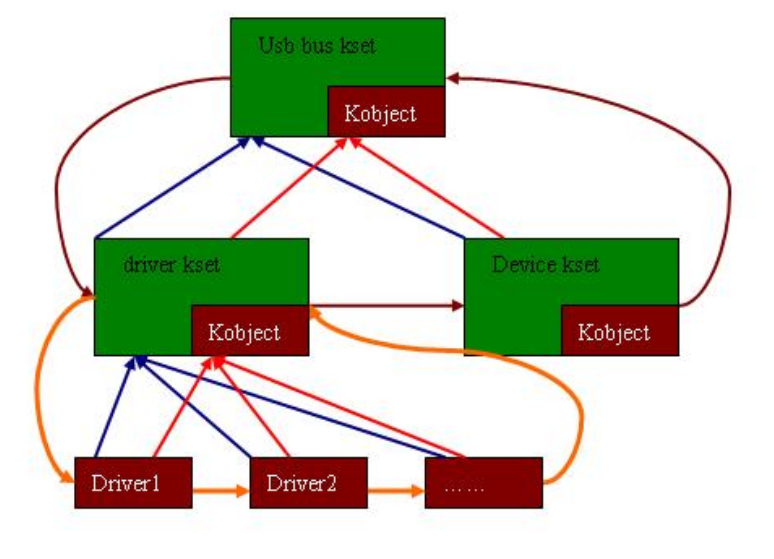
每个设备,都被挂接到不同的总线上,当设备挂接到对应的总线上 后,其所对应的总线类型就确定了,而设备在挂接到总线上时,总线先要扫描设备,看看设备是否适合总线的要求,如果适合了,那接着就要扫描整个总线上的设备驱动链表,查找是否有驱动程序可以管理设备,如果找到,则把设备结构体中的相应指针成员指向对应的驱动程序,如果暂时没有找到对应的设备驱动程序,则设备结构体中的指向驱动程序的指针暂时为空,表示还没有设备驱动,还在总线的设备队列中等待;而如果设备不能通过总线的检查,即不会出现在总线的设备列表上, 自然不会去扫描设备驱动链表,查找匹配的驱动了。
而每个设备驱动程序,都是被安装到对应的总线上的,不论是手动安 装,还是自动安装,所谓安装,就是把驱动程序挂载到对应总线的驱动链表中,而挂载到对应的总线驱动链表,首先要满足总线的匹配要求,只有适合了要求,才能挂载到总线的驱动链表,也只有到达这个步骤,系统才会扫描整个总线的设备链表,来查找是否有设备需要此驱动来管理,如果找到这个设备,则驱动程序中的设备 管理链表,会记录这个设备的地址,从而达到管理设备的目的。
经过上述的设备插入,或者驱动安装,系统就会出现只有设备,而没有设备驱动程序的情况,也会出现,只有设备驱动程序,没有对应的设备的情况,此时,设备或者设备驱动程序,就会暂时在各自的队列里等待,一旦有驱动程序安装,或新的设备插入,就都会自动的去扫描对应的链表,来检测是否有配对的可能。
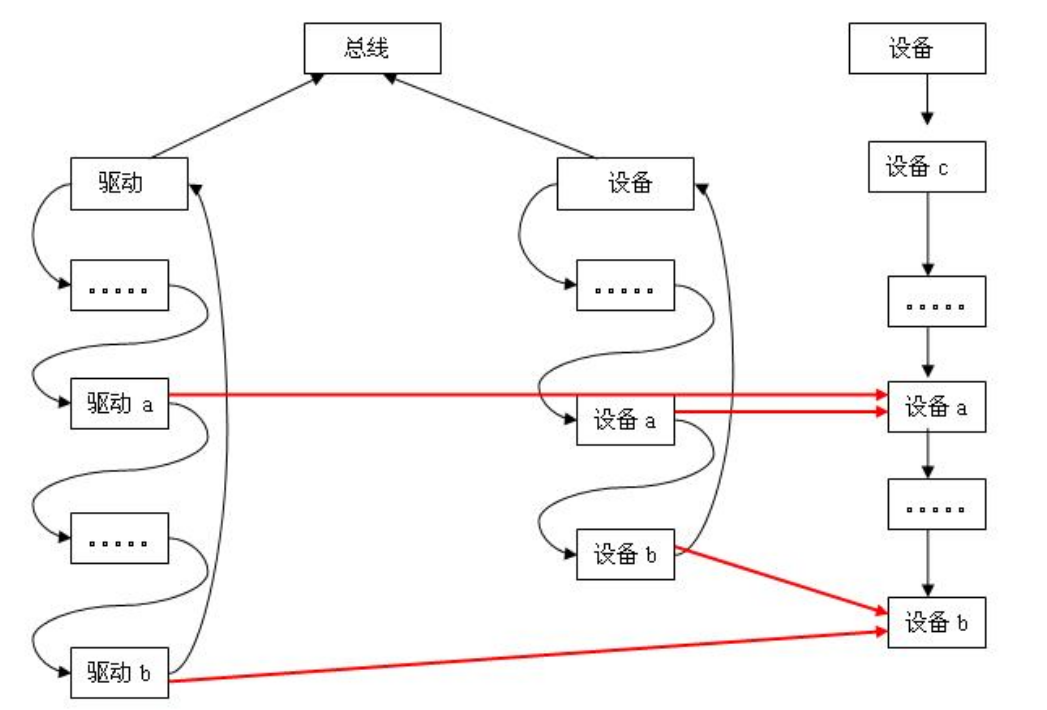
现在大概可以确定,我的猜测只猜对了一半,另一半是没有猜到它对自己总线上 “所有设备,所有驱动,所有绑定关系的设备和驱动” 分别维护了一条链表,共三条链表。
现在我们知道了设备,驱动,总线三者间的关系了, 现在来看看他们是怎么初始化的,以及他们是怎么样建立关系的,这应该是个有趣的过程。
下面的内容主要来自对这三篇文章的理解:
pci设备的初始化
理解linux pci 扫描流程
linux重新扫描pci总线
PCI学习笔记网路上搜的资料大多数都是从pci_scan_child_bus这个函数开始讲的,当时没有明白为什么,现在才了解到每一种不同的硬件架构,它初始化的方式是不一样的,所以现在就不花时间来分析这个了,我们更关注一个网卡是怎么样添加到PCI总线设备的链表里面的。
PCI 总线初始化
从pci_scan_bus说起
struct pci_bus *pci_scan_bus(int bus, struct pci_ops *ops,
                                        void *sysdata)
{
        LIST_HEAD(resources);
        struct pci_bus *b;

        pci_add_resource(&resources, &ioport_resource);
        pci_add_resource(&resources, &iomem_resource);
        pci_add_resource(&resources, &busn_resource);
        b = pci_create_root_bus(NULL, bus, ops, sysdata, &resources);
        if (b) {
                pci_scan_child_bus(b);
        } else {
                pci_free_resource_list(&resources);
        }
        return b;
}
EXPORT_SYMBOL(pci_scan_bus);
pcie的pci_scan_bus
pcie的pci_create_root_bus 分析
pcie的pci_scan_device
1806 /*
1807  * Read the config data for a PCI device, sanity-check it
1808  * and fill in the dev structure...
1809  */
1810 static struct pci_dev *pci_scan_device(struct pci_bus *bus, int devfn)
1811 {
1812     struct pci_dev *dev;
1813     u32 l;
1814
1815     if (!pci_bus_read_dev_vendor_id(bus, devfn, &l, 60*1000))   //读取并判断设备中的PCI_VENDOR_ID是否合法,如果不为0xff和0x00表示这个设备是真实有效的
1816         return NULL;
1817
1818     dev = pci_alloc_dev(bus);  //设备有效,则给该设备申请pci_dev对象的空间
1819     if (!dev)
1820         return NULL;
1821
1822     dev->devfn = devfn;
1823     dev->vendor = l & 0xffff;
1824     dev->device = (l >> 16) & 0xffff;
1825
1826     pci_set_of_node(dev);
1827
1828     if (pci_setup_device(dev)) {  //将设备的其他参数初始化到结构体中,所以硬件中的参数都是通过它来读取的,读取以后存放在结构体中,它很重要,后面了解驱动
                                         的时候,会进行详细的分析。
1829         pci_bus_put(dev->bus);
1830         kfree(dev);
1831         return NULL;
1832     }
1833
1834     return dev;
1835 }
2. 网络设备驱动的加载
前面大致了解了网络设备是怎么被扫描并挂载到总线设备链表的,这个章节将介绍网络设备的驱动是怎么加载并挂载到总线设备驱动链表的。
linux驱动 之 module_init解析 (上)
Linux内核很吊之 module_init解析 (下)
一般发起驱动注册的方式有两种,一种是驱动编译进了内核,随着开机启动完成注册,另外一种是编译成模块随着模块的加载而完成设备驱动的注册(module_init),不管通过哪种方式,他们最终都是通过调用pci_register_driver函数完成的,下面来看看它是怎么做到的:
int __pci_register_driver(struct pci_driver *drv, struct module *owner,
                          const char *mod_name)
{
        /* initialize common driver fields */
        drv->driver.name = drv->name;
        drv->driver.bus = &pci_bus_type;
        drv->driver.owner = owner;
        drv->driver.mod_name = mod_name;

        spin_lock_init(&drv->dynids.lock);
        INIT_LIST_HEAD(&drv->dynids.list);

        /* register with core */
        return driver_register(&drv->driver);
}
EXPORT_SYMBOL(__pci_register_driver);
struct module;
struct pci_driver {
        struct list_head node;
        const char *name;
        const struct pci_device_id *id_table;   /* must be non-NULL for probe to be called */
        int  (*probe)  (struct pci_dev *dev, const struct pci_device_id *id);   /* New device inserted */
        void (*remove) (struct pci_dev *dev);   /* Device removed (NULL if not a hot-plug capable driver) */
        int  (*suspend) (struct pci_dev *dev, pm_message_t state);      /* Device suspended */
        int  (*suspend_late) (struct pci_dev *dev, pm_message_t state);
        int  (*resume_early) (struct pci_dev *dev);
        int  (*resume) (struct pci_dev *dev);                   /* Device woken up */
        void (*shutdown) (struct pci_dev *dev);
        int (*sriov_configure) (struct pci_dev *dev, int num_vfs); /* PF pdev */
        const struct pci_error_handlers *err_handler;
        struct device_driver    driver;
        struct pci_dynids dynids;
};
/**
 * struct device_driver - The basic device driver structure
 * @name:       Name of the device driver.
 * @bus:        The bus which the device of this driver belongs to.
 * @owner:      The module owner.
 * @mod_name:   Used for built-in modules.
 * @suppress_bind_attrs: Disables bind/unbind via sysfs.
 * @probe_type: Type of the probe (synchronous or asynchronous) to use.
 * @of_match_table: The open firmware table.
 * @acpi_match_table: The ACPI match table.
 * @probe:      Called to query the existence of a specific device,
 *              whether this driver can work with it, and bind the driver
 *              to a specific device.
 * @remove:     Called when the device is removed from the system to
 *              unbind a device from this driver.
 * @shutdown:   Called at shut-down time to quiesce the device.
 * @suspend:    Called to put the device to sleep mode. Usually to a
 *              low power state.
 * @resume:     Called to bring a device from sleep mode.
 * @groups:     Default attributes that get created by the driver core
 *              automatically.
 * @pm:         Power management operations of the device which matched
 *              this driver.
 * @p:          Driver core's private data, no one other than the driver
 *              core can touch this.
 *
 * The device driver-model tracks all of the drivers known to the system.
 * The main reason for this tracking is to enable the driver core to match
 * up drivers with new devices. Once drivers are known objects within the
 * system, however, a number of other things become possible. Device drivers
 * can export information and configuration variables that are independent
 * of any specific device.
 */
struct device_driver {
        const char              *name;  //驱动的名字
        struct bus_type         *bus; //总线类型信息又是一堆回绕指针

        struct module           *owner;
        const char              *mod_name;      /* used for built-in modules */

        bool suppress_bind_attrs;       /* disables bind/unbind via sysfs */ 是否绑定设备,可以通过sys来控制
        enum probe_type probe_type;

        const struct of_device_id       *of_match_table;  //可能一个驱动可以匹配多个设备,所以有这张表
        const struct acpi_device_id     *acpi_match_table;

        int (*probe) (struct device *dev);  //向已经存在的设备发出请求,看一下有没有匹配的设备,如果设备匹配,则和它进行绑定
        int (*remove) (struct device *dev);
        void (*shutdown) (struct device *dev);
        int (*suspend) (struct device *dev, pm_message_t state);
        int (*resume) (struct device *dev);
        const struct attribute_group **groups;

        const struct dev_pm_ops *pm;

        struct driver_private *p;  //这个是每个driver保留的私有数据
}
到这里主要的结构体应该有大概的了解了,我们继续看注册过程:
        /* register with core */
        return driver_register(&drv->driver);  //注意它传进来的参数是什么类型的
/**
 * driver_register - register driver with bus
 * @drv: driver to register
 *
 * We pass off most of the work to the bus_add_driver() call,
 * since most of the things we have to do deal with the bus
 * structures.
 */
int driver_register(struct device_driver *drv)
{
        int ret;
        struct device_driver *other;

        BUG_ON(!drv->bus->p);

        if ((drv->bus->probe && drv->probe) ||
            (drv->bus->remove && drv->remove) ||
            (drv->bus->shutdown && drv->shutdown))
                printk(KERN_WARNING "Driver '%s' needs updating - please use "
                        "bus_type methodsn", drv->name);

        other = driver_find(drv->name, drv->bus);
        if (other) {
                printk(KERN_ERR "Error: Driver '%s' is already registered, "
                        "aborting...n", drv->name);
                return -EBUSY;
        }
        ret = bus_add_driver(drv);
        if (ret)
                return ret;
        ret = driver_add_groups(drv, drv->groups);
        if (ret) {
                bus_remove_driver(drv);
                return ret;
        }
        kobject_uevent(&drv->p->kobj, KOBJ_ADD);

        return ret;
}
EXPORT_SYMBOL_GPL(driver_register);
int driver_register(struct device_driver *drv)
	|
	|--> driver_find //查找驱动是否已经装载
	|--> bus_add_driver//根据总线类型添加驱动
	|--> driver_add_groups//将驱动添加到对应组中
	|--> kobject_uevent//注册uevent事件
我对linux理解之driver_register
linux驱动篇之 driver_register 过程分析(一)
linux驱动篇之 driver_register 过程分析(二)bus_add_driver
这两篇文章介绍的挺好的,博主写的文章也很用心,所以贴过来了,引用的东西,关键是帮助自己理解,但是不要拿来主义就好。这里还要回答一个问题,就是驱动和设备是怎么实现绑定的呢?我们这里简答跟一下,有机会后面分析驱动的时候详细介绍。
pci_register_driver
1----| __pci_register_driver
2--------| driver_register(&drv->driver)
3------------| bus_add_driver(drv)
4----------------| driver_attach(drv)
5--------------------| __driver_attach
6------------------------| driver_probe_device(drv, dev)
7----------------------------| really_probe(dev, drv)
8--------------------------------| driver_bound(dev)
9------------------------------------| klist_add_tail(&dev->p->knode_driver, &dev->driver->p->klist_devices)
看到这里,虽然不能弄懂全部,但是思路应该有了,但是奇怪的是第7步有两个参数,但是第8步参数个数却变成了一个,那么他们是怎么绑定的呢?直接来看really_probe(dev, drv)函数:
325 static int really_probe(struct device *dev, struct device_driver *drv)
326 {
 .......
352 re_probe:
353     dev->driver = drv;

360     ret = dma_configure(dev);
361     if (ret)
362         goto dma_failed;
363
364     if (driver_sysfs_add(dev)) {
365         printk(KERN_ERR "%s: driver_sysfs_add(%s) failedn",
366             __func__, dev_name(dev));
367         goto probe_failed;
368     }

384     if (dev->bus->probe) {
385         ret = dev->bus->probe(dev);
386         if (ret)
387             goto probe_failed;
388     } else if (drv->probe) {
389         ret = drv->probe(dev);
390         if (ret)
391             goto probe_failed;
392     }

418     driver_bound(dev);
419     ret = 1;
420     pr_debug("bus: '%s': %s: bound device %s to driver %sn",
421          drv->bus->name, __func__, dev_name(dev), drv->name);
422     goto done;
dev->driver = drv //这是驱动和设备第一步绑定,所以在第二步的时候才能只传一个参数
driver_bound(dev) //这是驱动和设备的第二部绑定,我们看看它的实现
236 static void driver_bound(struct device *dev)
237 {
238     if (device_is_bound(dev)) {
239         printk(KERN_WARNING "%s: device %s already boundn",
240             __func__, kobject_name(&dev->kobj));
241         return;
242     }
243
244     pr_debug("driver: '%s': %s: bound to device '%s'n", dev->driver->name,
245          __func__, dev_name(dev));
246
247     klist_add_tail(&dev->p->knode_driver, &dev->driver->p->klist_devices);
248     device_links_driver_bound(dev);
249
250     device_pm_check_callbacks(dev);
251
252     /*
253      * Make sure the device is no longer in one of the deferred lists and
254      * kick off retrying all pending devices
255      */
256     driver_deferred_probe_del(dev);
257     driver_deferred_probe_trigger();
258
259     if (dev->bus)
260         blocking_notifier_call_chain(&dev->bus->p->bus_notifier,
261                          BUS_NOTIFY_BOUND_DRIVER, dev);
262 }
1. device_is_bound(dev) 检测是否已经绑定
2. klist_add_tail(&dev->p->knode_driver, &dev->driver->p->klist_devices); 设备和驱动真正的绑定,这!才!是!关!键!!
3. blocking_notifier_call_chain(&dev->bus->p->bus_notifier,BUS_NOTIFY_BOUND_DRIVER, dev); 绑定以后通知关心这个事件的对象
3. 网络设备的激活
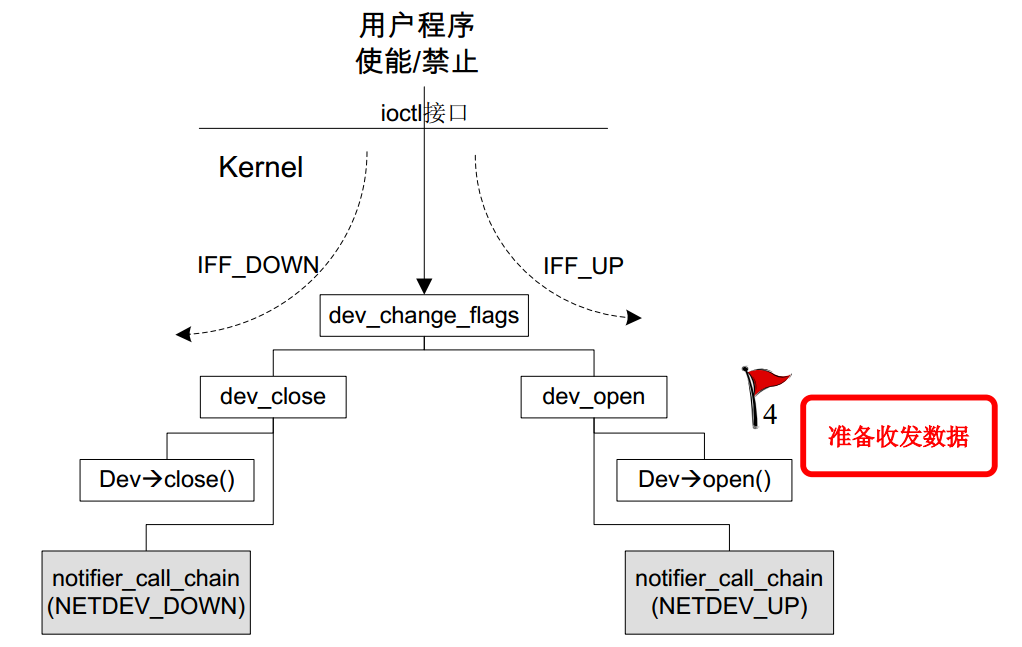
到这里,应该对网络设备怎么被扫描进PCI总线,驱动怎么被注册进PCI总线和设备驱动与设备怎么完成绑定应该有一定的了解了。当这些事情都完成以后,需要激活才能让设备工作起来。
网卡被激活的时候,它要完成几个非常重用的事情:
1. 挂接中断处理函数( ISR),如果不能为驱动程序申请到中断,那说明要么网卡没插好,要么和其他设备发生了冲突,结果就是设备根本不能用。
2. 创建驱动程序内部接收环和发送缓冲区,网卡一般都要“环”的方式来存放报文。
3. 挂接接口状态扫描定时器,以 poll 的方式轮询接口是否真正 up 或 down。
4. 进一步打开设备特定寄存器,使其可以开始收发报文了
4. net_dev_init
这个函数在开机的时候以subsys_initcall(net_dev_init)的方式被调用, 它主要完成初始化proc 文件系统、 sysfs 系统、全局设备和索引表、设置软中断回调等,最重要的是对 queue的各项成员的初始化。
这个函数放在这里介绍,主要是让它做到一个承上启下的作用,承上是对设备和驱动的回顾,启下是引出后面CPU对包的处理过程会用到下面的一些重要成员。
8532 /*
8533 * Initialize the DEV module. At boot time this walks the device list and
8534 * unhooks any devices that fail to initialise (normally hardware not
8535 * present) and leaves us with a valid list of present and active devices.
8536 *
8537 */
8538
8539 /*
8540 * This is called single threaded during boot, so no need
8541 * to take the rtnl semaphore.
8542 */
8543 static int __init net_dev_init(void)
8544 {
8545 int i, rc = -ENOMEM;
8546
8547 BUG_ON(!dev_boot_phase);
8548
8549 if (dev_proc_init())
8550 goto out;
8551
8552 if (netdev_kobject_init())
8553 goto out;
8554
8555 INIT_LIST_HEAD(&ptype_all);
8556 for (i = 0; i < PTYPE_HASH_SIZE; i++)
8557 INIT_LIST_HEAD(&ptype_base[i]);
8558
8559 INIT_LIST_HEAD(&offload_base);
8560
8561 if (register_pernet_subsys(&netdev_net_ops))
8562 goto out;
8563
8564 /*
8565 * Initialise the packet receive queues.
8566 */
8567
8568 for_each_possible_cpu(i) {
8569 struct work_struct *flush = per_cpu_ptr(&flush_works, i);
8570 struct softnet_data *sd = &per_cpu(softnet_data, i);
8571
8572 INIT_WORK(flush, flush_backlog);
8573
8574 skb_queue_head_init(&sd->input_pkt_queue);
8575 skb_queue_head_init(&sd->process_queue);
8576 INIT_LIST_HEAD(&sd->poll_list);
8577 sd->output_queue_tailp = &sd->output_queue;
8578 #ifdef CONFIG_RPS
8579 sd->csd.func = rps_trigger_softirq;
8580 sd->csd.info = sd;
8581 sd->cpu = i;
8582 #endif
8583
8584 sd->backlog.poll = process_backlog;
8585 sd->backlog.weight = weight_p;
8586 }
8588 dev_boot_phase = 0;
8589
8590 /* The loopback device is special if any other network devices
8591 * is present in a network namespace the loopback device must
8592 * be present. Since we now dynamically allocate and free the
8593 * loopback device ensure this invariant is maintained by
8594 * keeping the loopback device as the first device on the
8595 * list of network devices. Ensuring the loopback devices
8596 * is the first device that appears and the last network device
8597 * that disappears.
8598 */
8599 if (register_pernet_device(&loopback_net_ops))
8600 goto out;
8601
8602 if (register_pernet_device(&default_device_ops))
8603 goto out;
8604
8605 open_softirq(NET_TX_SOFTIRQ, net_tx_action);
8606 open_softirq(NET_RX_SOFTIRQ, net_rx_action);
8607
8608 rc = cpuhp_setup_state_nocalls(CPUHP_NET_DEV_DEAD, "net/dev:dead",
8609 NULL, dev_cpu_dead);
8610 WARN_ON(rc < 0);
8611 dst_subsys_init();
8612 rc = 0;
8613 out:
8614 return rc;
8615 }
8616
8617 subsys_initcall(net_dev_init);
这些标红色的都是和网络密切相关的对象,后面分析的时候会详细讲到,这里只要知道是在这里初始化的就好了。
5. 总结
了解总线,设备,驱动三者之间的关心花了不少时间,也查了不少资料,但仍然只是知道个大概,理解并不透彻,内核那些飞针走线的写法有时候简直让人抓狂,特别是总线驱动和设备管理的这一块,它进行了抽象处理,更是不好理解。
这块代码的难度不在于算法有多复杂,代码有多晦涩,而在于太绕,千丝万缕,缠绕交织。当你走进去的时候很容易被绕晕,有时候理解A需要了解B,了解B的同时也需要掌握C,当这些完成后才能回过来看为什么A是这样做的;当慢慢的将这些关系捋顺了以后,将他们整理成一个个关系图,然后形成自己的理解,就会发现,原始它是这么做的。
所以最后的感觉是:“不识庐山真面目,只缘身在此山中” “会当凌绝顶,一览众山小”
最后
以上就是幽默画板最近收集整理的关于学习Linux-4.12内核网路协议栈(1.8)——网络设备驱动模块的加载pci设备的初始化理解linux pci 扫描流程linux重新扫描pci总线pcie的pci_scan_buspcie的pci_create_root_bus 分析pcie的pci_scan_device我对linux理解之driver_register linux驱动篇之 driver_register 过程分析(一)linux驱动篇之 driver_register 过程分析(二)bus_add_driver的全部内容,更多相关学习Linux-4.12内核网路协议栈(1.8)——网络设备驱动模块的加载pci设备的初始化理解linux内容请搜索靠谱客的其他文章。


发表评论 取消回复