dataBinding是Google官方开发的第三方视图数据绑定框架。优缺点如下:
优点:很好用
缺点:调试bug不易,部分AS版本中不太友好
首先说下如何使用:
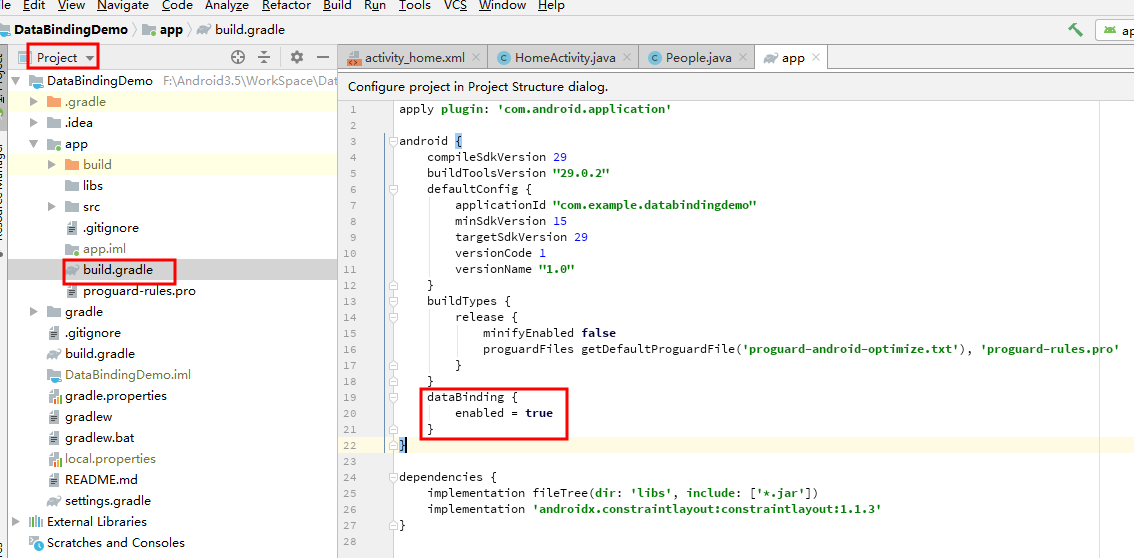
在gradle中的android模块中添加 如下命令:
dataBinding {
        enabled = true
    }
如下图
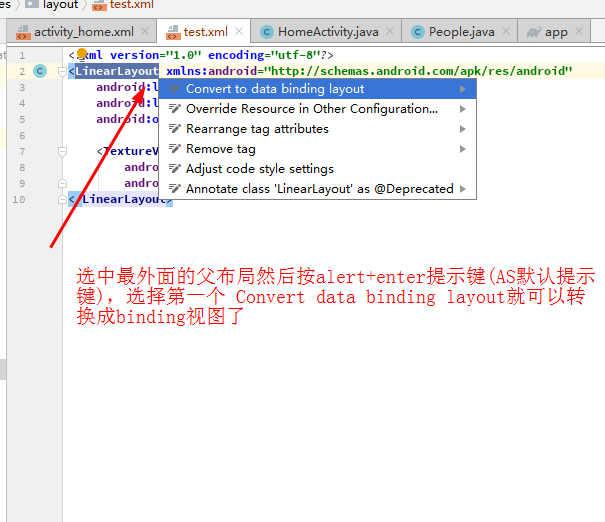
然后将你要绑定的xml布局视图转换成Binding视图:
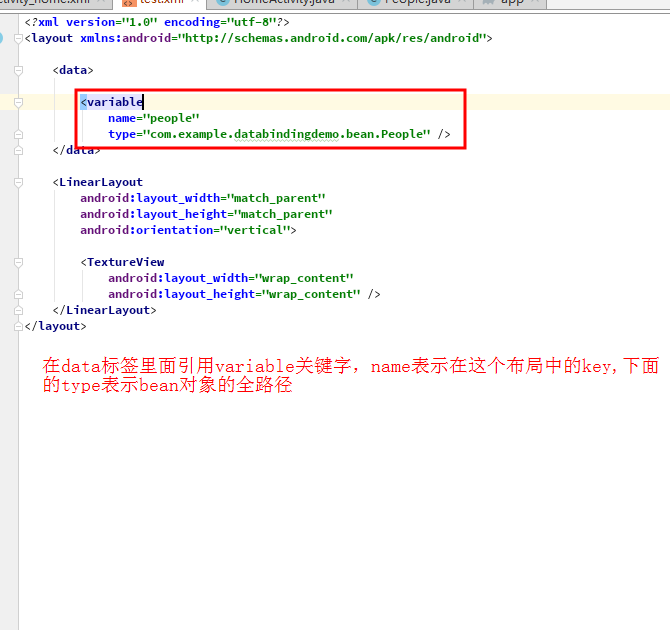
开始将bean对象放到xml布局中
然后通过dataBinding加载此布局:
DataBindingUtil.setContentView(this, R.layout.activity_home);上面会返回一个dataBinding类型的对象ActivityHomeBinding这里说明下:这个返回的对象的名称是根据activity_home名称决定的。例如xml布局叫activity_page,那么返回的dataBinding类型就为ActivityPageBinding这个规则了。
然后可以拿到这个返回的对象去设置数据了
activityHomeBinding = DataBindingUtil.setContentView(this, R.layout.activity_home);
        people.setWork("高级移动金砖工程师");
        peopleMessage.setAddress("东直门");
        peopleMessage.setAge(21);
        peopleMessage.setName("李晓华");
        people.setPeopleMessage(peopleMessage);
        activityHomeBinding.setPeople(people);
当然也可以用这个返回的对象去调用xml布局中的id:例如
activityHomeBinding.tvShowPeople上面的tvShowPeople就是xml中的tv_show_people这个id
如何更新数据呢?
我们需要在xml中这样写
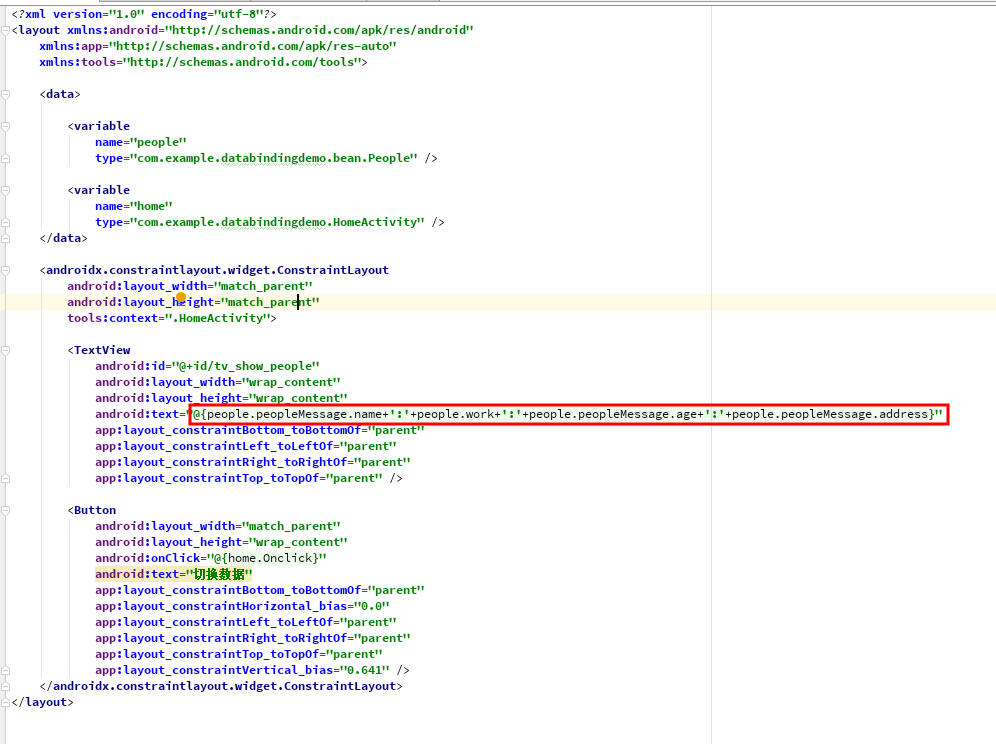
重点代码
<TextView
            android:id="@+id/tv_show_people"
            android:layout_width="wrap_content"
            android:layout_height="wrap_content"
            android:text="@{people.peopleMessage.name+':'+people.work+':'+people.peopleMessage.age+':'+people.peopleMessage.address}"
            app:layout_constraintBottom_toBottomOf="parent"
            app:layout_constraintLeft_toLeftOf="parent"
            app:layout_constraintRight_toRightOf="parent"
            app:layout_constraintTop_toTopOf="parent" />
数据绑定的规则:@{},这个大括号里面的就是我们设置的数据,people就是上面xml布局中的data标签中的name字段,people.work代表的是获取com.example.databindingdemo.bean.People这个路径下面的bean对象里面的work字段,其它字段同理
因为我们上面已经设置了people的基本参数了

这样数据就绑定了。项目跑起来就会显示刚刚设置的people数据了
我们再来看下更新数据:
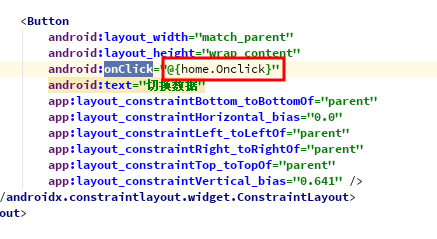
首先在xml中定义点击事件onClick,下面红框里面的home.Onclick这个方法名称随意写
然后在activity中写好刚刚定义的Onclick方法:更新数据就是重新复制给people即可,在将重新复制的people赋值给binding那个对象即可
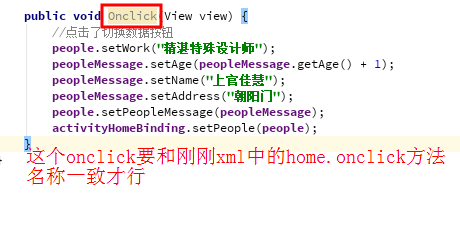
但是每次都要重新将复制的people赋值给binding那个对象太麻烦。
所以我们使用新方法,在bean对象里面使用注解:
1.首先类名要继承BaseObservable
2.在要更新同步数据的方法上面添加@Bindable注解
3.刷新数据这个方法notifyPropertyChanged(BR.更新的字段);
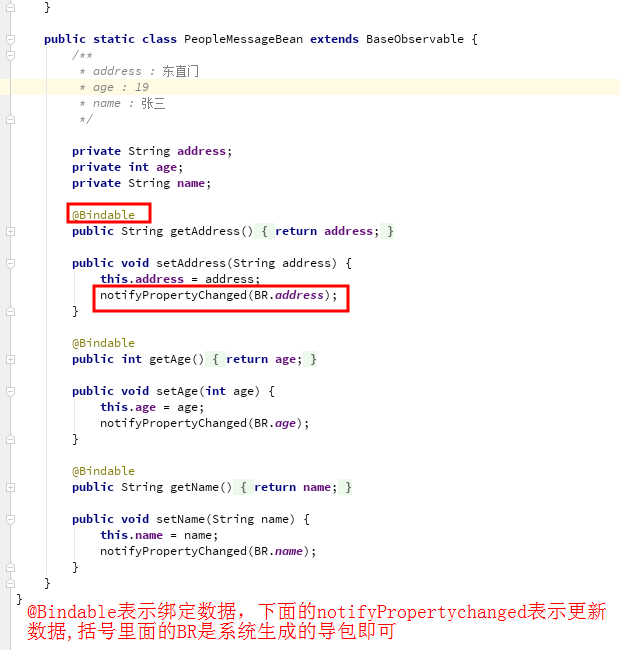
可能有点乱,但是对比源码看可能好点:GitHub源码下载
更新了添加kotlin经典绑定代码示例:
package com.noboauto.module_album.adapter

import android.annotation.SuppressLint
import android.view.LayoutInflater
import android.view.ViewGroup
import androidx.recyclerview.widget.RecyclerView
import com.noboauto.module_album.databinding.AlbumItemFragmentCategoryHomeListBinding
import com.noboauto.xm_api.http.data.album.XmAlbum
import java.text.DecimalFormat

/**
 * 项目名称 : Radio
 * 项目路径 : com.module_album.adapter
 * 当前作者 : xiayiye5
 * 创建时间 : 2021/9/2 13:57
 */
class RadioCategoryAdapter(private var categoryItemData: List<XmAlbum>) :
    RecyclerView.Adapter<RadioCategoryAdapter.RadioCategoryHolder>() {
    override fun onCreateViewHolder(parent: ViewGroup, viewType: Int): RadioCategoryHolder {
        val albumItemBinding = AlbumItemFragmentCategoryHomeListBinding.inflate(
            LayoutInflater.from(parent.context),
            parent,
            false
        )
        return RadioCategoryHolder(albumItemBinding)
    }


    override fun onBindViewHolder(holder: RadioCategoryHolder, position: Int) {
        //使用viewbinding设置数据给bean对象,在xml中拿到bean对象后就可以直接设置数据了
        holder.albumItemBinding.xmAlbum = categoryItemData[position]
        //将当前adapter实例对象传递给databinding布局,拿到后可以调用adapter里面的两个方法
        //countNumber和showRadioNumber
        holder.albumItemBinding.adapter = this@RadioCategoryAdapter
    }

    override fun getItemCount(): Int {
        return if (categoryItemData.isEmpty()) 0 else categoryItemData.size
    }

    fun showData(it: List<XmAlbum>) {
        categoryItemData = it
        notifyDataSetChanged()
    }

    class RadioCategoryHolder(val albumItemBinding: AlbumItemFragmentCategoryHomeListBinding) :
        RecyclerView.ViewHolder(albumItemBinding.root) {
    }

    fun countNumber(number: Long): String {
        val format = DecimalFormat("#.##").format(number / 10000f)
        return if (number < 10000) number.toString() else "${format}万"
    }

    fun showRadioNumber(itemData: XmAlbum): String = "${itemData.free_track_count}集"
}
再看下xml布局
<?xml version="1.0" encoding="utf-8"?>
<layout xmlns:android="http://schemas.android.com/apk/res/android"
    xmlns:app="http://schemas.android.com/apk/res-auto">

    <data>

        <variable
            name="xmAlbum"
            type="com.noboauto.xm_api.http.data.album.XmAlbum" />

        <variable
            name="adapter"
            type="com.noboauto.module_album.adapter.RadioCategoryAdapter" />
    </data>

    <androidx.constraintlayout.widget.ConstraintLayout
        android:layout_width="match_parent"
        android:layout_height="wrap_content"
        android:layout_margin="15dp"
        android:background="@color/album_test_color_1"
        android:padding="15dp">

        <ImageView
            android:id="@+id/iv_category_home_list_item_icon"
            bindingImage="@{xmAlbum.announcer.avatar_url}"
            android:layout_width="100dp"
            android:layout_height="100dp"
            android:src="@drawable/abc_vector_test"
            app:layout_constraintStart_toStartOf="parent"
            app:layout_constraintTop_toTopOf="parent" />

        <TextView
            android:id="@+id/tv_category_home_list_item_title"
            android:layout_width="wrap_content"
            android:layout_height="wrap_content"
            android:layout_marginStart="15dp"
            android:singleLine="true"
            android:text="@{xmAlbum.title}"
            app:layout_constraintStart_toEndOf="@+id/iv_category_home_list_item_icon"
            app:layout_constraintTop_toTopOf="@+id/iv_category_home_list_item_icon" />

        <TextView
            android:id="@+id/tv_category_home_list_item_play_number"
            android:layout_width="wrap_content"
            android:layout_height="wrap_content"
            android:layout_marginStart="15dp"
            android:drawableLeft="@drawable/abc_vector_test"
            android:gravity="center"
            android:text="@{adapter.countNumber(xmAlbum.play_count)}"
            app:layout_constraintBottom_toTopOf="@+id/tv_category_home_list_item_author_name"
            app:layout_constraintStart_toEndOf="@+id/iv_category_home_list_item_icon"
            app:layout_constraintTop_toBottomOf="@+id/tv_category_home_list_item_title" />


        <TextView
            android:id="@+id/tv_category_home_list_item_des"
            android:layout_width="wrap_content"
            android:layout_height="wrap_content"
            android:layout_marginStart="15dp"
            android:drawableLeft="@drawable/abc_vector_test"
            android:gravity="center"
            android:singleLine="true"
            android:text="@{adapter.showRadioNumber(xmAlbum)}"
            app:layout_constraintBottom_toBottomOf="@+id/tv_category_home_list_item_play_number"
            app:layout_constraintEnd_toEndOf="parent"
            app:layout_constraintTop_toTopOf="@+id/tv_category_home_list_item_play_number" />


        <TextView
            android:id="@+id/tv_category_home_list_item_author_name"
            android:layout_width="wrap_content"
            android:layout_height="wrap_content"
            android:layout_marginStart="15dp"
            android:drawableLeft="@drawable/abc_vector_test"
            android:singleLine="true"
            android:text="@{xmAlbum.announcer.nickname}"
            app:layout_constraintBottom_toBottomOf="@+id/iv_category_home_list_item_icon"
            app:layout_constraintStart_toEndOf="@+id/iv_category_home_list_item_icon" />


    </androidx.constraintlayout.widget.ConstraintLayout>
</layout>
最后
以上就是发嗲马里奥最近收集整理的关于Android开发之关于MVVM架构中视图数据绑定框架dataBinding的基本用法的全部内容,更多相关Android开发之关于MVVM架构中视图数据绑定框架dataBinding内容请搜索靠谱客的其他文章。


发表评论 取消回复