在上一篇我们已经介绍了客户端的流程分析,我们已经对启动已经大体上有了一定的认识,现在我们继续看对服务端的流程来看一看到底有什么区别。
服务端代码
public class NioServer {
	private static final int PORT = 9898;

	public static void main(String[] args) {
		EventLoopGroup boss = new NioEventLoopGroup(1);
		EventLoopGroup work = new NioEventLoopGroup();
		try {
			ServerBootstrap bootstrap = new ServerBootstrap();
			bootstrap.group(boss, work).channel(NioServerSocketChannel.class).option(ChannelOption.SO_BACKLOG, 100)
					.handler(new LoggingHandler(LogLevel.INFO)).childHandler(new ChannelInitializer<SocketChannel>() {
						@Override
						protected void initChannel(SocketChannel ch) throws Exception {
							ChannelPipeline pipeline = ch.pipeline();
							pipeline.addLast("stringDecoder", new StringDecoder());
							pipeline.addLast("stringEncoder", new StringEncoder());
							pipeline.addLast("serverHandle", new SimpleChannelInboundHandler<String>() {
								@Override
								protected void channelRead0(ChannelHandlerContext ctx, String msg) throws Exception {
								}
							});
						}
					});
			ChannelFuture channelFuture = bootstrap.bind(PORT).sync();
			channelFuture.channel().closeFuture().sync();
		} catch (InterruptedException e) {
			e.printStackTrace();
		} finally {
			boss.shutdownGracefully();
			work.shutdownGracefully();
		}
	}
}
上面代码主要做了以下几件事
- 声明 EventLoopGroup 不管是服务端还是客户端都需要初始化 EventLoopGroup,上面代码中声明了两个 EventLoopGroup,boss 的作用是处理客户端的连接事件,work 的作用是处理客户端连接事件的 IO 操作。
- channel 的初始化,我们发现和客户端的类型不一样,客户端是 NioSocketChannel 而服务端则是 NioServerSocketChannel。
- option 的设置。
- handler 的设置。
- childHandler 的设置。
group 的初始化操作
NioEventLoopGroup 的初始化操作在客户端已经说明过了,这里就不再多说了。我们直接来看 bootstrap.group(boss, work); 这句代码我们跟进去。
public ServerBootstrap group(EventLoopGroup parentGroup, EventLoopGroup childGroup) {
    // 调用父类构造器传入 boss
    super.group(parentGroup);
    if (childGroup == null) {
        throw new NullPointerException("childGroup");
    }
    if (this.childGroup != null) {
        throw new IllegalStateException("childGroup set already");
    }
    // 将 work 赋值给 childGroup 属性
    this.childGroup = childGroup;
    return this;
}

// 父类的构造器
public B group(EventLoopGroup group) {
    if (group == null) {
        throw new NullPointerException("group");
    }
    if (this.group != null) {
        throw new IllegalStateException("group set already");
    }
    this.group = group;
    return self();
}
上面主要是把 boss 的引用传入给父类的 group 属性保存,work 给自己的 childGroup 属性保存。boss 主要用于处理客户端的连接请求就像饭店的一个服务员会引导顾客,而 work 就是厨师实际干活的啦。
Channel 的初始化过程
通过客户端的分析我们其实已经知道 bootstrap.channel(class); 方法是将 class 存入到一个 ReflectiveChannelFactory 实例中真正的实例化 channel 就是调用该工厂的 newChannel(); 方法实现。
public B channel(Class<? extends C> channelClass) {
    if (channelClass == null) {
        throw new NullPointerException("channelClass");
    }
    return channelFactory(new ReflectiveChannelFactory<C>(channelClass));
}

// ReflectiveChannelFactory
@Override
public T newChannel() {
    try {
        return constructor.newInstance();
    } catch (Throwable t) {
        throw new ChannelException("Unable to create Channel from class " + constructor.getDeclaringClass(), t);
    }
}
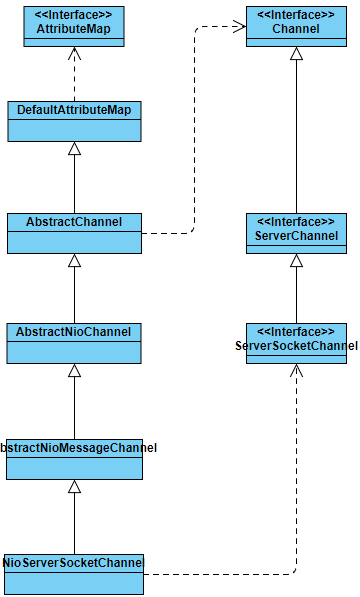
这样就能创造出一个 NioServerSocket 实例。从代码中可以看出是通过反射实例化的那么肯定是执行 NioServerSocketChannel 的构造方法,我们继续来看下 NioServerSocketChannel 的实例化过程,在看之前我们先来看下 NioServerSocketChannel 的继承结构图。

首先我们来看 NioServerSocket 的构造器
private static final SelectorProvider DEFAULT_SELECTOR_PROVIDER = SelectorProvider.provider();

public NioServerSocketChannel() {
    this(newSocket(DEFAULT_SELECTOR_PROVIDER));
}
我们看到构造器发现在内部调用了 newSokcet 方法传了 sun.nio.ch.DefaultSelectorProvider 实例进去。
private static ServerSocketChannel newSocket(SelectorProvider provider) {
    try {
        // 调用 openSocketChannel 方法获取 ServerSocketChannel
        return provider.openServerSocketChannel();
    } catch (IOException e) {
        throw new ChannelException(
                "Failed to open a server socket.", e);
    }
}
获取到了 ServerSocketChannel 后会调用重载的构造器
public NioServerSocketChannel(ServerSocketChannel channel) {
    super(null, channel, SelectionKey.OP_ACCEPT);
    config = new NioServerSocketChannelConfig(this, javaChannel().socket());
}
发现会调用父类的构造器和创造一个 config 实例。我们到 AbstractNioChannel 的构造器看看
protected AbstractNioChannel(Channel parent, SelectableChannel ch, int readInterestOp) {
    super(parent);
    // ch 赋值
    this.ch = ch;
    // OP_ACCEPT 赋值
    this.readInterestOp = readInterestOp;
    try {
        // 设置非阻塞
        ch.configureBlocking(false);
    } catch (IOException e) {
        try {
            ch.close();
        } catch (IOException e2) {
            if (logger.isWarnEnabled()) {
                logger.warn(
                        "Failed to close a partially initialized socket.", e2);
            }
        }

        throw new ChannelException("Failed to enter non-blocking mode.", e);
    }
}
上面代码主要设置了一下 channel 和继续调用父类的构造器
protected AbstractChannel(Channel parent) {
    this.parent = parent;
    id = newId();
    unsafe = newUnsafe();
    pipeline = newChannelPipeline();
}
上面代码在客户端的时候已经说过,但是需要注意的是 unsafe 的实例类型会不一样,服务端的实例类型是 AbstractNioMessageChannel$NioMessageUnsafe 的实例。
@Override
protected AbstractNioUnsafe newUnsafe() {
    return new NioMessageUnsafe();
}
ChannelPipeline 的实例化
ChannelPipeline 的流程在客户端的分析中说明了,后面也会单独出一期 ChannelPipeline 的说明,在此不在说了。
bootstrap.option()
private final Map<ChannelOption<?>, Object> options = new LinkedHashMap<ChannelOption<?>, Object>();

public <T> B option(ChannelOption<T> option, T value) {
    if (option == null) {
        throw new NullPointerException("option");
    }
    if (value == null) {
        synchronized (options) {
            options.remove(option);
        }
    } else {
        synchronized (options) {
            options.put(option, value);
        }
    }
    return self();
}
我们发现 option 方法中是调用父类的 AbstractBootstrap.option 来为 options 赋值。
bootstrap.handler()
private volatile ChannelHandler handler;

public B handler(ChannelHandler handler) {
    if (handler == null) {
        throw new NullPointerException("handler");
    }
    this.handler = handler;
    return self();
}
handler() 方法也是调用父类的 AbstractBootstrap.handler() 来为 handler 属性赋值。
bootstrap.childHandler()
private volatile ChannelHandler childHandler;

public ServerBootstrap childHandler(ChannelHandler childHandler) {
    if (childHandler == null) {
        throw new NullPointerException("childHandler");
    }
    this.childHandler = childHandler;
    return this;
}
childHandler() 方法也是调用自身的 handler() 来为 childHandler 属性赋值。因为这是服务端扩展的一个属性。
bootstrap.bind()
终于到了重头戏了,我们查看了下 bind() 到最后发现是 io.netty.bootstrap.AbstractBootstrap#doBind 中实现的.
private ChannelFuture doBind(final SocketAddress localAddress) {
    // 重点查看代码
    final ChannelFuture regFuture = initAndRegister();
    // 以下代码省略
    if (regFuture.cause() != null) {
        return regFuture;
    }
        return promise;
    }
}
我们跟进去 initAndRegister() 方法看一看.
final ChannelFuture initAndRegister() {
    Channel channel = null;
    try {
        // channel 初始化在上面已经说过了
        channel = channelFactory.newChannel();
        // 初始化 channel
        init(channel);
    } catch (Throwable t) {
    }
    // 这个 group 就是 bossGroup
    ChannelFuture regFuture = config().group().register(channel);
}
我们重点看 init(channel); 在下面获取到的就是 bossGroup 随后就将 bossGroup 和我们的 NioServerSocketChannel 关联起来了。
那么我们的 workGroup 是怎么处理的呢?我们进去看看 init(channel);
@Override
void init(Channel channel) throws Exception {
    // 将之前设置的 option 和 NioServerSocketChannel 关联起来
    final Map<ChannelOption<?>, Object> options = options0();
    synchronized (options) {
        setChannelOptions(channel, options, logger);
    }
    // 设置一些属性到 NioServerSocketChannel 中
    final Map<AttributeKey<?>, Object> attrs = attrs0();
    synchronized (attrs) {
        for (Entry<AttributeKey<?>, Object> e: attrs.entrySet()) {
            @SuppressWarnings("unchecked")
            AttributeKey<Object> key = (AttributeKey<Object>) e.getKey();
            channel.attr(key).set(e.getValue());
        }
    }
    // 获取到 NioServerSocketChannel 对应的 ChannelPipeline,在实例化的时候就已经创建了对应了 ChannelPipeline
    ChannelPipeline p = channel.pipeline();

    final EventLoopGroup currentChildGroup = childGroup;
    final ChannelHandler currentChildHandler = childHandler;
    final Entry<ChannelOption<?>, Object>[] currentChildOptions;
    final Entry<AttributeKey<?>, Object>[] currentChildAttrs;
    synchronized (childOptions) {
        currentChildOptions = childOptions.entrySet().toArray(newOptionArray(0));
    }
    synchronized (childAttrs) {
        currentChildAttrs = childAttrs.entrySet().toArray(newAttrArray(0));
    }
    // 重点
    p.addLast(new ChannelInitializer<Channel>() {
        @Override
        public void initChannel(final Channel ch) throws Exception {
            final ChannelPipeline pipeline = ch.pipeline();
            ChannelHandler handler = config.handler();
            if (handler != null) {
                pipeline.addLast(handler);
            }

            ch.eventLoop().execute(new Runnable() {
                @Override
                public void run() {
                    pipeline.addLast(new ServerBootstrapAcceptor(
                            ch, currentChildGroup, currentChildHandler, currentChildOptions, currentChildAttrs));
                }
            });
        }
    });
}
上面代码主要做了
- 设置 option
- 设置 attr
- 设置 NioServerSocketChannel 对应的 ChannelPipeline
从上面的代码片段中我们看到, 它为 pipeline 中添加了一个 ChannelInitializer, 而这个 ChannelInitializer 中添加了一个关键的 ServerBootstrapAcceptor handler。
我们先来看下这个类
ServerBootstrapAcceptor(
        final Channel channel, EventLoopGroup childGroup, ChannelHandler childHandler,
        Entry<ChannelOption<?>, Object>[] childOptions, Entry<AttributeKey<?>, Object>[] childAttrs) {
    this.childGroup = childGroup;
    this.childHandler = childHandler;
    this.childOptions = childOptions;
    this.childAttrs = childAttrs;

    enableAutoReadTask = new Runnable() {
        @Override
        public void run() {
            channel.config().setAutoRead(true);
        }
    };
}
ServerBootstrapAcceptor 这个类中包含了 childGroup、childHandler、childOptions、childAttrs,并且重写了 channelRead 方法。
并且将 ServerBootstrapAcceptor 的实例放在了 ChannelPipeline 的最后面.跟进 addLast() 方法会发现是在 DefaultChannelPipeline.addLast0()
private void addLast0(AbstractChannelHandlerContext newCtx) {
    AbstractChannelHandlerContext prev = tail.prev;
    newCtx.prev = prev;
    newCtx.next = tail;
    prev.next = newCtx;
    tail.prev = newCtx;
}
从上面代发会发现将 ServerBootstrapAcceptor 放在了最后一个。
Channel 的注册
服务器端和客户端的 Channel 的注册过程一致。
最后
以上就是粗犷路人最近收集整理的关于Netty 源码学习——服务端流程分析的全部内容,更多相关Netty内容请搜索靠谱客的其他文章。


发表评论 取消回复