前言
一般都是在阿里云或者其他云主机上来部署服务器,前端时间京东云免费送了一个一个月的主机,在这里写一篇记录一下吧!
使用XShell来连接主机发送命令:点击下载
使用FlashFXP来进行文件的传输:点击下载
1、在Linux安装东西是用yum命令最是简单,得到主机后不管其它先来一个update命令:
yum update2、命令执行完毕,先看看是不是已经安装了JDK:yum list installed | grep java
[root@hzw-2312 ~]# yum list installed | grep java
java-1.7.0-openjdk.x86_64            1:1.7.0.121-2.6.8.1.el6_8         @updates
java-1.7.0-openjdk-demo.x86_64       1:1.7.0.121-2.6.8.1.el6_8         @updates
java-1.7.0-openjdk-devel.x86_64      1:1.7.0.121-2.6.8.1.el6_8         @updates
java-1.7.0-openjdk-javadoc.noarch    1:1.7.0.121-2.6.8.1.el6_8         @updates
java-1.7.0-openjdk-src.x86_64        1:1.7.0.121-2.6.8.1.el6_8         @updates
tzdata-java.noarch                   2016j-1.el6                       @updates
3、我这里之前已经安装了1.7的jdk,现在把它卸载了(如果没有,直接跳过此步骤):
卸载JDK输入:yum -y remove java-1.7.0-openjdk*
卸载tzdata-java输入:yum -y remove tzdata-java.noarch
[root@hzw-2312 ~]# yum -y remove java-1.7.0-openjdk*
Loaded plugins: fastestmirror, presto
Setting up Remove Process
Resolving Dependencies
--> Running transaction check
---> Package java-1.7.0-openjdk.x86_64 1:1.7.0.121-2.6.8.1.el6_8 will be erased
---> Package java-1.7.0-openjdk-demo.x86_64 1:1.7.0.121-2.6.8.1.el6_8 will be erased
---> Package java-1.7.0-openjdk-devel.x86_64 1:1.7.0.121-2.6.8.1.el6_8 will be erased
---> Package java-1.7.0-openjdk-javadoc.noarch 1:1.7.0.121-2.6.8.1.el6_8 will be erased
---> Package java-1.7.0-openjdk-src.x86_64 1:1.7.0.121-2.6.8.1.el6_8 will be erased
--> Finished Dependency Resolution

Dependencies Resolved

========================================================================================
 Package                       Arch      Version                      Repository   Size
========================================================================================
Removing:
 java-1.7.0-openjdk            x86_64    1:1.7.0.121-2.6.8.1.el6_8    @updates     91 M
 java-1.7.0-openjdk-demo       x86_64    1:1.7.0.121-2.6.8.1.el6_8    @updates    4.0 M
 java-1.7.0-openjdk-devel      x86_64    1:1.7.0.121-2.6.8.1.el6_8    @updates     36 M
 java-1.7.0-openjdk-javadoc    noarch    1:1.7.0.121-2.6.8.1.el6_8    @updates    233 M
 java-1.7.0-openjdk-src        x86_64    1:1.7.0.121-2.6.8.1.el6_8    @updates     43 M

Transaction Summary
========================================================================================
Remove        5 Package(s)

Installed size: 407 M
Downloading Packages:
Running rpm_check_debug
Running Transaction Test
Transaction Test Succeeded
Running Transaction
  Erasing    : 1:java-1.7.0-openjdk-src-1.7.0.121-2.6.8.1.el6_8.x86_64              1/5
  Erasing    : 1:java-1.7.0-openjdk-javadoc-1.7.0.121-2.6.8.1.el6_8.noarch          2/5
  Erasing    : 1:java-1.7.0-openjdk-devel-1.7.0.121-2.6.8.1.el6_8.x86_64            3/5
  Erasing    : 1:java-1.7.0-openjdk-demo-1.7.0.121-2.6.8.1.el6_8.x86_64             4/5
  Erasing    : 1:java-1.7.0-openjdk-1.7.0.121-2.6.8.1.el6_8.x86_64                  5/5
  Verifying  : 1:java-1.7.0-openjdk-1.7.0.121-2.6.8.1.el6_8.x86_64                  1/5
  Verifying  : 1:java-1.7.0-openjdk-src-1.7.0.121-2.6.8.1.el6_8.x86_64              2/5
  Verifying  : 1:java-1.7.0-openjdk-javadoc-1.7.0.121-2.6.8.1.el6_8.noarch          3/5
  Verifying  : 1:java-1.7.0-openjdk-demo-1.7.0.121-2.6.8.1.el6_8.x86_64             4/5
  Verifying  : 1:java-1.7.0-openjdk-devel-1.7.0.121-2.6.8.1.el6_8.x86_64            5/5

Removed:
  java-1.7.0-openjdk.x86_64 1:1.7.0.121-2.6.8.1.el6_8
  java-1.7.0-openjdk-demo.x86_64 1:1.7.0.121-2.6.8.1.el6_8
  java-1.7.0-openjdk-devel.x86_64 1:1.7.0.121-2.6.8.1.el6_8
  java-1.7.0-openjdk-javadoc.noarch 1:1.7.0.121-2.6.8.1.el6_8
  java-1.7.0-openjdk-src.x86_64 1:1.7.0.121-2.6.8.1.el6_8

Complete!
[root@hzw-2312 ~]#下面卸载tzdata-java:
[root@hzw-2312 ~]# yum -y remove tzdata-java.noarch
Loaded plugins: fastestmirror, presto
Setting up Remove Process
Resolving Dependencies
--> Running transaction check
---> Package tzdata-java.noarch 0:2016j-1.el6 will be erased
--> Finished Dependency Resolution

Dependencies Resolved

========================================================================================
 Package               Arch             Version                Repository          Size
========================================================================================
Removing:
 tzdata-java           noarch           2016j-1.el6            @updates           362 k

Transaction Summary
========================================================================================
Remove        1 Package(s)

Installed size: 362 k
Downloading Packages:
Running rpm_check_debug
Running Transaction Test
Transaction Test Succeeded
Running Transaction
  Erasing    : tzdata-java-2016j-1.el6.noarch                                       1/1
  Verifying  : tzdata-java-2016j-1.el6.noarch                                       1/1

Removed:
  tzdata-java.noarch 0:2016j-1.el6

Complete!4,、查看yum库中的Java安装包
输入:yum -y list java*
[root@hzw-2312 ~]# yum -y list java*
Loaded plugins: fastestmirror, presto
Loading mirror speeds from cached hostfile
 * base: mirrors.163.com
 * extras: mirrors.163.com
 * updates: mirrors.aliyun.com
Available Packages
java-1.5.0-gcj.x86_64                          1.5.0.0-29.1.el6                  base
java-1.5.0-gcj-devel.x86_64                    1.5.0.0-29.1.el6                  base
java-1.5.0-gcj-javadoc.x86_64                  1.5.0.0-29.1.el6                  base
java-1.5.0-gcj-src.x86_64                      1.5.0.0-29.1.el6                  base
java-1.6.0-openjdk.x86_64                      1:1.6.0.40-1.13.12.6.el6_8        updates
java-1.6.0-openjdk-demo.x86_64                 1:1.6.0.40-1.13.12.6.el6_8        updates
java-1.6.0-openjdk-devel.x86_64                1:1.6.0.40-1.13.12.6.el6_8        updates
java-1.6.0-openjdk-javadoc.x86_64              1:1.6.0.40-1.13.12.6.el6_8        updates
java-1.6.0-openjdk-src.x86_64                  1:1.6.0.40-1.13.12.6.el6_8        updates
java-1.7.0-openjdk.x86_64                      1:1.7.0.121-2.6.8.1.el6_8         updates
java-1.7.0-openjdk-demo.x86_64                 1:1.7.0.121-2.6.8.1.el6_8         updates
java-1.7.0-openjdk-devel.x86_64                1:1.7.0.121-2.6.8.1.el6_8         updates
java-1.7.0-openjdk-javadoc.noarch              1:1.7.0.121-2.6.8.1.el6_8         updates
java-1.7.0-openjdk-src.x86_64                  1:1.7.0.121-2.6.8.1.el6_8         updates
java-1.8.0-openjdk.x86_64                      1:1.8.0.111-0.b15.el6_8           updates
java-1.8.0-openjdk-debug.x86_64                1:1.8.0.111-0.b15.el6_8           updates
java-1.8.0-openjdk-demo.x86_64                 1:1.8.0.111-0.b15.el6_8           updates
java-1.8.0-openjdk-demo-debug.x86_64           1:1.8.0.111-0.b15.el6_8           updates
java-1.8.0-openjdk-devel.x86_64                1:1.8.0.111-0.b15.el6_8           updates
java-1.8.0-openjdk-devel-debug.x86_64          1:1.8.0.111-0.b15.el6_8           updates
java-1.8.0-openjdk-headless.x86_64             1:1.8.0.111-0.b15.el6_8           updates
java-1.8.0-openjdk-headless-debug.x86_64       1:1.8.0.111-0.b15.el6_8           updates
java-1.8.0-openjdk-javadoc.noarch              1:1.8.0.111-0.b15.el6_8           updates
java-1.8.0-openjdk-javadoc-debug.noarch        1:1.8.0.111-0.b15.el6_8           updates
java-1.8.0-openjdk-src.x86_64                  1:1.8.0.111-0.b15.el6_8           updates
java-1.8.0-openjdk-src-debug.x86_64            1:1.8.0.111-0.b15.el6_8           updates
java-dirq.noarch                               1.4-1.el6                         epel
java-dirq-javadoc.noarch                       1.4-1.el6                         epel
java-service-wrapper.x86_64                    3.2.5-23.el6                      epel
java-service-wrapper-javadoc.noarch            3.2.5-23.el6                      epel
java-sleep.noarch                              2.1-6.el6                         epel
java-sleep-javadoc.noarch                      2.1-6.el6                         epel
java_cup.x86_64                                1:0.10k-5.el6                     base
java_cup-javadoc.x86_64                        1:0.10k-5.el6                     base
java_cup-manual.x86_64                         1:0.10k-5.el6                     base
javacc.x86_64                                  4.1-0.5.el6                       base
javacc-demo.x86_64                             4.1-0.5.el6                       base
javacc-manual.x86_64                           4.1-0.5.el6                       base
javassist.noarch                               3.9.0-6.el6                       base
javassist-javadoc.noarch                       3.9.0-6.el6                       base
javastroke.x86_64                              0.5.1-33.el6                      epel
javatar.noarch                                 2.5-5.el6                         epel
javatar-javadoc.noarch                         2.5-5.el6                         epel
[root@hzw-2312 ~]#
5、使用yum命令安装Java环境
输入:yum -y install java-1.8.0-openjdk*[root@hzw-2312 ~]# yum -y install java-1.8.0-openjdk*
Loaded plugins: fastestmirror, presto
Setting up Install Process
Loading mirror speeds from cached hostfile
* base: mirrors.163.com
* extras: mirrors.163.com
* updates: mirrors.aliyun.com
Resolving Dependencies
--> Running transaction check
---> Package java-1.8.0-openjdk.x86_64 1:1.8.0.111-0.b15.el6_8 will be installed
---> Package java-1.8.0-openjdk-debug.x86_64 1:1.8.0.111-0.b15.el6_8 will be installed
---> Package java-1.8.0-openjdk-demo.x86_64 1:1.8.0.111-0.b15.el6_8 will be installed
---> Package java-1.8.0-openjdk-demo-debug.x86_64 1:1.8.0.111-0.b15.el6_8 will be installed
---> Package java-1.8.0-openjdk-devel.x86_64 1:1.8.0.111-0.b15.el6_8 will be installed
---> Package java-1.8.0-openjdk-devel-debug.x86_64 1:1.8.0.111-0.b15.el6_8 will be installed
---> Package java-1.8.0-openjdk-headless.x86_64 1:1.8.0.111-0.b15.el6_8 will be installed
--> Processing Dependency: tzdata-java >= 2014f-1 for package: 1:java-1.8.0-openjdk-headless-1.8.0.111-0.b15.el6_8.x86_64
---> Package java-1.8.0-openjdk-headless-debug.x86_64 1:1.8.0.111-0.b15.el6_8 will be installed
---> Package java-1.8.0-openjdk-javadoc.noarch 1:1.8.0.111-0.b15.el6_8 will be installed
---> Package java-1.8.0-openjdk-javadoc-debug.noarch 1:1.8.0.111-0.b15.el6_8 will be installed
---> Package java-1.8.0-openjdk-src.x86_64 1:1.8.0.111-0.b15.el6_8 will be installed
---> Package java-1.8.0-openjdk-src-debug.x86_64 1:1.8.0.111-0.b15.el6_8 will be installed
--> Running transaction check
---> Package tzdata-java.noarch 0:2016j-1.el6 will be installed
--> Finished Dependency Resolution
Dependencies Resolved
========================================================================================
Package Arch Version Repository
Size
========================================================================================
Installing:
java-1.8.0-openjdk x86_64 1:1.8.0.111-0.b15.el6_8 updates 198 k
java-1.8.0-openjdk-debug x86_64 1:1.8.0.111-0.b15.el6_8 updates 201 k
java-1.8.0-openjdk-demo x86_64 1:1.8.0.111-0.b15.el6_8 updates 1.9 M
java-1.8.0-openjdk-demo-debug x86_64 1:1.8.0.111-0.b15.el6_8 updates 2.0 M
java-1.8.0-openjdk-devel x86_64 1:1.8.0.111-0.b15.el6_8 updates 10 M
java-1.8.0-openjdk-devel-debug x86_64 1:1.8.0.111-0.b15.el6_8 updates 10 M
java-1.8.0-openjdk-headless x86_64 1:1.8.0.111-0.b15.el6_8 updates 32 M
java-1.8.0-openjdk-headless-debug x86_64 1:1.8.0.111-0.b15.el6_8 updates 32 M
java-1.8.0-openjdk-javadoc noarch 1:1.8.0.111-0.b15.el6_8 updates 17 M
java-1.8.0-openjdk-javadoc-debug noarch 1:1.8.0.111-0.b15.el6_8 updates 17 M
java-1.8.0-openjdk-src x86_64 1:1.8.0.111-0.b15.el6_8 updates 45 M
java-1.8.0-openjdk-src-debug x86_64 1:1.8.0.111-0.b15.el6_8 updates 45 M
Installing for dependencies:
tzdata-java noarch 2016j-1.el6 updates 182 k
Transaction Summary
========================================================================================
Install 13 Package(s)
Total download size: 214 M
Installed size: 939 M
Downloading Packages:
Setting up and reading Presto delta metadata
updates/prestodelta | 275 kB 00:00
Processing delta metadata
Package(s) data still to download: 214 M
(1/13): java-1.8.0-openjdk-1.8.0.111-0.b15.el6_8.x86_64.rpm | 198 kB 00:00
(2/13): java-1.8.0-openjdk-debug-1.8.0.111-0.b15.el6_8.x86_64.rp | 201 kB 00:00
(3/13): java-1.8.0-openjdk-demo-1.8.0.111-0.b15.el6_8.x86_64.rpm | 1.9 MB 00:01
(4/13): java-1.8.0-openjdk-demo-debug-1.8.0.111-0.b15.el6_8.x86_ | 2.0 MB 00:01
(5/13): java-1.8.0-openjdk-devel-1.8.0.111-0.b15.el6_8.x86_64.rp | 10 MB 00:10
(6/13): java-1.8.0-openjdk-devel-debug-1.8.0.111-0.b15.el6_8.x86_64.rpm | 10 MB 00:09
(7/13): java-1.8.0-openjdk-headless-1.8.0.111-0.b15.el6_8.x86_64.rpm | 32 MB 00:31
(8/13): java-1.8.0-openjdk-headless-debug-1.8.0.111-0.b15.el6_8.x86_64.rpm | 32 MB 00:32
(9/13): java-1.8.0-openjdk-javadoc-1.8.0.111-0.b15.el6_8.noarch.rpm | 17 MB 00:17
(10/13): java-1.8.0-openjdk-javadoc-debug-1.8.0.111-0.b15.el6_8.noarch.rpm | 17 MB 00:17
(11/13): java-1.8.0-openjdk-src-1.8.0.111-0.b15.el6_8.x86_64.rpm | 45 MB 00:45
(12/13): java-1.8.0-openjdk-src-debug-1.8.0.111-0.b15.el6_8.x86_64.rpm | 45 MB 00:44
(13/13): tzdata-java-2016j-1.el6.noarch.rpm | 182 kB 00:00
------------------------------------------------------------------------------------------------------------------------------------------------------------------------------------------------------------------------------------------------------------------------------
Total 1.0 MB/s | 214 MB 03:34
Running rpm_check_debug
Running Transaction Test
Transaction Test Succeeded
Running Transaction
Installing : tzdata-java-2016j-1.el6.noarch 1/13
Installing : 1:java-1.8.0-openjdk-headless-1.8.0.111-0.b15.el6_8.x86_64 2/13
Installing : 1:java-1.8.0-openjdk-debug-1.8.0.111-0.b15.el6_8.x86_64 3/13
Installing : 1:java-1.8.0-openjdk-devel-debug-1.8.0.111-0.b15.el6_8.x86_64 4/13
Installing : 1:java-1.8.0-openjdk-headless-debug-1.8.0.111-0.b15.el6_8.x86_64 5/13
Installing : 1:java-1.8.0-openjdk-1.8.0.111-0.b15.el6_8.x86_64 6/13
Installing : 1:java-1.8.0-openjdk-demo-1.8.0.111-0.b15.el6_8.x86_64 7/13
Installing : 1:java-1.8.0-openjdk-devel-1.8.0.111-0.b15.el6_8.x86_64 8/13
Installing : 1:java-1.8.0-openjdk-src-debug-1.8.0.111-0.b15.el6_8.x86_64 9/13
Installing : 1:java-1.8.0-openjdk-demo-debug-1.8.0.111-0.b15.el6_8.x86_64 10/13
Installing : 1:java-1.8.0-openjdk-src-1.8.0.111-0.b15.el6_8.x86_64 11/13
Installing : 1:java-1.8.0-openjdk-javadoc-1.8.0.111-0.b15.el6_8.noarch 12/13
Installing : 1:java-1.8.0-openjdk-javadoc-debug-1.8.0.111-0.b15.el6_8.noarch 13/13
Verifying : 1:java-1.8.0-openjdk-devel-debug-1.8.0.111-0.b15.el6_8.x86_64 1/13
Verifying : 1:java-1.8.0-openjdk-headless-1.8.0.111-0.b15.el6_8.x86_64 2/13
Verifying : 1:java-1.8.0-openjdk-javadoc-debug-1.8.0.111-0.b15.el6_8.noarch 3/13
Verifying : 1:java-1.8.0-openjdk-debug-1.8.0.111-0.b15.el6_8.x86_64 4/13
Verifying : 1:java-1.8.0-openjdk-src-debug-1.8.0.111-0.b15.el6_8.x86_64 5/13
Verifying : 1:java-1.8.0-openjdk-headless-debug-1.8.0.111-0.b15.el6_8.x86_64 6/13
Verifying : 1:java-1.8.0-openjdk-src-1.8.0.111-0.b15.el6_8.x86_64 7/13
Verifying : 1:java-1.8.0-openjdk-1.8.0.111-0.b15.el6_8.x86_64 8/13
Verifying : 1:java-1.8.0-openjdk-demo-1.8.0.111-0.b15.el6_8.x86_64 9/13
Verifying : 1:java-1.8.0-openjdk-javadoc-1.8.0.111-0.b15.el6_8.noarch 10/13
Verifying : 1:java-1.8.0-openjdk-devel-1.8.0.111-0.b15.el6_8.x86_64 11/13
Verifying : 1:java-1.8.0-openjdk-demo-debug-1.8.0.111-0.b15.el6_8.x86_64 12/13
Verifying : tzdata-java-2016j-1.el6.noarch 13/13
Installed:
java-1.8.0-openjdk.x86_64 1:1.8.0.111-0.b15.el6_8 java-1.8.0-openjdk-debug.x86_64 1:1.8.0.111-0.b15.el6_8 java-1.8.0-openjdk-demo.x86_64 1:1.8.0.111-0.b15.el6_8 java-1.8.0-openjdk-demo-debug.x86_64 1:1.8.0.111-0.b15.el6_8
java-1.8.0-openjdk-devel.x86_64 1:1.8.0.111-0.b15.el6_8 java-1.8.0-openjdk-devel-debug.x86_64 1:1.8.0.111-0.b15.el6_8 java-1.8.0-openjdk-headless.x86_64 1:1.8.0.111-0.b15.el6_8 java-1.8.0-openjdk-headless-debug.x86_64 1:1.8.0.111-0.b15.el6_8
java-1.8.0-openjdk-javadoc.noarch 1:1.8.0.111-0.b15.el6_8 java-1.8.0-openjdk-javadoc-debug.noarch 1:1.8.0.111-0.b15.el6_8 java-1.8.0-openjdk-src.x86_64 1:1.8.0.111-0.b15.el6_8 java-1.8.0-openjdk-src-debug.x86_64 1:1.8.0.111-0.b15.el6_8
Dependency Installed:
tzdata-java.noarch 0:2016j-1.el6
Complete!6、测试jdk
[root@hzw-2312 ~]# java
Usage: java [-options] class [args...]
           (to execute a class)
   or  java [-options] -jar jarfile [args...]
           (to execute a jar file)
where options include:
    -d32	  use a 32-bit data model if available
    -d64	  use a 64-bit data model if available
    -server	  to select the "server" VM
                  The default VM is server.

    -cp <class search path of directories and zip/jar files>
    -classpath <class search path of directories and zip/jar files>
                  A : separated list of directories, JAR archives,
                  and ZIP archives to search for class files.
    -D<name>=<value>
                  set a system property
    -verbose:[class|gc|jni]
                  enable verbose output
    -version      print product version and exit
    -version:<value>
                  Warning: this feature is deprecated and will be removed
                  in a future release.
                  require the specified version to run
    -showversion  print product version and continue
    -jre-restrict-search | -no-jre-restrict-search
                  Warning: this feature is deprecated and will be removed
                  in a future release.
                  include/exclude user private JREs in the version search
    -? -help      print this help message
    -X            print help on non-standard options
    -ea[:<packagename>...|:<classname>]
    -enableassertions[:<packagename>...|:<classname>]
                  enable assertions with specified granularity
    -da[:<packagename>...|:<classname>]
    -disableassertions[:<packagename>...|:<classname>]
                  disable assertions with specified granularity
    -esa | -enablesystemassertions
                  enable system assertions
    -dsa | -disablesystemassertions
                  disable system assertions
    -agentlib:<libname>[=<options>]
                  load native agent library <libname>, e.g. -agentlib:hprof
                  see also, -agentlib:jdwp=help and -agentlib:hprof=help
    -agentpath:<pathname>[=<options>]
                  load native agent library by full pathname
    -javaagent:<jarpath>[=<options>]
                  load Java programming language agent, see java.lang.instrument
    -splash:<imagepath>
                  show splash screen with specified image
See http://www.oracle.com/technetwork/java/javase/documentation/index.html for more details.[root@hzw-2312 ~]# javac
Usage: javac <options> <source files>
where possible options include:
-g Generate all debugging info
-g:none Generate no debugging info
-g:{lines,vars,source} Generate only some debugging info
-nowarn Generate no warnings
-verbose Output messages about what the compiler is doing
-deprecation Output source locations where deprecated APIs are used
-classpath <path> Specify where to find user class files and annotation processors
-cp <path> Specify where to find user class files and annotation processors
-sourcepath <path> Specify where to find input source files
-bootclasspath <path> Override location of bootstrap class files
-extdirs <dirs> Override location of installed extensions
-endorseddirs <dirs> Override location of endorsed standards path
-proc:{none,only} Control whether annotation processing and/or compilation is done.
-processor <class1>[,<class2>,<class3>...] Names of the annotation processors to run; bypasses default discovery process
-processorpath <path> Specify where to find annotation processors
-parameters Generate metadata for reflection on method parameters
-d <directory> Specify where to place generated class files
-s <directory> Specify where to place generated source files
-h <directory> Specify where to place generated native header files
-implicit:{none,class} Specify whether or not to generate class files for implicitly referenced files
-encoding <encoding> Specify character encoding used by source files
-source <release> Provide source compatibility with specified release
-target <release> Generate class files for specific VM version
-profile <profile> Check that API used is available in the specified profile
-version Version information
-help Print a synopsis of standard options
-Akey[=value] Options to pass to annotation processors
-X Print a synopsis of nonstandard options
-J<flag> Pass <flag> directly to the runtime system
-Werror Terminate compilation if warnings occur
@<filename> Read options and filenames from file7、Tomcat安装
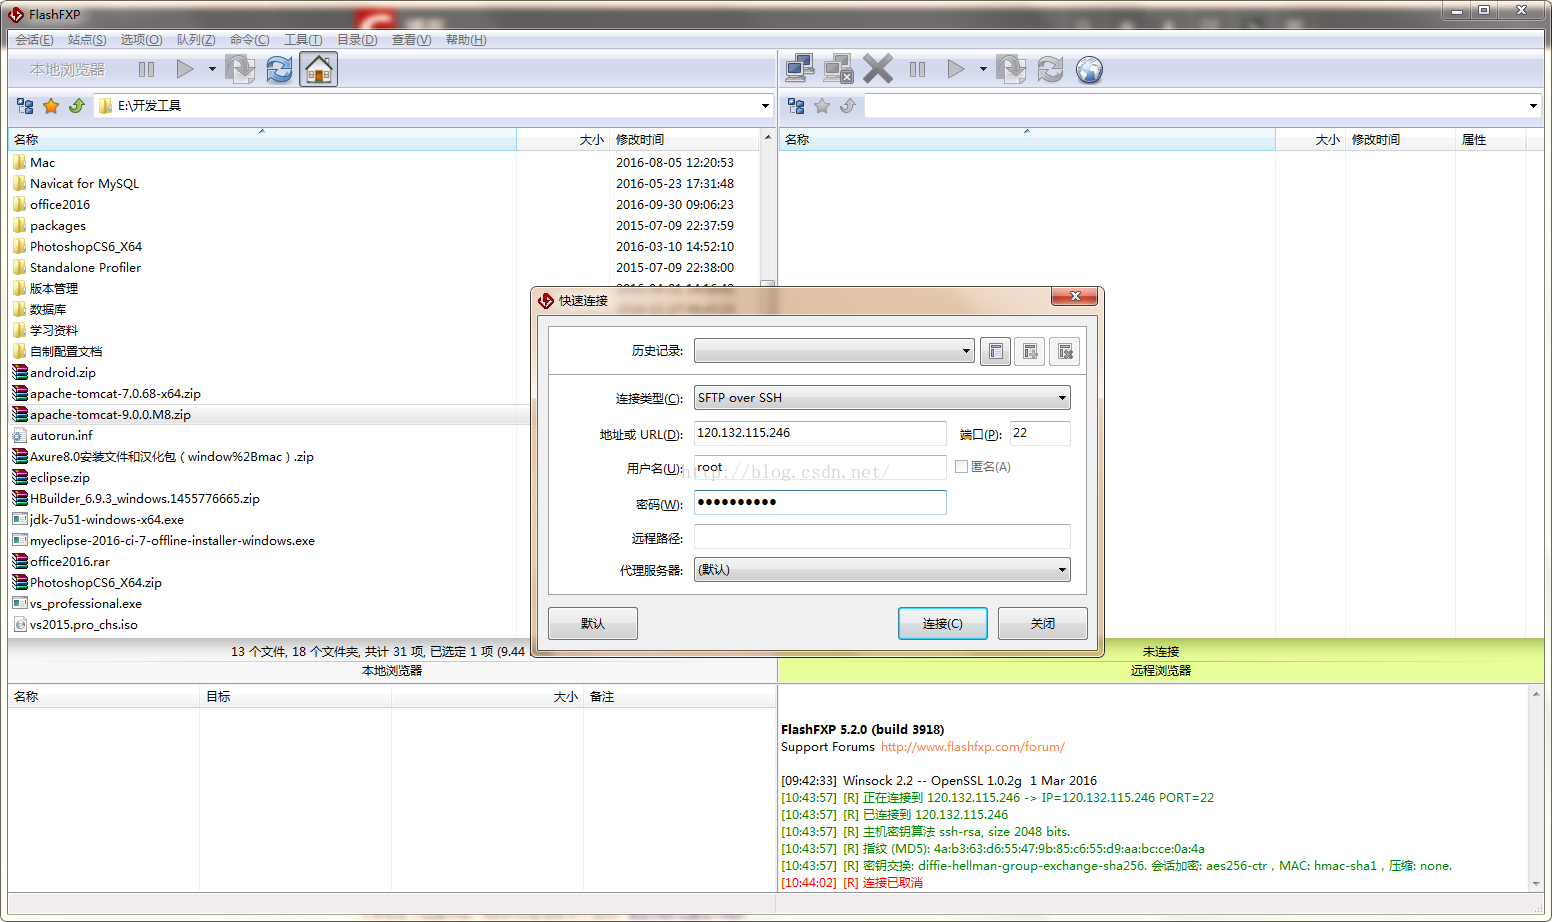
这里我们不选择安装Tomcat直接在官网下载一个绿色版本的Tomcat来就好: Tomcat官网下载好过后我们直接使用FlashFXP来把Tomcat传输到Linux主机上:
a、安装好过后,点击左上角的“会话E”选择“快速连接”。
b、连接类型选择“SFTP over SSH”
c、输入地址或URL:这里填写主机的IP地址,端口就用默认的22
d、填写用户名跟密码
e、其他就不用管了,直接点击“连接”

f、安装unzip来进行zip包的解压缩:
输入:yum install unzip
[root@hzw-2312 ~]# yum install unzip
Loaded plugins: fastestmirror, presto
Setting up Install Process
Loading mirror speeds from cached hostfile
 * base: mirrors.163.com
 * extras: mirrors.163.com
 * updates: mirrors.aliyun.com
Resolving Dependencies
--> Running transaction check
---> Package unzip.x86_64 0:6.0-4.el6 will be installed
--> Finished Dependency Resolution

Dependencies Resolved

========================================================================================
 Package            Arch                Version                 Repository         Size
========================================================================================
Installing:
 unzip              x86_64              6.0-4.el6               base              152 k

Transaction Summary
========================================================================================
Install       1 Package(s)

Total download size: 152 k
Installed size: 324 k
Is this ok [y/N]: y
Downloading Packages:
Setting up and reading Presto delta metadata
Processing delta metadata
Package(s) data still to download: 152 k
unzip-6.0-4.el6.x86_64.rpm                                       | 152 kB     00:00
Running rpm_check_debug
Running Transaction Test
Transaction Test Succeeded
Running Transaction
  Installing : unzip-6.0-4.el6.x86_64                                               1/1
  Verifying  : unzip-6.0-4.el6.x86_64                                               1/1

Installed:
  unzip.x86_64 0:6.0-4.el6

Complete!先进入Linux主机上Tomcat的存放目录下面,在使用unzip命令解压Tomcat压缩文件
[root@hzw-2312 ~]# cd /home/web/
[root@hzw-2312 web]# ls
apache-tomcat-7.0.68  apache-tomcat-9.0.0.M8.zip
[root@hzw-2312 web]# unzip apache-tomcat-9.0.0.M8.zip
8、启动Tomcat
解压好过后进入Tomcat的bin目录下面输入:./startup.sh[root@hzw-2312 web]# cd /home/web/apache-tomcat-9.0.0.M8/bin
[root@hzw-2312 bin]# ./startup.sh
-bash: ./startup.sh: Permission denied
[root@hzw-2312 bin]#
获得执行权限后在输入:./startup.sh
[root@hzw-2312 bin]# chmod u+x *.sh
[root@hzw-2312 bin]# ./startup.sh
Using CATALINA_BASE:   /home/web/apache-tomcat-9.0.0.M8
Using CATALINA_HOME:   /home/web/apache-tomcat-9.0.0.M8
Using CATALINA_TMPDIR: /home/web/apache-tomcat-9.0.0.M8/temp
Using JRE_HOME:        /usr
Using CLASSPATH:       /home/web/apache-tomcat-9.0.0.M8/bin/bootstrap.jar:/home/web/apache-tomcat-9.0.0.M8/bin/tomcat-juli.jar
Tomcat started.[root@hzw-2312 bin]# cd ../logs
[root@hzw-2312 logs]# tail -f catalina.out
05-Dec-2016 11:11:48.717 INFO [main] org.apache.catalina.startup.VersionLoggerListener.log Command line argument: -Djava.io.tmpdir=/home/web/apache-tomcat-9.0.0.M8/temp
05-Dec-2016 11:11:48.717 INFO [main] org.apache.catalina.core.AprLifecycleListener.lifecycleEvent The APR based Apache Tomcat Native library which allows optimal performance in production environments was not found on the java.library.path: /usr/java/packages/lib/amd64:/usr/lib64:/lib64:/lib:/usr/lib
05-Dec-2016 11:11:48.822 INFO [main] org.apache.coyote.AbstractProtocol.init Initializing ProtocolHandler ["http-nio-8080"]
05-Dec-2016 11:11:48.849 INFO [main] org.apache.tomcat.util.net.NioSelectorPool.getSharedSelector Using a shared selector for servlet write/read
05-Dec-2016 11:11:48.858 INFO [main] org.apache.coyote.AbstractProtocol.init Initializing ProtocolHandler ["ajp-nio-8009"]
05-Dec-2016 11:11:48.860 INFO [main] org.apache.tomcat.util.net.NioSelectorPool.getSharedSelector Using a shared selector for servlet write/read
05-Dec-2016 11:11:48.860 INFO [main] org.apache.catalina.startup.Catalina.load Initialization processed in 753 ms
05-Dec-2016 11:11:48.896 INFO [main] org.apache.catalina.core.StandardService.startInternal Starting service Catalina
05-Dec-2016 11:11:48.896 INFO [main] org.apache.catalina.core.StandardEngine.startInternal Starting Servlet Engine: Apache Tomcat/9.0.0.M8
05-Dec-2016 11:11:48.914 INFO [localhost-startStop-1] org.apache.catalina.startup.HostConfig.deployDirectory Deploying web application directory /home/web/apache-tomcat-9.0.0.M8/webapps/ROOT
05-Dec-2016 11:12:17.240 INFO [localhost-startStop-1] org.apache.catalina.util.SessionIdGeneratorBase.createSecureRandom Creation of SecureRandom instance for session ID generation using [SHA1PRNG] took [27,715] milliseconds.
05-Dec-2016 11:12:17.286 INFO [localhost-startStop-1] org.apache.catalina.startup.HostConfig.deployDirectory Deployment of web application directory /home/web/apache-tomcat-9.0.0.M8/webapps/ROOT has finished in 28,372 ms
05-Dec-2016 11:12:17.286 INFO [localhost-startStop-1] org.apache.catalina.startup.HostConfig.deployDirectory Deploying web application directory /home/web/apache-tomcat-9.0.0.M8/webapps/docs
05-Dec-2016 11:12:17.333 INFO [localhost-startStop-1] org.apache.catalina.startup.HostConfig.deployDirectory Deployment of web application directory /home/web/apache-tomcat-9.0.0.M8/webapps/docs has finished in 47 ms
05-Dec-2016 11:12:17.333 INFO [localhost-startStop-1] org.apache.catalina.startup.HostConfig.deployDirectory Deploying web application directory /home/web/apache-tomcat-9.0.0.M8/webapps/manager
05-Dec-2016 11:12:17.405 INFO [localhost-startStop-1] org.apache.catalina.startup.HostConfig.deployDirectory Deployment of web application directory /home/web/apache-tomcat-9.0.0.M8/webapps/manager has finished in 72 ms
05-Dec-2016 11:12:17.406 INFO [localhost-startStop-1] org.apache.catalina.startup.HostConfig.deployDirectory Deploying web application directory /home/web/apache-tomcat-9.0.0.M8/webapps/host-manager
05-Dec-2016 11:12:17.440 INFO [localhost-startStop-1] org.apache.catalina.startup.HostConfig.deployDirectory Deployment of web application directory /home/web/apache-tomcat-9.0.0.M8/webapps/host-manager has finished in 35 ms
05-Dec-2016 11:12:17.442 INFO [localhost-startStop-1] org.apache.catalina.startup.HostConfig.deployDirectory Deploying web application directory /home/web/apache-tomcat-9.0.0.M8/webapps/examples
05-Dec-2016 11:12:17.819 INFO [localhost-startStop-1] org.apache.catalina.startup.HostConfig.deployDirectory Deployment of web application directory /home/web/apache-tomcat-9.0.0.M8/webapps/examples has finished in 377 ms
05-Dec-2016 11:12:17.824 INFO [main] org.apache.coyote.AbstractProtocol.start Starting ProtocolHandler [http-nio-8080]
05-Dec-2016 11:12:17.841 INFO [main] org.apache.coyote.AbstractProtocol.start Starting ProtocolHandler [ajp-nio-8009]
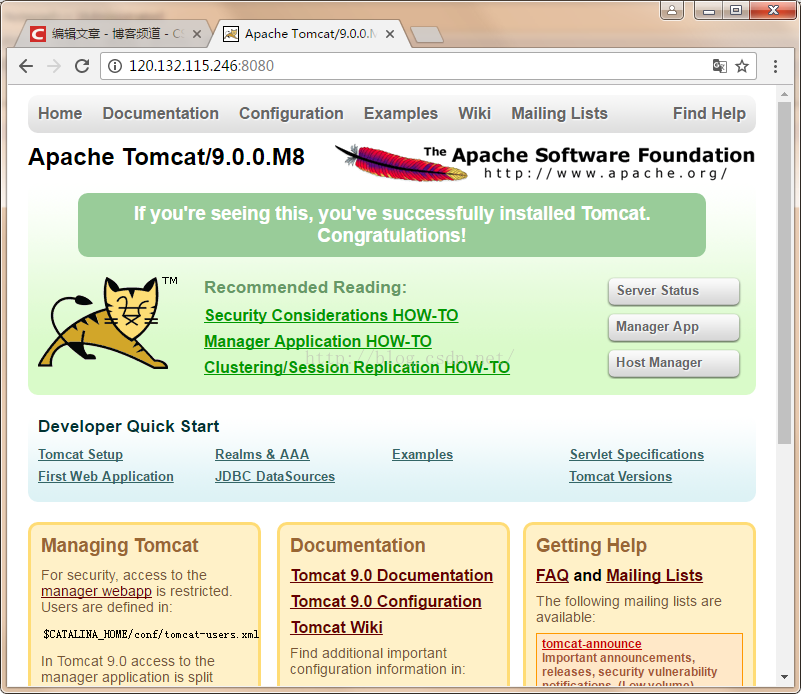
05-Dec-2016 11:12:17.845 INFO [main] org.apache.catalina.startup.Catalina.start Server startup in 28984 ms9、测试Tomcat安装是否成功
在浏览器中输入我们的ip地址加上端口号:http://120.132.115.246:8080/
------------------------------------------------------------------------------------------------------
如果需要80端口,可以考虑直接把程序放在Root目录下,把原来的Root目录的文件全部删除,配置conf目录下的server.xml文件的端口为80就好。
还可以直接在server.xml中的Host节点中配置编译好了的工程代码:
<Host name="localhost"  appBase="webapps"
	unpackWARs="true" autoDeploy="true">
<Context path="/" docBase="/home/web/代码目录"
	debug="0" reloadable="false" URIEncoding="UTF-8"></Context>
<Valve className="org.apache.catalina.valves.AccessLogValve" directory="logs"
	   prefix="localhost_access_log." suffix=".txt"
	   pattern="%h %l %u %t "%r" %s %b" />
</Host>
最后
以上就是潇洒心情最近收集整理的关于在Linux上部署JavaEE应用前言1、在Linux安装东西是用yum命令最是简单,得到主机后不管其它先来一个update命令:2、命令执行完毕,先看看是不是已经安装了JDK:yum list installed | grep java3、我这里之前已经安装了1.7的jdk,现在把它卸载了(如果没有,直接跳过此步骤):4,、查看yum库中的Java安装包5、使用yum命令安装Java环境6、测试jdk7、Tomcat安装8、启动Tomcat9、测试Tomcat安装是否成功的全部内容,更多相关在Linux上部署JavaEE应用前言1、在Linux安装东西是用yum命令最是简单,得到主机后不管其它先来一个update命令:2、命令执行完毕,先看看是不是已经安装了JDK:yum内容请搜索靠谱客的其他文章。


发表评论 取消回复