limit-conn 并发限制插件
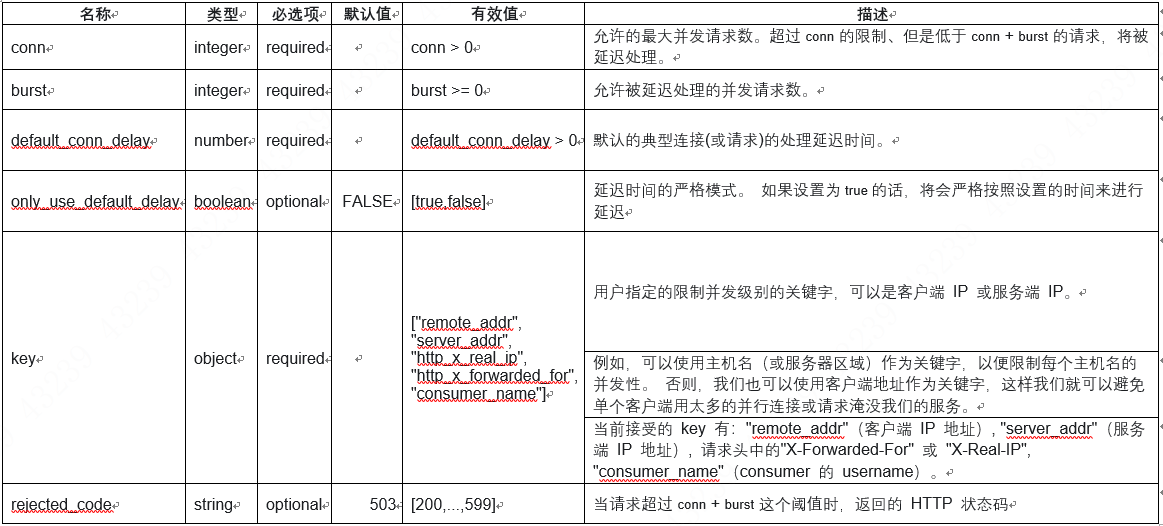
关键属性

源码实现
local limit_conn_new = require("resty.limit.conn").new
local function create_limit_obj(conf)
    core.log.info("create new limit-conn plugin instance")
    return limit_conn_new("plugin-limit-conn", conf.conn, conf.burst,
                          conf.default_conn_delay)
end

function _M.access(conf, ctx)
    core.log.info("ver: ", ctx.conf_version)
    local lim, err = lrucache(conf, nil, create_limit_obj, conf)
    if not lim then
        core.log.error("failed to instantiate a resty.limit.conn object: ", err)
        return 500
    end

    local key = (ctx.var[conf.key] or "") .. ctx.conf_type .. ctx.conf_version
    core.log.info("limit key: ", key)

    local delay, err = lim:incoming(key, true)
    if not delay then
        if err == "rejected" then
            return conf.rejected_code
        end

        core.log.error("failed to limit req: ", err)
        return 500
    end

    if lim:is_committed() then
        if not ctx.limit_conn then
            ctx.limit_conn = core.tablepool.fetch("plugin#limit-conn", 0, 6)
        end

        core.table.insert_tail(ctx.limit_conn, lim, key, delay)
    end

    if delay >= 0.001 then
        sleep(delay)
    end
end


function _M.log(conf, ctx)
    local limit_conn = ctx.limit_conn
    if not limit_conn then
        return
    end

    for i = 1, #limit_conn, 3 do
        local lim = limit_conn[i]
        local key = limit_conn[i + 1]
        local delay = limit_conn[i + 2]

        local latency
        if ctx.proxy_passed then
            latency = ctx.var.upstream_response_time
        else
            latency = ctx.var.request_time - delay
        end

        core.log.debug("request latency is ", latency) -- for test

        local conn, err = lim:leaving(key, latency)
        if not conn then
            core.log.error("failed to record the connection leaving request: ",
                           err)
            break
        end
    end

    core.tablepool.release("plugin#limit-conn", limit_conn)
    return
end
使用Openresty中的resty.limit.conn模块
limit_conn_new("plugin-limit-conn", conf.conn, conf.burst,
                          conf.default_conn_delay)
动态拦截:依据当前系统的响应时间来动态调整限流的阈值,如果响应较快则可以把阈值调的大一些,放过更多请求,反之则自动降低限流阈值,只使少量请求通过。
–以下是官网给的配置参数的的说明介绍。
("my_limit_conn_store", 200, 100, 0.5) 这个是官网给的参数
–限制200个并发请求下的请求和一个100个并发的额外的突发请求。也就是我们延迟
–请求300个并发连接以内以及200个以上连接,并拒绝任何超过300的新请求连接。
–默认请求时间为0.5秒,也就是说通过下面的log_by_lua中的leaving() 进行动态调整。
        -- 超过直接拒绝
        if err == "rejected" then
            return conf.rejected_code
        end
       ....
                if delay >= 0.001 then
		--请求超过200连接比但低于300个连接,所以我们故意将它延迟到这里以符合200连接限制。
                    ngx.sleep(delay)
                end
– 其实这里的 delay 肯定是上面说的并发处理时间的整数倍,
– 举个例子,每秒处理100并发,桶容量200个,当时同时来500个并发,则200个拒掉
– 100个在被处理,然后200个进入桶中暂存,被暂存的这200个连接中,0-100个连接其实应该延后0.5秒处理,
– 101-200个则应该延后0.5*2=1秒处理(0.5是上面预估的并发处理时间)
    if lim:is_committed() then
        if not ctx.limit_conn then
            ctx.limit_conn = core.tablepool.fetch("plugin#limit-conn", 0, 6)
        end

        core.table.insert_tail(ctx.limit_conn, lim, key, delay)
    end
– commit 为true 代表要更新shared dict中key的值,
– false 代表只是查看当前请求要处理的延时情况和前面还未被处理的请求数
– 如果请求连接计数等信息被加到shared dict中,则在ctx中记录,后面通过leaving释放;
最后
以上就是神勇黑裤最近收集整理的关于APISIX源码解析-插件-并发限制【limit-conn】limit-conn 并发限制插件的全部内容,更多相关APISIX源码解析-插件-并发限制【limit-conn】limit-conn内容请搜索靠谱客的其他文章。
本图文内容来源于网友提供,作为学习参考使用,或来自网络收集整理,版权属于原作者所有。


发表评论 取消回复