gtest 单元测试
- gtest 简介
- gtest 优点
- 安装 gtest
- 测试 demo
- 总结
gtest 简介
gtest是Google的一套用于编写C++测试的框架,可以运行在很多平台上(包括Linux、Mac OS X、Windows、Cygwin等等)。基于xUnit架构。支持很多好用的特性,包括自动识别测试、丰富的断言、断言自定义、死亡测试、非终止的失败、生成XML报告等等。
gtest 优点
好的测试应该有下面的这些特点,我们看看GTest是如何满足要求的。
- 测试应该是独立的、可重复的。一个测试的结果不应该作为另一个测试的前提。GTest中每个测试运行在独立的对象中。如果某个测试失败了,可以单独地调试它。
- 测试应该是有清晰的结构的。GTest的测试有很好的组织结构,易于维护。
- 测试应该是可移植和可复用的。有很多代码是不依赖平台的,因此它们的测试也需要不依赖于平台。GTest可以在多种操作系统、多种编译器下工作,有很好的可移植性。
- 测试失败时,应该给出尽可能详尽的信息。GTest在遇到失败时并不停止接下来的测试,而且还可以选择使用非终止的失败来继续执行当前的测试。这样一次可以测试尽可能多的问题。
- 测试框架应该避免让开发者维护测试框架相关的东西。GTest可以自动识别定义的全部测试,你不需要一一列举它们。
- 测试应该够快。GTest在满足测试独立的前提下,允许你复用共享数据,它们只需创建一次。
- GTest采用的是xUnit架构,你会发现和JUnit、PyUnit很类似,所以上手非常快。
安装 gtest
2.搭建测试框架
gtest下载地址: https://github.com/google/googletest
下载方法是:git clone https://github.com/google/googletest.git
安装方法是:
$ cd googletest
注意:如果在make 过程中报错,可在CMakeLists.txt 中增加如下行,再执行下面的命令: SET(CMAKE_CXX_FLAGS “-std=c++11”)
$ cmake .
$ make
然后在lib目录下会生成:libgmock.a libgmock_main.a libgtest.a libgtest_main.a
最后我们再sudo make install。
测试 demo
待测试的代码文件:
sample1.cc
写得比较简单: 一个函数是 n 的阶乘计算,另外一个是判断是否为素数
#include "sample1.h"

// Returns n! (the factorial of n).  For negative n, n! is defined to be 1.
int Factorial(int n) {
  int result = 1;
  for (int i = 1; i <= n; i++) {
    result *= i;
  }

  return result;
}

// Returns true iff n is a prime number.
bool IsPrime(int n) {
  // Trivial case 1: small numbers
  if (n <= 1) return false;

  // Trivial case 2: even numbers
  if (n % 2 == 0) return n == 2;

  // Now, we have that n is odd and n >= 3.

  // Try to divide n by every odd number i, starting from 3
  for (int i = 3; ; i += 2) {
    // We only have to try i up to the square root of n
    if (i > n/i) break;

    // Now, we have i <= n/i < n.
    // If n is divisible by i, n is not prime.
    if (n % i == 0) return false;
  }

  // n has no integer factor in the range (1, n), and thus is prime.
  return true;
}
测试代码头文件
#ifndef GTEST_SAMPLES_SAMPLE1_H_
#define GTEST_SAMPLES_SAMPLE1_H_

// Returns n! (the factorial of n).  For negative n, n! is defined to be 1.
int Factorial(int n);

// Returns true iff n is a prime number.
bool IsPrime(int n);

#endif
创建测试文件,其中使用的规则 和 gtest 库相关 sample_unittest.cc
#include <limits.h>
#include "sample1.h"
#include "gtest/gtest.h"
//加上命名空间 避免和 gtest 里面的变量 命名冲突
namespace {
//TEST 是标号,gtest 识别,标号后面 (待测试的函数名称,以及一个标识符),命名没有特别要求,但是建议顾名思义,第一个是你要测试的函数名,第二个是参数是正还是负,这是待会测试打印的,便于查看的
TEST(FactorialTest, Negative) {
    // This test is named "Negative", and belongs to the "FactorialTest"
    // test case.
    EXPECT_EQ(1, Factorial(-5));//这里就是 将 -5 传到 Factorial 函数中去,看是不是预期等于1
    EXPECT_EQ(1, Factorial(-1));//同理 传入 -1 预期是否为1
    EXPECT_GT(Factorial(-10), 0);	//GT 大于等原因的意思,是否是大于0
}

TEST(FactorialTest, Zero) {
    EXPECT_EQ(1, Factorial(0));
}
//与上面同理,这种 传值,大小的分类是便于我们自己查看,也可以一锅炖,都在一个 TEST 里面测试。但是这不方便我们查看。
TEST(FactorialTest, Positive) {
    EXPECT_EQ(1, Factorial(1));
    EXPECT_EQ(2, Factorial(2));
    EXPECT_EQ(6, Factorial(3));
    EXPECT_EQ(40320, Factorial(8));
}


// Tests IsPrime()
TEST(IsPrimeTest, Negative) {
  EXPECT_FALSE(IsPrime(-1));
  EXPECT_FALSE(IsPrime(-2));
  EXPECT_FALSE(IsPrime(INT_MIN));
}

TEST(IsPrimeTest, Trivial) {
  EXPECT_FALSE(IsPrime(0));
  EXPECT_FALSE(IsPrime(1));
  EXPECT_TRUE(IsPrime(2));
  EXPECT_TRUE(IsPrime(3));
}

TEST(IsPrimeTest, Positive) {
  EXPECT_FALSE(IsPrime(4));
  EXPECT_TRUE(IsPrime(5));
  EXPECT_FALSE(IsPrime(6));
  EXPECT_TRUE(IsPrime(23));
}
}  // namespace
编译上述 三个文件 需要加上 gtest 库,线程库
g++ sample1.cc sample1_unittest.cc -lgtest -std=c++11 -lgtest_main -lpthread -o test1
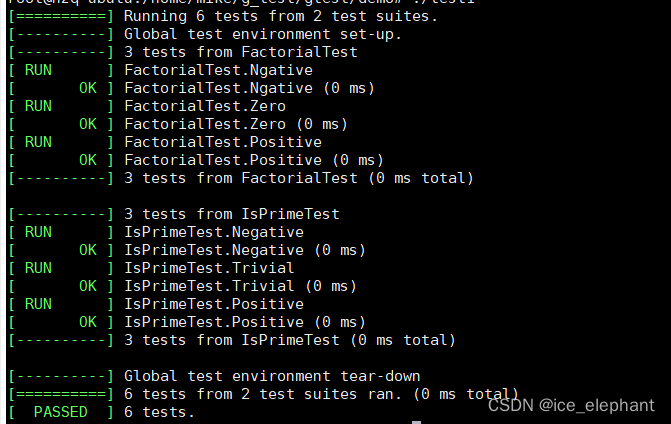
测试效果
执行 ./tese1

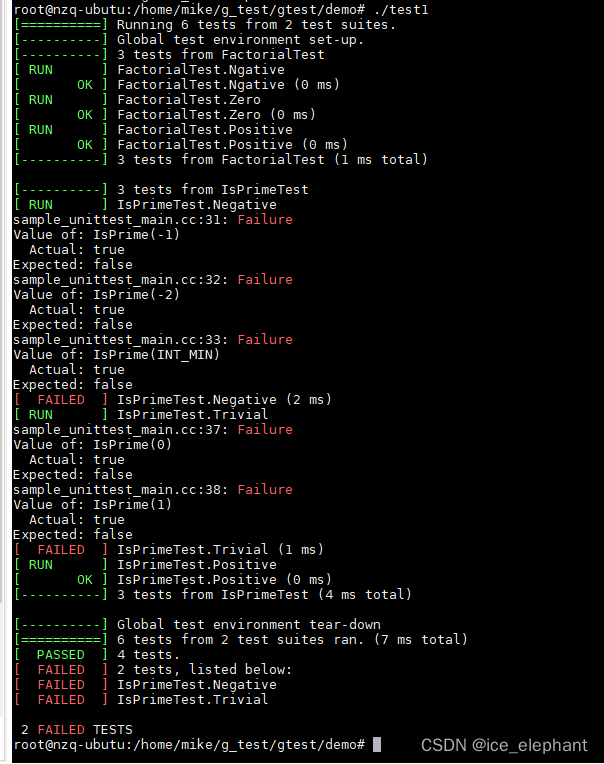
如果我们故意 将
sample1.cc
中 n <= 1 ,改为 return false‘
立马定位到我们的错误

总结
上述介绍了 gtest 两个案例,一是 n 的阶乘,另一个是 判断是否是素数.gtest 功能强大,在实际项目开发中必不可少。
最后
以上就是伶俐指甲油最近收集整理的关于gtest 单元测试工具的基本使用gtest 简介gtest 优点安装 gtest测试 demo总结的全部内容,更多相关gtest内容请搜索靠谱客的其他文章。


发表评论 取消回复