在学习IO多路复用时,对select代码中close的实现感兴趣,寻找过程如下:
1. 首先是select的代码
#include <stdio.h>
#include <arpa/inet.h>
#include <unistd.h>
#include <stdlib.h>
#include <string.h>
#include <sys/select.h>
#include <linux/sched.h>
int main() {

    // 创建socket
    int lfd = socket(PF_INET, SOCK_STREAM, 0);
    struct sockaddr_in saddr;
    saddr.sin_port = htons(9999);
    saddr.sin_family = AF_INET;
    saddr.sin_addr.s_addr = INADDR_ANY;

    // 绑定
    bind(lfd, (struct sockaddr *)&saddr, sizeof(saddr));

    // 监听
    listen(lfd, 8);

    // 创建一个fd_set的集合,存放的是需要检测的文件描述符
    fd_set rdset, tmp;
    FD_ZERO(&rdset);
    FD_SET(lfd, &rdset);
    int maxfd = lfd;
    //printf("lfd = %dn", lfd); lfd3,maxfd=3
    while(1) {

        tmp = rdset;

        // 调用select系统函数,让内核帮检测哪些文件描述符有数据
        int ret = select(maxfd + 1, &tmp, NULL, NULL, NULL);
        if(ret == -1) {
            perror("select");
            exit(-1);
        } else if(ret == 0) {
            continue;
        } else if(ret > 0) {
            // 说明检测到了有文件描述符的对应的缓冲区的数据发生了改变
            if(FD_ISSET(lfd, &tmp)) {
                // 表示有新的客户端连接进来了
                struct sockaddr_in cliaddr;
                int len = sizeof(cliaddr);
                int cfd = accept(lfd, (struct sockaddr *)&cliaddr, &len);

                // 将新的文件描述符加入到集合中
                FD_SET(cfd, &rdset);

                // 更新最大的文件描述符
                maxfd = maxfd > cfd ? maxfd : cfd;
                printf("maxfd = %dn", maxfd);
            }

            for(int i = lfd + 1; i <= maxfd; i++) {
                if(FD_ISSET(i, &tmp)) {
                    // 说明这个文件描述符对应的客户端发来了数据
                    char buf[1024] = {0};
                    int len = read(i, buf, sizeof(buf));
                    if(len == -1) {
                        perror("read");
                        exit(-1);
                    } else if(len == 0) {
                        printf("client closed...n");
                        close(i);
                        FD_CLR(i, &rdset);
                    } else if(len > 0) {
                        printf("read buf = %sn", buf);
                        write(i, buf, strlen(buf) + 1);
                    }
                }
            }

        }

    }
    close(lfd);
    return 0;
}
2. 进行gdb调试
先在close处增加断点,继续run时发现
…/sysdeps/unix/sysv/linux/close.c: 没有那个文件或目录.
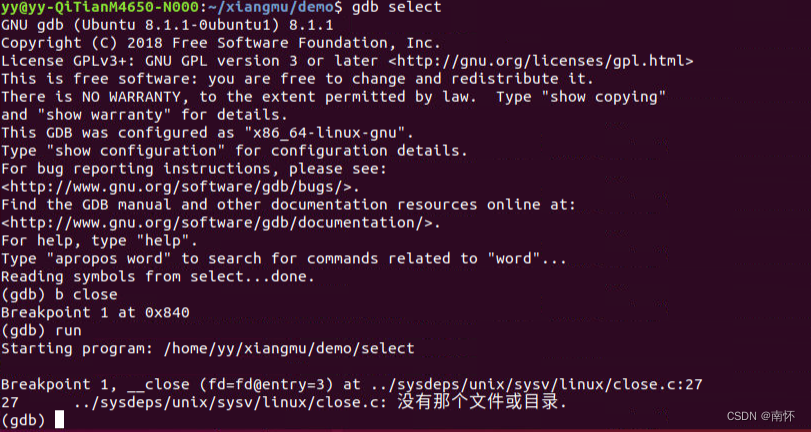
原因是没有glibc库,于是
$ sudo apt install glibc-source
一般glibc在/usr/src/glibc下,然后解压压缩包,可能版本不一样,
$ sudo tar -xvf glibc-2.27.tar.xz
#需要glibc的调试信息
$ sudo apt-get install libc-dbg
$ settings set target.source-map /lib/x86_64-linux-gnu/libc.so.6 /usr/src/glibc/glibc-2.27
有一点要注意,不要在运行中的系统上安装glibc,否则将会导致系统崩溃。
不想下载glibc的话,可以看这个链接,此网址是glibc库的网页版,查函数很方便,可以换成你自己的glibc版本,https://elixir.bootlin.com/glibc/glibc2.27/source/sysdeps/unix/sysv/linux/close.c
还是在原来的gdb调试中加入
directory /usr/src/glibc/glibc-2.27/sysdeps/unix/sysv/linux/
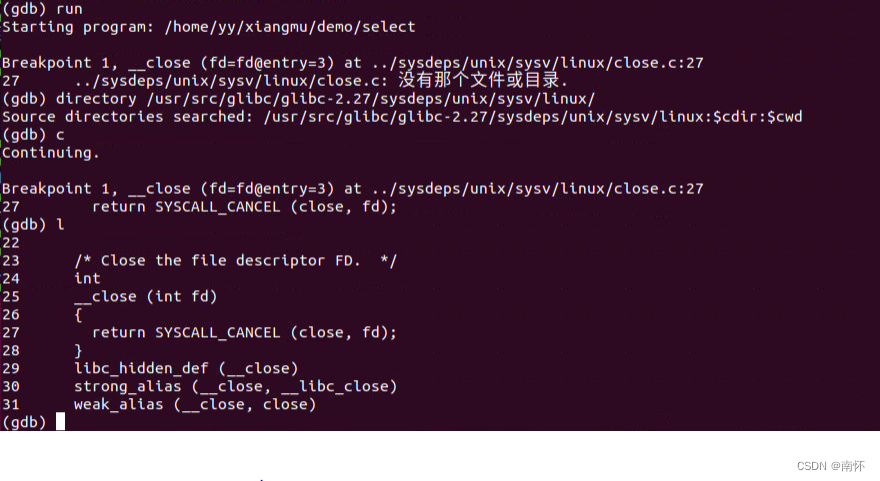
这时发现其实close返回的是 return SYSCALL_CANCEL (close, fd);
而SYSCALL_CANCEL 则是一个宏定义,在/usr/src/glibc/glibc-2.27/sysdeps/unix/sysdep.h中被定义,“”表示为换行,SYSCALL_CANCEL宏做了单线程与多线程下调用系统调用的处理。SINGLE_THREAD_P即为单线程。
#define INLINE_SYSCALL_CALL(...)
  __INLINE_SYSCALL_DISP (__INLINE_SYSCALL, __VA_ARGS__)

#define SYSCALL_CANCEL(...)
  ({
    long int sc_ret;
    if (SINGLE_THREAD_P)
      sc_ret = INLINE_SYSCALL_CALL (__VA_ARGS__);
    else
      {
	int sc_cancel_oldtype = LIBC_CANCEL_ASYNC ();
	sc_ret = INLINE_SYSCALL_CALL (__VA_ARGS__);
        LIBC_CANCEL_RESET (sc_cancel_oldtype);
      }
    sc_ret;
  })
INLINE_SYSCALL_CALL 根据相关宏定义展开:
INLINE_SYSCALL_CALL(close,fd);
-> INLINE_SYSCALL_CALL(close,fd);
-> __INLINE_SYSCALL_DISP(__INLINE_SYSCALL,close,fd);
->__SYSCALL_CONCAT (__INLINE_SYSCALL,__INLINE_SYSCALL_NARGS(close,fd))(close,fd)
其中 __INLINE_SYSCALL_NARGS(close,fd)
	->__INLINE_SYSCALL_NARGS_X (close,fd,7,6,5,4,3,2,1,0,)
	->1
于是,
-> __SYSCALL_CONCAT(__INLINE_SYSCALL, 1)(close, fd)
-> __SYSCALL_CONCAT_X(__INLINE_SYSCALL, 1)(close, fd)
-> __INLINE_SYSCALL1(close, fd)
-> INLINE_SYSCALL (close, 1, fd)
sysdep.h中相关宏定义如下:
#define __SYSCALL_CONCAT_X(a,b)     a##b //连接两个宏
#define __SYSCALL_CONCAT(a,b)       __SYSCALL_CONCAT_X (a, b)

#define __INLINE_SYSCALL0(name)
  INLINE_SYSCALL (name, 0)
#define __INLINE_SYSCALL1(name, a1)
  INLINE_SYSCALL (name, 1, a1)
#define __INLINE_SYSCALL2(name, a1, a2)
  INLINE_SYSCALL (name, 2, a1, a2)
#define __INLINE_SYSCALL3(name, a1, a2, a3)
  INLINE_SYSCALL (name, 3, a1, a2, a3)
#define __INLINE_SYSCALL4(name, a1, a2, a3, a4)
  INLINE_SYSCALL (name, 4, a1, a2, a3, a4)
#define __INLINE_SYSCALL5(name, a1, a2, a3, a4, a5)
  INLINE_SYSCALL (name, 5, a1, a2, a3, a4, a5)
#define __INLINE_SYSCALL6(name, a1, a2, a3, a4, a5, a6)
  INLINE_SYSCALL (name, 6, a1, a2, a3, a4, a5, a6)
#define __INLINE_SYSCALL7(name, a1, a2, a3, a4, a5, a6, a7)
  INLINE_SYSCALL (name, 7, a1, a2, a3, a4, a5, a6, a7)

#define __INLINE_SYSCALL_NARGS_X(a,b,c,d,e,f,g,h,n,...) n
#define __INLINE_SYSCALL_NARGS(...)
  __INLINE_SYSCALL_NARGS_X (__VA_ARGS__,7,6,5,4,3,2,1,0,)
#define __INLINE_SYSCALL_DISP(b,...)
  __SYSCALL_CONCAT (b,__INLINE_SYSCALL_NARGS(__VA_ARGS__))(__VA_ARGS__)
于是得到 INLINE_SYSCALL (close, 1, fd),
INLINE_SYSCALL之后宏定义与硬件和os有关,在glibc源码路径sysdeps/unix/sysv/linux/x86_64/sysdep.h中定义:
# define INLINE_SYSCALL(name, nr, args...)
  ({
    unsigned long int resultvar = INTERNAL_SYSCALL (name, , nr, args);
    if (__glibc_unlikely (INTERNAL_SYSCALL_ERROR_P (resultvar, )))
      {
	 	__set_errno (INTERNAL_SYSCALL_ERRNO (resultvar, ));
	    resultvar = (unsigned long int) -1;
      }
    (long int) resultvar; })
#define INTERNAL_SYSCALL(name, err, nr, args...)
	internal_syscall##nr (SYS_ify (name), err, args)
#undef internal_syscall1
#define internal_syscall1(number, err, arg1)
({
    unsigned long int resultvar;
    TYPEFY (arg1, __arg1) = ARGIFY (arg1);
    register TYPEFY (arg1, _a1) asm ("rdi") = __arg1;
    asm volatile (
    "syscallnt"
    : "=a" (resultvar)
    : "0" (number), "r" (_a1)
    : "memory", REGISTERS_CLOBBERED_BY_SYSCALL);
    (long int) resultvar;
})
最终汇编嵌入调用syscall指令执行系统调用。
3. 系统调用
SYSCALL_DEFINE1是系统调用的入口,其中1表示函数参数的个数,name表示系统调用函数的名字,同理下面的2,3,4,5,6表示参数个数。其具体定义位于linux-4.13.16includelinuxsyscalls.h中,具体定义如下:
#define SYSCALL_DEFINE1(name, ...) SYSCALL_DEFINEx(1, _##name, __VA_ARGS__)
#define __SC_DECL(t, a)	t a         //该宏可以用作类型和参数组合
...
#define __MAP0(m,...)
#define __MAP1(m,t,a) m(t,a)
#define __MAP2(m,t,a,...) m(t,a), __MAP1(m,__VA_ARGS__)
#define __MAP3(m,t,a,...) m(t,a), __MAP2(m,__VA_ARGS__)
#define __MAP4(m,t,a,...) m(t,a), __MAP3(m,__VA_ARGS__)
#define __MAP5(m,t,a,...) m(t,a), __MAP4(m,__VA_ARGS__)
#define __MAP6(m,t,a,...) m(t,a), __MAP5(m,__VA_ARGS__)
#define __MAP(n,...) __MAP##n(__VA_ARGS__)//函数有几个参数就调用对应的组合函数依次调用对应组合函数最终可得所有参数及其类型
#define __SYSCALL_DEFINEx(x, name, ...)
	asmlinkage long sys##name(__MAP(x,__SC_DECL,__VA_ARGS__))
    ...
    ...
	static inline long SYSC##name(__MAP(x,__SC_DECL,__VA_ARGS__))
通过系统调用sys_close来执行的,
asmlinkage long sys_close(unsigned int fd)
{
    // 清除(close_on_exec即退出进程时)的位图标记
    FD_CLR(fd, fdt->close_on_exec);
    // 释放文件描述符
    // 将fdt->open_fds即打开的fd位图中对应的位清除
    // 再将fd挂入下一个可使用的fd以便复用
    __put_unused_fd(files, fd);
    // 调用file_pointer的close方法真正清除
    retval = filp_close(filp, files);
}
最终是调用的filp_close方法:
int filp_close(struct file *filp, fl_owner_t id)
{
    // 如果存在flush方法则flush
    if (filp->f_op && filp->f_op->flush)
        filp->f_op->flush(filp, id);
    // 调用fput
    fput(filp);
    ......
}
void fastcall fput(struct file *file)
{
    // 对应file->count--,同时检查是否还有关于此file的引用
    // 如果没有,则调用_fput进行释放
    if (atomic_dec_and_test(&file->f_count))
        __fput(file);
}
void fastcall __fput(struct file *file)
{
    // 从eventpoll中释放file
    eventpoll_release(file);
    // 如果是release方法,则调用release
    if (file->f_op && file->f_op->release)
        file->f_op->release(inode, file);
}
探查file->f_op->release在socket情况下的实现可见这篇文章
https://zhuanlan.zhihu.com/p/485411986
最后
以上就是刻苦花生最近收集整理的关于socket中close的Linux源码实现1. 首先是select的代码2. 进行gdb调试3. 系统调用的全部内容,更多相关socket中close的Linux源码实现1.内容请搜索靠谱客的其他文章。


发表评论 取消回复