背景
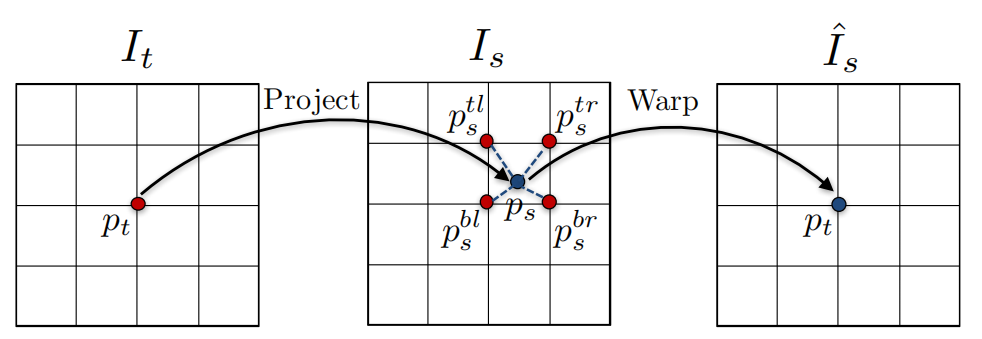
最近在学习SfMLearner,其中一个非常重要的部分是Differentiable depth image-based rendering,翻译过来就是基于深度的可微图像渲染。这看起来好像很高大上,但是换句话说其实就是要根据深度,在当前影像上生成另一个视角的影像。不多说这个了,这其中一个比较重要的部分就是,双线性采样,论文里图示如下,
I
t
I_t
It是目标影像(即前文说的另一个视角的影像),
I
t
I_t
It是原始影像,
I
t
I_t
It上一个整数坐标
p
t
p_t
pt,根据深度投影到
I
s
I_s
Is上后得到一个浮点型坐标
p
s
p_s
ps;此时就要进行双线性采样,利用
I
s
I_s
Is上的四个点采样出
p
s
p_s
ps的值。

说到这里,我基本说清楚了SfMLearner这个Rendering的原理,但是立马就有一个问题出现在我的脑海里,即这玩意在PyTorch里应该怎么实现。在查阅了ClementPinard的代码SfmLearner-Pytorch后,发现对应的工具是porch.nn.functional.grid_sample。
那问题就来了,这玩意到底怎么用呢?后边,我将配合代码瞅瞅这玩意到底咋回事。当然,我的结论不一定完全对,但至少给一些表面的感觉吧。
参考链接
- https://pytorch.org/docs/master/nn.functional.html#grid-sample
- https://github.com/ClementPinard/SfmLearner-Pytorch/blob/master/inverse_warp.py
- Unsupervised Learning of Depth and Ego-Motion from Video
代码及说明
文档
搞事之前,先简单看一下文档,如下:
torch.nn.functional.grid_sample(
input,
grid,
mode='bilinear',
padding_mode='zeros',
align_corners=None)
- 其中
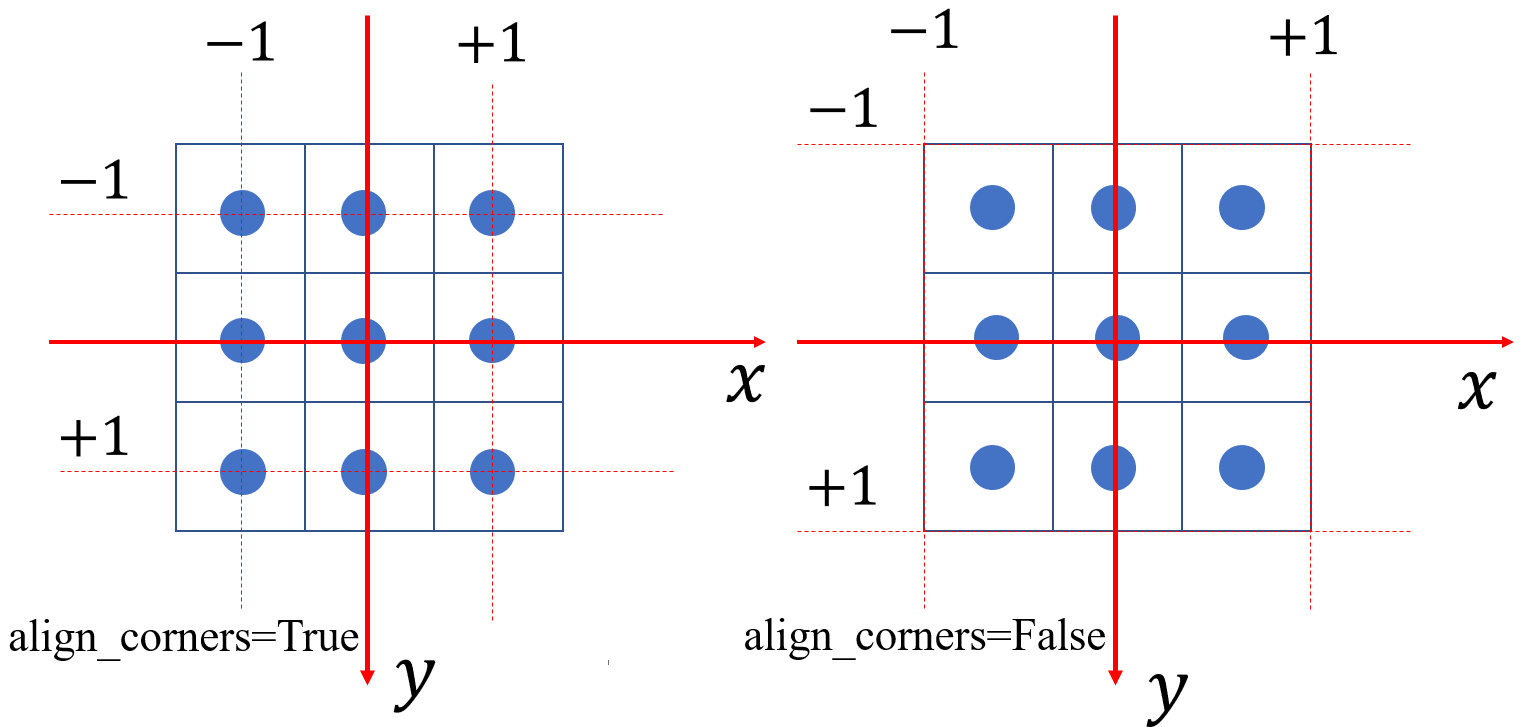
input的输入格式是 ( N , C , H i n , W i n ) (N,C,H_{in},W_{in}) (N,C,Hin,Win);其中 N N N对应的是Batch_Size, C C C是通道数量; H i n H_{in} Hin, W i n W_{in} Win对应的是影像的高宽;这里说明一下,还有一个5-D的输入,我就不讨论了。 grid的输入格式是 ( N , H o u t , W o u t , 2 ) (N,H_{out},W_{out},2) (N,Hout,Wout,2);这个 N N N对应的也是Batch_Size; H o u t H_{out} Hout和 W o u t W_{out} Wout分别对应的是grid的形状,当然,输出的形状和这个也是对应的;最后就是这个2,表示的是grid上一个点的坐标,分别是x坐标和y坐标,但注意坐标值得范围是归一化后的[-1,+1]。mode值得是采样的方式,这个有nearest和bilinear;nearest就是最邻近采样,bilinear是双线性插值。padding_mode指的是边缘的处理模式,包括zeros,border和reflection;zeros指的是边缘补充部分为0,border指的是边缘补充部分直接复制边缘区域,reflection指的是边缘补充部分为根据边缘的镜像,举个例子ABC|CBA,,其中|是边缘,CBA是原始图像。align_corners,这个可以说是让我脑袋最大的一个参数,看了半天都没搞懂啥意思;经过多次看文档和写代码测试,我终于有点明白了,这里简单解释一下;当align_corners=True时,坐标归一化范围是图像四个角点的中心;当align_corners=False时,坐标归一化范围是图像四个角点靠外的角点;为了更好的说明这个情况,我画了一个大小为 3 × 3 3×3 3×3影像进行说明,如下,其中每一个方格代表一个像素,并且像素坐标在方格中央;这个图已经很清楚了吧,如果还不清楚,后边还有代码测试。

代码
为了验证之前的结论,以下有一些代码进行测试。
- 生成一个3*3的输入
test = torch.rand(1,1,3,3)
test[0][0][0][0]=1
test[0][0][0][1]=2
test[0][0][0][2]=3
test[0][0][1][0]=4
test[0][0][1][1]=5
test[0][0][1][2]=6
test[0][0][2][0]=7
test[0][0][2][1]=8
test[0][0][2][2]=9
print(test)
输入
tensor([[[[1., 2., 3.],
          [4., 5., 6.],
          [7., 8., 9.]]]])
- 定义采样格网,这里为了简单,只有一个点
sample_one = torch.zeros(1,1,1,2)
sample_one [0][0][0][0] = -1  # x
sample_one [0][0][0][1] = -1  # y

sample_two = torch.zeros(1,1,1,2)
sample_two [0][0][0][0] = -2/3  # x
sample_two [0][0][0][1] = -2/3  # y

sample_thr = torch.zeros(1,1,1,2)
sample_thr [0][0][0][0] = -0.5  # x
sample_thr [0][0][0][1] = -0.5  # y
- 采样
result_one = torch.nn.functional.grid_sample(test,sample,mode='bilinear',padding_mode="zeros",align_corners=True)
print(result_one )

result_two= torch.nn.functional.grid_sample(test,sample_two ,mode='bilinear',padding_mode="zeros",align_corners=False)
print(result_two)

result_thr= torch.nn.functional.grid_sample(test,sample_thr ,mode='bilinear',padding_mode="zeros",align_corners=True)
print(result_thr)
输出
# result_one
# 这个很好理解,当`align_corners=True`时,$(-1,-1)$对应的就是`test`的左上角点
tensor([[[[1.]]]])

# result_two
# 这个其实很奇葩,当`align_corners=False`时,$(-2/3,-2/3)$对应的才是`test`的左上角点
tensor([[[[1.]]]])

# result_thr
# 当`align_corners=True`时,如果懂双线性插值的话,直接算就可以得到(1*0.5+2*0.5)*0.5+(4*0.5+5*0.5)*0.5=3
tensor([[[[3.]]]])
补充
补充两个代码,分别是在二维影像上进行一次采样和多次采样
class SampleFeatureSingle(nn.Module):
    def __init__(self):
        super(SampleFeatureSingle, self).__init__()

    def forward(self,feature,x_move,y_move):

        b,c,h,w = feature.shape

        x_range = torch.arange(0, w).view(1, 1, w).expand(b,h,w).float() + x_move
        y_range = torch.arange(0, h).view(1, h, 1).expand(b,h,w).float() + y_move

        x_range = 2.*x_range/(w-1) - 1
        y_range = 2.*y_range/(h-1) - 1

        grid = torch.stack((x_range,y_range), dim=3)

        sample = F.grid_sample(feature,grid,mode='bilinear',padding_mode="zeros",align_corners=True)

        return sample

class SampleFeatureMulti(nn.Module):
    def __init__(self):
        super(SampleFeatureMulti, self).__init__()

    def forward(self,feature,x_move,y_move):

        b,c,t,h,w = feature.shape
        bd,td,hd,wd = x_move.shape

        x_range = torch.arange(0, w).view(1, 1, w).expand(b,1,h,w).expand(b,td,h,w).float().cuda() + x_move
        y_range = torch.arange(0, h).view(1, h, 1).expand(b,1,h,w).expand(b,td,h,w).float().cuda() + y_move
        z_range = torch.arange(0, td).view(1, td, 1, 1).expand(b,td,h,w).float().cuda()

        x_range = 2.*x_range/(w-1) - 1
        y_range = 2.*y_range/(h-1) - 1
        z_range = 2.*z_range/(td-1) - 1

        grid = torch.stack((x_range,y_range,z_range), dim=4)

        sample = F.grid_sample(feature,grid,mode='bilinear',padding_mode="zeros",align_corners=True)

        return sample
总结
关于torch.nn.functional.grid_sample学习内容就如上了,后续继续看warp的代码,加油!!
最后
以上就是殷勤书包最近收集整理的关于PyTorch(1.3.0+):学习torch.nn.functional.grid_sample背景参考链接代码及说明总结的全部内容,更多相关PyTorch(1内容请搜索靠谱客的其他文章。


发表评论 取消回复