聚焦在 Twitter 上关于Apache Spark的数据, 这些是准备用于机器学习和流式处理应用的数据。 重点是如何通过分布式网络交换代码和数据,获得 串行化, 持久化 , 调度和缓存的实战经验 。 认真使用 Spark SQL, 交互性探索结构化和半结构化数据. Spark SQL 的基础数据结构是 Spark dataframe, Spark dataframe 受到了 Python Pandas dataframe 和R dataframe 的启发. 这是一个强大的数据结构, 有R 或Python 背景的数据科学家非常容易理解并喜欢上它.
主要关注以下几点:
• 连接 Twitter, 收集有关数据, 然后存储到各种格式中如 JSON ,CSV 以及 MongoDB这样的数据存储
• 使用Blaze and Odo分析数据, 一个Blaze的副产品库, 能够在各种源和目标之间建立连接并传输数据
• 引入 Spark dataframes 作为各个 Spark 模块交换数据的基础,同时使用 Spark SQL交互性探索数据
回顾数据密集型应用的架构
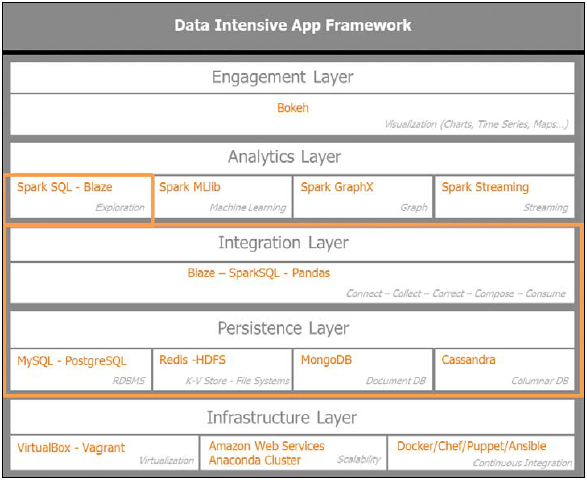
首先审视数据密集型应用架构,集中关注集成层以及获取、提炼和数据持久化迭代循环的基本运行. 这一循环命名为 5C. 5C 代表了connect, collect,correct, compose和consume. 这是集成层运行的基本过程以便于保证从Twitter 获取数据的质量和数量. 我们也将深入持久化层,建立如 MongoDB这样的数据存储方便后面数据的处理.
通过Blaze探索数据, 这是数据操控的一个Python 库, 通过Spark SQL使用 Spark dataframe, 完成交互性数据发现,感受一下三种 dataframe flavors 的细微差别。
下图指出了本章的重点, 集中在集成层和持久化层:
数据的序列化和反序列化
由于在通过API获取数据是的限制,我们需要数据存储. 数据在分布式集群上处理,我们需要一致的方式来保存状态以便于将来的提取使用。现在定义序列化, 持久化, 调度和缓存.
序列化一个Python对象是将它转换一个字节流. 该Python 对象在程序挂掉的时候能够通过反序列化提取.序列化后的 Python 对象在网络上传输或者存在持久化存储中. 反序列化是其逆运算将字节流转化为初始的 Python 对象所以程序能够从保存的状态中提取。 Python中最流行的序列化库是Pickle. 事实上,PySpark命令将pickled 的数据传输到多个工作节点.
持久化 将程序的状态数据保存到硬盘或内存,因而在离开或重启时继续使用。把一个Python 对象从内存保存到文件或数据库,在以后加载的时候拥有相同的状态。
调度 是在多核或者分布式系统中在网络TCP连接上发送 Python 代码和数据.
缓存 是将一个Python 对象转化为内存中的字符串可以作为字典中的关键字. Spark 支持将数据放入集群范围的内存缓冲区. 这在数据重复访问时非常有用,例如查询一个小引用的数据集或者象 Google PageRank那样的迭代算法.
缓存是Spark中非常关键的一个概念,允许我们将RDDs 存入内存或者溢出到硬盘 . 缓存策略的选择依赖于数据的线性程度或者RDD转换的DAG ,这样可以最小化 shuffle 或跨网络数据交换.Spark 为了获得更好的性能,需要注意数据shuffling. 一个好的分区策略和 RDD 缓存, 避免不必要的操作, 可以导致Spark更好的性能.
获取和存储数据
在深入如MongoDB这样的数据库存储之前,先看一下广泛使用的文件存储 : CSV和JSON文件存储. 这两种格式被广泛使用的主要原因: 可读性好, 简单, 轻度关联, 并容易使用.
在CSV中持久化数据
CSV 是轻量级可读易用的格式. 拥有已分隔的文本列和内在表格制式。Python提供了强健的csv库能将 cvs文件序列化为一个Python的字典. 为了我们的程序方便, 写了一个 python类来管理CSV格式中 数据的存储,和从CSV中读取数据. 看一下 IO_csv 类的代码. init 部分 实例化了文件路径,文件名和文件后缀(本例中, .csv):
class  IO_csv(object):

    def  __init__(self,  filepath,  filename,  filesuffix='csv'):
    self.filepath  =  filepath  #  /path/to/file  without  the  /'
    at  the  end
    self.filename  =  filename  #  FILE_NAME
    self.filesuffix  =  filesuffix
该类的存储方法使用了tuple 和 csv 文件的头字段作为scheme来持久化数据。如果csv文件存在,则追加数据,否则创建:
def  save(self,  data,  NTname,  fields):
    #  NTname  =  Name  of  the  NamedTuple
    #  fields  =  header  of  CSV  -  list  of  the  fields  name
    NTuple  =  namedtuple(NTname,  fields)

    if  os.path.isfile('{0}/{1}.{2}'.format(self.filepath,  self.
    filename,  self.filesuffix)):
    #  Append  existing  file
    with  open('{0}/{1}.{2}'.format(self.filepath,  self.
    filename,  self.filesuffix),  'ab')  as  f:
    writer  =  csv.writer(f)
    #  writer.writerow(fields)  #  fields  =  header  of  CSV
    writer.writerows([row  for  row  in  map(NTuple._make,
    data)])
    #  list  comprehension  using  map  on  the  NamedTuple._
    make()  iterable  and  the  data  file  to  be  saved
    #  Notice  writer.writerows  and  not  writer.writerow
    (i.e.  list  of  multiple  rows  sent  to  csv  file
    else:
    #  Create  new  file
    with  open('{0}/{1}.{2}'.format(self.filepath,  self.
    filename,  self.filesuffix),  'wb')  as  f:
        writer  =  csv.writer(f)
        writer.writerow(fields)  # fields  =  header  of  CSV  -
        list  of  the  fields  name
        writer.writerows([row  for  row  in  map(NTuple._make,
        data)])
        #   list  comprehension  using  map  on  the  NamedTuple._make()  iterable  and  the  data  file  to  be  saved
        #  Notice  writer.writerows  and  not  writer.writerow
        (i.e.  list  of  multiple  rows  sent  to  csv  file
该类的加载方法使用了tuple 和 csv 文件的头字段使用一致的schema来提取数据。 加载方法使用生成器来提高内存的有效性,使用yield 返回:
def  load(self,  NTname,  fields):
    #  NTname  =  Name  of  the  NamedTuple
    #  fields  =  header  of  CSV  -  list  of  the  fields  name
    NTuple  =  namedtuple(NTname,  fields)
    with open('{0}/{1}.{2}'.format(self.filepath,self.filename,self.filesuffix),'rU')  as  f:
        reader  =  csv.reader(f)
        for  row  in  map(NTuple._make,  reader):
            #  Using  map  on  the  NamedTuple._make()  iterable  and  the reader  file  to  be  loaded
            yield  row
我们使用tuple解析tweet保存到csv或者从csv中提取数据:
fields01  =  ['id',  'created_at',  'user_id',  'user_name',  'tweet_text','url']
Tweet01  =  namedtuple('Tweet01',fields01)

def  parse_tweet(data):
    """
    Parse  a  ``tweet``  from  the  given  response  data.
    """
    return  Tweet01(
        id=data.get('id',  None),
        created_at=data.get('created_at',  None),
        user_id=data.get('user_id',  None),
        user_name=data.get('user_name',  None),
        tweet_text=data.get('tweet_text',  None),
        url=data.get('url')
    )
在 JSON中持久化
JSON 是互联网应用中使用最广泛的数据格式之一. 所有我们使用的API,Twitter, GitHub, 和Meetup, 都通过JSON格式发送数据. JSON 格式比 XML格式要轻,可读性好,在JSON 中内嵌模式. 对于CSV 格式, 所有记录遵从相同的表结构,而JSON 的结构能够变化,是半结构化的,一条JSON 记录能够映射成Python中的字典。 看一下 IO_json类的代码. init 部分例化了文件路径,文件名和文件后缀(本例中,.json):
class  IO_json(object):
    def  __init__(self,  filepath,  filename,  filesuffix='json'):
        self.filepath  =  filepath  #  /path/to/file  without  the  /'
        at  the  end
        self.filename  =  filename  #  FILE_NAME
        self.filesuffix  =  filesuffix
        #  self.file_io  =  os.path.join(dir_name,  .'.join((base_
        filename,  filename_suffix)))
该类的save方法使用utf-8编码来保证数据读写的兼容性。 如果JSON存在, 则追加数据否则创建:
def  save(self,  data):
    if  os.path.isfile('{0}/{1}.{2}'.format(self.filepath,  self.
    filename,  self.filesuffix)):
        #  Append  existing  file
        with  io.open('{0}/{1}.{2}'.format(self.filepath, self.filename, self.filesuffix), 'a', encoding='utf-8')  as  f:
            f.write(unicode(json.dumps(data,  ensure_ascii=
            False)))  # In python 3, there is no "unicode"  function
            #  f.write(json.dumps(data,  ensure_ascii=  False))  #
            create  a  "  escape  char  for  "  in  the  saved  file
            else:
            #  Create  new  file
        with  io.open('{0}/{1}.{2}'.format(self.filepath, self.filename,  self.filesuffix),  'w',  encoding='utf-8') as  f:
            f.write(unicode(json.dumps(data,  ensure_ascii=
            False)))
            #  f.write(json.dumps(data,  ensure_ascii=  False))
这个类的load 方法返回了读取的文件 , 获取json数据需要调用 json.loads函数:
def  load(self):
    with  io.open('{0}/{1}.{2}'.format(self.filepath, self.filename,  self.filesuffix),  encoding='utf-8')  as  f:
        return  f.read()
搭建MongoDB
鉴于存储所收集信息的重要性,搭建MongoDB 作为我们的文档存储数据库 . 所有采集的信息是 JSON 格式, MongoDB 以 BSON (short for Binary JSON)格式信息, 因此是一个自然的选择.
现在完成下列步骤:
• 安装MongoDB 服务器和客户端
• 运行MongoDB server
• 运行 Mongo client
• 安装PyMongo driver
• 创建 Python Mongo client
安装MongoDB服务器和客户端
执行如下步骤安装 MongoDB 包:
1. 使用包管理工具导入公钥(in our
case, Ubuntu’s apt),命令如下:
sudo apt-key adv --keyserver hkp://keyserver.ubuntu.com:80 --recv
7F0CEB10 - 创建 MongoDB 的文件列表,命令如下. :
echo "deb http://repo.mongodb.org/apt/ubuntu "$("lsb_release
-sc)"/ mongodb-org/3.0 multiverse" | sudo tee /etc/apt/sources.
list.d/mongodb-org-3.0.list
3.升级本地包的数据库:
sudo apt-get update4.安装MongoDB 的最新稳定版:
sudo apt-get install -y mongodb-org运行MongoDB服务器
启动MongoDB server:
1. 启动MongoDB server, 命令如下:
sudo service mongodb start
- 检查mongod 是否正常启动:
an@an-VB:/usr/bin$  ps  -ef  |  grep  mongo
mongodb
967 1 4  07:03   ? 00:02:02  /usr/bin/mongod
--config  /etc/mongod.conf
an
3143 3085 0  07:45  pts/3 00:00:00  grep  --color=auto
mongo
In
在本例中,mongodb 运行在967进程.
3. The mongod server 监听默认端口27017 可以在配置文件中修改.
4. 检查/var/log/mongod/mongod.log 日志文件的内容:
an@an-VB:/var/lib/mongodb$  ls  -lru

total  81936

drwxr-xr-x  2  mongodb  nogroup 4096  Apr  25  11:19  _tmp

-rw-r--r--  1  mongodb  nogroup 69  Apr  25  11:19  storage.bson


-rwxr-xr-x  1  mongodb  nogroup 5  Apr  25  11:19  mongod.lock


-rw-------  1  mongodb  nogroup  16777216  Apr  25  11:19  local.ns


-rw-------  1  mongodb  nogroup  67108864  Apr  25  11:19  local.0


drwxr-xr-x  2  mongodb  nogroup 4096  Apr  25  11:19  journal
5. 停止mongodb 的服务器, 命令如下:
sudo service mongodb stop运行Mongo客户端
在控制台运行Mongo client 很简单,命令如下:
an@an-VB:/usr/bin$  mongo

MongoDB  shell  version:  3.0.2

connecting  to:  test
Server  has  startup  warnings:

2015-05-30T07:03:49.387+0200  I  CONTROL [initandlisten]

2015-05-30T07:03:49.388+0200  I  CONTROL [initandlisten]
在mongo client console 提示下, 查看数据库的命令如下:
>  show  dbs


local 0.078GB


test 0.078GB
选择 test数据库:
>  use  test

switched  to  db  test
在数据库中显示 collections:
>  show  collections


restaurants


system.indexes
我们查看 restaurant collection 中的纪录:
>  db.restaurants.find()


{  "_id"  :  ObjectId("553b70055e82e7b824ae0e6f"),  "address  :  {  "building
:  "1007",  "coord"  :  [  -73.856077,  40.848447  ],  "street  :  "Morris  Park
Ave",  "zipcode  :  "10462  },  "borough  :  "Bronx",  "cuisine  :  "Bakery",
"grades  :  [  {  "grade  :  "A",  "score"  :  2,  "date"  :  ISODate("2014-
03-03T00:00:00Z")  },  {  "date"  :  ISODate("2013-09-11T00:00:00Z"),
"grade  :  "A",  "score"  :  6  },  {  "score"  :  10,  "date"  :  ISODate("2013-
01-24T00:00:00Z"),  "grade  :  "A  },  {  "date"  :  ISODate("2011-11-
23T00:00:00Z"),  "grade  :  "A",  "score"  :  9  },  {  "date"  :  ISODate("2011-
03-10T00:00:00Z"),  "grade  :  "B",  "score"  :  14  }  ],  "name  :  "Morris
Park  Bake  Shop",  "restaurant_id  :  "30075445"  }
安装PyMongo driver
在anaconda 中安装mongodb的Python驱动也很简单:
conda install pymongo
创建 MongoDB的Python client
我们创建一个 IO_mongo 类用来收集数据 存储采集的数据 提取保存的数据. 为了创建mongo client, 需要import pymongo. 连接本地端口 27017命令如下:
from  pymongo  import  MongoClient  as  MCli
class  IO_mongo(object):
conn={'host':'localhost',  'ip':'27017'}
我们的类初始化了客户端连接, 数据库 (本例中, twtr_db),和被访问连接的collection (本例中, twtr_coll):
def  __init__(self,  db='twtr_db',  coll='twtr_coll',  **conn  ):
    #  Connects  to  the  MongoDB  server
    self.client  =  MCli(**conn)
    self.db  =  self.client[db]
    self.coll  =  self.db[coll]
save方法插入新的纪录:
def  save(self,  data):
    #Insert  to  collection  in  db
    return  self.coll.insert(data)
load 方法根据规则提取数据. 在数据量大的情况下 返回游标:
def  load(self,  return_cursor=False,  criteria=None, projection=None):

    if  criteria  is  None:
    criteria  =  {}

    if  projection  is  None:
        cursor  =  self.coll.find(criteria)
    else:
        cursor  =  self.coll.find(criteria,  projection)

    #  Return  a  cursor  for  large  amounts  of  data
    if  return_cursor:
        return  cursor
    else:
        return  [  item  for  item  in  cursor  ]
从Twitter汲取数据
每个社交网络都有自己的限制和挑战, 一个主要的障碍就是强加的流量限制. 在长连接或重复执行时要有暂停, 必须要避免重复数据.我们重新设计了连接程序来关注流量限制。
TwitterAPI 类根据查询条件来搜索和采集,我们已经添加了如下操作:
•日志能力,使用 Python logging 库在程序失败时纪录错误和警告
• 使用MongoDB 的持久化能力,象使用 IO_json 操作JSON 文件那样操作 IO_mongo 类
• API 流量限制和错误管理能力 , 保证我们弹性调用 Twitter 而不会被认为是恶意攻击
步骤如下:
1. 通过证书初始化Twitter API 的实例:
class  TwitterAPI(object):
    """
    TwitterAPI  class  allows  the  Connection  to  Twitter  via  OAuth
    once  you  have  registered  with  Twitter  and  receive  the
    necessary  credentials
    """

    def  __init__(self):
        consumer_key  =  'get_your_credentials'
        consumer_secret  =  get  your_credentials'
        access_token  =  'get_your_credentials'
        access_secret  =  'get  your_credentials'
        self.consumer_key  =  consumer_key
        self.consumer_secret  =  consumer_secret
        self.access_token  =  access_token
        self.access_secret  =  access_secret
        self.retries  =  3
        self.auth  =  twitter.oauth.OAuth(access_token,  access_
        secret,  consumer_key,  consumer_secret)
        self.api  =  twitter.Twitter(auth=self.auth)
2 设置日志等级,初始化 logger:
°   logger.debug(debug  message)
°   logger.info(info  message)
°   logger.warn(warn  message)
°   logger.error(error  message)
°   logger.critical(critical  message)
3设置日志路径和内容格式:
#  logger  initialisation
appName  =  'twt150530'
self.logger  =  logging.getLogger(appName)
#self.logger.setLevel(logging.DEBUG)
#  create  console  handler  and  set  level  to  debug
logPath  = '/home/an/spark/spark-1.3.0-bin-hadoop2.4/examples/AN_Spark/data'
fileName  =  appName
fileHandler  =  logging.FileHandler("{0}/{1}.log".
format(logPath,  fileName))
formatter  =  logging.Formatter('%(asctime)s  -  %(name)s  -
%(levelname)s  -  %(message)s')
fileHandler.setFormatter(formatter)
self.logger.addHandler(fileHandler)
self.logger.setLevel(logging.DEBUG)
4.初始化JSON文件的持久化指令:
#  Save  to  JSON  file  initialisation
jsonFpath  =  '/home/an/spark/spark-1.3.0-bin-hadoop2.4/
examples/AN_Spark/data'
jsonFname  =  'twtr15053001'
self.jsonSaver  =  IO_json(jsonFpath,  jsonFname)
5.初始化 MongoDB database 和 collection :
#  Save  to  MongoDB  Intitialisation
self.mongoSaver  =  IO_mongo(db='twtr01_db',  coll='twtr01_
coll')
6.searchTwitter 方法 根据指定的查询条件搜索:
def  searchTwitter(self,  q,  max_res=10,**kwargs):
    search_results  =  self.api.search.tweets(q=q,  count=10,
    **kwargs)
    statuses  =  search_results['statuses']
    max_results  =  min(1000,  max_res)

    for  _  in  range(10):
        try:
            next_results  =  search_results['search_metadata']
            ['next_results']
            #  self.logger.info('info'  in  searchTwitter  -  next_
            results:%s'%  next_results[1:])
        except  KeyError  as  e:
            self.logger.error('error' in searchTwitter: %s',%(e))
            break

        #  next_results  =  urlparse.parse_qsl(next_results[1:])
        #  python  2.7
        next_results  =  urllib.parse.parse_qsl(next_results[1:])
        #  self.logger.info('info'  in  searchTwitter  -  next_
        results[max_id]:',  next_results[0:])
        kwargs  =  dict(next_results)
        #  self.logger.info('info'  in  searchTwitter  -  next_
        results[max_id]:%s'%  kwargs['max_id'])
        search_results  =  self.api.search.tweets(**kwargs)
        statuses  +=  search_results['statuses']
        self.saveTweets(search_results['statuses'])

        if  len(statuses)  >  max_results:
            self.logger.info('info'  in  searchTwitter  -  got  %i tweets  -  max:  %i'  %(len(statuses),  max_results))
            break
    return  statuses
7.saveTweets 方法将所选的tweets 保存为JSON 存入MongoDB:
def  saveTweets(self,  statuses):
    #  Saving  to  JSON  File
    self.jsonSaver.save(statuses)

    #  Saving  to  MongoDB
    for  s  in  statuses:
    self.mongoSaver.save(s)
8.parseTweets 方法从Twitter API 提供的大量信息中提取关键的 tweet 信息:
def  parseTweets(self,  statuses):
    return  [  (status['id'],
    status['created_at'],
    status['user']['id'],
    status['user']['name']
    status['text''text'],
    url['expanded_url'])
    for  status  in  statuses
        for  url  in  status['entities']['urls']
    ]
9.getTweets 方法调用searchTwitter,保证API 调用的稳定性并重点关注速率限制。代码如下:
def  getTweets(self,  q,    max_res=10):
    """
    Make  a  Twitter  API  call  whilst  managing  rate  limit  and errors.
    """
    def  handleError(e,  wait_period=2,  sleep_when_rate_
    limited=True):
        if  wait_period  >  3600:  #  Seconds
        self.logger.error('Too  many  retries  in  getTweets:
        %s',  %(e))
            raise  e
        if  e.e.code  ==  401:
            self.logger.error('error  401  *  Not  Authorised  *  in
            getTweets:  %s',  %(e))
            return  None
        elif  e.e.code  ==  404:
            self.logger.error('error  404  *  Not  Found  *  in
            getTweets:  %s',  %(e))
            return  None
        elif  e.e.code  ==  429:
            self.logger.error('error  429  *  API  Rate  Limit
            Exceeded  *  in  getTweets:  %s',  %(e))
            if  sleep_when_rate_limited:
                self.logger.error('error  429  *  Retrying  in  15
                minutes  *  in  getTweets:  %s',  %(e))
                sys.stderr.flush()
                time.sleep(60*15  +  5)
                self.logger.info('error  429  *  Retrying  now  *
                in  getTweets:  %s',  %(e))
                return  2
            else:
                raise  e  # Caller must handle  the  rate  limiting issue
        elif  e.e.code  in  (500,  502,  503,  504):
            self.logger.info('Encountered  %i  Error.  Retrying
            in  %i  seconds'  %  (e.e.code,  wait_period))
            time.sleep(wait_period)
            wait_period  *=  1.5
            return  wait_period
        else:
            self.logger.error('Exit  -  aborting  -  %s',  %(e))
            raise  e
10.根据指定的参数查询调用searchTwitter API . 如果遇到了任何错误, 由handleError 方法处理:
while  True:
    try:
        self.searchTwitter(  q,  max_res=10)
    except  twitter.api.TwitterHTTPError  as  e:
        error_count  =  0
        wait_period  =  handleError(e,  wait_period)
        if  wait_period  is  None:
            return
使用Blaze探索数据
Blaze是个由Continuum.io,开发的 Python库 ,利用了 Python Numpy arrays 和 Pandas dataframe. Blaze 扩展到多核计算, 而Pandas 和 Numpy 是单核的.
Blaze 为各种后端提供了统一适配的一致性用户接口. Blaze 精心安排了:
• Data: 不同数据存储的无缝交换如 CSV, JSON, HDF5,
HDFS, 和 Bcolz 文件
• Computation: 对不同的后端采用同样的查询方式如 Spark, MongoDB, Pandas, or SQL Alchemy.
• Symbolic expressions: 在一定范围内使用了与Pandas类似的语法来抽象表达 join, group-by, filter,
selection, 和注入,参考R语言实现了
split-apply-combine 方法.
Blaze 表达式 和Spark RDD 数据转换一致,采用延迟计算.
深入 Blaze首先要引入所需的库: numpy, pandas, blaze 和 odo. Odo 是 Blaze的一个派生品保证了各种数据后端的数据移植,命令如下:
import  numpy  as  np

import  pandas  as  pd


from  blaze  import  Data,  by,  join,  merge


from  odo  import  odo


BokehJS  successfully  loaded.
读取存储在CSV文件中解析过的tweets 生成Pandas Dataframe:
twts_csv:
twts_pd_df  =  pd.DataFrame(twts_csv_read,  columns=Tweet01._fields)

twts_pd_df.head()


Out[65]:
id created_at user_id user_name tweet_text url

1 598831111406510082 2015-05-14  12:43:57 14755521
raulsaeztapia RT  @pacoid:  Great  recap  of  @StrataConf  EU  in  L...
http://www.mango-solutions.com/wp/2015/05/the-...

2 598831111406510082 2015-05-14  12:43:57 14755521
raulsaeztapia RT  @pacoid:  Great  recap  of  @StrataConf  EU  in  L...
http://www.mango-solutions.com/wp/2015/05/the-...

3 98808944719593472 2015-05-14  11:15:52 14755521
raulsaeztapia RT  @alvaroagea:  Simply  @ApacheSpark  http://t.c...
http://www.webex.com/ciscospark/

4 598808944719593472 2015-05-14  11:15:52 14755521
raulsaeztapia RT  @alvaroagea:  Simply  @ApacheSpark  http://t.c...
http://sparkjava.com/
运行Tweets Panda Dataframe 的 describe() 函数 获得数据集中的信心:
twts_pd_df.describe()
Out[66]:
id  created_at  user_id user_name   tweet_text  url
count   19  19  19  19  19  19
unique  7   7   6   6   6   7
top 598808944719593472  2015-05-14  11:15:52    14755521
raulsaeztapia   RT  @alvaroagea:  Simply  @ApacheSpark  http://t.c...
http://bit.ly/1Hfd0Xm
freq    6   6   9   9   6   6
简单的调用Data() 函数将Pandas dataframe 转化为一个 Blaze dataframe:
#
#  Blaze  dataframe
#
twts_bz_df  =  Data(twts_pd_df)
通过传递schema 函数提取一个 Blaze dataframe 的schema 表达:
twts_bz_df.schema
Out[73]:
dshape("""{
id:  ?string,
created_at:  ?string,
user_id:  ?string,
user_name:  ?string,
tweet_text:  ?string,
url:  ?string
}""")
.dshape 函数给出一条记录和schema:
twts_bz_df.dshape
Out[74]:
dshape("""19  *  {
    id:  ?string,
    created_at:  ?string,
    user_id:  ?string,
    user_name:  ?string,
    tweet_text:  ?string,
    url:  ?string
    }""")
打印Blaze dataframe 的内容:
twts_bz_df.data
Out[75]:
id  created_at  user_id user_name   tweet_text  url
1   598831111406510082  2015-05-14  12:43:57    14755521
raulsaeztapia   RT  @pacoid:  Great  recap  of  @StrataConf  EU  in  L...
http://www.mango-solutions.com/wp/2015/05/the-...
2   598831111406510082  2015-05-14  12:43:57    14755521
raulsaeztapia   RT  @pacoid:  Great  recap  of  @StrataConf  EU  in  L...
http://www.mango-solutions.com/wp/2015/05/the-...
...
18  598782970082807808  2015-05-14  09:32:39    1377652806
embeddedcomputer.nl RT  @BigDataTechCon:  Moving  Rating
Prediction  w...    http://buff.ly/1QBpk8J
19  598777933730160640  2015-05-14  09:12:38    294862170   Ellen
Friedman    I'm  still  on  Euro  time.  If  you  are  too  check  o...
http://bit.ly/1Hfd0Xm
提取 tweet_text 字段,获得唯一的值:
twts_bz_df.tweet_text.distinct()
Out[76]:
tweet_text
0   RT  @pacoid:  Great  recap  of  @StrataConf  EU  in  L...
1   RT  @alvaroagea:  Simply  @ApacheSpark  http://t.c...
2   RT  @PrabhaGana:  What  exactly  is  @ApacheSpark  a...
3   RT  @Ellen_Friedman:  I'm  still  on  Euro  time.  If...
4   RT  @BigDataTechCon:  Moving  Rating  Prediction  w...
5   I'm  still  on  Euro  time.  If  you  are  too  check  o...
从dataframe 中提取了多个字段 [‘id’, ‘user_name’,’tweet_text’] 并计算唯一的记录:
twts_bz_df[['id',  'user_name','tweet_text']].distinct()
Out[78]:
id  user_name   tweet_text
0   598831111406510082  raulsaeztapia   RT  @pacoid:  Great  recap  of  @
StrataConf  EU  in  L...
1   598808944719593472  raulsaeztapia   RT  @alvaroagea:  Simply  @
ApacheSpark  http://t.c...
2   598796205091500032  John  Humphreys RT  @PrabhaGana:  What  exactly
is  @ApacheSpark  a...
3   598788561127735296  Leonardo  D'Ambrosi RT  @Ellen_Friedman:  I'm
still  on  Euro  time.  If...
4   598785545557438464  Alexey  Kosenkov    RT  @Ellen_Friedman:  I'm
still  on  Euro  time.  If...
5   598782970082807808  embeddedcomputer.nl RT  @BigDataTechCon:
Moving  Rating  Prediction  w...
6   598777933730160640  Ellen  Friedman I'm  still  on  Euro  time.  If
you  are  too  check  o...
使用 Odo传输数据
Odo 是Blaze的一个衍生项目. 用于数据交换,保证了各种不同格式数据间的移植 (CSV, JSON, HDFS, and more) 并且跨越不同的数据库 (SQL 数据库, MongoDB, 等等) ,用法简单,Odo(source, target) 为了 传输到一个数据库,需要指定URL地址. 例如, MongoDB , 用法如下:
mongodb://username:password@hostname:port/database_name::collection_name
使用Odo 运行一些例子,这里通过读取CSV文件并创建一个 Blaze dataframe来展示Odo的用法:
filepath =  csvFpath


filename =  csvFname


filesuffix  =  csvSuffix


twts_odo_df  =  Data('{0}/{1}.{2}'.format(filepath,  filename,
filesuffix))
计算 dataframe中的记录个数:
twts_odo_df.count()


Out[81]:


19
显示dataframe中最初的5条记录:
twts_odo_df.head(5)


Out[82]:


id created_at user_id user_name tweet_text url


0 598831111406510082 2015-05-14  12:43:57 14755521
raulsaeztapia RT  @pacoid:  Great  recap  of  @StrataConf  EU  in  L...
http://www.mango-solutions.com/wp/2015/05/the-...


2 598808944719593472 2015-05-14  11:15:52 14755521
raulsaeztapia RT  @alvaroagea:  Simply  @ApacheSpark  http://t.c...  http://www.webex.com/ciscospark/
3   598808944719593472  2015-05-14  11:15:52    14755521
raulsaeztapia   RT  @alvaroagea:  Simply  @ApacheSpark  http://t.c...
http://sparkjava.com/
4   598808944719593472  2015-05-14  11:15:52    14755521
raulsaeztapia   RT  @alvaroagea:  Simply  @ApacheSpark  http://t.c...
https://www.sparkfun.com/
从dataframe 中获得 dshape 的信息 , 这里得到记录的个数和 schema:
twts_odo_df.dshape
Out[83]:
dshape("var  *  {
    id:  int64,
    created_at:  ?datetime,
    user_id:  int64,
    user_name:  ?string,
    tweet_text:  ?string,
    url:  ?string
    }""")
将处理过的 Blaze dataframe 存入 JSON:
odo(twts_odo_distinct_df,  '{0}/{1}.{2}'.format(jsonFpath,  jsonFname,
jsonSuffix))
Out[92]:
<odo.backends.json.JSONLines  at  0x7f77f0abfc50>
转换JSON 文件为 CSV 文件:
odo('{0}/{1}.{2}'.format(jsonFpath,  jsonFname,  jsonSuffix),  '{0}/{1}.{2}'.format(csvFpath,  csvFname,  csvSuffix))
Out[94]:
<odo.backends.csv.CSV  at  0x7f77f0abfe10>
使用Spark SQL探索数据
Spark SQL 是建立在Spark 核心之上的关系型查询引擎. Spark SQL 使用的查询优化叫 Catalyst.
关系型查询使用 SQL 或HiveQL 表达,在 JSON, CSV, 和各种数据库中查询. Spark SQL 为 RDD 函数式编程之上的Spark dataframes 提供了完整的声明式表达.
理解 Spark dataframe
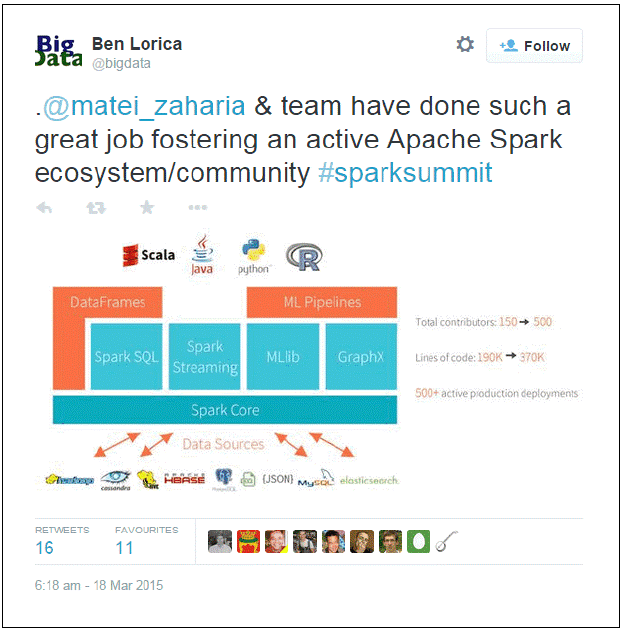
从 @bigdata 而来的一个tweet 意味着 Spark SQL和 dataframes都可以使用了,参见图中下方的各种数据源. 在顶部, R作为一个新的语言在Scala, Java和Python之后将逐步被支持. 最终, Data Frame 机理遍布在 R, Python, 和 Spark 中.
Spark dataframes 从 SchemaRDDs 中产生. 它结合了 RDD 和可以被Spark 推导 schema, 注册过的dataframe 才能被请求,允许通过直白的SQL 完成复杂嵌套的JSON 数据查询,同时支持 延迟计算, lineage,分区,和持久化.
通过 Spark SQL 查询数据, 首先要导入 SparkContext 和SQLContex:
from  pyspark  import  SparkConf,  SparkContext
from  pyspark.sql  import  SQLContext,  Row
In  [95]:
sc
Out[95]:
<pyspark.context.SparkContext  at  0x7f7829581890>
In  [96]:
sc.master
Out[96]:
u'local[*]'
''In  [98]:
#  Instantiate  Spark   SQL  context
sqlc  = SQLContext(sc)
读取存储在 Odo中的JSON文件:
twts_sql_df_01  =  sqlc.jsonFile  ("/home/an/spark/spark-1.3.0-bin-
hadoop2.4/examples/AN_Spark/data/twtr15051401_distinct.json")
In  [101]:
twts_sql_df_01.show()
created_at  id  tweet_text  user_id
user_name
2015-05-14T12:43:57Z  598831111406510082  RT  @pacoid:  Great...  14755521
raulsaeztapia
2015-05-14T11:15:52Z  598808944719593472  RT  @alvaroagea:  S...  14755521
raulsaeztapia
2015-05-14T10:25:15Z  598796205091500032  RT  @PrabhaGana:  W...  48695135
John  Humphreys
2015-05-14T09:54:52Z  598788561127735296  RT  @Ellen_Friedma...
2385931712  Leonardo  D'Ambrosi
2015-05-14T09:42:53Z  598785545557438464  RT  @Ellen_Friedma...  461020977
Alexey  Kosenkov
2015-05-14T09:32:39Z  598782970082807808  RT  @BigDataTechCo...
1377652806  embeddedcomputer.nl
2015-05-14T09:12:38Z  598777933730160640  I'm  still  on  Euro...  294862170
Ellen  Friedman
打印 Spark dataframe 的schema:
twts_sql_df_01.printSchema()
root
|--  created_at:  string  (nullable  =  true)
|--  id:  long  (nullable  =  true)
|--  tweet_text:  string  (nullable  =  true)
|--  user_id:  long  (nullable  =  true)
|--  user_name:  string  (nullable  =  true)
从dataframe中选择 user_name 字段:
twts_sql_df_01.select('user_name').show()
user_name
raulsaeztapia
raulsaeztapia
John  Humphreys
Leonardo  D'Ambrosi
Alexey  Kosenkov
embeddedcomputer.nl
Ellen  Friedman
将 dataframe 注册成一个表 ,在上执行一个 SQL 查询:
twts_sql_df_01.registerAsTable('tweets_01')可以处理更复杂的 JSON; 读取原始的 Twitter JSON 文件:
twts_sql_df_01_selection  =  sqlc.sql("SELECT  *  FROM  tweets_01 WHERE
user_name  =  'raulsaeztapia'")
In  [109]:
twts_sql_df_01_selection.show()
created_at  id  tweet_text  user_id
user_name
2015-05-14T12:43:57Z  598831111406510082  RT  @pacoid:  Great... 14755521
raulsaeztapia
2015-05-14T11:15:52Z  598808944719593472  RT  @alvaroagea:  S... 14755521
raulsaeztapia
Let's  process  some  more  complex  JSON;  we  read  the  original  Twitter  JSON  file:
tweets_sqlc_inf  =  sqlc.jsonFile(infile)
Spark  SQL  is  able  to  infer  the  schema  of  a  complex  nested  JSON  file:
tweets_sqlc_inf.printSchema()
root
|--  contributors:  string  (nullable  =  true)
|--  coordinates:  string  (nullable  =  true)
|--  created_at:  string  (nullable  =  true)
|--  entities:  struct  (nullable  =  true)
|   |--  hashtags:  array  (nullable  =  true)
|   |   |--  element:  struct  (containsNull  =  true)
|   |   |   |--  indices:  array  (nullable  =  true)
|   |   |   |   |--  element:  long  (containsNull  =  true)
|   |   |   |--  text:  string  (nullable  =  true)
|   |--  media:  array  (nullable  =  true)
|   |   |--  element:  struct  (containsNull  =  true)
|   |   |   |--  display_url:  string  (nullable  =  true)
|   |   |   |--  expanded_url:  string  (nullable  =  true)
|   |   |   |--  id:  long  (nullable  =  true)
|   |   |   |--  id_str:  string  (nullable  =  true)
|   |   |   |--  indices:  array  (nullable  =  true)
...     (snip)  ...
|   |--  statuses_count:  long  (nullable  =  true)
|   |--  time_zone:  string  (nullable  =  true)
|   |--  url:  string  (nullable  =  true)
|   |--  utc_offset:  long  (nullable  =  true)
|   |--  verified:  boolean  (nullable  =  true)
从dataframe 选定列中读取感兴趣的关键信息 (本例中, [‘created_at’, ‘id’, ‘text’, ‘user.id’, ‘user.name’, ‘entities.urls.expanded_url’]):
tweets_extract_sqlc  =  tweets_sqlc_inf[['created_at',  'id',  'text',
'user.id',  'user.name',  'entities.urls.expanded_url']].distinct()
In  [145]:
tweets_extract_sqlc.show()
created_at  id  text    id
name    expanded_url
Thu  May  14  09:32:...  598782970082807808  RT  @BigDataTechCo...
1377652806  embeddedcomputer.nl  ArrayBuffer(http:...
Thu  May  14  12:43:...  598831111406510082  RT  @pacoid:  Great...  14755521
raulsaeztapia   ArrayBuffer(http:...
Thu  May  14  12:18:...  598824733086523393  @rabbitonweb  spea...

...
Thu  May  14  12:28:...  598827171168264192  RT  @baandrzejczak...  20909005
Paweł  Szulc    ArrayBuffer()
理解Spark SQL query optimizer
在 dataframe 中执行SQL 语句:
tweets_extract_sqlc_sel  =  sqlc.sql("SELECT  *  from  Tweets_xtr_001  WHERE
name='raulsaeztapia'")
看一下Spark SQL 执行查询计划的细节:
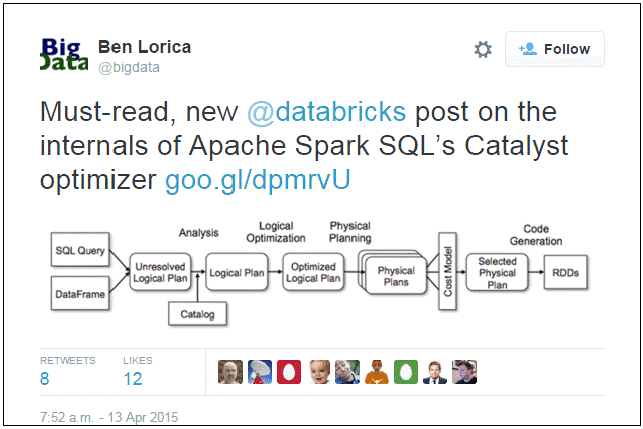
• 解析
• 分析
• 优化
• 物理查询
查询计划使用了 Spark SQL’s Catalyst 优化器. 为了冲查询部分生成编译过的字节码, Catalyst 优化器在物理计划评估后根据成本执行解析和优化.
在tweet中的解释:
回顾一下代码, 在执行Spark SQL 查询时调用 .explain 函数, 给出了 Catalyst optimizer之行时的全部细节:
tweets_extract_sqlc_sel.explain(extended  =  True)
==  Parsed  Logical  Plan  ==
'Project  [*]
'Filter  ('name  =  raulsaeztapia)'name'    'UnresolvedRelation'  [Tweets_
xtr_001],  None
==  Analyzed  Logical  Plan  ==
Project  [created_at#7,id#12L,text#27,id#80L,name#81,expanded_url#82]
Filter  (name#81  =  raulsaeztapia)
Distinct
Project  [created_at#7,id#12L,text#27,user#29.id  AS  id#80L,user#29.
name  AS  name#81,entities#8.urls.expanded_url  AS  expanded_url#82]
Relation[contributors#5,coordinates#6,created_
at#7,entities#8,favorite_count#9L,favorited#10,geo#11,id#12L,id_
str#13,in_reply_to_screen_name#14,in_reply_to_status_id#15,in_reply_
to_status_id_str#16,in_reply_to_user_id#17L,in_reply_to_user_id_str#
18,lang#19,metadata#20,place#21,possibly_sensitive#22,retweet_count#2
3L,retweeted#24,retweeted_status#25,source#26,text#27,truncated#28,us
er#29]  JSONRelation(/home/an/spark/spark-1.3.0-bin-hadoop2.4/examples/
AN_Spark/data/twtr15051401.json,1.0,None)
==  Optimized  Logical  Plan  ==
Filter  (name#81  =  raulsaeztapia)
Distinct
Project  [created_at#7,id#12L,text#27,user#29.id  AS  id#80L,user#29.
name  AS  name#81,entities#8.urls.expanded_url  AS  expanded_url#82]
Relation[contributors#5,coordinates#6,created_
at#7,entities#8,favorite_count#9L,favorited#10,geo#11,id#12L,id_
str#13,in_reply_to_screen_name#14,in_reply_to_status_id#15,in_reply_
to_status_id_str#16,in_reply_to_user_id#17L,in_reply_to_user_id_str#
18,lang#19,metadata#20,place#21,possibly_sensitive#22,retweet_count#2
3L,retweeted#24,retweeted_status#25,source#26,text#27,truncated#28,us
er#29]  JSONRelation(/home/an/spark/spark-1.3.0-bin-hadoop2.4/examples/
AN_Spark/data/twtr15051401.json,1.0,None)
==  Physical  Plan  ==
Filter  (name#81  =  raulsaeztapia)
Distinct  false
Exchange  (HashPartitioning  [created_at#7,id#12L,text#27,id#80L,name#
81,expanded_url#82],  200)
Distinct  true
Project  [created_at#7,id#12L,text#27,user#29.id  AS  id#80L,user#29.
name  AS  name#81,entities#8.urls.expanded_url  AS  expanded_url#82]
PhysicalRDD  [contributors#5,coordinates#6,created_
at#7,entities#8,favorite_count#9L,favorited#10,geo#11,id#12L,id_str#13,in_reply_to_screen_name#14,in_reply_to_status_id#15,in_reply_to_status_id_str#16,in_reply_to_user_id#17L,in_reply_to_user_id_str#
18,lang#19,metadata#20,place#21,possibly_sensitive#22,retweet_count#2
3L,retweeted#24,retweeted_status#25,source#26,text#27,truncated#28,us
er#29],  MapPartitionsRDD[165]  at  map  at  JsonRDD.scala:41
Code  Generation:  false
==  RDD  ==
最后, 这里是查询的结果:
tweets_extract_sqlc_sel.show()
created_at  id  text    id
name    expanded_url
Thu  May  14  12:43:...  598831111406510082  RT  @pacoid:  Great...  14755521
raulsaeztapia  ArrayBuffer(http:...
Thu  May  14  11:15:...  598808944719593472  RT  @alvaroagea:  S...  14755521
raulsaeztapia  ArrayBuffer(http:...
In  [148]:
用Spark SQL 加载和处理 CSV files with Spark
使用 Spark 的 spark-csv_2.11:1.2.0 包. 在IPython Notebook 启动PySpark 需要准确地通过 –packages 指定 spark-csv 的包名:
$ IPYTHON_OPTS='notebook' /home/an/spark/spark-1.5.0-bin-hadoop2.6/bin/
pyspark --packages com.databricks:spark-csv_2.11:1.2.0
这触发了下面的输出; 可以看到 spark-csv 包使用的所有依赖:
an@an-VB:~/spark/spark-1.5.0-bin-hadoop2.6/examples/AN_Spark$  IPYTHON_
OPTS='notebook'  /home/an/spark/spark-1.5.0-bin-hadoop2.6/bin/pyspark
--packages  com.databricks:spark-csv_2.11:1.2.0
...     (snip)  ...
Ivy  Default  Cache  set  to:  /home/an/.ivy2/cache
The  jars  for  the  packages  stored  in:  /home/an/.ivy2/jars
::  loading  settings  ::  url  =  jar:file:/home/an/spark/spark-1.5.0-bin-
hadoop2.6/lib/spark-assembly-1.5.0-hadoop2.6.0.jar!/org/apache/ivy/
core/settings/ivysettings.xml
com.databricks#spark-csv_2.11  added  as  a  dependency
::  resolving  dependencies  ::  org.apache.spark#spark-submit-parent;1.0
confs:  [default]
found  com.databricks#spark-csv_2.11;1.2.0  in  central
found  org.apache.commons#commons-csv;1.1  in  central
found  com.univocity#univocity-parsers;1.5.1  in  central
::  resolution  report  ::  resolve  835ms  ::  artifacts  dl  48ms
::  modules  in  use:
com.databricks#spark-csv_2.11;1.2.0  from  central  in  [default]
com.univocity#univocity-parsers;1.5.1  from  central  in  [default]
org.apache.commons#commons-csv;1.1  from  central  in  [default]
----------------------------------------------------------------
|   |   modules ||  artifacts   |
|   conf    |  number|  search|dwnlded|evicted||  number|dwnlded|
----------------------------------------------------------------
|   default |   3   |   0   |   0   |   0   ||  3   |   0
----------------------------------------------------------------
::  retrieving  ::  org.apache.spark#spark-submit-parent
confs:  [default]
0  artifacts  copied,  3  already  retrieved  (0kB/45ms)
We are now ready to load our csv file and process it. Let’s first import the
SQLContext:
#
#  Read  csv  in  a  Spark  DF
#
sqlContext  =  SQLContext(sc)
spdf_in  =  sqlContext.read.format('com.databricks.spark.csv')
.options(delimiter=";").
options(header="true")
.options(header='true').load(csv_
in)
访问从加载的CSV中创建的 dataframe 的schema:
In  [10]:
spdf_in.printSchema()
root
|--  :  string  (nullable  =  true)
|--  id:  string  (nullable  =  true)
|--  created_at:  string  (nullable  =  true)
|--  user_id:  string  (nullable  =  true)
|--  user_name:  string  (nullable  =  true)
|--  tweet_text:  string  (nullable  =  true)
检查 dataframe的列:
In  [12]:
spdf_in.columns
Out[12]:
['',  'id',  'created_at',  'user_id',  'user_name',  'tweet_text']
审视一下 dataframe 的内容:
In  [13]:
spdf_in.show()
+---+------------------+--------------------+----------+--------------
----+--------------------+
|   |   id| created_at| user_id|    user_
name|   tweet_text|
+---+------------------+--------------------+----------+--------------
----+--------------------+
|   0|638830426971181057|Tue  Sep  01  21:46:...|3276255125|    True
Equality|ernestsgantt:  Bey...|
|   1|638830426727911424|Tue  Sep  01  21:46:...|3276255125|    True
Equality|ernestsgantt:  Bey...|
|   2|638830425402556417|Tue  Sep  01  21:46:...|3276255125|    True
Equality|ernestsgantt:  Bey...|
...     (snip)  ...
|  41|638830280988426250|Tue  Sep  01  21:46:...|  951081582|   Jack
Baldwin|RT  @cloudaus:  We  ...|
|  42|638830276626399232|Tue  Sep  01  21:46:...|   6525302|Masayoshi
Nakamura|PynamoDB使使使使使使使    |
+---+------------------+--------------------+----------+--------------
----+--------------------+
only  showing  top  20  rows
通过Spark SQL查询MangoDB
有两个方法完成MongoDB 和Spark的交互: 首先是通过 Hadoop MongoDB connector, 第二种的直接访问.
第一种方法需要搭建一个 Hadoop 环境才能从
Hadoop MongoDB connector中完成查询. onnector
托管在GitHub 上 https://github.com/mongodb/mongo-hadoop/
wiki/Spark-Usage.
MongoDB 发表了一系列的官方博客描述了真实的使用场景:
• Using MongoDB with Hadoop & Spark: Part 1 - Introduction & Setup (https://
www.mongodb.com/blog/post/using-mongodb-hadoop-spark-part-1-
introduction-setup)
• Using MongoDB with Hadoop and Spark: Part 2 - Hive Example (https://www.
mongodb.com/blog/post/using-mongodb-hadoop-spark-part-2-hive-
example)
• Using MongoDB with Hadoop & Spark: Part 3 - Spark Example & Key Takeaways
(https://www.mongodb.com/blog/post/using-mongodb-hadoop-spark-
part-3-spark-example-key-takeaways)
搭建一个完整的 Hadoop 环境是个力气活. 使用第二种方法,利用Stratio开发并维护的spark-mongodb ,这是托管在Spark.packages.org.上的 Stratio spark-mongodb 包. 该包的版本和相关信息可以从 spark.packages.org :
Releases
Version: 0.10.1 ( 8263c8 | zip | jar ) / Date: 2015-11-18 / License:
Apache-2.0 / Scala version: 2.10
(http://spark-packages.org/package/Stratio/spark-mongodb)
在IPython Notebook 中启动PySpark, 同时准确指定spark-mongodb 的包名:
$ IPYTHON_OPTS='notebook' /home/an/spark/spark-1.5.0-bin-hadoop2.6/bin/
pyspark --packages com.stratio.datasource:spark-mongodb_2.10:0.10.1这将触发下面的输出; 可以看到 spark-mongodb 包的所有依赖:
an@an-VB:~/spark/spark-1.5.0-bin-hadoop2.6/examples/AN_Spark$  IPYTHON_
OPTS='notebook'  /home/an/spark/spark-1.5.0-bin-hadoop2.6/bin/pyspark
--packages  com.stratio.datasource:spark-mongodb_2.10:0.10.1
...     (snip)  ...
Ivy  Default  Cache  set  to:  /home/an/.ivy2/cache
The  jars  for  the  packages  stored  in:  /home/an/.ivy2/jars
::  loading  settings  ::  url  =  jar:file:/home/an/spark/spark-1.5.0-bin-
hadoop2.6/lib/spark-assembly-1.5.0-hadoop2.6.0.jar!/org/apache/ivy/
core/settings/ivysettings.xml
com.stratio.datasource#spark-mongodb_2.10  added  as  a  dependency
::  resolving  dependencies  ::  org.apache.spark#spark-submit-parent;1.0
confs:  [default]
found  com.stratio.datasource#spark-mongodb_2.10;0.10.1  in  central
[W  22:10:50.910  NotebookApp]  Timeout  waiting  for  kernel_info  reply
from  764081d3-baf9-4978-ad89-7735e6323cb6
found  org.mongodb#casbah-commons_2.10;2.8.0  in  central
found  com.github.nscala-time#nscala-time_2.10;1.0.0  in  central
found  joda-time#joda-time;2.3  in  central
found  org.joda#joda-convert;1.2  in  central
found  org.slf4j#slf4j-api;1.6.0  in  central
found  org.mongodb#mongo-java-driver;2.13.0  in  central
found  org.mongodb#casbah-query_2.10;2.8.0  in  central
found  org.mongodb#casbah-core_2.10;2.8.0  in  central
downloading  https://repo1.maven.org/maven2/com/stratio/datasource/
park-mongodb_2.10/0.10.1/spark-mongodb_2.10-0.10.1.jar...
[SUCCESSFUL  ]  com.stratio.datasource#spark-
mongodb_2.10;0.10.1!spark-mongodb_2.10.jar  (3130ms)
downloading  https://repo1.maven.org/maven2/org/mongodb/casbah-
ommons_2.10/2.8.0/casbah-commons_2.10-2.8.0.jar...
[SUCCESSFUL  ]  org.mongodb#casbah-commons_2.10;2.8.0!casbah-
commons_2.10.jar  (2812ms)
downloading  https://repo1.maven.org/maven2/org/mongodb/casbah-
uery_2.10/2.8.0/casbah-query_2.10-2.8.0.jar...
[SUCCESSFUL  ]  org.mongodb#casbah-query_2.10;2.8.0!casbah-query_2.10.
jar  (1432ms)
downloading  https://repo1.maven.org/maven2/org/mongodb/casbah-
ore_2.10/2.8.0/casbah-core_2.10-2.8.0.jar...
[SUCCESSFUL  ]  org.mongodb#casbah-core_2.10;2.8.0!casbah-core_2.10.
jar  (2785ms)
downloading  https://repo1.maven.org/maven2/com/github/nscala-time/
scala-time_2.10/1.0.0/nscala-time_2.10-1.0.0.jar...
[SUCCESSFUL  ]  com.github.nscala-time#nscala-time_2.10;1.0.0!nscala-
time_2.10.jar  (2725ms)
downloading  https://repo1.maven.org/maven2/org/slf4j/slf4j-api/1.6.0/
slf4j-api-1.6.0.jar  ...
[SUCCESSFUL  ]  org.slf4j#slf4j-api;1.6.0!slf4j-api.jar  (371ms)
downloading  https://repo1.maven.org/maven2/org/mongodb/mongo-java-
driver/2.13.0/mongo-java-driver-2.13.0.jar  ...
[SUCCESSFUL  ]  org.mongodb#mongo-java-driver;2.13.0!mongo-java-
driver.jar  (5259ms)
downloading  https://repo1.maven.org/maven2/joda-time/joda-time/2.3/
joda-time-2.3.jar  ...
[SUCCESSFUL  ]  joda-time#joda-time;2.3!joda-time.jar  (6949ms)
downloading  https://repo1.maven.org/maven2/org/joda/joda-convert/1.2/
joda-convert-1.2.jar  ...
[SUCCESSFUL  ]  org.joda#joda-convert;1.2!joda-convert.jar  (548ms)
::  resolution  report  ::  resolve  11850ms  ::  artifacts  dl  26075ms
::  modules  in  use:
com.github.nscala-time#nscala-time_2.10;1.0.0  from  central  in
[default]
com.stratio.datasource#spark-mongodb_2.10;0.10.1  from  central  in
[default]
joda-time#joda-time;2.3  from  central  in  [default]
org.joda#joda-convert;1.2  from  central  in  [default]
org.mongodb#casbah-commons_2.10;2.8.0  from  central  in  [default]
org.mongodb#casbah-core_2.10;2.8.0  from  central  in  [default]
org.mongodb#casbah-query_2.10;2.8.0  from  central  in  [default]
org.mongodb#mongo-java-driver;2.13.0  from  central  in  [default]
org.slf4j#slf4j-api;1.6.0  from  central  in  [default]
-----------------------------------------------------------------
|   |   modules ||  artifacts
|
|   conf    |  number|  search|dwnlded|evicted||
number|dwnlded|
-------------------------------------------------------------------
--
|   default |   9   |   9   |   9   |   0   ||  9   |   9
|
-------------------------------------------------------------------
--
::  retrieving  ::  org.apache.spark#spark-submit-parent
confs:  [default]
9  artifacts  copied,  0  already  retrieved  (2335kB/51ms)
...     (snip)  ...
查询MongDB的27017端口,从twtr01_db中的collection twtr01_coll读取数据。
首先import SQLContext:
In  [5]:
from  pyspark.sql  import  SQLContext
sqlContext.sql("CREATE  TEMPORARY  TABLE  tweet_table  USING  com.stratio.datasource.mongodb  OPTIONS  (host  'localhost:27017',  database  'twtr01_
db',  collection  'twtr01_coll')")
sqlContext.sql("SELECT  *  FROM  tweet_table  where  id=598830778269769728
").collect()
这里是查询输出:
Out[5]:
[Row(text=u'@spark_io  is  now  @particle  -  awesome  news  -  now  I  can enjoy  my  Particle  Cores/Photons  +  @sparkfun  sensors  +  @ApacheSpark analytics  :-)',  _id=u'55aa640fd770871cba74cb88',  contributors=None,
retweeted=False,  user=Row(contributors_enabled=False,  created_at=u'Mon Aug  25  14:01:26  +0000  2008',  default_profile=True,  default_profile_image=False,  description=u'Building  open  source  tools  for  and  teaching
enterprise  software  developers',  entities=Row(description=Row(urls=[]),  url=Row(urls=[Row(url=u'http://t.co/TSHp13EWeu',  indices=[0,22],

...     (snip)  ...

9],  name=u'Spark  is  Particle',  screen_name=u'spark_io'),
Row(id=487010011,  id_str=u'487010011',  indices=[17,  26],
name=u'Particle',  screen_name=u'particle'),  Row(id=17877351,
id_str=u'17877351',  indices=[88,  97],  name=u'SparkFun
Electronics',  screen_name=u'sparkfun'),  Row(id=1551361069,  id_
str=u'1551361069',  indices=[108,  120],  name=u'Apache  Spark',  screen_name=u'ApacheSpark')]),  is_quote_status=None,  lang=u'en',  quoted_status_id_str=None,  quoted_status_id=None,  created_at=u'Thu  May 14  12:42:37  +0000  2015',  retweeted_status=None,  truncated=False,
place=None,  id=598830778269769728,  in_reply_to_user_id=3187046084,
retweet_count=0,  in_reply_to_status_id=None,  in_reply_to_screen_name=u'spark_io',  in_reply_to_user_id_str=u'3187046084',  source=u'<a href="http://twitter.com"  rel="nofollow">Twitter  Web  Client</a>',
id_str=u'598830778269769728',  coordinates=None,  metadata=Row(iso_language_code=u'en',  result_type=u'recent'),  quoted_status=None)]
#
最后
以上就是现实大白最近收集整理的关于地铁译:Spark for python developers ---Spark的数据戏法回顾数据密集型应用的架构数据的序列化和反序列化获取和存储数据搭建MongoDB使用Blaze探索数据使用 Odo传输数据使用Spark SQL探索数据的全部内容,更多相关地铁译:Spark内容请搜索靠谱客的其他文章。


发表评论 取消回复