由于mvc5的用户管理系统比较复杂,有时候不希望使用mvc5的管理系统。所以必须把他剔除出去使用自己的用户管理系统那要怎么做呢,主要还是在登陆和登出中来体现
第一部分 创建网站
一、首先在vs2015中创建一个空的mvc5模板
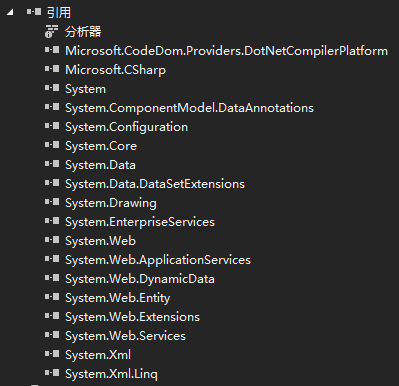
当前状态为:
(1)引用dll

(2)webconfig
<?xml version="1.0" encoding="utf-8"?>
<!--
有关如何配置 ASP.NET 应用程序的详细信息,请访问
http://go.microsoft.com/fwlink/?LinkId=169433
-->
<configuration>
<system.web>
<compilation debug="true" targetFramework="4.5"/>
<httpRuntime targetFramework="4.5"/>
</system.web>
<system.codedom>
<compilers>
<compiler language="c#;cs;csharp" extension=".cs"
type="Microsoft.CodeDom.Providers.DotNetCompilerPlatform.CSharpCodeProvider, Microsoft.CodeDom.Providers.DotNetCompilerPlatform, Version=1.0.0.0, Culture=neutral, PublicKeyToken=31bf3856ad364e35"
warningLevel="4" compilerOptions="/langversion:6 /nowarn:1659;1699;1701"/>
<compiler language="vb;vbs;visualbasic;vbscript" extension=".vb"
type="Microsoft.CodeDom.Providers.DotNetCompilerPlatform.VBCodeProvider, Microsoft.CodeDom.Providers.DotNetCompilerPlatform, Version=1.0.0.0, Culture=neutral, PublicKeyToken=31bf3856ad364e35"
warningLevel="4" compilerOptions="/langversion:14 /nowarn:41008 /define:_MYTYPE="Web" /optionInfer+"/>
</compilers>
</system.codedom>
</configuration>(3)packages.config
<?xml version="1.0" encoding="utf-8"?>
<packages>
  <package id="Microsoft.CodeDom.Providers.DotNetCompilerPlatform" version="1.0.0" targetFramework="net45" />
  <package id="Microsoft.Net.Compilers" version="1.0.0" targetFramework="net45" developmentDependency="true" />
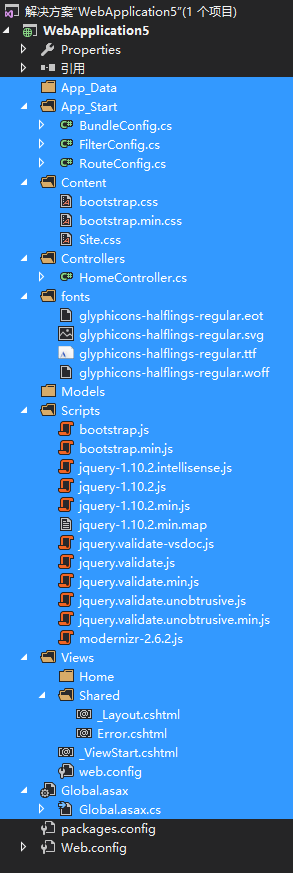
</packages>二、右键项目-添加-新搭建基架的项目-选择MVC5控制器 空

注:蓝色为选择mvc5控制器后新添加的部分
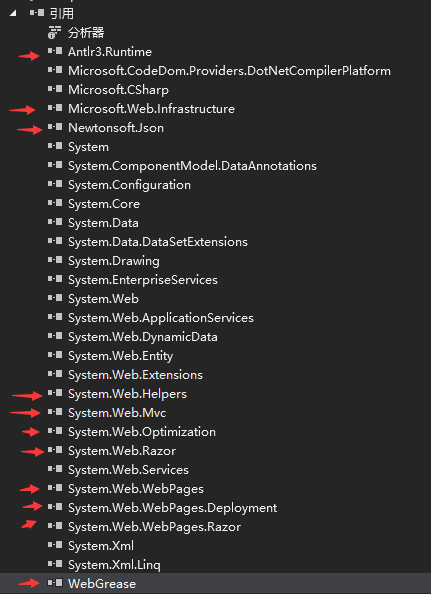
新添加的dll

注:箭头所指为新添加的dll
三、添加相关dll
(1)在nuget里添加Microsoft.Owin.Security.Cookies 会自动添加另外三个依赖项分别为 owin,microsoft.owin.security , microsoft.owin
(2)在nuget里添加Microsoft.AspNet.Identity.Core;无依赖项
(3)在nuget中添加Microsoft.Owin.Host.SystemWeb (用于让mvc可以执行startup.cs,如果没有此dll则不会执行startup.cs)
(4)web.config中添加,用以使用owin当中的认证系统
  <system.webServer>
    <modules>
      <remove name="FormsAuthentication" />
    </modules>
  </system.webServer>
四、添加Owin启动类
(1)自动添加Startup.cs (OWIN Startup类) 会添加Owin类和Microsoft.Owin,必须有Microsoft.Owin.Host.SystemWeb,
(2)也可以手动添加Startup.cs
using System;
using System.Threading.Tasks;
using Owin;
using Microsoft.Owin.Security.Cookies;
using Microsoft.Owin;
using Microsoft.AspNet.Identity;
[assembly: OwinStartup(typeof(WebApplication5.Startup))]

namespace WebApplication5
{
    public class Startup
    {
        public void Configuration(IAppBuilder app)
        {
            // 有关如何配置应用程序的详细信息,请访问 http://go.microsoft.com/fwlink/?LinkID=316888
            // New code:
            // app.Run(context =>
            //  {
            //    context.Response.ContentType = "text/plain";
            //     return context.Response.WriteAsync("Hello, world.");
            // });

            app.UseCookieAuthentication(new CookieAuthenticationOptions
            {
                 AuthenticationType = DefaultAuthenticationTypes.ApplicationCookie,
                LoginPath = new PathString("/Account/Login"),
                CookieSecure = CookieSecureOption.SameAsRequest,
                ExpireTimeSpan = TimeSpan.FromMinutes(30),//30分钟后过期
                SlidingExpiration = true,//当用户保持访问网站的时候再过特定时间(不访问)则失效
            });
        }
    }
}
项目中必须包含Microsoft.Owin.Host.SystemWeb,否则startup类不执行;
五、 搭建用户登陆 退出例子,只是做了一个例子没有更多的东西
添加HomeController ,并对index添加view
using System.Web;
using System.Web.Mvc;
using Microsoft.AspNet.Identity;
using System.Security.Claims;
using Microsoft.Owin.Security;
namespace WebApplication4.Controllers
{
    public class HomeController : Controller
    {
        public ActionResult Index()
        {
            ClaimsIdentity claimsIdentity = new ClaimsIdentity(DefaultAuthenticationTypes.ApplicationCookie, ClaimTypes.NameIdentifier, ClaimTypes.Role);
            claimsIdentity.AddClaim(new Claim(ClaimTypes.NameIdentifier, "15", "http://www.w3.org/2001/XMLSchema#string"));//如果有@Html.AntiForgeryToken()参与下面的ClaimTypes.NameIdentifier必须有
            claimsIdentity.AddClaim(new Claim(ClaimTypes.Name, "jonny", "http://www.w3.org/2001/XMLSchema#string"));//可选 只是如果没有ClaimTypes.Name 就找不到名字
            //claimsIdentity.AddClaim(new Claim("permissionList", permissionlist, "http://www.w3.org/2001/XMLSchema#string"));可选 同上

            claimsIdentity.AddClaim(new Claim("Role", "User", "http://www.w3.org/2001/XMLSchema#string"));////可选 同上
            claimsIdentity.AddClaim(new Claim("http://schemas.microsoft.com/accesscontrolservice/2010/07/claims/identityprovider", "Custom Identity", "http://www.w3.org/2001/XMLSchema#string"));//如果有@Html.AntiForgeryToken()参与下面的ClaimTypes.NameIdentifier必须有
                                                                                                                                                                                                  // AuthenticationManager.SignIn(new AuthenticationProperties() { IsPersistent = rememberme }, claimsIdentity);

            var authenticationManager = HttpContext.GetOwinContext().Authentication;
            //var authenticationManager2 = HttpContext.GetOwinContext().Get(); ;
            authenticationManager.SignIn(new AuthenticationProperties() { IsPersistent = true }, claimsIdentity);
            return View();
        }
        [Authorize]
        public ActionResult login()
        {
            // AuthenticationManager.SignIn(new AuthenticationProperties() { IsPersistent = rememberme }, claimsIdentity);

            return Content(User.Identity.Name);
        }
        public ActionResult logout()
        {
            // AuthenticationManager.SignIn(new AuthenticationProperties() { IsPersistent = rememberme }, claimsIdentity);
            var authenticationManager = HttpContext.GetOwinContext().Authentication;
            authenticationManager.SignOut();
            return Content("logout");
        }
    }
}
第二部分 详细介绍 自定义登录系统
在MVC5中登录系统需要进行配置,如上所述配置登录的关键一步就是
            app.UseCookieAuthentication(new CookieAuthenticationOptions
            {
                 AuthenticationType = DefaultAuthenticationTypes.ApplicationCookie,
                LoginPath = new PathString("/Account/Login"),
                CookieSecure = CookieSecureOption.SameAsRequest,
                ExpireTimeSpan = TimeSpan.FromMinutes(30),//30分钟后过期
                SlidingExpiration = true,//当用户保持访问网站的时候再过特定时间(不访问)则失效
            });
如果配置出现问题,有可能在以后的使用中产生登陆后过一段时间报错的问题.
为了方便移植,我们把登录放到一个类文件中如下所示
public class UserSigninManager
    {
        private IAuthenticationManager AuthenticationManager { get; }


        EntityContainer db = new EntityContainer();
        public UserSigninManager(IAuthenticationManager authenticationManager)
        {
            AuthenticationManager = authenticationManager;
        }

        public SignInStatus Signin(string name, string password, bool RememberMe)
        {


            if (name == null || password == null) return SignInStatus.Failure;
            //检测账户密码是否能够登录
            var onlyUser = db.Users.Where(m => (m.user_name.Trim() == name.Trim() || m.mobile_phone.Trim() == name.Trim()));
            if(onlyUser.Count() <= 0) return SignInStatus.Failure;
            var realUsername = onlyUser.First().user_name;
            var md5password = GetMD5double(password, onlyUser.First().user_name);
            var user = db.Users.Where(m => m.user_name.Trim() == realUsername.Trim() && m.password == md5password);
            if (user.Count() <= 0) return SignInStatus.Failure;
            var op = user.FirstOrDefault();
            SigninSession(op.id.ToString(), op.user_name, RememberMe);

            return SignInStatus.Success;
        }
        private void SigninSession(string id, string name, bool rememberme)
        {
            //"{name:'jonny',contry:'china',childern:[{name:'jason',sex:'boy'},{name:'jasica',sex:'girl'}]}"
            ClaimsIdentity claimsIdentity = new ClaimsIdentity(DefaultAuthenticationTypes.ApplicationCookie, ClaimTypes.NameIdentifier, ClaimTypes.Role);
            claimsIdentity.AddClaim(new Claim(ClaimTypes.NameIdentifier, id, "http://www.w3.org/2001/XMLSchema#string"));//如果有@Html.AntiForgeryToken()参与下面的ClaimTypes.NameIdentifier必须有
            claimsIdentity.AddClaim(new Claim(ClaimTypes.Name, name, "http://www.w3.org/2001/XMLSchema#string"));//可选 只是如果没有ClaimTypes.Name 就找不到名字
            //claimsIdentity.AddClaim(new Claim("permissionList", permissionlist, "http://www.w3.org/2001/XMLSchema#string"));可选 同上

            claimsIdentity.AddClaim(new Claim("Role", "User", "http://www.w3.org/2001/XMLSchema#string"));////可选 同上
            claimsIdentity.AddClaim(new Claim("http://schemas.microsoft.com/accesscontrolservice/2010/07/claims/identityprovider", "Custom Identity", "http://www.w3.org/2001/XMLSchema#string"));//如果有@Html.AntiForgeryToken()参与下面的ClaimTypes.NameIdentifier必须有
            AuthenticationManager.SignIn(new AuthenticationProperties() { IsPersistent = rememberme }, claimsIdentity);


        }
        public void SignOut()
        {

            AuthenticationManager.SignOut(DefaultAuthenticationTypes.ApplicationCookie);


        }


        #region 帮助程序
        private static string GetMD5(string myString, string salt)
        {
            MD5 md5 = new MD5CryptoServiceProvider();
            byte[] fromData = System.Text.Encoding.Unicode.GetBytes(myString + salt);
            byte[] targetData = md5.ComputeHash(fromData);
            string byte2String = null;

            for (int i = 0; i < targetData.Length; i++)
            {
                byte2String += targetData[i].ToString("x");
            }

            return byte2String;
        }
        public static string GetMD5double(string myString, string salt)
        {
            string cwords = GetMD5(myString, salt);
            cwords = GetMD5(salt, cwords);
            return cwords;
        }

        #endregion
    }
这里的帮助程序基本上就是进行MD5加密. 其关键核心部分已经在第一部分详细写出来了.
下面是如何使用上面的类进行登录.如下
 [HttpPost]
 [AllowAnonymous]
 [ValidateAntiForgeryToken]
 public ActionResult Login(LoginViewModel model, string returnUrl, string code)
 {
     if (HttpContext.User.Identity.IsAuthenticated) {
          return RedirectToLocal(HttpUtility.UrlDecode(returnUrl));
     }
     if (!ModelState.IsValid){
         return View(model);
     }
     string sessioncode = (Session["ValidateCode"]??"").ToString();
     if (sessioncode != code){
         ModelState.AddModelError("Code", "验证码错误");
         return View();
     }
     UserSigninManager SM = new UserSigninManager(HttpContext.GetOwinContext().Authentication);
     var result = SM.Signin(model.UserOrPhone, model.Password, model.RememberMe);
     switch (result){
         case SignInStatus.Success:
              return RedirectToLocal(HttpUtility.UrlDecode(returnUrl));
         case SignInStatus.LockedOut:
              return View("Lockout");
         case SignInStatus.RequiresVerification:
              return RedirectToAction("SendCode", new { ReturnUrl = returnUrl, RememberMe = model.RememberMe });
         case SignInStatus.Failure:
              default:
                    ModelState.AddModelError("UserOrPhone", "用户名或密码号码错误。");
                    return View(model);
            }
        }
[HttpPost]
[ValidateAntiForgeryToken]
public ActionResult Logoff(){
    UserSigninManager SM = new UserSigninManager(HttpContext.GetOwinContext().Authentication);
    SM.SignOut();
     return RedirectToAction("login", "account");

}
完成
最后
以上就是满意老鼠最近收集整理的关于简化mvc5的登陆系统的全部内容,更多相关简化mvc5内容请搜索靠谱客的其他文章。


发表评论 取消回复