在CentOS中默认安装有MariaDB,这个是MySQL的分支,但为了需要,还是要在系统中安装MySQL,而且安装完成之后可以直接覆盖掉MariaDB。
安装过程
参考:https://www.cnblogs.com/bigbrotherer/p/7241845.html
-
1 下载并安装MySQL官方的 Yum Repository
wget -i -c http://dev.mysql.com/get/mysql57-community-release-el7-10.noarch.rpm -
2 使用上面的命令就直接下载了安装用的Yum Repository,大概25KB的样子,然后就可以直接yum安装了。
yum -y install mysql57-community-release-el7-10.noarch.rpm -
3 之后就开始安装MySQL服务器。
yum -y install mysql-community-server -
4 卸载Repository
因为安装了Yum Repository,以后每次yum操作都会自动更新,需要把这个卸载掉:
yum -y remove mysql57-community-release-el7-10.noarch
启动mysql服务( 结束 stop 重启 restart )
systemctl start mysqld.service
设置开机启动
systemctl enable mysqld
重载所有修改过的配置文件
systemctl daemon-reload
查看mysql 运行状态
systemctl status mysqld.service
正常运行的mysql状态如下:
[root@biz-h77-dev admin]# systemctl status mysqld.service
● mysqld.service - MySQL Server
   Loaded: loaded (/usr/lib/systemd/system/mysqld.service; enabled; vendor preset: disabled)
   Active: active (running) since Tue 2019-12-31 18:07:00 CST; 7s ago
     Docs: man:mysqld(8)
           http://dev.mysql.com/doc/refman/en/using-systemd.html
  Process: 30863 ExecStart=/usr/sbin/mysqld --daemonize --pid-file=/var/run/mysqld/mysqld.pid $MYSQLD_OPTS (code=exited, status=0/SUCCESS)
  Process: 30801 ExecStartPre=/usr/bin/mysqld_pre_systemd (code=exited, status=0/SUCCESS)
 Main PID: 30867 (mysqld)
    Tasks: 27
   Memory: 332.4M
   CGroup: /system.slice/mysqld.service
           └─30867 /usr/sbin/mysqld --daemonize --pid-file=/var/run/mysq`在这里插入代码片`ld/mysqld.pid
注意:安装mysql5.7 后 第一次启动mysql 会在 /var/log/mysqld.log 文件输出 root的临时密码,用命令
grep “password” /var/log/mysqld.log 查看该密码,并记录下来
[root@biz-h77-dev admin]# grep "password" /var/log/mysqld.log
2020-01-02T01:32:15.088022Z 1 [Note] A temporary password is generated for root@localhost: aS?LpKshV9bA
[root@biz-h77-dev admin]#
[root@biz-h77-dev admin]#
本地连接mysql
登录mysql (这里输入的密码是 前面提到的root临时密码,如果找不到了,那就重装吧 <<centos7 卸载 mysql5.7>>)
mysql -uroot -p
修改root密码(注:5.7 默认设置的密码有复杂度要求,不能太简单,例如 ksd!_d2dFA85zlh)
mysql> ALTER USER ‘root’@‘localhost’ IDENTIFIED BY ‘你的新密码’;
mysql> flush privileges;
[root@biz-h77-dev admin]# mysql -uroot -p
Enter password:
Welcome to the MySQL monitor.  Commands end with ; or g.
Your MySQL connection id is 2
Server version: 5.7.28

Copyright (c) 2000, 2019, Oracle and/or its affiliates. All rights reserved.

Oracle is a registered trademark of Oracle Corporation and/or its
affiliates. Other names may be trademarks of their respective
owners.

Type 'help;' or 'h' for help. Type 'c' to clear the current input statement.

mysql> ALTER USER 'root'@'localhost' IDENTIFIED BY '你的新密码';
Query OK, 0 rows affected (0.00 sec)

mysql> flush privileges;
Query OK, 0 rows affected (0.00 sec)

mysql> exit
Bye
[root@biz-h77-dev admin]#
注意:如果新密码很简单,会失败,报错:ERROR 1819 (HY000): Your password does not satisfy the current policy requirements
解决:登录mysql后 设置
mysql> set global validate_password_policy=0;
mysql> set global validate_password_length=1;
mysql> flush privileges;
授权远程访问
mysql> grant all privileges on . to root@"%" identified by " 你的密码";
mysql> flush privileges;
解决 远程连接mysql 连不上报错 10038
1 远程连接mysql,需要授权远程访问权限 (在上面已经提到了)
本地登录mysql
mysql -uroot -p
授权远程访问,刷新
grant all privileges on . to root@"%" identified by “你的密码”;
flush privileges;
[root@biz-h77-dev admin]# mysql -uroot -p
Enter password:
Welcome to the MySQL monitor.  Commands end with ; or g.
Your MySQL connection id is 66
Server version: 5.7.28 MySQL Community Server (GPL)

Copyright (c) 2000, 2019, Oracle and/or its affiliates. All rights reserved.

Oracle is a registered trademark of Oracle Corporation and/or its
affiliates. Other names may be trademarks of their respective
owners.

Type 'help;' or 'h' for help. Type 'c' to clear the current input statement.

mysql> grant all privileges on *.* to root@"%" identified by "你的密码";
Query OK, 0 rows affected, 1 warning (0.00 sec)

mysql> flush privileges;
Query OK, 0 rows affected (0.00 sec)

mysql>
mysql> exit
Bye
[root@biz-h77-dev admin]#
2 关闭防火墙
查看防火墙 firewall-cmd --state ,如果防火墙没关的话,关闭防火墙 systemctl stop firewalld.service ,禁止防火墙开机启动 systemctl disable firewalld.service
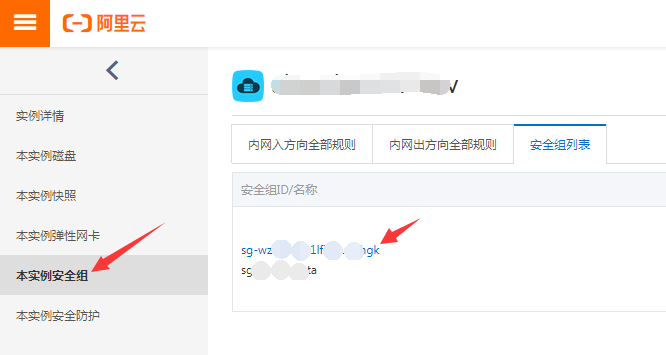
3 如果是云服务器的话,会有安全组,在云服务器所在的安全组中添加 3306端口权限,如下:


4 如果还不行的话,看看是不是有iptables 将外部的3306端口封掉了的
将3306的规则从iptables里删除,参考https://www.vpser.net/security/linux-iptables.html
最后
以上就是迷人薯片最近收集整理的关于centos7 yum安装mysql5.7,解决 远程连接mysql 连不上报错 10038的全部内容,更多相关centos7内容请搜索靠谱客的其他文章。


发表评论 取消回复