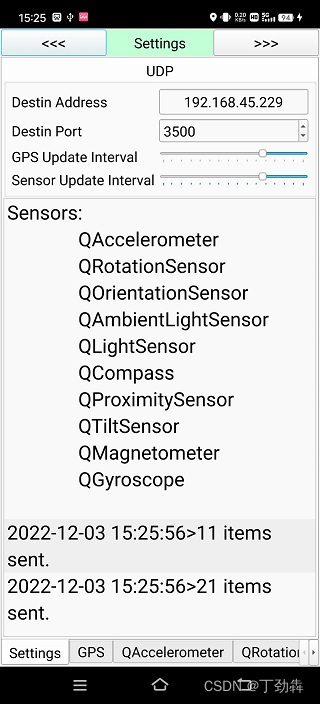
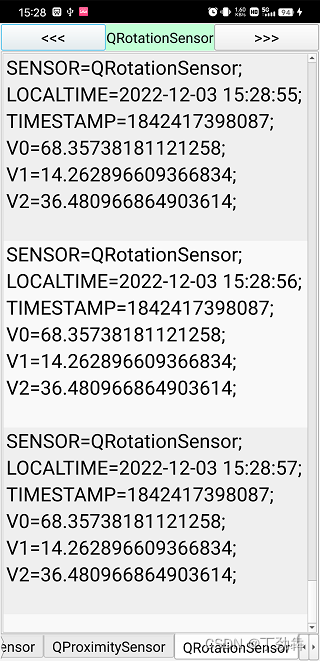
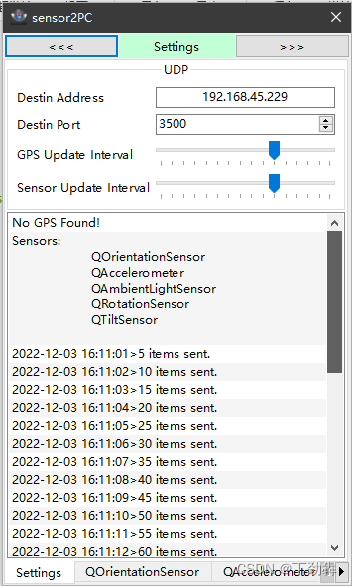
在上一篇,我们搭建了开发环境。本篇,使用C++代码真正实现功能。我们使用UDP协议从手机上指定发送的目的地、端口。效果如下图,完整工程参考https://gitcode.net/coloreaglestdio/qtcpp_demo/-/tree/master/android/sensors2pc:
| 移动端1 | 移动端2 | 桌面 |
|---|---|---|
 |  |  |
1. 在PC端实现程序并调试
我们建立一个Qt的Widgets程序,添加 position, sensors模块。
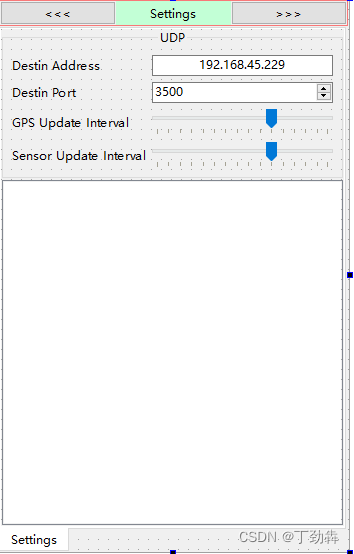
- 界面里支持设置目的地址、端口。
- 界面里可以设置GPS与各个传感器的刷新速度。
- 传感器使用Qt枚举,并创建刷新函数。
传感器的主对话框类如下:
#ifndef DLGSTP_H
#define DLGSTP_H

#include <QDialog>
#include <QGeoPositionInfoSource>
#include <QStandardItemModel>
#include <QUdpSocket>
#include <QSensor>
#include <functional>
QT_BEGIN_NAMESPACE
namespace Ui { class DlgSTP; }
QT_END_NAMESPACE

class DlgSTP : public QDialog
{
	Q_OBJECT
public:
	DlgSTP(QWidget *parent = nullptr);
	~DlgSTP();
	void EnumSensors();
	void openGPS();
protected:
	void timerEvent(QTimerEvent * evt) override;
private:
	Ui::DlgSTP *ui;
	QStandardItemModel * m_pMsgMod = 0;
	int m_nTimer = -1;
protected:
	//Sensors Update Lambdas
	QList<std::function<void (void)> > m_sensorUpdaters;
protected:
	//GPS
	QGeoPositionInfoSource *m_pos_source = 0;
protected:
	//Net Send
	QUdpSocket * m_psock = 0;
	QStringList m_listInfo;
};
#endif // DLGSTP_H

//cpp

DlgSTP::DlgSTP(QWidget *parent)
	: QDialog(parent)
	, ui(new Ui::DlgSTP)
	, m_pMsgMod(new QStandardItemModel(this))
	, m_psock(new QUdpSocket(this))
{
	ui->setupUi(this);
	ui->listView_msg->setModel(m_pMsgMod);
	showMaximized();
	//Open GPS Device
	openGPS();
	//Enum all sensors
	EnumSensors();
	loadSettings();
	m_nTimer = startTimer(20);
}
1.1 枚举传感器并建立界面
通过Qt的Sensors可以枚举到传感器的取值。
void DlgSTP::EnumSensors()
{
	QList<QByteArray> sensors = QSensor::sensorTypes();
	QString strSensors = "Sensors:n";
	for (QByteArray stp : sensors)
	{
		QSensor * sensor = new QSensor(stp);
		sensor->start();
		//添加界面刷新
		QListView * lstView = new QListView(this);
		QStandardItemModel * m_pMod = new QStandardItemModel(this);
		lstView->setModel(m_pMod);
		QString name = stp;
		ui->tabWidget->addTab(lstView,name);
		//设置刷新函数(供定时器调用),使用Lamdba后期调用,省的建立函数了。
		m_sensorUpdaters<<[sensor,m_pMod,this,lstView,name](void)->void
		{
			QSensorReading *reading = sensor->reading();
			QString str = "SENSOR="+name + ";n";
			//获取当前传感器有多少数值
			int n = reading->valueCount();
			for (int i=0;i<n;++i)
			{
				QVariant vt = reading->value(i);
				str += QString("%1").arg(vt.toString());
			}
			//消息写入m_listInfo,后续发送
			m_listInfo << str;
			m_pMod->appendRow(new QStandardItem(str));
			lstView->scrollToBottom();
		};
	}
}
值得注意的是,上面的代码是在实际代码中进行了简化。实际代码里为了避免频繁刷新界面的同时,迅速吞吐传感器数据,进行了一些处理。可参考实际源码。
1.2 初始化GPS
GPS是手机的一个重要功能。通过初始化GPS,可以实时获取位置、时刻。
void DlgSTP::openGPS()
{
	m_pos_source = QGeoPositionInfoSource::createDefaultSource(0);
	if (m_pos_source)
	{
		//Add Tab
		QListView * lstView = new QListView(this);
		QStandardItemModel * m_pMod = new QStandardItemModel(this);
		lstView->setModel(m_pMod);
		ui->tabWidget->addTab(lstView,"GPS");
		//直接把GPS刷新信号绑定到Lambda
		connect (m_pos_source,
				 &QGeoPositionInfoSource::positionUpdated,
				 [lstView,m_pMod,this](const QGeoPositionInfo &update)->void
		{
			double lat = update.coordinate().latitude();
			double lon = update.coordinate().longitude();
			QDateTime dtm = update.timestamp();
			QString str = QString("SENSOR=GPS;nGMT_TIME=%1;nLAT=%2;nLON=%3;n")
					.arg(dtm.toString("yyyy-MM-dd HH:mm:ss"))
					.arg(lat,0,'f',7)
					.arg(lon,0,'f',7);
				//消息写入m_listInfo,后续发送
				m_listInfo << str;
			m_pMod->appendRow(new QStandardItem(str));
			lstView->scrollToBottom();
		});
		//即使出错了,也继续开始,把出错的信息绑定到Lambda
		connect (m_pos_source,
				 &QGeoPositionInfoSource::errorOccurred,
				 [this](QGeoPositionInfoSource::Error pe)->void{
			m_pos_source->startUpdates();
			m_pMsgMod->appendRow(new QStandardItem(QString("GPS Err Code %1.").arg(int(pe))));
		});
		//开启GPS
		m_pos_source->setUpdateInterval(ui->horizontalSlider_gps->value());
		m_pos_source->startUpdates();
	}
	else
		m_pMsgMod->appendRow(new QStandardItem("No GPS Found!"));
}
1.3 发送UDP
设置一个定时器,进行UDP发射。定时器的尺度是20ms的整数倍,可以调整。
void  DlgSTP::timerEvent(QTimerEvent * evt)
{
	if (evt->timerId()==m_nTimer)
	{
		++m_clk;
		//UDP Send
		const int updateITV = ui->horizontalSlider_freq->value();
		const int updateGUI = (50 / (updateITV>50?50:updateITV) )* updateITV;
		if (m_clk % updateITV ==0 )
		{
			//调用各个Lambda刷新传感器,消息写入m_listInfo
			foreach(auto fn, m_sensorUpdaters)
				fn();
			//发送
			QHostAddress addr (ui->lineEdit_ip->text());
			int port = ui->spinBox_port->value();
			foreach(QString i, m_listInfo)
				m_psock->writeDatagram(i.toLocal8Bit(),addr,port);
			m_nTotalSent += m_listInfo.size();
			m_listInfo.clear();
			//适时更新界面
			if (m_clk % updateGUI==0)
			{
				m_pMsgMod->appendRow(new QStandardItem(QString("%1>%2 items sent.")
													   .arg(QDateTime::currentDateTime().toString("yyyy-MM-dd HH:mm:ss"))
													   .arg(m_nTotalSent)));
				if (m_pMsgMod->rowCount()>MAX_ROWS_LSTV)
					m_pMsgMod->removeRows(0,m_pMsgMod->rowCount()-MAX_ROWS_LSTV);
				ui->listView_msg->scrollToBottom();
			}
		}
	}
}
我们在PC上可以先调试,发现PC上竟然也有很多传感器。
2 部署到Android 手机
我们在手机上打开调试模式,一般是连续击打系统版本号,即可打开。打开后,手机会提示允不允许USB调试,点击允许即可。
如果编译Debug版本,是不需要证书签名的。如果是Release,需要签名。
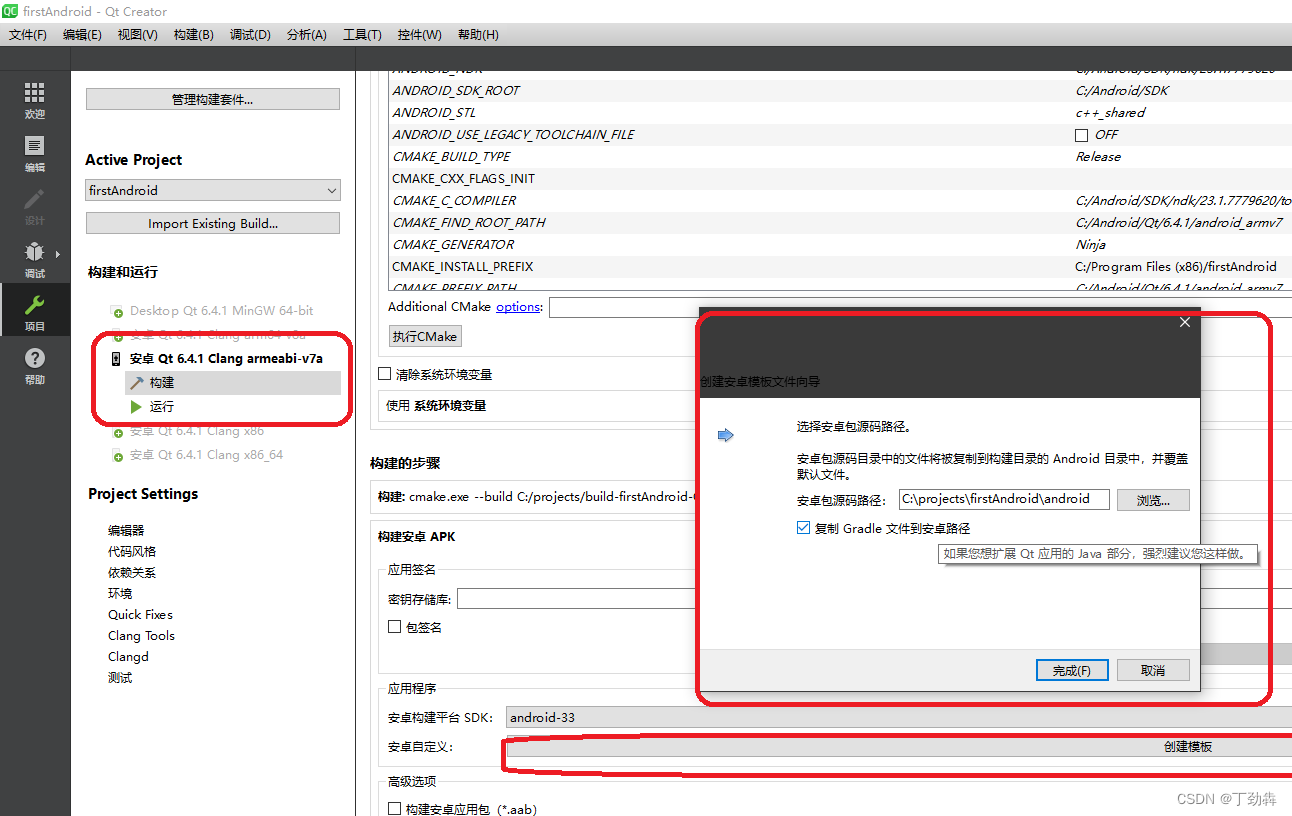
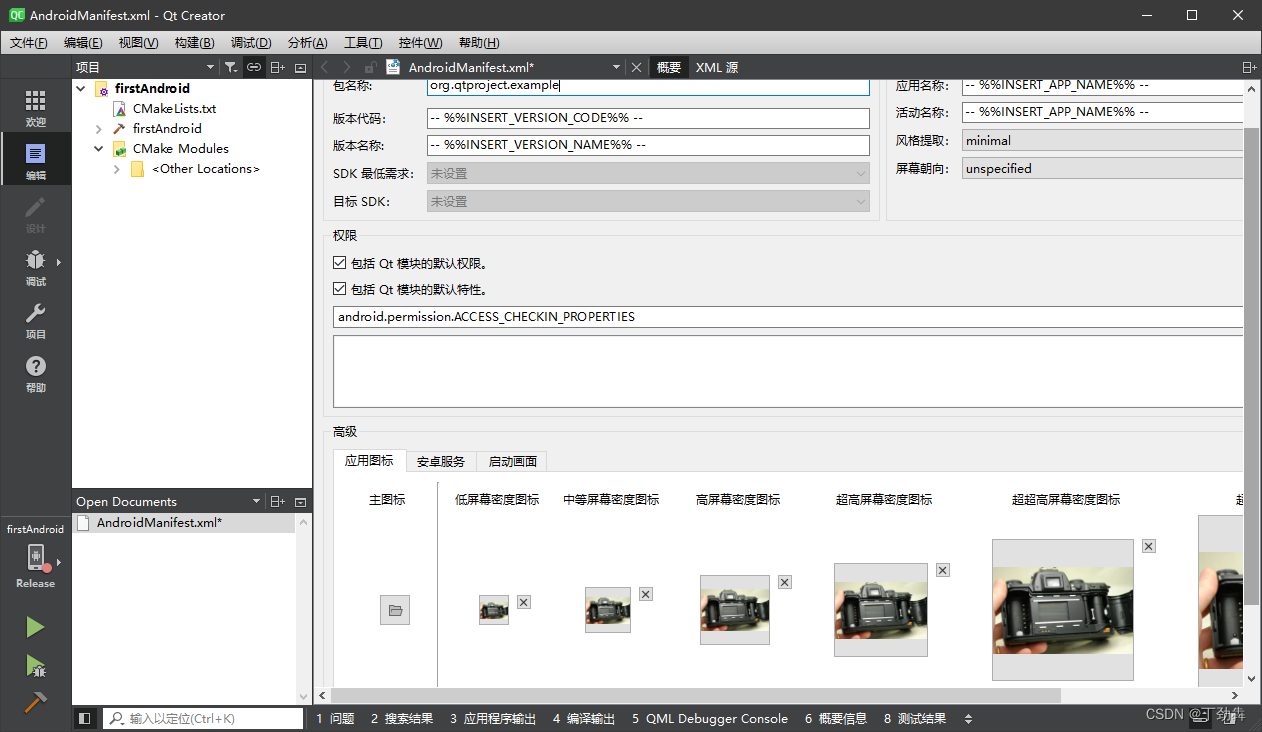
2.1 设置应用程序的名字和图标
在项目设置里,直接创建app的manifest
 创建后,即可编辑名字、图标:
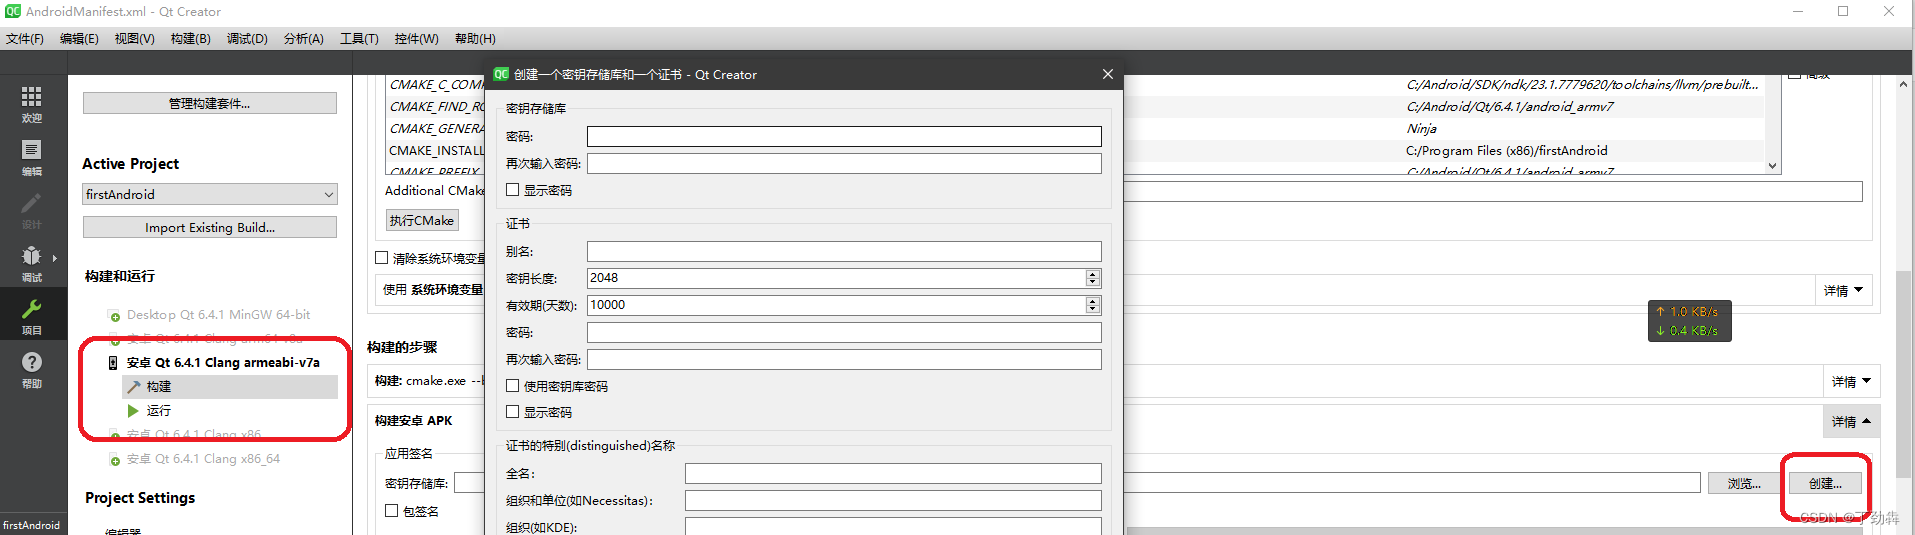
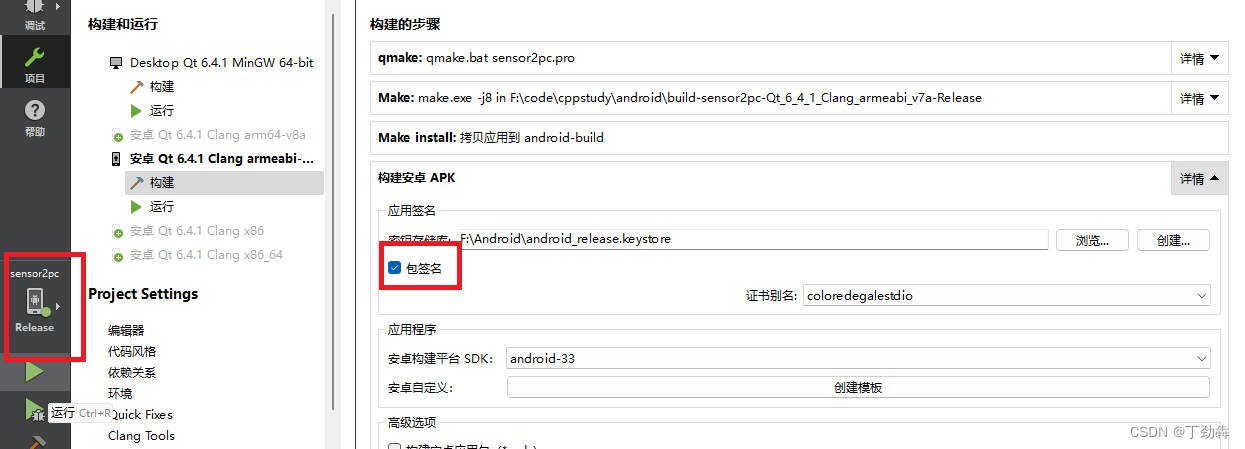
2.2 创建证书
在构建选项里,选择创建证书,输入必要信息后完成创建。注意,Release版本如果构建不成功,就要重新开启一下签名。为了安全,QtCreator会确保是你本人在烧写程序。
 创建后,选择“”包签名“”即可开启签名。注意,Release版本如果构建不成功,就要重新开启一下签名。为了安全,QtCreator会确保是你本人在烧写程序,会经常清除这个选项,以便您再次输入密码。
2.3 部署并运行程序
确保在Qt的编译栏选取了适当的设备(API版本一致),且绿色按钮出现(而非红色)
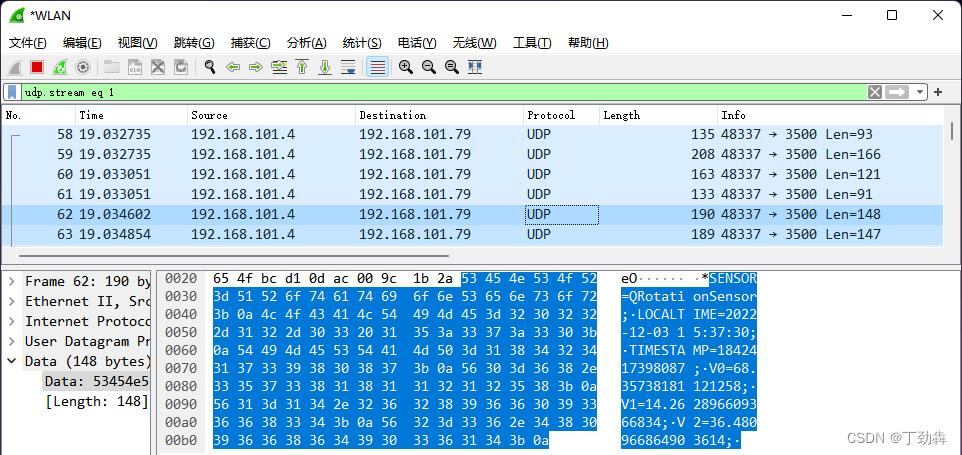
3 在PC上接收数据
当计算机、手机处于一个局域网,或者是处于IP可达的网络时,在PC端就可以接收到消息了。
最后
以上就是明亮热狗最近收集整理的关于使用 Qt for Android 获取并利用手机传感器数据(下篇)使用C++实现功能1. 在PC端实现程序并调试2 部署到Android 手机2.1 设置应用程序的名字和图标3 在PC上接收数据的全部内容,更多相关使用内容请搜索靠谱客的其他文章。
![[Android6.0][MTK6737] UVC Camera (MJPEG) 移植[Android6.0][MTK6737] UVC Camera (MJPEG) 移植](https://www.shuijiaxian.com/files_image/reation/bcimg15.png)


发表评论 取消回复