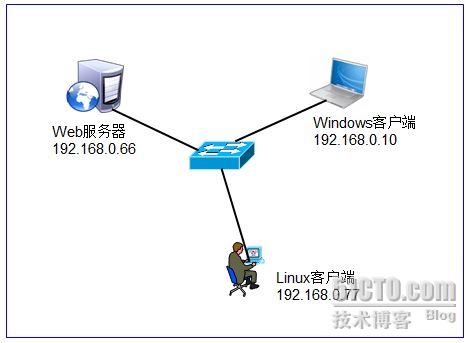
SSH(Secure SHell, 安全命令解释器)是目前比较流行和实用的远程登录方式,通过SSH协议可以有效防止远程管理过程中的信息泄露问题。本文将以实例说明如何在Linux系统中构建SSH远程登录服务器。以下是本次实验的拓扑图:
要求如下:
1.在Web服务器上启用OpenSSH服务,使用端口号为3000,允许网站管理员webmaster从任何客户端远程登录Web服务器,允许用户xiangxiang只能从Linux客户端远程登录Web服务器。
2.分别使用密码验证和密钥对(证书)验证方式远程登录服务器。
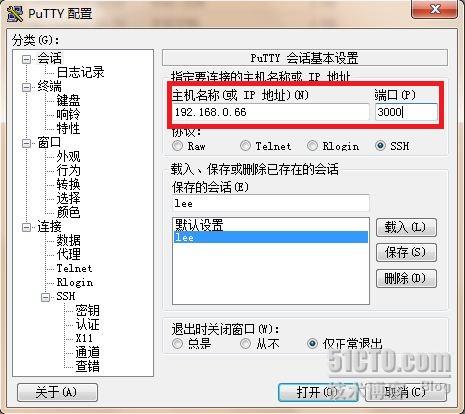
3.在Windows客户端使用PuTTY、WinSCP工具实现远程服务。
步骤如下:
一.SSH服务器的配置:
在RHEL5系统中,OpenSSH服务器和客户端的相关软件包是默认安装的,并已将sshd服务添加为标准的系统服务,因此,只需要在Web服务器中执行“service sshd start”就可以开启默认配置sshd服务,包括root在内的大部分用户(只要有能执行命令的有效shell)都可以远程登录系统。但这样做并不安全,我们需要修改配置文件(位于/etc/ssh/sshd_config),允许指定的用户来访问SSH服务器:
1.开启sshd服务:
#service sshd start
2.修改配置文件,允许允许网站管理员webmaster从任何客户端远程登录Web服务器,允许用户xiangxiang只能从Linux客户端(192.168.0.77)远程登录Web服务器,SSH默认监听的端口号22,修改为3000,以提高安全性:
#vi /etc/ssh/sshd_config
Port 3000 //修改监听端口号为3000,默认为22
ListenAddress 192.168.0.66 //只在Web服务器上提供服务
PermitRootLogin no //禁止root用户远程登录
PermitEmptyPassword no //禁止空密码用户登录
LoginGraceTime 1m //登录验证过程时间为1分钟
MaxAuthTries 3 //允许用户登录验证最大重试次数为3次
PasswordAuthentication yes //允许使用密码验证
AllowUsers webmaster xiangxiang@192.168.0.77 //此项需要手动添加,允许webmaster用户可以从任何客户端登录,允许用户xiangxiang只能从192.168.0.77客户机登录,其他用户均拒绝
【注】当root用户被禁止登录时,可以先使用普通账号远程进入系统,在需要执行管理任务时再使用“su -”的方式切换为root,或者在服务器配置sudo以执行部分管理命令,这样以提高系统的安全性。
3.创建允许远程登录Web服务器的用户:
#useradd webmaster
#useradd xiangxiang
#passwd webmaster
#passwd xiangxiang
#useradd xiangxiang
#passwd webmaster
#passwd xiangxiang
4.重新启动sshd服务,接下来就可以在客户端使用密码验证方式远程登录Web服务器:
#service sshd restart
二.客户端使用SSH方式登录Web服务器:
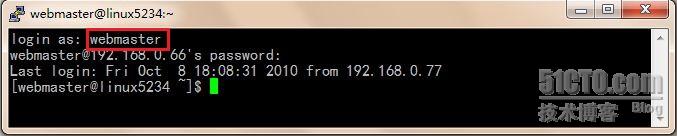
1.验证webmaster从Linux客户端(192.168.0.77)SSH远程登录Web服务器:(可以登录)

2.验证xiangxiang从Linux客户端(192.168.0.77)SSH远程登录Web服务器:(可以登录)

3.验证webmaster和xiangxiang从Windows客户端(192.168.0.77)SSH远程登录Web服务器
用户webmaster登录成功!
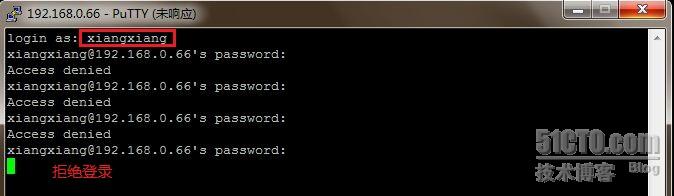
拒绝用户xiangxiang从除192.168.0.77之外的客户端登录!
三.配置使用密钥对(证书)方式远程登录Web服务器:
1.在Web服务器调整/etc/ssh/sshd_config配置文件,配置使用密钥对验证方式登录:
#vi /etc/ssh/sshd_config
PasswordAuthentication no //禁止使用密码验证方式
PubkeyAuthentication yes //使用密钥对(证书)方式进行登录验证
AuthorizedKeysFile ./ssh/authorized_keys //指定保存各用户公钥内容的数据文件位置
PasswordAuthentication no //禁止使用密码验证方式
PubkeyAuthentication yes //使用密钥对(证书)方式进行登录验证
AuthorizedKeysFile ./ssh/authorized_keys //指定保存各用户公钥内容的数据文件位置
2.重新启动sshd服务:
#service sshd restart
3.在客户端(192.168.0.77)创建密钥对:
[root@localhost ~]#
ssh-keygen -t rsa
Generating public/private rsa key pair.
Enter file in which to save the key (/root/.ssh/id_rsa): //直接回车
Enter passphrase (empty for no passphrase): //设置保护私钥文件的密码
Enter same passphrase again: //再次输入保护私钥文件的密码
Your identification has been saved in /root/.ssh/id_rsa.
Your public key has been saved in /root/.ssh/id_rsa.pub.
The key fingerprint is:
33:ee:01:7d:c3:74:83:13:ef:67:ee:d7:60:2d:e1:16 root@localhost
[root@localhost ~]# ll -a .ssh/
总计 24
drwxrwxrwx 2 root root 4096 10-08 19:29 .
drwxr-x--- 21 root root 4096 10-08 19:25 ..
-rw------- 1 root root 1743 10-08 19:29 id_rsa //创建的私钥
-rw-r--r-- 1 root root 396 10-08 19:29 id_rsa.pub //创建的公钥
-rw-r--r-- 1 root root 790 2015-11-04 known_hosts
4.上传公钥文件到Web服务器:(可以通过FTP,Samba,HTTP,SCP等方式上传)
[root@localhost ~]#
scp -P 3000 .ssh/id_rsa.pub webmaster@192.168.0.66:/home/webmaster
Address 192.168.0.66 maps to localhost, but this does not map back to the address - POSSIBLE BREAK-IN ATTEMPT!
webmaster@192.168.0.66's password:
id_rsa.pub 100% 396 0.4KB/s 00:00
Address 192.168.0.66 maps to localhost, but this does not map back to the address - POSSIBLE BREAK-IN ATTEMPT!
webmaster@192.168.0.66's password:
id_rsa.pub 100% 396 0.4KB/s 00:00
查看公钥文件是否上传成功:(成功!)
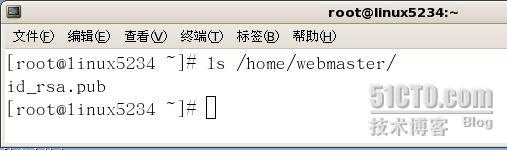
在Web服务器端(SSH服务器),将公钥文件的内容添加至用户webmaster、xiangxiang授权密钥库:
[root@linux5234 ~]#
mkdir -p /home/webmaster/.ssh
[root@linux5234 ~]# mkdir -p /home/xiangxiang/.ssh
[root@linux5234 ~]# cat /home/webmaster/id_rsa.pub >> /home/webmaster/.ssh/authorized_keys
[root@linux5234 ~]# cat /home/webmaster/id_rsa.pub >> /home/xiangxiang/.ssh/authorized_keys
[root@linux5234 ~]# ls -l /home/webmaster/.ssh/authorized_keys
-rw-r--r-- 1 root root 396 10-08 19:56 /home/webmaster/.ssh/authorized_keys
[root@linux5234 ~]# ls -l /home/xiangxiang/.ssh/authorized_keys
-rw-r--r-- 1 root root 396 10-08 19:57 /home/xiangxiang/.ssh/authorized_keys
四.在Linux客户端以密钥对(证书)验证方式登录SSH服务器:
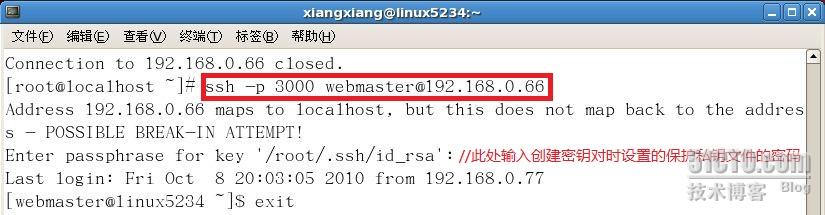
1.以root用户登录客户端系统,执行ssh命令,以用户webmaster远程登录SSH服务器:
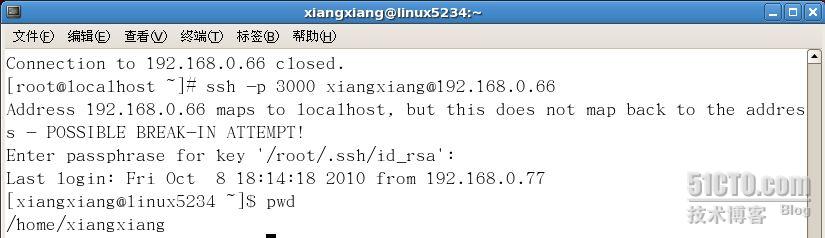
2.以root用户登录客户端系统,执行ssh命令,以用户xiangxiang远程登录SSH服务器:
3.以其它普通用户(tom)登录客户端系统,执行ssh命令,以用户webmaster远程登录SSH服务器:
[root@localhost ~]# useradd tom
[root@localhost ~]# mkdir -p /home/tom/.ssh
[root@localhost ~]# cp .ssh/id_rsa /home/tom/.ssh/
[root@localhost ~]# chown tom.tom /home/tom/.ssh/id_rsa
[root@localhost ~]# ll /home/tom/.ssh/id_rsa
-rw------- 1 tom tom 1743 10-08 20:22 /home/tom/.ssh/id_rsa
[root@localhost ~]# mkdir -p /home/tom/.ssh
[root@localhost ~]# cp .ssh/id_rsa /home/tom/.ssh/
[root@localhost ~]# chown tom.tom /home/tom/.ssh/id_rsa
[root@localhost ~]# ll /home/tom/.ssh/id_rsa
-rw------- 1 tom tom 1743 10-08 20:22 /home/tom/.ssh/id_rsa
登录:
[root@localhost ~]# su - tom
[tom@localhost ~]$ ssh -p 3000 webmaster@192.168.0.66
The authenticity of host '192.168.0.66 (192.168.0.66)' can't be established.
RSA key fingerprint is 6f:ef:59:01:b4:cf:73:36:03:42:88:94:73:82:52:43.
Are you sure you want to continue connecting (yes/no)? yes
Failed to add the host to the list of known hosts (/home/tom/.ssh/known_hosts).
Address 192.168.0.66 maps to localhost, but this does not map back to the address - POSSIBLE BREAK-IN ATTEMPT!
Enter passphrase for key '/home/tom/.ssh/id_rsa':
Last login: Fri Oct 8 20:03:36 2010 from 192.168.0.77
[webmaster@linux5234 ~]$
五.在Windows客户端使用Putty、WinSCP以密钥对(证书)验证方式登录SSH服务器:
1.使用FTP或其他方法从Linux客户端导出私钥至Windows客户端(步骤略)。
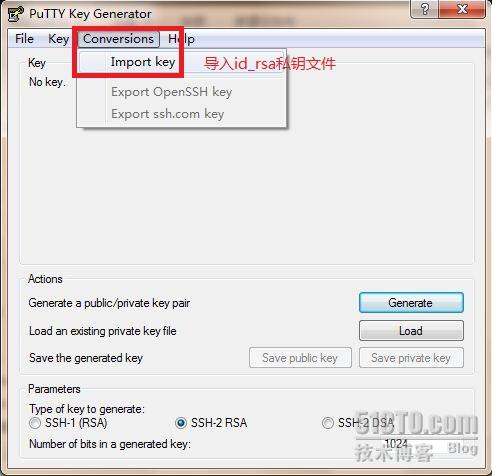
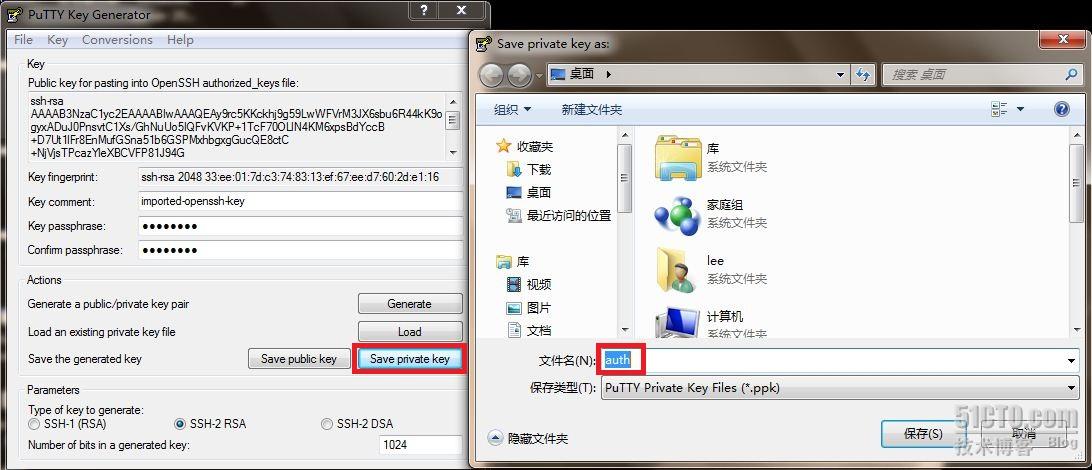
2.使用PUTTYGEN工具导入私钥文件并转换成.ppk格式的私钥:

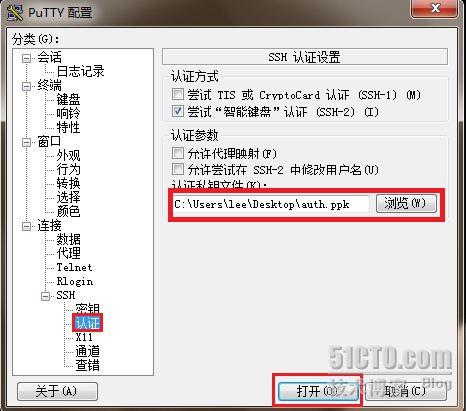
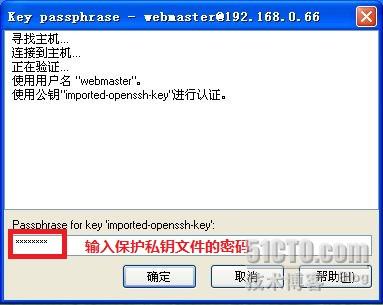
3.使用Putty登录:


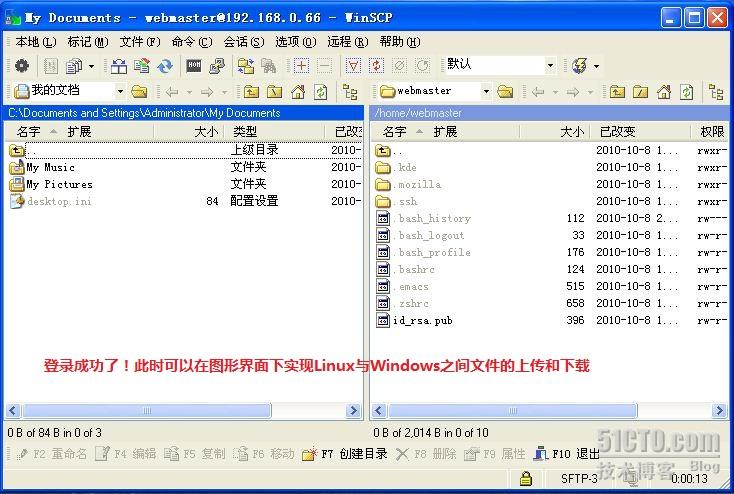
4.使用WinSCP工具远程登录SSH服务器(需要先在客户端安装WinSCP软件),以安全的方式上传和下载文件:
安装好WinSCP后,打开程序,看到以下界面:


通过以上的配置,我们可以很方便远程登录Linux各种服务器,实现安全便捷的管理!
转载于:https://blog.51cto.com/kk5234/402512
最后
以上就是自由星星最近收集整理的关于在RHEL5下搭建SSH远程登录服务器的全部内容,更多相关在RHEL5下搭建SSH远程登录服务器内容请搜索靠谱客的其他文章。
本图文内容来源于网友提供,作为学习参考使用,或来自网络收集整理,版权属于原作者所有。


发表评论 取消回复