对于springboot的使用起来非常的轻便简单,但是如果能够理清原理会对你的学习帮助很多,对于面试也肯定不会只让我们去讲如何使用它,面试官更喜欢听的还是你对底层原理的了解程度,因为底层很多的思路都是贯通的,话不多说,直接开干。
首先我们来实现一个小小需求,按条件去加载一个类进入ioc容器,比如当我们导入了jedis的jar包的时候,加载实体类User,如果不导入的话,加载失败,可以想一想?之所以摆出这个问题,是因为官方底层也是这么加载的。
- 创建一个实体类User
public class User {
}
2.创建配置类UserConfig
@Configuration
public class UserConfig {


    @Bean
    @MyConditionOnClass("redis.clients.jedis.Jedis")
    public User user(){
        return  new User();
    }
}
3.上面用到了自定义注解,所以我们创建一个注解@MyConditionOnClass
@Target({ElementType.TYPE, ElementType.METHOD})
@Retention(RetentionPolicy.RUNTIME)
@Documented
@Conditional(ClassCondition.class)
public @interface MyConditionOnClass {

    String[] value();
}
4.以上又使用到了ClassCondition类,所以我们创建出来,并实现对应的类。
public class ClassCondition implements Condition {
    @Override
    public boolean matches(ConditionContext context, AnnotatedTypeMetadata metadata) {
        Map<String, Object> map = metadata.getAnnotationAttributes(MyConditionOnClass.class.getName());
        System.out.println(map);
        boolean flag = true;
        try {
            String[] strings =(String[]) map.get("value");
            for(String className : strings){
                Class.forName(className);
            }
        } catch (ClassNotFoundException e) {
            e.printStackTrace();
            flag = false;
        }
        return flag;
    }
}
5.最后测试,条件是是否导入jedis的jar包,来看ioc是否有User对象
 <dependency>
            <groupId>redis.clients</groupId>
            <artifactId>jedis</artifactId>
</dependency>
@SpringBootApplication
public class AutoConfigureApplication {
    public static void main(String[] args) {
       //返回ioc容器,可以操作得到对应的bean对象
        ConfigurableApplicationContext context = SpringApplication.run(AutoConfigureApplication.class, args);
        Object user = context.getBean("user");
        System.out.println(user);

    }
}
6.测试结果是,
当我们导入了以上的依赖jar包控制台打印了com.lzc.domain.User@17d238b1,成功获取到对象。
当我们拿掉依赖的时候,报错加载不到user对象,需求实现成功。
Exception in thread "main" org.springframework.beans.factory.NoSuchBeanDefinitionException: No bean named 'user' available
	at org.springframework.beans.factory.support.DefaultListableBeanFactory.getBeanDefinition(DefaultListableBeanFactory.java:808)
	at org.springframework.beans.factory.support.AbstractBeanFactory.getMergedLocalBeanDefinition(AbstractBeanFactory.java:1279)
	at org.springframework.beans.factory.support.AbstractBeanFactory.doGetBean(AbstractBeanFactory.java:297)
	at org.springframework.beans.factory.support.AbstractBeanFactory.getBean(AbstractBeanFactory.java:202)
	at org.springframework.context.support.AbstractApplicationContext.getBean(AbstractApplicationContext.java:1108)
	at com.lzc.AutoConfigureApplication.main(AutoConfigureApplication.java:12)
总结:当我们在配置类上,把User对象加入ioc的时候,上面加了一个自定义注解,@MyConditionOnClass,而这个注解上面又有一个本地注解,@Conditional(ClassCondition.class),它引用了ClassCondition类,而这个类又实现了Condition,并覆写了方法matches,最主要的是我们要理清这里面的逻辑,它的意思是判断@MyConditionOnClass注解里面是否有属性,如果有就通过Class.forName()加载这个属性,最后做出判断,这就是本质。
@ConditionalOnBean:当容器里有指定的bean的条件下。 @ConditionalOnMissingBean:当容器里不存在指定bean的条件下。 @ConditionalOnClass:当类路径下有指定类的条件下。
@ConditionalOnMissingClass:当类路径下不存在指定类的条件下。
@ConditionalOnProperty:指定的属性是否有指定的值,比如@ConditionalOnProperties(prefix=”xxx.xxx”, value=”enable”, matchIfMissing=true),代表当xxx.xxx为enable时条件的布尔值为true,如果没有设置的情况下也为true。
接下来我们揭开springboot自动配置的面纱
首先我们点开我们的常用注解@SpringbootApplication
@Target(ElementType.TYPE)
@Retention(RetentionPolicy.RUNTIME)
@Documented
@Inherited
@SpringBootConfiguration
@EnableAutoConfiguration
@ComponentScan(excludeFilters = { @Filter(type = FilterType.CUSTOM, classes = TypeExcludeFilter.class),
		@Filter(type = FilterType.CUSTOM, classes = AutoConfigurationExcludeFilter.class) })
public @interface SpringBootApplication {
其中我们关注的是@EnableAutoConfiguration,点开
@Target(ElementType.TYPE)
@Retention(RetentionPolicy.RUNTIME)
@Documented
@Inherited
@AutoConfigurationPackage
@Import(AutoConfigurationImportSelector.class)
public @interface EnableAutoConfiguration {
可以知道它是通过Import实现的,接下里我们看AutoConfigurationImportSelector,同样覆写SelectImports(),并调用了以下方法,这是关键。
protected List<String> getCandidateConfigurations(AnnotationMetadata metadata, AnnotationAttributes attributes) {
		List<String> configurations = SpringFactoriesLoader.loadFactoryNames(getSpringFactoriesLoaderFactoryClass(),
				getBeanClassLoader());
		Assert.notEmpty(configurations, "No auto configuration classes found in META-INF/spring.factories. If you "
				+ "are using a custom packaging, make sure that file is correct.");
		return configurations;
	}
SpringFactoriesLoader.loadFactoryNames()扫描所有具有META-INF/spring.factories的jar包。spring-boot-autoconfigure-x.x.x.x.jar里就有一个这样的spring.factories文件。
这个spring.factories文件也是一组一组的key=value的形式,其中一个key是EnableAutoConfiguration类的全类名,而它的value是一个xxxxAutoConfiguration的类名的列表,这些类名以逗号分隔,如下图所示:
org.springframework.boot.autoconfigure.EnableAutoConfiguration=
org.springframework.boot.autoconfigure.admin.SpringApplicationAdminJmxAutoConfiguration,
org.springframework.boot.autoconfigure.aop.AopAutoConfiguration,
org.springframework.boot.autoconfigure.amqp.RabbitAutoConfiguration,
org.springframework.boot.autoconfigure.batch.BatchAutoConfiguration,
org.springframework.boot.autoconfigure.cache.CacheAutoConfiguration,
org.springframework.boot.autoconfigure.cassandra.CassandraAutoConfiguration,
org.springframework.boot.autoconfigure.cloud.CloudServiceConnectorsAutoConfiguration,
org.springframework.boot.autoconfigure.context.ConfigurationPropertiesAutoConfiguration,
org.springframework.boot.autoconfigure.context.MessageSourceAutoConfiguration,
org.springframework.boot.autoconfigure.context.PropertyPlaceholderAutoConfiguration,
org.springframework.boot.autoconfigure.couchbase.CouchbaseAutoConfiguration,
org.springframework.boot.autoconfigure.dao.PersistenceExceptionTranslationAutoConfiguration,
org.springframework.boot.autoconfigure.data.cassandra.CassandraDataAutoConfiguration,
org.springframework.boot.autoconfigure.data.cassandra.CassandraReactiveDataAutoConfiguration,
org.springframework.boot.autoconfigure.data.cassandra.CassandraReactiveRepositoriesAutoConfiguration,
org.springframework.boot.autoconfigure.data.cassandra.CassandraRepositoriesAutoConfiguration,
org.springframework.boot.autoconfigure.data.couchbase.CouchbaseDataAutoConfiguration,
org.springframework.boot.autoconfigure.data.couchbase.CouchbaseReactiveDataAutoConfiguration,
org.springframework.boot.autoconfigure.data.couchbase.CouchbaseReactiveRepositoriesAutoConfiguration,
org.springframework.boot.autoconfigure.data.couchbase.CouchbaseRepositoriesAutoConfiguration,
org.springframework.boot.autoconfigure.data.elasticsearch.ElasticsearchAutoConfiguration,
org.springframework.boot.autoconfigure.data.elasticsearch.ElasticsearchDataAutoConfiguration,
org.springframework.boot.autoconfigure.data.elasticsearch.ElasticsearchRepositoriesAutoConfiguration,
org.springframework.boot.autoconfigure.data.elasticsearch.ReactiveElasticsearchRepositoriesAutoConfiguration,
org.springframework.boot.autoconfigure.data.elasticsearch.ReactiveRestClientAutoConfiguration,
org.springframework.boot.autoconfigure.data.jdbc.JdbcRepositoriesAutoConfiguration,
org.springframework.boot.autoconfigure.data.jpa.JpaRepositoriesAutoConfiguration,
org.springframework.boot.autoconfigure.data.ldap.LdapRepositoriesAutoConfiguration,
org.springframework.boot.autoconfigure.data.mongo.MongoDataAutoConfiguration,
org.springframework.boot.autoconfigure.data.mongo.MongoReactiveDataAutoConfiguration,
org.springframework.boot.autoconfigure.data.mongo.MongoReactiveRepositoriesAutoConfiguration,
org.springframework.boot.autoconfigure.data.mongo.MongoRepositoriesAutoConfiguration,
org.springframework.boot.autoconfigure.data.neo4j.Neo4jDataAutoConfiguration,
org.springframework.boot.autoconfigure.data.neo4j.Neo4jRepositoriesAutoConfiguration,
这个@EnableAutoConfiguration注解通过@SpringBootApplication被间接的标记在了Spring Boot的启动类上。在SpringApplication.run(…)的内部就会执行selectImports()方法,找到所有JavaConfig自动配置类的全限定名对应的class,然后将所有自动配置类加载到Spring容器中。
自动配置原理过程总结
Spring Boot启动的时候会通过@EnableAutoConfiguration注解找到META-INF/spring.factories配置文件中的所有自动配置类,并对其进行加载,而这些自动配置类都是以AutoConfiguration结尾来命名的,它实际上就是一个JavaConfig形式的Spring容器配置类,它能通过以Properties结尾命名的类中取得在全局配置文件中配置的属性如:server.port,而XxxxProperties类是通过@ConfigurationProperties注解与全局配置文件中对应的属性进行绑定的。
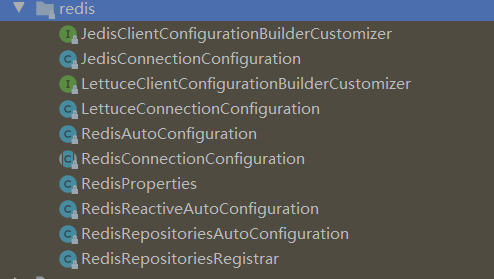
接下来我们看一个具体的RedisAutoConfiguration,对以上有个深入的了解。

这就是上面说的经典组合,RedisAutoConfiguration和RedisProperties
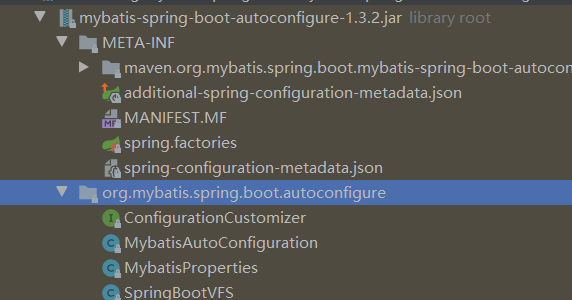
,几乎都是这样实现的,当我们引入第三方jar包的时候,比如当我们引入mybatis继承springboot,底层也是MybatisAutoConfiguration,MybatisProperties

当然在META-INF下面spring.factories文件,和上面一样,只不过上面是默认大量的配置类,引入这个myabtis的时候,就会扫描对应的spring.factories文件,然后加入容器中,我们就可以使用。
接下来我们看看这两个类MybatisAutoConfiguration,MybatisProperties
@Configuration
@ConditionalOnClass({SqlSessionFactory.class, SqlSessionFactoryBean.class})
@ConditionalOnBean({DataSource.class})
@EnableConfigurationProperties({MybatisProperties.class})
@AutoConfigureAfter({DataSourceAutoConfiguration.class})
public class MybatisAutoConfiguration {
```java
     @Bean
    @ConditionalOnMissingBean
    public SqlSessionFactory sqlSessionFactory(DataSource dataSource) throws Exception {
从上面可以看到用到了我们最开始将的其中一个@ConditionalOnMissingBean,现在大家应该知道了,都是按条件加载,其实很多的实现都是这样,还有一点上面使用了MybatisProperties,我们看看
@ConfigurationProperties(
    prefix = "mybatis"
)
public class MybatisProperties {
    public static final String MYBATIS_PREFIX = "mybatis";
    private String configLocation;
    private String[] mapperLocations;
    private String typeAliasesPackage;
    private String typeHandlersPackage;
    private boolean checkConfigLocation = false;
    private ExecutorType executorType;
    private Properties configurationProperties;
以上定义了一些属性,还有前缀mybatis,这样我们也能知道当我们编写配置文件application.properties或application.yml的时候,对应的前缀加上mybatis,就是从这个而来的。关于这个就介绍到这里,其他的大家可以去分别看看。
这里既然讲到了application.properties配置文件,我就简单的说一下他们怎么加载的。
spring加载配置文件是通过listener监视器实现的
application.properties和application.yml文件可以放在一下四个位置
外置,在相对于应用程序运行目录的/congfig子目录里。
外置,在应用程序运行的目录里
内置,在config包内
内置,在Classpath根目录
同样,这个列表按照优先级排序,也就是说,src/main/resources/config 下application.properties覆盖src/main/resources 下application.properties中相同的属性
此外,如果你在相同优先级位置同时有application.properties和application.yml,那么application.yml里面的属性就会覆盖application.properties里的属性。
集成Redis,实现缓存
- 导入依赖
<dependency>
            <groupId>org.springframework.boot</groupId>
            <artifactId>spring-boot-starter-data-redis</artifactId>
            <version>2.2.6.RELEASE</version>
 </dependency>
2.写配置类
@Configuration
@EnableCaching
public class RedisConfig extends CachingConfigurerSupport {

    /**
     * 选择redis作为默认缓存工具
     * @param redisConnectionFactory
     * @return
     */
    /*@Bean
    //springboot 1.xx
    public CacheManager cacheManager(RedisTemplate redisTemplate) {
        RedisCacheManager rcm = new RedisCacheManager(redisTemplate);
        return rcm;
    }*/
    @Bean
    public CacheManager cacheManager(RedisConnectionFactory redisConnectionFactory) {
        RedisCacheConfiguration redisCacheConfiguration = RedisCacheConfiguration.defaultCacheConfig()
                .entryTtl(Duration.ofHours(1)); // 设置缓存有效期一小时
        return RedisCacheManager
                .builder(RedisCacheWriter.nonLockingRedisCacheWriter(redisConnectionFactory))
                .cacheDefaults(redisCacheConfiguration).build();
    }

    /**
     * retemplate相关配置
     * @param factory
     * @return
     */
    @Bean
    public RedisTemplate<String, Object> redisTemplate(RedisConnectionFactory factory) {

        RedisTemplate<String, Object> template = new RedisTemplate<>();
        // 配置连接工厂
        template.setConnectionFactory(factory);

        //使用Jackson2JsonRedisSerializer来序列化和反序列化redis的value值(默认使用JDK的序列化方式)
        Jackson2JsonRedisSerializer jacksonSeial = new Jackson2JsonRedisSerializer(Object.class);

        ObjectMapper om = new ObjectMapper();
        // 指定要序列化的域,field,get和set,以及修饰符范围,ANY是都有包括private和public
        om.setVisibility(PropertyAccessor.ALL, JsonAutoDetect.Visibility.ANY);
        // 指定序列化输入的类型,类必须是非final修饰的,final修饰的类,比如String,Integer等会跑出异常
        om.enableDefaultTyping(ObjectMapper.DefaultTyping.NON_FINAL);
        jacksonSeial.setObjectMapper(om);

        // 值采用json序列化
        template.setValueSerializer(jacksonSeial);
        //使用StringRedisSerializer来序列化和反序列化redis的key值
        template.setKeySerializer(new StringRedisSerializer());

        // 设置hash key 和value序列化模式
        template.setHashKeySerializer(new StringRedisSerializer());
        template.setHashValueSerializer(jacksonSeial);
        template.afterPropertiesSet();

        return template;
    }

    /**
     * 对hash类型的数据操作
     *
     * @param redisTemplate
     * @return
     */
    @Bean
    public HashOperations<String, String, Object> hashOperations(RedisTemplate<String, Object> redisTemplate) {
        return redisTemplate.opsForHash();
    }

    /**
     * 对redis字符串类型数据操作
     *
     * @param redisTemplate
     * @return
     */
    @Bean
    public ValueOperations<String, Object> valueOperations(RedisTemplate<String, Object> redisTemplate) {
        return redisTemplate.opsForValue();
    }

    /**
     * 对链表类型的数据操作
     *
     * @param redisTemplate
     * @return
     */
    @Bean
    public ListOperations<String, Object> listOperations(RedisTemplate<String, Object> redisTemplate) {
        return redisTemplate.opsForList();
    }

    /**
     * 对无序集合类型的数据操作
     *
     * @param redisTemplate
     * @return
     */
    @Bean
    public SetOperations<String, Object> setOperations(RedisTemplate<String, Object> redisTemplate) {
        return redisTemplate.opsForSet();
    }

    /**
     * 对有序集合类型的数据操作
     *
     * @param redisTemplate
     * @return
     */
    @Bean
    public ZSetOperations<String, Object> zSetOperations(RedisTemplate<String, Object> redisTemplate) {
        return redisTemplate.opsForZSet();
    }
3.使用
@Mapper
@CacheConfig(cacheNames = "users")
public interface UserMapper {


        @Insert("insert into user(name,age) values(#{name},#{age})")
        int addUser(@Param("name")String name,@Param("age")String age);

        @Select("select * from user where id =#{id}")
        @Cacheable(key ="#p0")
        User findById(@Param("id") String id);

        @CachePut(key = "#p0")
        @Update("update user set name=#{name} where id=#{id}")
        void updataById(@Param("id")String id,@Param("name")String name);

        //如果指定为 true,则方法调用后将立即清空所有缓存
        @CacheEvict(key ="#p0",allEntries=true)
        @Delete("delete from user where id=#{id}")
        void deleteById(@Param("id")String id);


        @Select("select * from user")
        @Cacheable(key = "#p0")
        List<User> findAll(String id);
    }
注解解释:
@EnableCaching 开启注解
@CacheConfig(cacheNames = “users”) 注解生成前缀
@Cacheable将查询结果缓存到redis中,(key="#p0")指定传入的第一个参数作为redis的key。
@CachePut,指定key,将更新的结果同步到redis中
@CacheEvict,指定key,删除缓存数据,allEntries=true,方法调用后将立即清除缓存
使用redis是主要因为它是基于内存的,相比mysql是基于硬盘,它的速度飞快,第一次查询的时候从mysql数据库中查询,然后存到redis中去,第二次查询的时候直接从缓存中拿,很好的提升性能,关于redis非关系型数据库在项目经常会使用,也是相当的重要,所以我们不要局限于mysql,多去接触其他更好的技术,今天就到此为止,有讲的不对的,还请指出,下期再见。
最后
以上就是拼搏冰棍最近收集整理的关于springboot自动配置以及集成redis使用的全部内容,更多相关springboot自动配置以及集成redis使用内容请搜索靠谱客的其他文章。


发表评论 取消回复