1、Hadoop简介

Hadoop是一个由Apache基金会所开发的分布式系统基础架构。用户可以在不了解分布式底层细节的情况下,开发分布式程序。充分利用集群的威力进行高速运算和存储。
Hadoop实现了一个分布式文件系统(Hadoop Distributed File System),简称HDFS。HDFS有高容错性的特点,并且设计用来部署在低廉的(low-cost)硬件上;而且它提供高吞吐量(high throughput)来访问应用程序的数据,适合那些有着超大数据集(large data set)的应用程序。HDFS放宽了(relax)POSIX的要求,可以以流的形式访问(streaming access)文件系统中的数据。
Hadoop的框架最核心的设计就是:HDFS和MapReduce。HDFS为海量的数据提供了存储,则MapReduce为海量的数据提供了计算。
优点:
-
高可靠性:Hadoop按位存储和处理数据的能力值得人们信赖。
-
高扩展性:Hadoop是在可用的计算机集簇间分配数据并完成计算任务的,这些集簇可以方便地扩展到数以千计的节点中。
-
高效性:Hadoop能够在节点之间动态地移动数据,并保证各个节点的动态平衡,因此处理速度非常快。
-
高容错性。Hadoop能够自动保存数据的多个副本,并且能够自动将失败的任务重新分配。
-
低成本:与一体机、商用数据仓库以及QlikView、Yonghong Z-Suite等数据集市相比,hadoop是开源的,项目的软件成本因此会大大降低。
Hadoop带有用Java语言编写的框架,因此运行在 Linux 生产平台上是非常理想的。Hadoop 上的应用程序也可以使用其他语言编写,比如 C++。
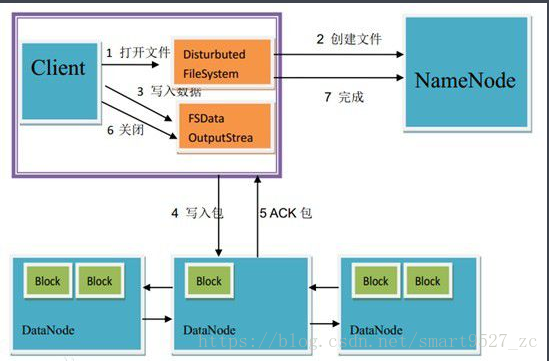
HDFS写入数据流程图

HDFS读出数据流程图
2、环境说明:2台arm架构的centos7.4操作系统
| IP | 操作系统 | 服务器名 |
| 10.2.151.138 | centos7.4 | localhost-master |
| 10.2.151.140 | centos7.4 | localhost-slave1 |
3、主机名设置
(1)查看当前主机名
[root@localhost ~]# hostname
localhost
(2)修改主机名(根据自己需要而定)
$:hostnamectl set-hostname xxxxx(3)配置hosts文件
$:vim /etc/hosts
ip              主机名
10.2.151.138    localhost-master
...
...
4、安装Java环境
$:mkdir /usr/java
$:tar -xvf jdk-8u161-linux-arm64-vfp-hflt.tar.gz -C /usr/java

$:vim /etc/profile
#java
export JAVA_HOME=/usr/java/jdk1.8.0_161/
export JRE_HOME=/usr/java/jdk1.8.0_161/jre
export CLASSPATH=.:$CLASSPATH:$JAVA_HOME/lib:$JRE_HOME/lib
export PATH=$PATH:$JAVA_HOME/bin:$JRE_HOME/bin

生效配置文件
$:source /etc/profile
5、ssh无密码登录
(1)安装和启动ssh服务
可以通过下面命令查看结果显示如下:
$:rpm -qa | grep openssh
openssh-7.4p1-11.el7.aarch64
openssh-server-7.4p1-11.el7.aarch64
openssh-clients-7.4p1-11.el7.aarch64
$:rpm -qa | grep rsync
rsync-3.1.2-4.el7.aarch64
若未安装可使用yum安装
yum install ssh #安装SSH协议
yum install rsync (rsync是一个远程数据同步工具,可通过LAN/WAN快速同步多台主机间的文件)
service sshd restart 启动服务
(2)配置Master无密码登录所有Salve
a、ssh无密码登录原理
Master(NameNode | JobTracker)作为客户端,要实现无密码公钥认证,连接到服务器Salve(DataNode | Tasktracker)上时,需要在Master上生成一个密钥对,包括一个公钥和一个私钥,而后将公钥复制到所有的Slave上。当Master通过SSH连接Salve时,Salve就会生成一个随机数并用Master的公钥对随机数进行加密,并发送给Master。Master收到加密数之后再用私钥解密,并将解密数回传给Slave,Slave确认解密数无误之后就允许Master进行连接了。这就是一个公钥认证过程,其间不需要用户手工输入密码。重要过程是将客户端Master复制到Slave上。
b、master机器上生成密码对
在Master节点上执行以下命令:ssh-keygen –t rsa –P ''
这条命是生成其无密码密钥对,询问其保存路径时直接回车采用默认路径。生成的密钥对:id_rsa和id_rsa.pub,默认存储在执行命令的目录下。
$: ssh-keygen -t rsa -P ''
Generating public/private rsa key pair.
Enter file in which to save the key (/root/.ssh/id_rsa):
Created directory '/root/.ssh'.
Your identification has been saved in /root/.ssh/id_rsa.
Your public key has been saved in /root/.ssh/id_rsa.pub.
The key fingerprint is:
SHA256:Ubr8vGxPKdtUHUSaTgjjC80nRoOzVuPMSz1rKu7iNpc root@localhost
The key's randomart image is:
+---[RSA 2048]----+
|        .=.   .o |
|       o==+ . +  |
|       .X*oo + . |
|       +oB+oo  ..|
|      . S.. o.. .|
|         + o o   |
|        . * +    |
|     + E o.B     |
|    o.*o..+.o    |
+----[SHA256]-----+
查看是否生成秘钥:
[root@localhost ~]# ll -a
total 7237680
dr-xr-x---.  6 root root       4096 Aug  3 13:28 .
dr-xr-xr-x. 17 root root        264 Aug  3 11:36 ..
-rw-------.  1 root root       1774 Dec 30  2017 anaconda-ks.cfg
-rw-------.  1 root root       3194 Aug  3 10:05 .bash_history
-rw-r--r--.  1 root root         18 Dec 29  2013 .bash_logout
-rw-r--r--.  1 root root        176 Dec 29  2013 .bash_profile
-rw-r--r--.  1 root root        176 Dec 29  2013 .bashrc
drwx------.  3 root root         17 Aug  3 11:09 .cache
-rwxr-xr-x.  1 root root 7411329024 Mar 20 14:20 CentOS-7-aarch64-Everything.iso
-rw-r--r--.  1 root root        100 Dec 29  2013 .cshrc
-rwxrwxrwx.  1 root root         74 May 24 15:04 force-eth0-100Mbps.sh
-rwxr-xr-x.  1 root root        493 May 30 15:08 lvm-resize-sda.sh
drwx------.  2 root root         38 Aug  3 13:28 .ssh
-rw-r--r--.  1 root root        129 Dec 29  2013 .tcshrc
drwxr-xr-x.  2 root root       4096 Apr 19 10:41 updates
-rw-------.  1 root root       5360 Aug  3 12:43 .viminfo
[root@localhost ~]# cd .ssh/
[root@localhost .ssh]# ll
total 8
-rw-------. 1 root root 1679 Aug  3 13:28 id_rsa
-rw-r--r--. 1 root root  396 Aug  3 13:28 id_rsa.pub
c、在master节点中将id_rsa.pub追加到授权的key里面去
[root@localhost .ssh]# cat ~/.ssh/id_rsa.pub >> ~/.ssh/authorized_keys
[root@localhost .ssh]# ll
total 12
-rw-r--r--. 1 root root  792 Aug  3 13:35 authorized_keys
-rw-------. 1 root root 1679 Aug  3 13:28 id_rsa
-rw-r--r--. 1 root root  396 Aug  3 13:28 id_rsa.pub
d、修改文件"authorized_keys"权限
[root@localhost .ssh]# ll
total 12
-rw-r--r--. 1 root root  792 Aug  3 13:35 authorized_keys
-rw-------. 1 root root 1679 Aug  3 13:28 id_rsa
-rw-r--r--. 1 root root  396 Aug  3 13:28 id_rsa.pub
[root@localhost .ssh]# chmod 600 ~/.ssh/authorized_keys
[root@localhost .ssh]# ll
total 12
-rw-------. 1 root root  792 Aug  3 13:35 authorized_keys
-rw-------. 1 root root 1679 Aug  3 13:28 id_rsa
-rw-r--r--. 1 root root  396 Aug  3 13:28 id_rsa.pub
e、用root用户设置"/etc/ssh/sshd_config"的内容
[root@localhost .ssh]# vim /etc/ssh/sshd_config
修改配置如下:
RSAAuthentication yes # 启用 RSA 认证
PubkeyAuthentication yes # 启用公钥私钥配对认证方式
AuthorizedKeysFile .ssh/authorized_keys # 公钥文件路径(和上面生成的文件同)
重启ssh服务使配置生效:service sshd restart
f、验证是否生效
[root@localhost ~]# ssh localhost
The authenticity of host 'localhost (::1)' can't be established.
ECDSA key fingerprint is SHA256:a1NFzC3BwML16Ic2ZDgqOjyrX9DWWFTaipmSU3AQC34.
ECDSA key fingerprint is MD5:d7:cd:5c:29:db:b0:b1:33:47:fe:9a:91:48:f1:32:5c.
Are you sure you want to continue connecting (yes/no)? yes
Warning: Permanently added 'localhost' (ECDSA) to the list of known hosts.
Last login: Fri Aug  3 12:42:53 2018 from 10.2.154.39
[root@localhost ~]# ls
anaconda-ks.cfg  CentOS-7-aarch64-Everything.iso  force-eth0-100Mbps.sh  lvm-resize-sda.sh  updates  zhaochuang
[root@localhost ~]# exit
logout
Connection to localhost closed.
[root@localhost ~]#
g、把公钥复制所有的Slave机器上
[root@localhost ~]# scp ~/.ssh/id_rsa.pub root@10.2.151.140:~/
The authenticity of host '10.2.151.140 (10.2.151.140)' can't be established.
ECDSA key fingerprint is SHA256:a1NFzC3BwML16Ic2ZDgqOjyrX9DWWFTaipmSU3AQC34.
ECDSA key fingerprint is MD5:d7:cd:5c:29:db:b0:b1:33:47:fe:9a:91:48:f1:32:5c.
Are you sure you want to continue connecting (yes/no)? yes
Warning: Permanently added '10.2.151.140' (ECDSA) to the list of known hosts.
root@10.2.151.140's password:
id_rsa.pub                                                                                                                                 100%  396   194.4KB/s   00:00
[root@localhost ~]#
h、登录salve节点,针对salve节点进行配置
《1》在~/创建.ssh文件
$:mkdir ~/.ssh
$:chmod 700 ~/.ssh
《2》追加到授权文件"authorized_keys"
[root@localhost-slave1 ~]# cat ~/id_rsa.pub >> ~/.ssh/authorized_keys
[root@localhost-slave1 ~]# chmod 600 ~/.ssh/authorized_keys
《2》修改"/etc/ssh/sshd_config"
[root@localhost-slave1 ~]# vim /etc/ssh/sshd_config
RSAAuthentication yes
PubkeyAuthentication yes
AuthorizedKeysFile .ssh/authorized_keys
重启ssh服务:service sshd restart
《3》在master上测试ssh无密码登录salve是否成功
[root@localhost ~]# ssh 10.2.151.140
Last login: Fri Aug  3 12:42:57 2018 from 10.2.154.39
[root@localhost-slave1 ~]#
把~/目录下的"id_rsa.pub"文件删除掉:rm –rf ~/id_rsa.pub
到此为止以实现master节点和slave节点的ssh无密码登录,重复上面步骤实现其他master和slave节点的无密码登录!!!
(3)实现slave节点ssh无密码登录master节点
a、创建"Slave"自己的公钥和私钥,并把自己的公钥追加到"authorized_keys"文件中
[root@localhost-slave1 ~]# rm –r ~/id_rsa.pub
rm: cannot remove ‘–r’: No such file or directory
rm: remove regular file ‘/root/id_rsa.pub’? y
[root@localhost-slave1 ~]# ssh-keygen -t rsa -P ''
Generating public/private rsa key pair.
Enter file in which to save the key (/root/.ssh/id_rsa):
Your identification has been saved in /root/.ssh/id_rsa.
Your public key has been saved in /root/.ssh/id_rsa.pub.
The key fingerprint is:
SHA256:bb17EEH7OwT1/CR/UZRCt09ZOfeW36TDdUlMrqb1aU0 root@localhost-slave1
The key's randomart image is:
+---[RSA 2048]----+
|           .o.++*|
|            .+oO*|
|            o.+=@|
|         . ..o.BX|
|        S o .*o=E|
|         .  =o=o*|
|           ...o=.|
|             .o. |
|            ..   |
+----[SHA256]-----+
[root@localhost-slave1 ~]# cat ~/.ssh/id_rsa.pub >> ~/.ssh/authorized_keys
[root@localhost-slave1 ~]#
b、在slave上,用命令"scp"复制"Slave"的公钥"id_rsa.pub"到"Master"的"~/"目录下,并追加到"Master"的"authorized_keys"中。
slave:
[root@localhost-slave1 ~]# scp ~/.ssh/id_rsa.pub root@10.2.151.138:~/
The authenticity of host '10.2.151.138 (10.2.151.138)' can't be established.
ECDSA key fingerprint is SHA256:a1NFzC3BwML16Ic2ZDgqOjyrX9DWWFTaipmSU3AQC34.
ECDSA key fingerprint is MD5:d7:cd:5c:29:db:b0:b1:33:47:fe:9a:91:48:f1:32:5c.
Are you sure you want to continue connecting (yes/no)? yes
Warning: Permanently added '10.2.151.138' (ECDSA) to the list of known hosts.
root@10.2.151.138's password:
id_rsa.pub                                                                                                                                 100%  403    72.3KB/s   00:00
[root@localhost-slave1 ~]#
master:
[root@localhost ~]# cat ~/id_rsa.pub >> ~/.ssh/authorized_keys
[root@localhost ~]# ll
total 7237648
-rw-------. 1 root root       1774 Dec 30  2017 anaconda-ks.cfg
-rwxr-xr-x. 1 root root 7411329024 Mar 20 14:20 CentOS-7-aarch64-Everything.iso
-rwxrwxrwx. 1 root root         74 May 24 15:04 force-eth0-100Mbps.sh
-rw-r--r--. 1 root root        403 Aug  3 14:21 id_rsa.pub
-rwxr-xr-x. 1 root root        493 May 30 15:08 lvm-resize-sda.sh
drwxr-xr-x. 2 root root       4096 Apr 19 10:41 updates
drwxr-xr-x. 2 root root        107 Aug  3 08:49 zhaochuang
[root@localhost ~]# rm -rf id_rsa.pub
e、测试slave无密码登录master
从"slave"到"master"无密码登录
[root@localhost-slave1 ~]# ssh 10.2.151.138
Last login: Fri Aug  3 13:44:30 2018 from ::1
[root@localhost ~]#
从"Master"到"Slave"无密码登录
[root@localhost ~]# ssh 10.2.151.140
Last login: Fri Aug  3 14:11:05 2018 from 10.2.151.138
[root@localhost-slave1 ~]#
到此为止以实 现master和salve互相之间的无密码登录。(其他master和slave节点实现过程同上)
6、安装Hadoop2.7.4
(1)解压hadoop2.7.4并创建tmp目录
$:mkdir /usr/hadoop
$:tar -xvf hadoop-2.7.4-aarch64.tar.gz -C /usr/hadoop
$:cd /usr/hadoop/hadoop-2.7.4
$:mv * ../
$:cd ../
$:rm -rf hadoop-2.7.4
$:mkdir tmp
(2)修改hadoop配置文件
1.配置"/etc/profile"
$:vim /etc/profile
#hadoop
export HADOOP_HOME=/usr/hadoop
export PATH=$PATH:$HADOOP_HOME/bin

使配置文件生效:source /etc/profile2.配置hadoop-env.sh
$:cd /usr/hadoop/etc/hadoop
$:vim hadoop-env.sh
末尾加
# set java environment
export JAVA_HOME=/usr/java/jdk1.8.0_161
3.配置core-site.xml文件
$:vim core-site.xml
<configuration>
        <property>
                <name>hadoop.tmp.dir</name>
                <value>/usr/hadoop/tmp</value>
                <description>A base for other temporary directories.</description>
        </property>
        <!-- file system properties -->
        <property>
                <name>fs.default.name</name>
                <value>hdfs://10.110.151.154:9000</value>
        </property>
</configuration>
4.配置hdfs-site.xml文件
$:vim hdfs-site.xml
<configuration>

        <property>
                <name>dfs.replication</name>
                <value>1</value>
        </property>

</configuration>
5.配置mapred-site.xml文件
$:vim mapred-site.xml
        <property>
                <name>mapred.job.tracker</name>
                <value>http://10.110.151.154:9001</value>
        </property>
6.配置masters文件
去掉"localhost",加入Master机器的IP:10.110.151.154
7.配置slaves文件(Master主机特有)
去掉"localhost",加入集群中所有Slave机器的IP,也是每行一个:10.2.151.140
7.启动及验证
1)格式化HDFS文件系统
cd /usr/hadoop/bin
hadoop namenode -format
2)启动hadoop
启动前关闭集群中所有机器的防火墙,不然会出现datanode开后又自动关闭。
service iptables stop
cd /usr/hadoop/sbin
start-all.sh
3)验证hadoop
(1)jps
(2)用"hadoop dfsadmin -report"
用这个命令可以查看Hadoop集群的状态。
(3)webUI访问"http:10.110.151.154:50070"
最后
以上就是想人陪哈密瓜最近收集整理的关于centos7.4-aarch64上如何部署Hadoop2.7.4的全部内容,更多相关centos7内容请搜索靠谱客的其他文章。


发表评论 取消回复