redis缓存服务器(nginx+tomcat+redis+mysql实现session会话共享)
环境:
192.168.24.128 Nginx
192.168.24.129 Tomcat1
192.168.24.130 Tomcat2
192.168.24.131 redis
192.168.24.132 MySQL
nginx安装配置
安装zlib-devel、pcre-devel等依赖包
[root@nginx ~]# yum -y install gcc gcc-c++ make libtool zlib zlib-devel pcre pcre-devel openssl openssl-devel
[root@nginx ~]# useradd -s /sbin/nologin www
[root@nginx src]# wget http://nginx.org/download/nginx-1.14.0.tar.gz
[root@nginx src]# tar zxf nginx-1.14.0.tar.gz
[root@nginx src]# cd nginx-1.14.0/
[root@nginx nginx-1.14.0]# ./configure --prefix=/usr/local/nginx1.10 --user=www --group=www --with-http_stub_status_module --with-http_realip_module --with-http_ssl_module --with-http_gzip_static_module --with-pcre --with-http_flv_module && make && make install

优化nginx程序的执行路径
[root@nginx nginx-1.14.0]# ln -s /usr/local/nginx1.10/sbin/nginx /usr/local/sbin/
[root@nginx nginx-1.14.0]# nginx -t
nginx: the configuration file /usr/local/nginx1.10/conf/nginx.conf syntax is ok
nginx: configuration file /usr/local/nginx1.10/conf/nginx.conf test is successful

配置nginx反向代理:反向代理+负载均衡+健康探测,nginx.conf文件内容:

[root@nginx conf]# cat nginx.conf
user www www;
worker_processes 4;
worker_cpu_affinity 0001 0010 0100 1000;
error_log logs/error.log;
#error_log logs/error.log notice;
#error_log logs/error.log info;
worker_rlimit_nofile 10240;
pid logs/nginx.pid;
events {
use epoll;
worker_connections 4096;
}
http {
include mime.types;
default_type application/octet-stream;
log_format main '$remote_addr - $remote_user [$time_local] "$request" '
'$status $body_bytes_sent "$http_referer" '
'"$http_user_agent" "$http_x_forwarded_for"';
access_log logs/access.log main;
server_tokens off;
sendfile on;
tcp_nopush on;
#keepalive_timeout 0;
keepalive_timeout 65;
#Compression Settings
gzip on;
gzip_comp_level 6;
gzip_http_version 1.1;
gzip_proxied any;
gzip_min_length 1k;
gzip_buffers 16 8k;
gzip_types text/plain text/css text/javascript application/json application/javascript
application/x-javascript application/xml;
gzip_vary on;
#end gzip
# http_proxy Settings
client_max_body_size 10m;
client_body_buffer_size 128k;
proxy_connect_timeout 75;
proxy_send_timeout 75;
proxy_read_timeout 75;
proxy_buffer_size 4k;
proxy_buffers 4 32k;
proxy_busy_buffers_size 64k;
proxy_temp_file_write_size 64k;
#load balance Settings
upstream backend_tomcat {
server 192.168.24.129:8080 weight=1 max_fails=2 fail_timeout=10s;
server 192.168.24.130:8080 weight=1 max_fails=2 fail_timeout=10s;
}
#virtual host Settings
server {
listen 80;
server_name www.benet.com;
charset utf-8;
location / {
root html;
index index.jsp index.html index.htm;
}
location ~* .(jsp|do)$ {
proxy_pass http://backend_tomcat;
proxy_redirect off;
proxy_set_header Host $host;
proxy_set_header X-Real-IP $remote_addr;
proxy_set_header X-Forwarded-For $proxy_add_x_forwarded_for;
proxy_next_upstream error timeout invalid_header http_500 http_502 http_503 http_504;
}
location /nginx_status {
stub_status on;
access_log off;
allow 192.168.24.0/24;
deny all;
}
}
[root@nginx conf]# nginx -t
nginx: the configuration file /usr/local/nginx1.10/conf/nginx.conf syntax is ok
nginx: configuration file /usr/local/nginx1.10/conf/nginx.conf test is successful
[root@nginx conf]# nginx安装部署tomcat应用程序服务器
在tomcat-1和tomcat-2节点上安装JDK
[root@tomcat1 src]# tar zxf jdk-8u171-linux-x64.tar.gz
[root@tomcat1 src]# mv jdk1.8.0_171/ /usr/local/java
在/etc/profile文件中添加内容如下:
export JAVA_HOME=/usr/local/java
export PATH=$JAVA_HOME/bin:$PATH
通过source命令执行profile文件,使其生效。
[root@tomcat1 src]# source /etc/profile
[root@tomcat1 src]# echo $PATH
/usr/local/java/bin:/usr/local/sbin:/usr/local/bin:/usr/sbin:/usr/bin:/root/bin
按照相同方法在tomcat-2也安装JDK
分别在 在tomcat-1和tomcat-2节点 运行java -version命令查看java版本是否和之前安装的一致。
[root@tomcat1 src]# java -version
java version "1.8.0_171"
Java(TM) SE Runtime Environment (build 1.8.0_171-b11)
Java HotSpot(TM) 64-Bit Server VM (build 25.171-b11, mixed mode)
至此java环境已经配置完成在tomcat-1和tomcat-2节点 安装配置tomcat
[root@tomcat1 src]# tar zxf apache-tomcat-7.0.86.tar.gz
[root@tomcat1 src]# mv apache-tomcat-7.0.86 /usr/local/tomcat7
配置tomcat环境变量
[root@tomcat1 src]# vim /etc/profile
export JAVA_HOME=/usr/local/java
export CATALINA_HOME=/usr/local/tomcat7
export PATH=$JAVA_HOME/bin:$CATALINA_HOME/bin:$PATH
[root@tomcat1 src]# source /etc/profile
[root@tomcat1 src]# echo $PATH
/usr/local/java/bin:/usr/local/tomcat7/bin:/usr/local/java/bin:/usr/local/sbin:/usr/local/bin:/usr/sbin:/usr/bin:/root/bin
查看tomcat的版本信息
[root@tomcat1 src]# catalina.sh version
Using CATALINA_BASE:   /usr/local/tomcat7
Using CATALINA_HOME:   /usr/local/tomcat7
Using CATALINA_TMPDIR: /usr/local/tomcat7/temp
Using JRE_HOME:        /usr/local/java
Using CLASSPATH:       /usr/local/tomcat7/bin/bootstrap.jar:/usr/local/tomcat7/bin/tomcat-juli.jar
Server version: Apache Tomcat/7.0.86
Server built:   Apr 9 2018 20:16:54 UTC
Server number:  7.0.86.0
OS Name:        Linux
OS Version:     3.10.0-327.el7.x86_64
Architecture:   amd64
JVM Version:    1.8.0_171-b11
JVM Vendor:     Oracle Corporation

启动tomcat
[root@tomcat1 src]# startup.sh
Using CATALINA_BASE:   /usr/local/tomcat7
Using CATALINA_HOME:   /usr/local/tomcat7
Using CATALINA_TMPDIR: /usr/local/tomcat7/temp
Using JRE_HOME:        /usr/local/java
Using CLASSPATH:       /usr/local/tomcat7/bin/bootstrap.jar:/usr/local/tomcat7/bin/tomcat-juli.jar
Tomcat started.

Tomcat默认运行在8080端口,运行netstat命令查看8080端口监听的信息
[root@tomcat1 src]# ss -anpt | grep java
LISTEN     0      100         :::8009                    :::*                   users:(("java",pid=4016,fd=46))
LISTEN 0 100 :::8080 :::* users:(("java",pid=4016,fd=45))按照相同方法在tomcat-2也安装
打开浏览器分别对tomcat-1和tomcat-2访问测试


如果想关闭tomcat则运行/usr/local/tomcat7/bin/shutdown.sh命令
好了,大家可以看到访成功。说明我们的tomcat安装完成,下面我们来 修改配置文件
[root@tomcat1 src]# vim /usr/local/tomcat7/conf/server.xml
设置默认虚拟主机,并增加jvmRoute
<Context docBase="/web/webapp1" path="" reloadable="true"/>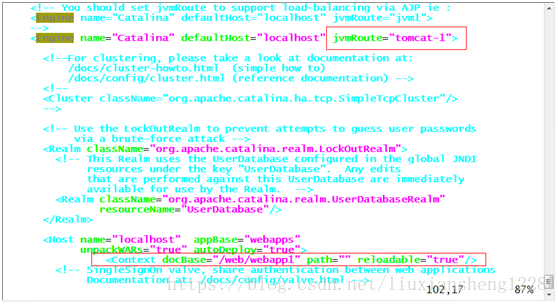
加上括号内的
增加文档目录与测试文件
[root@tomcat1 src]# mkdir -p /web/webapp1
[root@tomcat1 src]# cd /web/webapp1
[root@tomcat1 webapp1]# vim index.jsp
<%@page language="java" import="java.util.*" pageEncoding="UTF-8"%>
<html>
<head>
<title>tomcat-1</title>	#标红的地方在Tomcat2上改一下不然后面看不出效果
</head>
<body>
<h1><font color="red">Session serviced by tomcat</font></h1>
<table aligh="center" border="1">
<tr>
<td>Session ID</td>
<td><%=session.getId() %></td>
<% session.setAttribute("abc","abc");%>
</tr>
<tr>
<td>Created on</td>
<td><%= session.getCreationTime() %></td>
</tr>
</table>
</body>
<html>停止tomcat运行,检查配置文件并启动tomcat
[root@tomcat1 conf]# shutdown.sh
[root@tomcat1 conf]# ss -anpt | grep java
[root@tomcat2 webapp1]# catalina.sh configtest
Using CATALINA_BASE:   /usr/local/tomcat7
Using CATALINA_HOME:   /usr/local/tomcat7
Using CATALINA_TMPDIR: /usr/local/tomcat7/temp
Using JRE_HOME:        /usr/local/java
Using CLASSPATH:       /usr/local/tomcat7/bin/bootstrap.jar:/usr/local/tomcat7/bin/tomcat-juli.jar
May 14, 2018 7:21:47 PM org.apache.catalina.startup.VersionLoggerListener log
INFO: Server version:        Apache Tomcat/7.0.86
May 14, 2018 7:21:47 PM org.apache.catalina.startup.VersionLoggerListener log
INFO: Server built:          Apr 9 2018 20:16:54 UTC
May 14, 2018 7:21:47 PM org.apache.catalina.startup.VersionLoggerListener log
INFO: Server number:         7.0.86.0
May 14, 2018 7:21:47 PM org.apache.catalina.startup.VersionLoggerListener log
INFO: OS Name:               Linux
May 14, 2018 7:21:47 PM org.apache.catalina.startup.VersionLoggerListener log
INFO: OS Version:            3.10.0-327.el7.x86_64
May 14, 2018 7:21:47 PM org.apache.catalina.startup.VersionLoggerListener log
INFO: Architecture:          amd64
May 14, 2018 7:21:47 PM org.apache.catalina.startup.VersionLoggerListener log
INFO: Java Home:             /usr/local/java/jre
May 14, 2018 7:21:47 PM org.apache.catalina.startup.VersionLoggerListener log
INFO: JVM Version:           1.8.0_171-b11
May 14, 2018 7:21:47 PM org.apache.catalina.startup.VersionLoggerListener log
INFO: JVM Vendor:            Oracle Corporation
May 14, 2018 7:21:47 PM org.apache.catalina.startup.VersionLoggerListener log
INFO: CATALINA_BASE:         /usr/local/tomcat7
May 14, 2018 7:21:47 PM org.apache.catalina.startup.VersionLoggerListener log
INFO: CATALINA_HOME:         /usr/local/tomcat7
May 14, 2018 7:21:47 PM org.apache.catalina.startup.VersionLoggerListener log
INFO: Command line argument: -Djava.util.logging.manager=org.apache.juli.ClassLoaderLogManager
May 14, 2018 7:21:47 PM org.apache.catalina.startup.VersionLoggerListener log
INFO: Command line argument: -Djdk.tls.ephemeralDHKeySize=2048
May 14, 2018 7:21:47 PM org.apache.catalina.startup.VersionLoggerListener log
INFO: Command line argument: -Dignore.endorsed.dirs=
May 14, 2018 7:21:47 PM org.apache.catalina.startup.VersionLoggerListener log
INFO: Command line argument: -Dcatalina.base=/usr/local/tomcat7
May 14, 2018 7:21:47 PM org.apache.catalina.startup.VersionLoggerListener log
INFO: Command line argument: -Dcatalina.home=/usr/local/tomcat7
May 14, 2018 7:21:47 PM org.apache.catalina.startup.VersionLoggerListener log
INFO: Command line argument: -Djava.io.tmpdir=/usr/local/tomcat7/temp
May 14, 2018 7:21:47 PM org.apache.catalina.core.AprLifecycleListener lifecycleEvent
INFO: The APR based Apache Tomcat Native library which allows optimal performance in production environments was not found on the java.library.path: /usr/java/packages/lib/amd64:/usr/lib64:/lib64:/lib:/usr/lib
May 14, 2018 7:21:47 PM org.apache.coyote.AbstractProtocol init
INFO: Initializing ProtocolHandler ["http-bio-8080"]
May 14, 2018 7:21:47 PM org.apache.coyote.AbstractProtocol init
INFO: Initializing ProtocolHandler ["ajp-bio-8009"]
May 14, 2018 7:21:47 PM org.apache.catalina.startup.Catalina load
INFO: Initialization processed in 680 ms
[root@tomcat1 conf]# startup.sh
Using CATALINA_BASE:   /usr/local/tomcat7
Using CATALINA_HOME:   /usr/local/tomcat7
Using CATALINA_TMPDIR: /usr/local/tomcat7/temp
Using JRE_HOME:        /usr/local/java
Using CLASSPATH:       /usr/local/tomcat7/bin/bootstrap.jar:/usr/local/tomcat7/bin/tomcat-juli.jar
Tomcat started.
[root@tomcat1 conf]# ss -anpt | grep java
LISTEN     0      100         :::8009                    :::*                   users:(("java",pid=5169,fd=46))
LISTEN     0      100         :::8080                    :::*                   users:(("java",pid=5169,fd=45))
LISTEN 0 1 ::ffff:127.0.0.1:8005 :::* users:(("java",pid=4926,fd=49))Tomcat-2节点与tomcat-1节点配置基本类似,只是jvmRoute不同,另外为了区分由哪个节点提供访问,测试页标题也不同(生产环境两个tomcat服务器提供的网页内容是相同的)。其他的配置都相同。
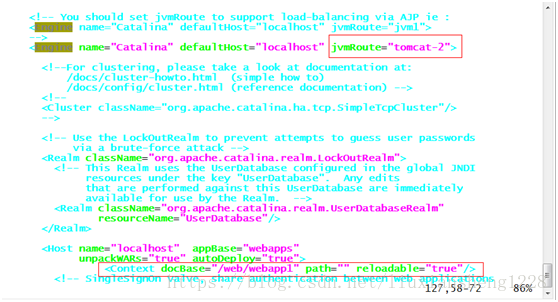
这个是Tomcat2的server.xml文件
用浏览器访问nginx主机,验证负载均衡
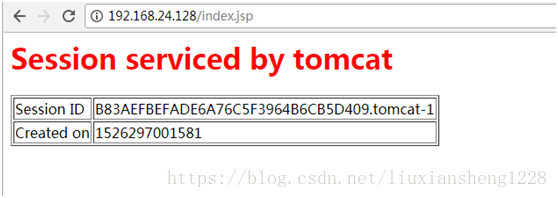
第一次访问的结果
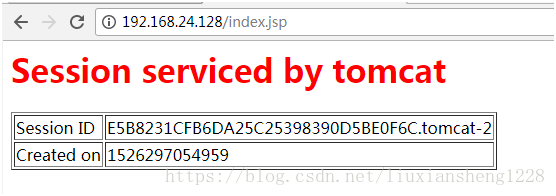
验证健康检查的方法可以关掉一台tomcat主机,用客户端浏览器测试访问。
从上面的结果能看出两次访问,nginx把访问请求分别分发给了后端的tomcat-1和tomcat-2,客户端的访问请求实现了负载均衡,但sessionid并不一样。 所以,到这里我们准备工作就全部完成了,下面我们来配置tomcat通过redis实现会话保持。
安装redis
下载redis源码,并进行相关操作,如下:
[root@redis src]# tar zxf redis-3.2.3.tar.gz
[root@redis src]# cd redis-3.2.3/
[root@redis redis-3.2.3]# make && make install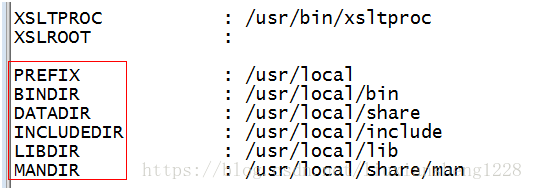
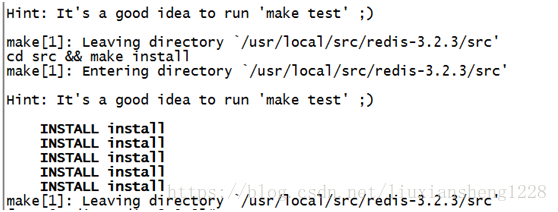
通过上图,我们可以很容易的看出,redis安装到
/usr/local,/usr/local/bin,/usr/local/share,/usr/local/include,/usr/local/lib,/usr/local/share/man目录下。
然后再切换到utils目录下,执行redis初始化本install_server.sh,如下:
[root@redis redis-3.2.3]# cd utils/
[root@redis utils]# ./install_server.sh
Welcome to the redis service installer
This script will help you easily set up a running redis server

Please select the redis port for this instance: [6379]
Selecting default: 6379
Please select the redis config file name [/etc/redis/6379.conf]
Selected default - /etc/redis/6379.conf
Please select the redis log file name [/var/log/redis_6379.log]
Selected default - /var/log/redis_6379.log
Please select the data directory for this instance [/var/lib/redis/6379]
Selected default - /var/lib/redis/6379
Please select the redis executable path [/usr/local/bin/redis-server]
Selected config:
Port           : 6379
Config file    : /etc/redis/6379.conf
Log file       : /var/log/redis_6379.log
Data dir       : /var/lib/redis/6379
Executable     : /usr/local/bin/redis-server
Cli Executable : /usr/local/bin/redis-cli
Is this ok? Then press ENTER to go on or Ctrl-C to abort.
Copied /tmp/6379.conf => /etc/init.d/redis_6379
Installing service...
Successfully added to chkconfig!
Successfully added to runlevels 345!
Starting Redis server...
Installation successful!通过上面的安装过程,我们可以看出redis初始化后redis配置文件为/etc/redis/6379.conf,日志文件为/var/log/redis_6379.log,数据文件dump.rdb存放到/var/lib/redis/6379目录下,启动脚本为/etc/init.d/redis_6379。
现在来查看redis版本使用redis-cli –version命令,如下:
[root@redis utils]# redis-cli --version
redis-cli 3.2.3
通过显示结果,我们可以看到redis版本是3.2.3。
到此源码方式安装redis就介绍完毕。
redis安装完毕之后,我们再来配置redis
设置redis监听的地址,添加监听redis主机的ip
考虑到安全性,我们需要启用redis的密码验证功能requirepass参数
最终redis配置文件如下:
[root@redis utils]# grep -Ev '^#|^$' /etc/redis/6379.conf  (红色为修改部分)
bind 127.0.0.1 192.168.24.131
protected-mode yes
port 6379
tcp-backlog 511
timeout 0
tcp-keepalive 300
daemonize yes
supervised no
pidfile /var/run/redis_6379.pid
loglevel notice
logfile /var/log/redis_6379.log
databases 16
save 900 1
save 300 10
save 60 10000
stop-writes-on-bgsave-error yes
rdbcompression yes
rdbchecksum yes
dbfilename dump.rdb
dir /var/lib/redis/6379
slave-serve-stale-data yes
slave-read-only yes
repl-diskless-sync no
repl-diskless-sync-delay 5
repl-disable-tcp-nodelay no
slave-priority 100
requirepass pwd@123
appendonly no
appendfilename "appendonly.aof"
appendfsync everysec
no-appendfsync-on-rewrite no
auto-aof-rewrite-percentage 100
auto-aof-rewrite-min-size 64mb
aof-load-truncated yes
lua-time-limit 5000
slowlog-log-slower-than 10000
slowlog-max-len 128
latency-monitor-threshold 0
notify-keyspace-events ""
hash-max-ziplist-entries 512
hash-max-ziplist-value 64
list-max-ziplist-size -2
list-compress-depth 0
set-max-intset-entries 512
zset-max-ziplist-entries 128
zset-max-ziplist-value 64
hll-sparse-max-bytes 3000
activerehashing yes
client-output-buffer-limit normal 0 0 0
client-output-buffer-limit slave 256mb 64mb 60
client-output-buffer-limit pubsub 32mb 8mb 60
hz 10
aof-rewrite-incremental-fsync yes

[root@redis utils]# service redis_6379 start
Starting Redis server...
[root@redis utils]# ss -anpt | grep redis
LISTEN 0 128 127.0.0.1:6379 *:* users:(("redis-server",pid=42857,fd=4))redis配置文件配置完毕后,我们来启动redis并进行简单的操作。如下:
[root@redis utils]# redis-cli -h 192.168.24.131 -p 6379 -a pwd@123
192.168.24.131:6379> set name list
OK
192.168.24.131:6379> get name
"list"
192.168.24.131:6379>
说明:
关于redis-cli -h 192.168.24.131 -p 6379 -a pwd@123的参数解释
这条命令是说要连接redis服务器,IP是192.168.24.131,端口是6379,密码是pwd@123。
keys *是查看redis所有的键值对。
set namelisi添加一个键值name,内容为lisi。
get name查看name这个键值的内容。
redis的命令使用暂时我们就介绍这么多
配置tomcatsession redis同步
下载tomcat-redis-session-manager相应的jar包,主要有三个:
tomcat-redis-session-manage-tomcat7.jar
jedis-2.5.2.jar
commons-pool2-2.2.jar
下载完成后拷贝到$TOMCAT_HOME/lib中
cp tomcat-redis-session-manage-tomcat7.jar jedis-2.5.2.jarcommons-pool2-2.2.jar /usr/local/tomcat7/lib/
修改tomcat的context.xml:
[root@tomcat1 src]# cat /usr/local/tomcat7/conf/context.xml
<?xml version='1.0' encoding='utf-8'?>
<!--
  Licensed to the Apache Software Foundation (ASF) under one or more
  contributor license agreements.  See the NOTICE file distributed with
  this work for additional information regarding copyright ownership.
  The ASF licenses this file to You under the Apache License, Version 2.0
  (the "License"); you may not use this file except in compliance with
  the License.  You may obtain a copy of the License at

      http://www.apache.org/licenses/LICENSE-2.0

  Unless required by applicable law or agreed to in writing, software
  distributed under the License is distributed on an "AS IS" BASIS,
  WITHOUT WARRANTIES OR CONDITIONS OF ANY KIND, either express or implied.
  See the License for the specific language governing permissions and
  limitations under the License.
-->
<!-- The contents of this file will be loaded for each web application -->
<Context>

    <!-- Default set of monitored resources -->
    <WatchedResource>WEB-INF/web.xml</WatchedResource>

    <!-- Uncomment this to disable session persistence across Tomcat restarts -->
    <!--
    <Manager pathname="" />
   />

    <!-- Uncomment this to enable Comet connection tacking (provides events
         on session expiration as well as webapp lifecycle) -->
    <!--
    <Valve className="org.apache.catalina.valves.CometConnectionManagerValve" />
    -->
    <Valve className="com.orangefunction.tomcat.redissessions.RedisSessionHandlerValve" />
    <Manager className="com.orangefunction.tomcat.redissessions.RedisSessionManager"
        host="192.168.24.131"
        password="pwd@123"
    port="6379"
    database="0"
    maxInactiveInterval="60" />

</Context>重启tomcat服务
说明:
maxInactiveInterval="60" : session的失效时间
[root@tomcat1 src]# shutdown.sh
Using CATALINA_BASE:   /usr/local/tomcat7
Using CATALINA_HOME:   /usr/local/tomcat7
Using CATALINA_TMPDIR: /usr/local/tomcat7/temp
Using JRE_HOME:        /usr/local/java
Using CLASSPATH:       /usr/local/tomcat7/bin/bootstrap.jar:/usr/local/tomcat7/bin/tomcat-juli.jar

[root@tomcat1 src]# startup.sh
Using CATALINA_BASE:   /usr/local/tomcat7
Using CATALINA_HOME:   /usr/local/tomcat7
Using CATALINA_TMPDIR: /usr/local/tomcat7/temp
Using JRE_HOME:        /usr/local/java
Using CLASSPATH:       /usr/local/tomcat7/bin/bootstrap.jar:/usr/local/tomcat7/bin/tomcat-juli.jar
Tomcat started.tomcat-2执行和tomcat-1相同的操作
通过浏览器访问http://192.168.24.128/index.jsp测试页
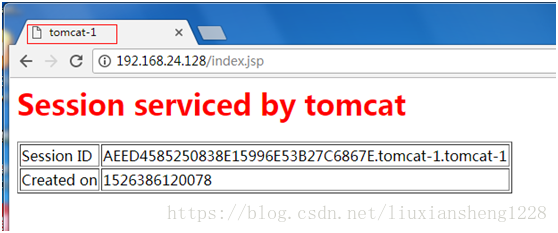
刷新页面
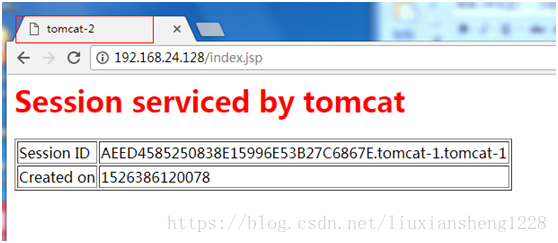
可以看出,分别访问了不同的tomcat,但是得到的session却是相同的,说明达到了集群的目的。
注:从Tomcat6开始默认开启了Session持久化设置,测试时可以关闭本地Session持久化,其实也很简单,在Tomcat的conf目录下的context.xml文件中,取消注释下面那段配置即可:
<!-- Uncomment this to disable session persistence acrossTomcat restarts -->
<!--
<Manager pathname="" />
-->
修改后:
<!-- Uncomment this to disable session persistenceacross Tomcat restarts -->
<Manager pathname="" />
重启tomcat服务
查看redis:
[root@redis utils]# redis-cli -h 192.168.24.131 -p 6379 -a pwd@123
192.168.24.131:6379> keys *
1) "E436F8342FE0C1059D2B870946372B15.tomcat-2.tomcat-2"
2) "AEED4585250838E15996E53B27C6867E.tomcat-1.tomcat-1"
3) "name"
tomcat连接数据库
192.168.24.132 作为mysql数据库服务器
[root@mysql src]# mysql -uroot -p123
mysql> grant all on *.* to javauser@'192.168.24.%' identified by 'javapasswd';
Query OK, 0 rows affected, 1 warning (0.00 sec)

mysql> create database javatest;
Query OK, 1 row affected (0.00 sec)

mysql> use javatest;
Database changed
mysql> create table testdata(id int not null auto_increment primary key,foo varchar(25),bar int);
Query OK, 0 rows affected (0.01 sec)

插入些数据
mysql> insert into testdata(foo,bar) values ('hello','123456'),('ok','654321');
Query OK, 2 rows affected (0.01 sec)
Records: 2  Duplicates: 0  Warnings: 0

mysql> select * from testdata;
+----+-------+--------+
| id | foo   | bar    |
+----+-------+--------+
|  1 | hello | 123456 |
|  2 | ok    | 654321 |
+----+-------+--------+
2 rows in set (0.00 sec)配置tomcat服务器连接mysql数据库
下载mysql-connector-java-5.1.22-bin.jar并复制到$CATALINA_HOME/lib目录下
[root@tomcat1 src]# cp mysql-connector-java-5.1.22-bin.jar /usr/local/tomcat7/lib/
[root@tomcat1 src]# ls /usr/local/tomcat7/lib/mysql-connector-java-5.1.22-bin.jar
/usr/local/tomcat7/lib/mysql-connector-java-5.1.22-bin.jar

[root@tomcat1 src]# vim /usr/local/tomcat7/conf/context.xml
在<Context>中添加如下内容:
    <Resource name="jdbc/TestDB" auth="Container" type="javax.sql.DataSource"
    maxActive="100" maxIdle="30" maxWait="10000"
    username="javauser" password="javapass" driverClassName="com.mysql.jdbc.Driver"
    url="jdbc:mysql://192.168.24.132:3306/javatest"/>

[root@tomcat1 src]# mkdir /web/webapp1/WEB-INF
[root@tomcat1 src]# vim /web/webapp1/WEB-INF/web.xml

<web-app xmlns="http://java.sun.com/xml/ns/j2ee"
xmlns:xsi="http://www.w3.org/2001/XMLSchema-instance"
xsi:schemaLocation="http://java.sun.com/xml/ns/j2ee
http://java.sun.com/xml/ns/j2ee/web-app_2_4.xsd"
version="2.4">
<description>MySQL Test App</description>
<resource-ref>
<description>DB Connection</description>
<res-ref-name>jdbc/TestDB</res-ref-name>
<res-type>javax.sql.DataSource</res-type>
<res-auth>Container</res-auth>
</resource-ref>
</web-app>

[root@tomcat1 src]# shutdown.sh
[root@tomcat1 src]# startup.shtomcat-2进行和tomcat-1相同的操用
[root@tomcat1 src]# vim /web/webapp1/test.jsp
<%@ page language="java" import="java.sql.*" pageEncoding="GB2312"%>
<html>
<head>
<title>MySQL</title>
</head>
<body>
connect MySQL<br>
<%
String driverClass="com.mysql.jdbc.Driver";
String url="jdbc:mysql://192.168.24.132:3306/javatest";
String username = "javauser";
String password = "javapasswd";
Class.forName(driverClass);
Connection conn=DriverManager.getConnection(url, username, password);
Statement stmt=conn.createStatement();
ResultSet rs = stmt.executeQuery("select * from testdata");
while(rs.next()){
out.println("<br>foo:"+rs.getString(2)+"bar:"+rs.getString(3));
}
rs.close();
stmt.close();
conn.close();
%>
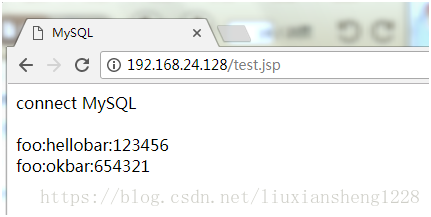
</body></html>通过浏览器访问http://192.168.24.128/test.jsp测试页
最后
以上就是俊逸小鸭子最近收集整理的关于redis缓存服务器(nginx+tomcat+redis+mysql实现session会话共享)的全部内容,更多相关redis缓存服务器(nginx+tomcat+redis+mysql实现session会话共享)内容请搜索靠谱客的其他文章。


发表评论 取消回复