2012-03-12
目的:
(接一)配置PSTN Trunk,简单实现系统inbound。
步骤:
jasonsong@ubuntu:/etc/asterisk$ sudo dahdi_genconf

jasonsong@ubuntu:/etc/asterisk$ more dahdi-channels.conf
; Autogenerated by /usr/sbin/dahdi_genconf on Sun Mar 11 18:53:36 2012

; If you edit this file and execute /usr/sbin/dahdi_genconf again,

; your manual changes will be LOST.

; Dahdi Channels Configurations (chan_dahdi.conf)

;

; This is not intended to be a complete chan_dahdi.conf. Rather, it is intended

; to be #include-d by /etc/chan_dahdi.conf that will include the global settings

;


; Span 1: WCTDM/0 "Wildcard TDM410P" (MASTER)

;;; line="1 WCTDM/0/0 FXSKS (In use)"

signalling=fxs_ks

callerid=asreceived

group=0

context=from-pstn

channel => 1

callerid=

group=

context=default


;;; line="2 WCTDM/0/1 FXSKS (In use)"

signalling=fxs_ks

callerid=asreceived

group=0

context=from-pstn

channel => 2

callerid=

group=

context=default


;;; line="3 WCTDM/0/2 FXSKS (In use)"

signalling=fxs_ks

callerid=asreceived

group=0

context=from-pstn

channel => 3

callerid=

group=

context=default


;;; line="4 WCTDM/0/3 FXOKS (In use)"

signalling=fxo_ks

callerid="Channel 4" <4004>

mailbox=4004

group=5

context=from-internal

channel => 4

callerid=

mailbox=

group=

context=default
jasonsong@ubuntu:/etc/dahdi$ sudo nano system.conf

# Autogenerated by /usr/sbin/dahdi_genconf on Sun Mar 11 18:53:36 2012

# If you edit this file and execute /usr/sbin/dahdi_genconf again,

# your manual changes will be LOST.

# Dahdi Configuration File

#

# This file is parsed by the Dahdi Configurator, dahdi_cfg

#

# Span 1: WCTDM/0 "Wildcard TDM410P" (MASTER)

fxsks=1

echocanceller=mg2,1

fxsks=2

echocanceller=mg2,2

fxsks=3

echocanceller=mg2,3

fxoks=4

echocanceller=mg2,4


# Global data


loadzone = cn

defaultzone = cn
编辑chan_dahdi.conf文件,加入#include dahdi-channels.conf

[channels]

;

; To apply other options to these channels, put them before "channel".

;

;signalling = fxs_ks ; in Asterisk, FXO channels use FXS signaling

; (and yes, FXS channels use FXO signaling)

;channel => 1-3 ; apply all the previously defined settings to this channel


;signalling = fxo_ks ;FXS channels use FXO singnaling

;channel => 4

#include dahdi-channels.conf
jasonsong@ubuntu:/etc/dahdi$ sudo reboot
重启系统并进入asterisk CLI

现在摘机,话机中有拨号音了(目前由于没配置dialplan,外拨和进线都不行)。
ubuntu*CLI> dahdi show channel 1

Channel: 1

File Descriptor: 5

Span: 1

Extension:

Dialing: no

Context: from-pstn

Caller ID:

Calling TON: 0

Caller ID subaddress:

Caller ID name:

Mailbox: none

Destroy: 0

InAlarm: 0

Signalling Type: FXS Kewlstart

Radio: 0

Owner: <None>

Real: <None>

Callwait: <None>

Threeway: <None>

Confno: -1

Propagated Conference: -1

Real in conference: 0

DSP: no

Busy Detection: no

TDD: no

Relax DTMF: no

Dialing/CallwaitCAS: 0/0

Default law: ulaw

Fax Handled: no

Pulse phone: no

Gains (RX/TX): 0.00/0.00

Dynamic Range Compression (RX/TX): 0.00/0.00

DND: no

Echo Cancellation:

1 taps

(unless TDM bridged) currently OFF

Wait for dialtone: 0ms

Actual Confinfo: Num/0, Mode/0x0000

Actual Confmute: No

Hookstate (FXS only): Offhook

编辑extension.conf 文件


jasonsong@ubuntu:/etc/asterisk$ nano extensions.conf

[globals]

TRUNK=DAHDI/g0

[from-pstn]

exten => s,1,Answer()

same => n,Playback(tt-weasels)

same => n,Hangup
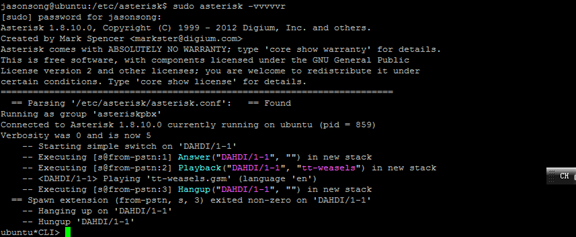
测试inbound,运行情况见下图

转载于:https://www.cnblogs.com/Spiritual-journey/archive/2012/03/12/2392667.html
最后
以上就是机灵蓝天最近收集整理的关于Asterisk学习之旅(二)------配置PSTN Trunk的全部内容,更多相关Asterisk学习之旅(二)------配置PSTN内容请搜索靠谱客的其他文章。
本图文内容来源于网友提供,作为学习参考使用,或来自网络收集整理,版权属于原作者所有。


发表评论 取消回复