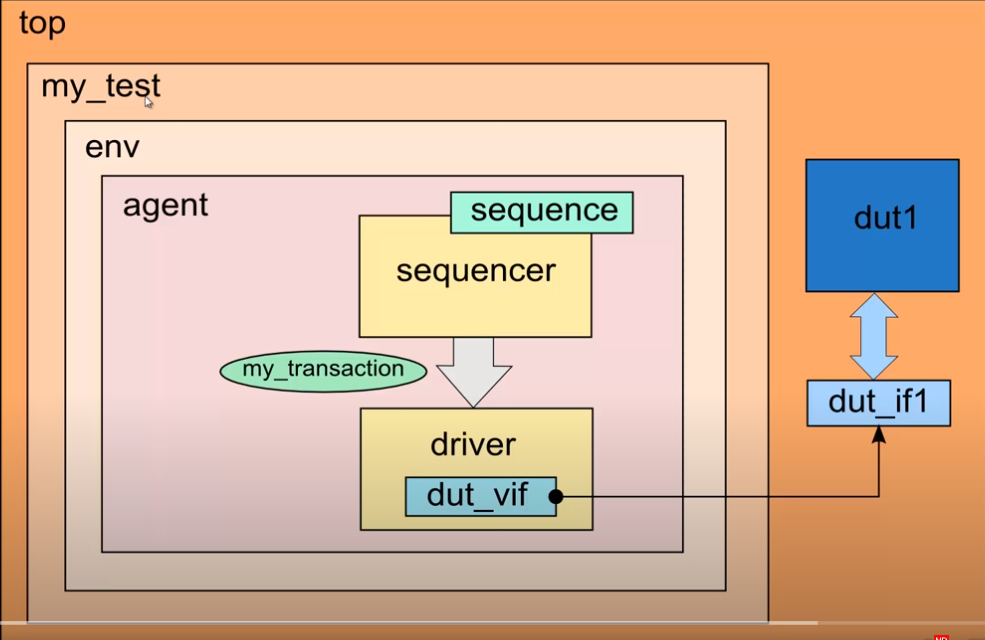
我是靠谱客的博主 细腻外套,这篇文章主要介绍UVM Hello World Tutorialdut:top:my_test:sequencer:driver仿真结果,现在分享给大家,希望可以做个参考。

dut:
// dut连接testbench的接口
interface dut_if;     // 在dut中定义dut接口
  logic clock, reset;
  logic cmd;           // 接口的变量,即transaction传输的变量
  logic [7:0] addr;
  logic [7:0] data;
endinterface

`include "uvm_macros.svh"

// dut
// 时钟切换就会简单地打印一条消息
module dut(dut_if dif);  // 声明传入接口,命名为dif
  import uvm_pkg::*;
  always @(posedge dif.clock)  // 来自接口的时钟
    if (dif.reset != 1) begin
      `uvm_info("DUT",
                $sformatf("Received cmd=%b, addr=0x%2h, data=0x%2h",
                          dif.cmd, dif.addr, dif.data), UVM_MEDIUM)
    end
endmodule
$sformatf(format,args),将args传入字符串中,返回字符串结果。
top:
top中例化dut,例化dut的接口,发送dut接口信息到库,定义dut的接口的时钟,开始测试
/*******************************************
This is a basic UVM "Hello World" testbench.

Explanation of this testbench on YouTube:
https://www.youtube.com/watch?v=Qn6SvG-Kya0
*******************************************/

`include "uvm_macros.svh"
`include "my_testbench_pkg.svh"  // include my_test

// 包含 DUT 和接口的顶层模块
// 这个模块开始测试
module top;
  import uvm_pkg::*;
  import my_testbench_pkg::*;  // import my_test


  dut_if dut_if1();  // 在top中实例化dut接口

  dut dut1(.dif(dut_if1));   // 在top中实例化dut, 并将其连接到接口

  // 在top中定义 dut接口的时钟发生器
  initial begin
    dut_if1.clock = 0;
    forever #5 dut_if1.clock = ~dut_if1.clock;  // 10ns一个时钟周期
  end

  initial begin
    // 将接口放入UVM配置数据库
    uvm_config_db#(virtual dut_if)::set(null, "*", "dut_vif", dut_if1);
    // 开始测试
    run_test("my_test");
  end

  // edaplayground 显示波形设置
  initial begin
    $dumpfile("dump.vcd");
    $dumpvars(0, top);
  end

endmodule
my_test:
my_testbench_pkg 中 包括 my_test,env,agent
package my_testbench_pkg;
  import uvm_pkg::*;

  // my_test 要包含sequence,driver
  `include "my_sequence.svh"
  `include "my_driver.svh"

  /******************my_test*************************/
  class my_test extends uvm_test;
    `uvm_component_utils(my_test)  // component注册

    my_env env;  // 声明,my_test包括env

    function new(string name, uvm_component parent);  // 构造函数
      super.new(name, parent);
    endfunction

    function void build_phase(uvm_phase phase);  // 实例化组件
      env = my_env::type_id::create("env", this);  // 实例化env
    endfunction

    task run_phase(uvm_phase phase);
      phase.raise_objection(this);  // 开始运行
      #10;
      `uvm_warning("", "Hello World!")
      phase.drop_objection(this);   // 结束运行
    endtask

  endclass

  /**********************env*********************/
  class my_env extends uvm_env;  // my_test 要包含env
    `uvm_component_utils(my_env)    // component注册

    my_agent agent;  // env要包含agent

    function new(string name, uvm_component parent);  // 构造函数
      super.new(name, parent);
    endfunction

    function void build_phase(uvm_phase phase);  // 实例化组件
      agent = my_agent::type_id::create("agent", this);  // 实例化agent
    endfunction

  endclass

  /******************agent*************************/
  class my_agent extends uvm_agent;  // my_test 再包含agent
    `uvm_component_utils(my_agent)  // component注册

    my_driver driver;  // agent包含driver
    uvm_sequencer#(my_transaction) sequencer;  // agent包含sequencer

    function new(string name, uvm_component parent);  // 构造函数
      super.new(name, parent);
    endfunction

    function void build_phase(uvm_phase phase);  // 实例化组件
      driver = my_driver ::type_id::create("driver", this);  // 在agent中实例化driver
      sequencer =
        uvm_sequencer#(my_transaction)::type_id::create("sequencer", this);  // 在agent中实例化sequencer
    endfunction

    function void connect_phase(uvm_phase phase);  // 连接组件
      driver.seq_item_port.connect(sequencer.seq_item_export);  // sequencer出口连接driver接口
    endfunction

    task run_phase(uvm_phase phase);  // 运行
      phase.raise_objection(this);  // 开始运行
      begin
        my_sequence seq;  // 运行阶段声明sequence
        seq = my_sequence::type_id::create("seq");  // 实例化sequence
        seq.start(sequencer);  // sequence从sequencer发送
      end
      phase.drop_objection(this);  // 结束运行
    endtask

  endclass

endpackage
sequencer:
// sequencer

class my_transaction extends uvm_sequence_item;  // transaction

  `uvm_object_utils(my_transaction)  // object注册

  rand bit cmd;  // transaction变量
  rand int addr;
  rand int data;

  constraint c_addr { addr >= 0; addr < 256; }  // addr变量约束
  constraint c_data { data >= 0; data < 256; }  // data变量约束

  function new (string name = "");  // 构造函数的
    super.new(name);
  endfunction

endclass: my_transaction

class my_sequence extends uvm_sequence#(my_transaction);   // sequence

  `uvm_object_utils(my_sequence)   // object注册

  function new (string name = "");  // 构造函数
    super.new(name);
  endfunction

  task body;
    repeat(8) begin  // 重复8次
      req = my_transaction::type_id::create("req");  // 在sequence中实例化transaction
      start_item(req);  // 发送

      if (!req.randomize()) begin  // 随机化transaction失败
        `uvm_error("MY_SEQUENCE", "Randomize failed.");
      end

      // If using ModelSim, which does not support randomize(),
      // we must randomize item using traditional methods, like
      // req.cmd = $urandom;
      // req.addr = $urandom_range(0, 255);
      // req.data = $urandom_range(0, 255);

      finish_item(req);  // 结束发送
    end
  endtask: body

endclass: my_sequence
driver
class my_driver extends uvm_driver #(my_transaction);

  `uvm_component_utils(my_driver)  // 注册component

  virtual dut_if dut_vif;  // 指向dut接口的指针, 在driver中的“虚拟接口”

  function new(string name, uvm_component parent);  // 构造函数
    super.new(name, parent);
  endfunction

  function void build_phase(uvm_phase phase);  // 实例化组件
    // 从配置数据库获取接口
    if(!uvm_config_db#(virtual dut_if)::get(this, "", "dut_vif", dut_vif)) begin
      `uvm_error("", "uvm_config_db::get failed")
    end
  endfunction

  task run_phase(uvm_phase phase);  // 运行
    dut_vif.reset = 1;     // 第一次切换先重置
    @(posedge dut_vif.clock);  // 获取dut接口时钟
    #1;
    dut_vif.reset = 0;    // 取消重置

    // 开始运行
    forever begin
      seq_item_port.get_next_item(req);  // sequencer获取transaction给driver
	  // driver把transaction给dut,此时sequencer停止获取transaction给driver
      dut_vif.cmd  = req.cmd;   // transaction的变量传给dut接口
      dut_vif.addr = req.addr;
      dut_vif.data = req.data;
      @(posedge dut_vif.clock);

      seq_item_port.item_done();  // 解除阻塞(sequencer可以获取transaction给driver)
    end
  endtask

endclass: my_driver
仿真结果


最后
以上就是细腻外套最近收集整理的关于UVM Hello World Tutorialdut:top:my_test:sequencer:driver仿真结果的全部内容,更多相关UVM内容请搜索靠谱客的其他文章。
本图文内容来源于网友提供,作为学习参考使用,或来自网络收集整理,版权属于原作者所有。


发表评论 取消回复