opencv -Camera曝光设置
1、曝光设置
cv_cap.set(cv::CAP_PROP_AUTO_EXPOSURE, 0.25); // where 0.25 means "manual exposure, manual iris"

cv_cap.set(CV_CAP_PROP_EXPOSURE, -13);
2、设置自动曝光为手动曝光
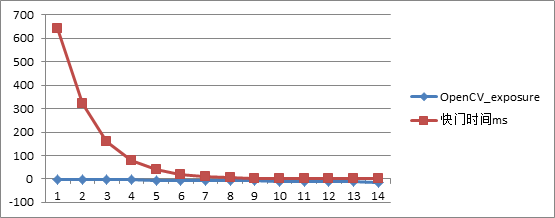
cv_cap.set(cv::CAP_PROP_AUTO_EXPOSURE, 0.25); // where 0.25 means "manual exposure, manual iris"3、曝光参数具体对应于曝光时间
| OpenCV_exposure | 快门时间ms |
| -1 | 640 |
| -2 | 320 |
| -3 | 160 |
| -4 | 80 |
| -5 | 40 |
| -6 | 20 |
| -7 | 10 |
| -8 | 5 |
| -9 | 2.5 |
| -10 | 1.25 |
| -11 | 0.625 |
| -12 | 0.3125 |
| -13 | 0.15625 |
| -14 | 0.078125 |

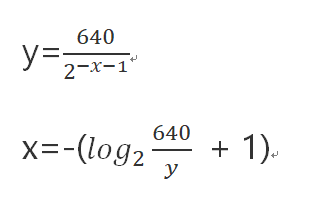
说明:x为opencv中设置的曝光值OpenCV_exposure
y为快门时间

4、代码实现:
void cameExposureTestAndExposureFusionTest(VideoCapture cap)
{
	int ix = 0;
	int numImages = 4;
	Mat frame;
	vector<Mat> images;

	//是否图像映射
	bool needsAlignment = true;

	//cap.set()
	auto i = cap.get(CAP_PROP_EXPOSURE);
	cout << "设置之前曝光为:" << i << endl;
	cap.set(CAP_PROP_AUTO_EXPOSURE, 0.25);
	while (waitKey(30) != 27)
	{
/*
		int 循环调节 = -13;
		while (1)
		{
			if (循环调节 == 0)
			{
				循环调节 = -13;
				break;
			}

			//cout << "设置之后曝光为:" << cap.get(CAP_PROP_EXPOSURE);
			cap.set(CAP_PROP_EXPOSURE, 循环调节);
			//cout << "设置之后曝光为:" << cap.get(CAP_PROP_EXPOSURE)<<endl;
			cap >> frame;
			putText(frame, "Exposure:" + to_string(循环调节), Point(20, 30), 3, 1.0, Scalar(255, 0, 0));
			imshow("调用摄像头", frame);
			imwrite("E:\Project_OpenCV_C++\openCV_Test1\openCV_Test3\cameExposureTest\" + to_string(循环调节) + ".jpg", frame);
			waitKey(30);
			images.push_back(frame);
			循环调节= 循环调节+1;

		}
*/
		vector<float> times;
		// 曝光时间列表
		const float timesArray[] = { 1 / 30.0f,0.25,2.5,15.0 };
		times.assign(timesArray, timesArray + numImages);


		// 曝光值列表
		float OpenCV_exposure[] = {NULL };

        //这里将快门时间转换成OpenCV的曝光参数
		for (ix = 0; ix < 4; ix++)
		{
			OpenCV_exposure[ix] = -(log(640 / (timesArray[ix]*1000) ) + 1);
		}

		for (ix=0; ix<4; ix++)
		{
			cap.set(CAP_PROP_EXPOSURE, OpenCV_exposure[ix]);
			cap >> frame;
			imshow("调用摄像头", frame);
			imwrite("E:\Project_OpenCV_C++\openCV_Test1\openCV_Test3\cameExposureTest\" + to_string(ix) + ".jpg", frame);
			waitKey(30);
			images.push_back(frame);
		}

		// Align input images
		if (needsAlignment)
		{
			cout << "Aligning images ... " << endl;
			Ptr<AlignMTB> alignMTB = createAlignMTB();
			alignMTB->process(images, images);
		}
		else
		{
			cout << "Skipping alignment ... " << endl;
		}

		// 获取图像响应函数 (CRF)
		Mat responseDebevec;
		Ptr<CalibrateDebevec> calibrateDebevec = createCalibrateDebevec();
		calibrateDebevec->process(images, responseDebevec, times);


		// Merge using Exposure Fusion 图像融合
		cout << "Merging using Exposure Fusion ... " << endl;
		Mat exposureFusion;
		Ptr<MergeMertens> mergeMertens = createMergeMertens();
		mergeMertens->process(images, exposureFusion);
		imwrite("E:\Project_OpenCV_C++\openCV_Test1\openCV_Test3\cameExposureTestAndExposureFusionTest\exposure-fusion.jpg", exposureFusion*255);

		// 将图像合并为HDR线性图像
		Mat hdrDebevec;
		Ptr<MergeDebevec> mergeDebevec = createMergeDebevec();
		mergeDebevec->process(images, hdrDebevec, times, responseDebevec);
		// 保存图像
		imwrite("E:\Project_OpenCV_C++\openCV_Test1\openCV_Test3\cameExposureTestAndExposureFusionTest\hdrDebevec.hdr", hdrDebevec);

		// 使用Drago色调映射算法获得24位彩色图像
		Mat ldrDrago;
		Ptr<TonemapDrago> tonemapDrago = createTonemapDrago(1.0, 0.7);
		tonemapDrago->process(hdrDebevec, ldrDrago);
		ldrDrago = 3 * ldrDrago;
		imwrite("E:\Project_OpenCV_C++\openCV_Test1\openCV_Test3\cameExposureTestAndExposureFusionTest\ldr-Drago.jpg", ldrDrago * 255);

		// 使用Durand色调映射算法获得24位彩色图像
/*
		Mat ldrDurand;
		Ptr<TonemapDurand> tonemapDurand = createTonemapDurand(1.5, 4, 1.0, 1, 1);
		tonemapDurand->process(hdrDebevec, ldrDurand);
		ldrDurand = 3 * ldrDurand;
		imwrite("E:\Project_OpenCV_C++\openCV_Test1\openCV_Test3\cameExposureTestAndExposureFusionTest\ldr-Durand.jpg", ldrDurand * 255);
*/

		// 使用Reinhard色调映射算法获得24位彩色图像
		Mat ldrReinhard;
		Ptr<TonemapReinhard> tonemapReinhard = createTonemapReinhard(1.5, 0, 0, 0);
		tonemapReinhard->process(hdrDebevec, ldrReinhard);
		imwrite("E:\Project_OpenCV_C++\openCV_Test1\openCV_Test3\cameExposureTestAndExposureFusionTest\ldr-Reinhard.jpg", ldrReinhard * 255);


		// 使用Mantiuk色调映射算法获得24位彩色图像
		Mat ldrMantiuk;
		Ptr<TonemapMantiuk> tonemapMantiuk = createTonemapMantiuk(2.2, 0.85, 1.2);
		tonemapMantiuk->process(hdrDebevec, ldrMantiuk);
		ldrMantiuk = 3 * ldrMantiuk;
		imwrite("ldr-Mantiuk.jpg", ldrMantiuk * 255);
		imwrite("E:\Project_OpenCV_C++\openCV_Test1\openCV_Test3\cameExposureTestAndExposureFusionTest\ldr-Mantiuk.jpg", ldrMantiuk * 255);

		images.clear();
	}

	return;
}
最后
以上就是个性滑板最近收集整理的关于OpenCV曝光参数和快门时间的对应关系的全部内容,更多相关OpenCV曝光参数和快门时间内容请搜索靠谱客的其他文章。
本图文内容来源于网友提供,作为学习参考使用,或来自网络收集整理,版权属于原作者所有。


发表评论 取消回复