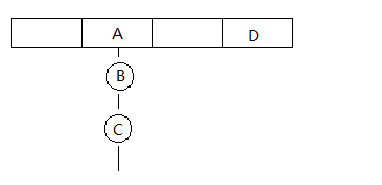
HashMap的存储结构
为了快速的查找和增删元素,java中的map采用的是数组+链表的数据结构来存储数据的。所以在遍历map的时候无法直接通过下标来遍历,而是需要使用迭代器的方式。
基于这种数组+链表的存储结构,HashMap中有三种遍历方式,分别是:
- KeySet:通过keySet()方法获取一个KeySet集合,这个类里封装的是map的key。
- Values:通过values()方法获取Values集合,这个类里封装的是map的值。
- EntrySet():通过entrySet()获取EnterSet集合,这个类里封装的是map的键值对。
以上三种方式获取到的都是某个类型的集合,需要对其进行迭代才能得到全部元素。其中最常用的就是获取EntrySet的集合对象。
存储结构示意图和遍历的伪代码

HashMap中的迭代器是内部类EntryIterator,它继承自另外一个内部类HashIterator,并且实现了Iterator接口(部分方法是在父类中实现的),迭代的主要代码存在于HashIterator这个类中。
下面是HashIterator的部分简化(代码格式可能不标准)
abstract class HashIterator {
	HashIterator (){
		//在无参构造中完成了一些初始化的工作
		//1.将modCount是HashMap的一个属性值,用来保证线程安全的,当它的值改变时就代表着当前的HashMap的结构发生了改变(有其他的线程修改了HashMap中的某些东西)
		int expectedModCount = modCount;
		//2.找到第一HashMap中的第一个值,并赋值给next,t是存储数据的数组
		do {} while (index < t.length && (next = t[index++]) == null);
	}
	//这个函数是循环时的结束条件,这里的next指的是当前元素,千万不能理解成当前要遍历的元素的下一个(因为next代表的元素还未被遍历,只是代表将要变得元素)
	public final boolean hasNext() {
            return next != null;
        }
    //这个函数是用来获取当前元素的
    final Node<K,V> nextNode() {
    	//1.根据expectedModCount == modCount来判断线程安全
    	//2.返回next值,并将next的值更新到下一个元素(Node是数组+链表中的链表结点对象)
    	Node<K,V> e = next;
    	do {} while (index < t.length && (next = t[index++]) == null);
    	return e;
     }
}
以EnterySet为例,演示迭代的使用方式
	HashMap<String, String> map = new HashMap<>();
	map.put("a","a");
	map.put("b","b");
	//iterator是获取迭代器的方法,它会返回EntryIterator对象
	Iterator<Map.Entry<String, String>> iterator = map.entrySet().iterator();
	while(iterator.hasNext()){
	//获取元素时使用的是EntryIterator中的next方法,在这个方法内部会调用父类的nextNode方法
		  Map.Entry<String, String> current = iterator.next();
		  System.out.println("当前元素的key值:"+current.getKey());
		  System.out.println("当前元素的value值:"+current.getValue());
	}
以下是HashIterator的源码部分
abstract class HashIterator {
        Node<K,V> next;        // next entry to return
        Node<K,V> current;     // current entry
        int expectedModCount;  // for fast-fail
        int index;             // current slot

        HashIterator() {
            expectedModCount = modCount;
            Node<K,V>[] t = table;
            current = next = null;
            index = 0;
            if (t != null && size > 0) { // advance to first entry
                do {} while (index < t.length && (next = t[index++]) == null);
            }
        }

        public final boolean hasNext() {
            return next != null;
        }

        final Node<K,V> nextNode() {
            Node<K,V>[] t;
            Node<K,V> e = next;
            if (modCount != expectedModCount)
                throw new ConcurrentModificationException();
            if (e == null)
                throw new NoSuchElementException();
            if ((next = (current = e).next) == null && (t = table) != null) {
                do {} while (index < t.length && (next = t[index++]) == null);
            }
            return e;
        }

        public final void remove() {
            Node<K,V> p = current;
            if (p == null)
                throw new IllegalStateException();
            if (modCount != expectedModCount)
                throw new ConcurrentModificationException();
            current = null;
            K key = p.key;
            removeNode(hash(key), key, null, false, false);
            expectedModCount = modCount;
        }
    }
最后
以上就是单薄手套最近收集整理的关于HashMap的迭代器遍历HashMap的存储结构存储结构示意图和遍历的伪代码的全部内容,更多相关HashMap内容请搜索靠谱客的其他文章。
本图文内容来源于网友提供,作为学习参考使用,或来自网络收集整理,版权属于原作者所有。


发表评论 取消回复