小白爬坑指南:
下午想用vue框架写个注册登录,结果在注册成功后跳转到登录页面给出提示卡了一下~~
给大家分享一下我的心路历程免得大家在这浪费时间。
1.beforeRouteEnter的使用:
代码如下
	 beforeRouteEnter(to, from, next) {
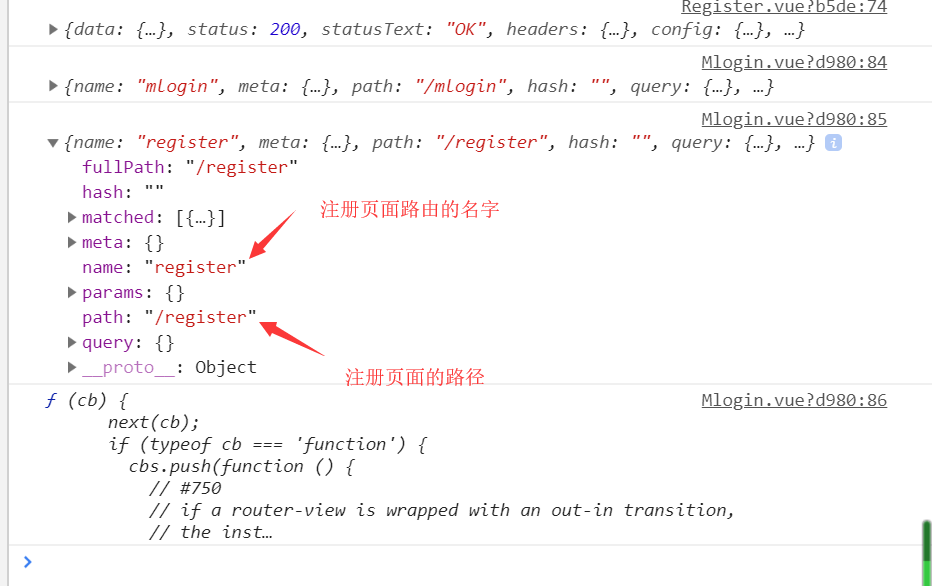
            	console.log(to);
            	console.log(from);		//直接通过这个我们可以查看到路由是从哪里跳转过来的
            	console.log(next);
            	next();
            }
如图:

2.beforeRouteEnter使用需要注意的:
在这我们可以直接访问他的path属性获得来时的路径,但我们无法直接通过this访问methods中定义的方法和data中定义的数据需要通过next中的参数来访问,具体代码如下:
 beforeRouteEnter (to, from, next) {
 							//通过router的名字访问是否正确注册后从register页面跳转过来的
							if(from.name==='register'){
								next(vm=>{
//									console.log(vm);
//									我的data中定义了一个名为alter的属性
									vm.alert='注册成功!';
								});
							}
				  	}
最终实现的效果如下:

最后如果大家不嫌弃我直接附上我登录页面的代码好了:有问题的话欢迎各位大佬和我探讨
<template>
<div class="backlogin">
<!--注册成功提示-->
<div v-if="alert" id="alert" class="alert alert-success alert-dismissible fade show" role="alert">
<strong>{{alert}}</strong>
<button v-on:click="hidden" type="button" class="close" data-dismiss="alert" aria-label="Close">
<span aria-hidden="true">×</span>
</button>
</div>
<div class="login_box">
<div class="title">后台登录</div>
<div>
<input class="myinput" type="text" placeholder="手机号/用户名" v-model="username" />
</div>
<div>
<input @keyup.13="login" class="myinput" type="password" placeholder="口令" v-model="password" />
</div>
<div class="login_other">
<a href="javascript:;">找回密码</a>
<input type="checkbox" id="remenberme" /><label for="remenberme">记住我</label>
</div>
<button :disabled="disablebtn" class="login" @click="login">{{loginText}}</button>
<button class="login" @click="register">注册</button>
</div>
</div>
</template>
<script>
import axios from 'axios'
export default {
name: 'backlogin',
data () {
return {
username:"admin",/*TODO:先预存测试值,以免手动输入*/
password:"123456",
disablebtn:false,
loginText:"登录",
alert:''
}
},
methods:{
//点击隐藏
hidden(){
var dis=document.getElementById("alert");
dis.style.display="none";
},
login(){
var _this = this;
this.disablebtn = true;
this.loginText = "登录中...";
//this.$reqs就访问到了main.js中绑定的axios
axios.post("/api/users/login",{
username:this.username,
password:this.password
})
.then(res =>{
//检验成功 设置登录状态并且跳转到、
localStorage.setItem("blog_login",true);
this.$router.push("/");
})
.catch(function (error) {
//失败
_this.disablebtn = false;
_this.loginText = "登录"
});
},
register(){
this.$router.push({path:'/register'});
},
},
beforeRouteEnter (to, from, next) {
if(from.name==='register'){
next(vm=>{
// console.log(vm);
vm.alert='用户注册成功!';
});
}
next();
}
}
</script>
<!-- Add "scoped" attribute to limit CSS to this component only -->
<style scoped>
.header{
height: 60px;
box-shadow: 0 1px 5px rgba(13,62,73,0.2) ;
}
.header img{
width: 170px;
margin-top: 12px;
margin-left: 15px;
float: left;
}
.header span{
float: left;
color: #566a80;
margin: 21px 0 0 20px;
}
.login_box{
width: 320px;
margin: 50px auto;
}
.login_box .myinput{
width: 100%;
border: 1px solid #cad3de;
height: 40px;
line-height: 40px;
margin: 5px 0 10px;
border-radius: 3px;
padding: 0 10px;
outline: none;
box-sizing: border-box;
}
.login_box .myinput:focus{
border: 1px solid #4289dc;
}
.login_other{
overflow: hidden;
}
.login_other a{
float: right;
color: #727f8f;
}
.login_other a:hover{
color: #273444;
}
.login_other input, .login_other label{
float: left;
color: #727f8f;
}
.login_other input{
margin: 4px 5px 0 0;
}
.login{
box-sizing: border-box;
border: none 0;
height: 44px;
line-height: 44px;
width: 100%;
background:#4187db;
font-size: 16px;
border-radius: 3px;
margin-right: 40px;
transition: all 0.5s ease;
cursor: pointer;
outline: none;
color: #fff;
margin-top: 15px;
}
.login:hover{
background: #2668b5;
}
.login[disabled]{
opacity: 0.8;
}
.login[disabled]:hover{
background:#4187db;
}
.title{
color: #273444;
font-size: 1.5em;
text-align: center;
margin: 0 0 20px 0;
}
@media only screen and (max-width: 768px) {
.login_box{
width: 280px;
margin: 50px auto;
}
}
</style>
最后
以上就是甜美含羞草最近收集整理的关于vue-router之beforeRouteEnter实现注册成功判定,并给出相应提示的全部内容,更多相关vue-router之beforeRouteEnter实现注册成功判定内容请搜索靠谱客的其他文章。
本图文内容来源于网友提供,作为学习参考使用,或来自网络收集整理,版权属于原作者所有。


发表评论 取消回复