【Unity3D】 FTP与MQTT服务器搭建
- 前言
- 项目准备
- 1.Unity3D
- 2.云服务器
- 3.远程连接
- 4.端口扫描
- FTP服务器搭建与连接
- 1.FTP服务器——vsftpd
- 2.Unity3d连接FTP服务器
- MQTT服务器搭建与连接
- MQTT服务器——ActiveMQ
- MQTT服务器——Apollo
- Unity3d连接MQTT服务器
前言
前些时间项目需要使用Unity3d做一套能够和FTP服务器与MQTT服务器共同搭建的项目,期间遇到了不少坑,由于以前没怎么做过后端服务器的搭建,这次也就相当于是给自己一次学习的记录吧。
项目准备
1.Unity3D
unity3D 是一款比较好用的商用游戏引擎,使用C#语言,是目前比较流行的商用游戏引擎。
官网下载链接有点迷,其自带的Unity Hub总感觉有些问题,建议去官方归档地址下载。
这个项目我使用的版本是Unity 2018.2.15f1。
装好Unity程序之后我们就可以进行后一步的操作了
2.云服务器
去阿里云或是腾讯云官网购买一个服务器就行了,安装的是Ubuntu操作系统。
3.远程连接
我这里用的Putty,因为云服务器是由另一方开发人员管理的,拿到他们给我的公网IP和账户密码后,用Putty进行远程连接操作即可。
4.端口扫描
因为老是遇到本地端口可以访问,但通过公网IP无法访问的问题。所以使用这个端口扫描来检查是不是自己的端口没有暴露出去。一般遇到公网IP无法访问到这种问题主要是一下几种情况(这些都是我遇到过的问题)
- 云服务器控制台没有打开端口,这种情况下端口扫描基本都是关闭的状况,这个联系管理员打开端口就行了。
- 另一种情况则是因为服务器的防火墙把端口禁掉了,使用iptables,把它放开允许访问就行了。
- 还有可能就是你服务器运行所需要的端口被其他进程占用了,不过这种情况下往往服务器程序应该也会报错的,使用下端口查询的命令看看端口被占用情况,使用类似kill的命令杀掉这些占用端口的程序然后再启动。
- 最后一个就是配置文件里面,往往是形如“127.0.0.1:port”,这种格式外网是无法访问到此端口的,因为它仅仅监听环回接口的数据,即本机发送给本机port端口的数据,其他主机发送过来的数据无法接收到,因此这种情况你需要把其改为"0.0.0.0:port"这种形式,它表示监听所有的网络接口数据,包括环回接口和其他网络接口,所有本机和其他主机发送的数据都可以接受到。
在排除这些问题之后,理论上你使用端口扫描工具,这些端口应该都是开放状态的。(如下方打开状态的端口),如果还有关闭的状态请重新检查下上述情况 。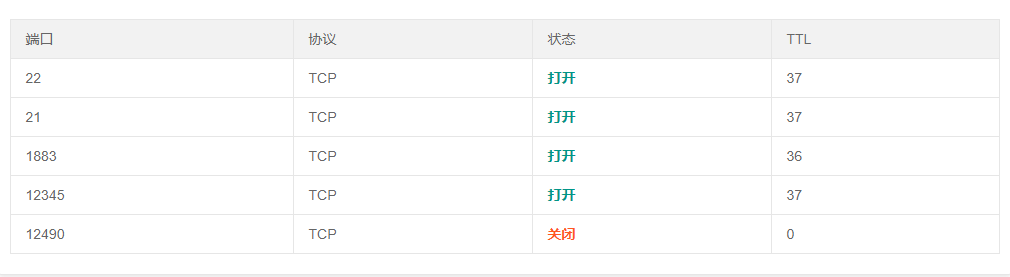
FTP服务器搭建与连接
1.FTP服务器——vsftpd
vsftpd 是一个 UNIX 类操作系统上运行的服务器的名字,它可以运行在诸如 Linux, BSD, Solaris, HP-UX 以及 IRIX 上面。它支持很多其他的 FTP 服务器不支持的特征。这里我选择这个服务器进行搭建,在Ubuntu终端上使用相关程序命令进行安装,并按照相关教程进行配置,这里我参考的是这篇博客。注意FTP服务器的连接端口是21端口,按照上面提到的端口解决方案,保证21端口是暴露出来的,在配置完成后,在chrome浏览器中输入ftp://xxx.xxx.xx.xx就应该可以进入ftp服务器的根目录了,注意浏览器栏中默认协议是http,所以输入时一定要手动输入ftp,不然无法访问到FTP服务器。
2.Unity3d连接FTP服务器
unity连接FTP服务器的方式很简单:
	/// <summary>
    /// 创建FTP服务器连接
    /// </summary>
    /// <param name="url">FTP服务器地址</param>
    /// <param name="requestMethod">FTP服务器请求方法</param>
    /// <returns></returns>
    private FtpWebRequest CreatFtpWebRequest(string url, string requestMethod)
    {
        FtpWebRequest request = (FtpWebRequest)FtpWebRequest.Create(url);
        request.Credentials = networkCredential;
        request.KeepAlive = true;
        request.UseBinary = true;
        request.Method = requestMethod;
        return request;
    }
其中,request.Credentials是用于验证用户身份的,使用形如
networkCredential = new NetworkCredential("账户名", "账户密码");
即可建立FTP连接,如果希望支持匿名访问的话,去vsftpd服务器的config文件里面将相关的设置为true即可。
然后你就可以通过形如:
FtpWebRequest request = CreatFtpWebRequest(url, WebRequestMethods.Ftp.ListDirectoryDetails);
FtpWebRequest request= CreatFtpWebRequest(url, WebRequestMethods.Ftp.GetFileSize);
FtpWebRequest request = CreatFtpWebRequest(url, WebRequestMethods.Ftp.DownloadFile);
FtpWebRequest request = CreatFtpWebRequest(url, WebRequestMethods.Ftp.UploadFile);
的方式创建ftp连接,其由上而下分别是获取文件列表方法,获取文件大小方法(可以用于制作进度条),文件下载方法和文件上传方法,这些都是C#支持的方法,直接使用这些方法建立传输连接并使用即可,此处我贴出我的几个方法实现:
- 连接FTP服务器并遍历返回的结果,后面略微有些复杂的逻辑是对ftp返回的字符串格式进行的处理,各位可以通过查看网络流数据内容的方式后自定义对结果字符串的处理结果。
 	/// <summary>
    /// 展示FTP连接后的遍历结果
    /// </summary>
    /// <param name="url">FTP服务器地址路径</param>
    /// <returns>是否连接上FTP服务器</returns>
    private bool ShowFtpFileAndDirectory(string url)
    {
        try
        {
            FtpWebRequest request = CreatFtpWebRequest(url, WebRequestMethods.Ftp.ListDirectoryDetails);
            FtpWebResponse response = GetFtpResponse(request);

            if (response == null)
            {
                Debug.Log("Response is null");
                return false;
            }

            //读取网络流数据
            Stream stream = response.GetResponseStream();
            StreamReader streamReader = new StreamReader(stream, Encoding.Default);
            string s = streamReader.ReadToEnd();
            streamReader.Close();
            response.Close();

            //处理并显示文件目录列表
            string[] ftpDir = s.Split(Environment.NewLine.ToCharArray(), StringSplitOptions.RemoveEmptyEntries);
            int length = 0;
            for (int i = 0; i < ftpDir.Length; i++)
            {
                if (ftpDir[i].EndsWith("."))
                {
                    length = ftpDir[i].Length - 2;
                    break;
                }
            }

            for (int i = 0; i < ftpDir.Length; i++)
            {
                s = ftpDir[i];
                int index = s.LastIndexOf('t');
                if (index == -1)
                {
                    if (length < s.Length)
                    {
                        index = length;
                    }
                    else
                    {
                        continue;
                    }
                }

                string name = s.Substring(index + 1);
                if (name == "." || name == "..")
                {
                    continue;
                }
                //判断是否为目录,在名称前加“Dirctory"来表示
                if (s[0] == 'd' || (s.ToLower()).Contains("<dir>"))
                {
                    string[] namefiled = name.Split(' ');
                    int namefiledlength = namefiled.Length;
                    string dirname;
                    dirname = namefiled[namefiledlength - 1];
                    dirname = dirname.PadRight(34, ' ');
                    name = dirname;
                    Debug.Log("<Dir>:" + name);
                }

            }

            for (int i = 0; i < ftpDir.Length; i++)
            {
                s = ftpDir[i];
                int index = s.LastIndexOf("t");
                if (index == -1)
                {
                    if (length < s.Length)
                    {
                        index = length;
                    }
                    else
                    {
                        continue;
                    }
                }
                string name = s.Substring(index + 1);
                if (name == "." || name == "..")
                {
                    continue;
                }
                if (!((s[0] == 'd') || (s.ToLower().Contains("<dir>"))))
                {
                    string[] namefiled = name.Split(' ');
                    int namefiledlength = namefiled.Length;
                    string filename;
                    filename = namefiled[namefiledlength - 1];
                    filename = filename.PadRight(34, ' ');
                    name = filename;
                    Debug.Log("<File>:" + name);
                }
            }
            return true;
        }
        catch (Exception e)
        {
            Debug.LogError(e.Message);
            return false;
        }
    }
- 然后是下载文件功能的实现,我这里默认保存在当前项目的StreamingAssets/SaveFiles文件夹内,使用协程的方式,每写入特定字节数后就更新一下下载进度条并等待至下一帧继续进行下载任务,避免unity的假死状态。
	 /// <summary>
    /// 下载文件
    /// </summary>
    /// <param name="url">待下载的文件路径,形如ftp://111.111.11.1/test.txt</param>
    public IEnumerator DownloadFile(string url)
    {
        long downloadFileAllLength = 0;
        long downloadFileAlreadyLength = 0;
        string savedFilePath = Application.dataPath + "/SaveFiles/" + url.Replace("ftp://111.111.11.1/","");
        try
        {
        	//获取待下载文件的大小
            FtpWebRequest resFile = CreatFtpWebRequest(url, WebRequestMethods.Ftp.GetFileSize);
            using (FtpWebResponse res = (FtpWebResponse)resFile.GetResponse())
            {
                Debug.Log("All Length: " + res.ContentLength);
                downloadFileAllLength = res.ContentLength;
                slider.maxValue = res.ContentLength;
                if (res == null)
                {
                    yield break;
                }
            }
        }
        catch (Exception e)
        {
            Debug.Log("Download filed: " + e.Message);
        }
		//开始下载
        FtpWebRequest request = CreatFtpWebRequest(url, WebRequestMethods.Ftp.DownloadFile);
        FtpWebResponse response = GetFtpResponse(request);
        Stream responseStream = response.GetResponseStream();
        FileStream fileStream = File.Create(savedFilePath);
        int buflength = 8196;
        byte[] buffer = new byte[buflength];
        int bytesRead = 1;

        while (bytesRead != 0)
        {
            bytesRead = responseStream.Read(buffer, 0, buflength);
            fileStream.Write(buffer, 0, bytesRead);
            downloadFileAlreadyLength += bytesRead;
            //Debug.Log("BytesRead:" + bytesRead + "AlreadyRead:" + downloadFileAlreadyLength);
            //此处用于使用协程更新下载进度条,避免大文件的下载直接导致unity的假死
            //yield return StartCoroutine(UpdateUISlider(downloadFileAlreadyLength));
            yield return new WaitForEndOfFrame();
        }

        Debug.Log("Download success!");
        fileStream.Close();
    }
- 最后是上传文件功能,同样是使用协程,避免文件写入操作导致的unity假死情况
	/// <summary>
    /// 上传文件功能
    /// </summary>
    /// <param name="newFileName">上传文件的文件名</param>
    /// <returns></returns>
    private IEnumerator UploadFile(string newFileName)
    {
        long uploadFileAlreadyLength = 0;

        string url = GetUrlString(newFileName);
        string filepath = Application.dataPath + "/StreamingAssets/" + newFileName;

        FtpWebRequest request = CreatFtpWebRequest(url, WebRequestMethods.Ftp.UploadFile);
        Stream responseStream = request.GetRequestStream();

        FileStream fs = File.OpenRead(filepath);
        int buflength = 1000000;
        byte[] buffer = new byte[buflength];
        int bytesRead = 1;

        while (bytesRead != 0)
        {
            bytesRead = fs.Read(buffer, 0, buflength);
            responseStream.Write(buffer, 0, bytesRead);
            uploadFileAlreadyLength += bytesRead;
            //此处用于使用协程更新下载进度条,避免大文件的上传直接导致unity的假死
            //yield return StartCoroutine(UpdateUISlider(downloadFileAlreadyLength));
             yield return new WaitForEndOfFrame();
        }
        responseStream.Close();

        //上传完毕后再次调用获取文件列表函数,查看上传情况
        if (ShowFtpFileAndDirectory() == true)
        {
            Debug.Log("Upload " + newFileName +" success!");
            //上传成功
        }
        else
        {
            Debug.Log("Upload failed!");
        }
    }
unity3d与FTP服务器的传输方式基本完成,在unity内,我们可以使用这套方法和相关的UI定义,完成在unity中对FTP服务器的访问工作
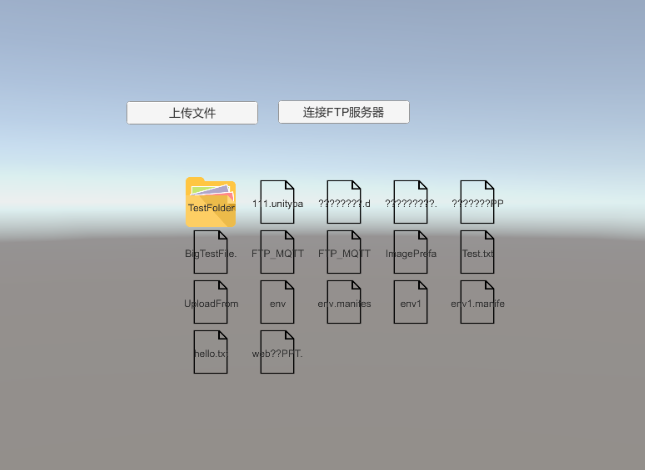
unity3d与FTP服务器的连接部分于是基本完成结束。
MQTT服务器搭建与连接
MQTT服务器——ActiveMQ
Apache ActiveMQ是Apache软件基金会所研发的开放源代码消息中间件;由于ActiveMQ是一个纯Java程序,因此只需要操作系统支持Java虚拟机,ActiveMQ便可执行。因此首先要在云服务器上安装Java,注意ActiveMQ5要求的JDK版本要在1.8以上,否则无法正常启动程序。安装完虚拟机后,建议使用wget命令进行下载ActiveMQ5,下载地址。在Ubuntu中使用类似以下的语句:
wget http://activemq.apache.org/components/classic/download/apache-activemq-5.15.12-bin.tar.gz
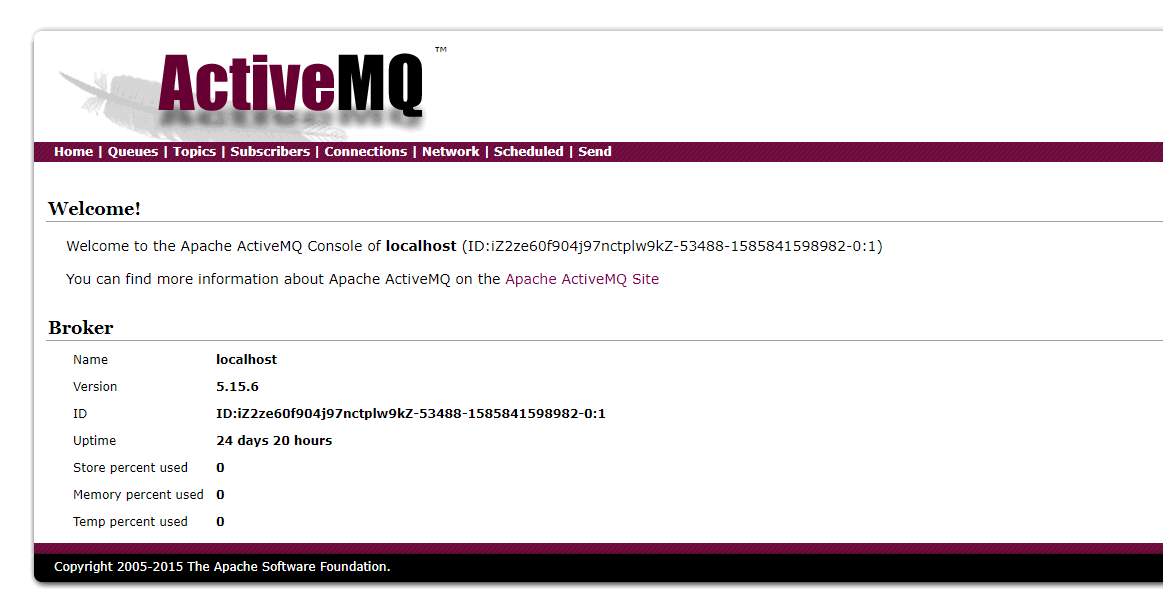
下载完毕Activemq安装包后,解压在当前路径下,进入config/activemq.xml文件中进行编辑,注意开放其config文件中所需要的端口,将mqtt中所用到的那个端口暴露出来。完成之后在/bin文件路径下使用activemq start开启服务即可。完成之后,在chrome浏览器中输入http://xxx.xx.xx.xx:port应该可以进入指定的后台程序,此部分可能会遇到的问题就是外网访问不到,基本这种问题都是我前文提到的端口未开放或是被防火墙阻拦等问题,可以去前面部分查找解决方案。
完成后访问后台程序,可以看到如下画面:其中有很多栏目,我们基本要用到的是这个Topics栏和Connections栏,前者可以查看连接的Topic,后者可以看到有哪些连接的机器。
MQTT服务器——Apollo
Apache Apolo是一款Apache官方已经不再支持的mqtt服务器,这里是因为以前一个旧项目使用C++进行开发,当时是针对这款服务器写的代码,不支持ActiveMQ服务器,所以又在网上找了个镜像下载Apollo(Apache官网上好像已经没有这个的下载地址了),然后由于缺乏文档,在其config文件中只能估摸着修改一下配置,这有个坑就是它支持在后台网页上修改配置文件,但是改错了并不会给你报错,你得重启服务器时才会跟你说服务器配置文件有错误。这个属于过时产品,了解一下即可(配置也比较简单,注意端口开放基本就没问题了),然后使用nohup后台挂载运行即可,避免因为远程连接断开而导致程序关闭。另外因为C++程序是匿名访问的,在配置文件中添加 authentication enabled="false"即可。
Unity3d连接MQTT服务器
在配置完MQTT服务器后,下载MQTT_Unity3D示例,导出包添加到Unity工程项目文件中即可。为了便于程序开发,使用单例模式建立MQTT实例:
using System;
using System.Collections;
using System.Collections.Generic;
using System.Net;
using UnityEngine;
using uPLibrary.Networking.M2Mqtt;


public class MqttClientInstance
{
    public static string IP = "xxx.xx.xx.xx";
    public static int Port = 000;
    private static MqttClient client;

    private static string id;
    private MqttClientInstance()
    {

    }

    public static MqttClient GetClient()
    {
        if (client == null)
        {
            Debug.Log("新建MQTT Client1");
            client = new MqttClient(IPAddress.Parse(IP), Port, false, null);
            client.MqttMsgSubscribed += Client_MqttMsgSubscribed;
            id = Guid.NewGuid().ToString();
            Debug.Log("Client ID:" + id);
            try
            {
                client.Connect(id);
            }
            catch (Exception e)
            {

                Debug.LogWarning(e);
            }
        }
        else
        {
            if (!client.IsConnected)
            {
                Debug.Log("失去服务器连接,尝试重新连接");
                try
                {
                    client.Connect(id);
                }
                catch (Exception e)
                {

                    Debug.LogWarning(e);
                }
            }
        }
        return client;
    }

    private static void Client_MqttMsgSubscribed(object sender, uPLibrary.Networking.M2Mqtt.Messages.MqttMsgSubscribedEventArgs e)
    {
        Debug.LogWarning(e.MessageId);
    }

    public static void Destroy()
    {
        if (client != null && client.IsConnected)
        {
            client.Disconnect();
        }
    }

}
注意然后可以使用形如下图的方式进行发布(Publish)和订阅(Subscribe)操作
MqttClientInstance.GetClient().Publish(topic, Encoding.UTF8.GetBytes(json));
MqttClientInstance.GetClient().Subscribe(new string[] {topic},new byte[] { uPLibrary.Networking.M2Mqtt.Messages.MqttMsgBase.QOS_LEVEL_EXACTLY_ONCE });
注意MQTT协议支持简单的数据格式传输,如果需要传输自定义类型,建议使用LitJson进行类封装,比如我需要发布Unity3D中的Transform类型,首先我先新建一个自定义类型JTransform:注意必须提供其构造函数
using System.Collections;
using System.Collections.Generic;
using UnityEngine;

/// <summary>
/// 自定义Transform类
/// </summary>
public class JTransform{

    public double PositionX { get; set; }
    public double PositionY { get; set; }
    public double PositionZ { get; set; }

    public double RotationX { get; set; }
    public double RotationY { get; set; }
    public double RotationZ { get; set; }

    public JTransform()
    {

    }

    public JTransform(Transform t)
    {
        PositionX = t.localPosition.x;
        PositionY = t.localPosition.y;
        PositionZ = t.localPosition.z;

        RotationX = t.localEulerAngles.x;
        RotationY = t.localEulerAngles.y;
        RotationZ = t.localEulerAngles.z;
    }

    public Vector3 GetPosition()
    {
        return new Vector3((float)PositionX, (float)PositionY, (float)PositionZ);
    }

    public Quaternion GetRotation()
    {
        return Quaternion.Euler((float)RotationX, (float)RotationY, (float)RotationZ);
    }
}
然后在发布程序中,每一帧我都进行更新操作:
using System.Collections;
using System.Collections.Generic;
using UnityEngine;
using uPLibrary.Networking.M2Mqtt;
using uPLibrary.Networking.M2Mqtt.Messages;
using uPLibrary.Networking.M2Mqtt.Utility;
using uPLibrary.Networking.M2Mqtt.Exceptions;
using System.Threading;
using System.Text;

public class JTransformPublisher: MonoBehaviour {

    private float speed = 20.0f;
    private string topic = "JTransform";

    void Update () {

        //demo控制移动代码,前后左右
		if(Input.GetKey(KeyCode.W))
        {
            this.transform.position += (speed * this.transform.forward * Time.deltaTime);
        }
        if(Input.GetKey(KeyCode.S))
        {
            this.transform.position -= (speed * this.transform.forward * Time.deltaTime);
        }
        if(Input.GetKey(KeyCode.A))
        {
            this.transform.position -= (speed * this.transform.right * Time.deltaTime);
        }
        if(Input.GetKey(KeyCode.D))
        {
            this.transform.position += (speed * this.transform.right * Time.deltaTime);
        }
        if(Input.GetKey(KeyCode.LeftArrow))
        {
            this.transform.Rotate(this.transform.up * 60.0f * Time.deltaTime);
        }
        if (Input.GetKey(KeyCode.RightArrow))
        {
            this.transform.Rotate(-1.0f * this.transform.up * 60.0f * Time.deltaTime);
        }
        //=====================每帧更新JTransform=====================
        JTransform jTransform = new JTransform(transform);
        string json = LitJson.JsonMapper.ToJson(jTransform);
        MqttClientInstance.GetClient().Publish(topic, Encoding.UTF8.GetBytes(json));
		//==========================================================
    }
}
在接收程序中,我订阅该Topic,然后每帧同步本地物体的位置和方向,就可以实现类似联网同步的效果
using System.Collections;
using System.Collections.Generic;
using UnityEngine;
using System.Text;
using uPLibrary.Networking.M2Mqtt;
using uPLibrary.Networking.M2Mqtt.Messages;


public class JTransformSubscribor: MonoBehaviour {

    private string topic = "JTransform";      					//订阅的topic
    private JTransform carPos;
    private float SynSpeed = 20.0f;                         	//位置信息的同步步长

	// Use this for initialization
	void Start () {
        MqttClientInstance.GetClient().Subscribe(new string[] {topic},new byte[] { uPLibrary.Networking.M2Mqtt.Messages.MqttMsgBase.QOS_LEVEL_EXACTLY_ONCE });

        MqttClientInstance.GetClient().MqttMsgPublishReceived += (sender, data) => {
            if (data.Topic.Equals(topic))
            {
                string json = Encoding.UTF8.GetString(data.Message);
                //Debug.Log(json);
                carPos = LitJson.JsonMapper.ToObject<JTransform>(json);
            }
        };

	}

	// Update is called once per frame
	void Update () {
		if(carPos!=null)
        {
            this.transform.position = Vector3.Lerp(this.transform.position, carPos.GetPosition(), SynSpeed * Time.deltaTime);
            this.transform.rotation = Quaternion.Lerp(this.transform.rotation, carPos.GetRotation(), SynSpeed * Time.deltaTime);
        }
	}
}
由此完成Unity3D与MQTT服务器的连接和订阅/发布操作的实现。
最后
以上就是尊敬高跟鞋最近收集整理的关于[Unity3D]FTP与MQTT服务器搭建的全部内容,更多相关[Unity3D]FTP与MQTT服务器搭建内容请搜索靠谱客的其他文章。


![[Unity3D]FTP与MQTT服务器搭建](https://www.shuijiaxian.com/files_image/reation/bcimg15.png)


![[深度学习][原创]旋转目标检测框架yolov5_obb,paddledetection-s2anet和mmrotate谁最好用?](https://www.shuijiaxian.com/files_image/reation/bcimg18.png)
发表评论 取消回复