第六章:组件高级
回顾:
侦听器:侦听数据属性的变化
函数+计算属性(缓存) watch:{}
组件:让我们的页面结构可复用 ,组件----》vue实例
全局:定义在全局位置 Vue.component('名字',{
template:"组件的模板", data ....
data(){
return {
}
}
})
局部:
components:{}
作用域:
问题:组件之间的数据传递
本章目标:
- 掌握props选项的用法
- 监听自定义事件
一、组件的进阶使用
1.1 父组件传值给子组件
子组件有时候需要接收来自父组件的数据,这时候就需要绑定props的值
<div id="app">
    <input type="text" v-model="parentMessage">
    <my-component :message="parentMessage"></my-component>
</div>
//Prop 是你可以在组件上注册的一些自定义 attribute。当一个值传递给一个 prop attribute 的时候,它就变成了那个组件实例的一个 property
1.2 props 选项的作用 prop
props是自定义属性,组件之间可以通过props属性去自定义一些属于自己的属性,并通过这个属性来进行组件之间的数据传输。
单页面应用
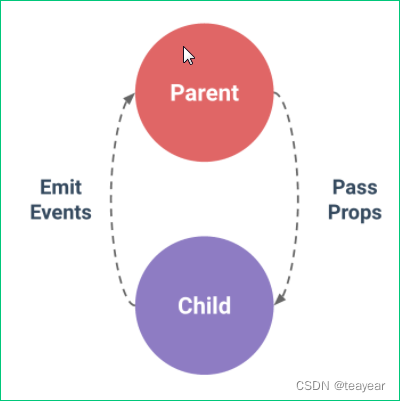
- 组件不仅仅是要把模板的内容进行复用,更重要的是组件之间的通信,由父组件向子组件正向传递数据或者参数,就是通过props来实现的
- props选项用来声明它期待获得的数据
- props 本质:props 为元素属性

1.3 props 的使用
- 现在子组件中定义props属性 自定义 需要的属性的名字
- 在父组件调用子组件的地方 通过 v-bind:自定义属性名 传递数据
我们需要在组件中添加一个新的属性props 里边用来定义期待的数据的名字===》data中数据的属性名,不过这个数据是由父组件传递来的
#js
components: {
 '组件名称': {
    template: '#模板ID',
    props: ['message1', 'message2',...]
  }
}

#html
此时的messages就是上边子组件中定义的props中的message1 val就是传递来的该属性的值
<组件 message1='val'></组件> 传递写死的值
<组件 :message1='val'></组件> 通过v-bind动态的传递值
1.4 Prop可以具有的类型
- 以字符串数组的形式传递(此时传递来的数据的类型一般都是字符串类型)
- **注意:**如果使用字符串数组 定义属性 此时传递来的数据的类型要看父 父组件是什么类型,子组件接收到就是什么类型。
通常,我们只看到了以字符串数组形式列出的 prop:
props: ['title', 'likes', 'isPublished', 'commentIds', 'author']
- 把props以对象的形式定义:自定义传递来的数据的类型
但是,如果你希望每个 prop 都有指定的值类型。这时,你可以以对象形式列出 prop,这些 property 的名称和值分别是 prop 各自的名称和类型:
props: {
  title: String,
  likes: Number,
  isPublished: Boolean,
  commentIds: Array,
  author: Object,
  callback: Function,
  contactsPromise: Promise // or any other constructor
}
<!DOCTYPE html>
<html lang="en">
<head>
    <script src="../js/vue.js"></script>
    <style>
        #fff{
            width: 500px;
            height: 500px;
            background-color: red;

        }
        #sss{
            margin: auto;
            width: 300px;
            height: 300px;
            background-color: skyblue;
        }
    </style>
</head>
<body>
    <div id="app">
        <input type="text" v-model="inp">
        //最外层节点向father节点传递数据
        <father :val="inp"></father>
    </div>
    <template id="father">
        <div id="fff">
            这里是父亲:<br>
            根节点传递来的数据:{{val}}
            <br>
            父亲可以给儿子的钱: <input type="text" v-model.number="money">
            //father节点向son节点传递数据
            <son :fname="fmsg" :fage="fage" :fmoney="money"></son>
        </div>
    </template>
    <template id="son">
        <div id="sss">
            这里是儿子
            <p>父亲的姓名是:{{fname}},年龄是{{fage}},可以从父亲那里拿{{fmoney+1}}元</p>
        </div>
    </template>
</body>
<script>
    new Vue({
        el:'#app',
        data:{
            inp:'你好哈哈哈'
        },
        components:{
            //定义父组件
            father:{
                template:'#father',
                props:['val'],
                data(){
                    return {
                        fmsg:'杨爹',
                        fage:55,
                        money:null
                    }
                },
                //定义子组件
                components:{
                    son:{
                        template:'#son',
                        data(){
                            return {
                                smsg:'小杨',
                                sage:18
                            }
                        },
                        //使用数组形式接收父组件传递来子组件的数据
                        //props: ['fname','fage','fmoney']
                        //使用对象形式 来接收父组件传递来子组件的数据
                        props:{
                            fname:String,
                            fage:Number,
                            fmoney:Number
                        }
                    }
                }
            }
        }
    })
</script>
</html>
1.5 Prop 验证
我们可以为组件的 prop 指定验证要求,例如你知道的这些类型。如果有一个需求没有被满足,则 Vue 会在浏览器控制台中警告你。
为了定制 prop 的验证方式,你可以为 props 中的值提供一个带有验证需求的对象,而不是一个字符串数组。例如:
Vue.component('my-component', {
  props: {
    // 基础的类型检查 (`null` 和 `undefined` 会通过任何类型验证)
    propA: Number,
    // 多个可能的类型
    propB: [String, Number],
    // 必填的字符串
    propC: {
      type: String, //数据类型
      required: true  //必填项
    },
    // 带有默认值的数字
    propD: {
      type: Number,
      default: 100  //默认值
    },
    // 带有默认值的对象
    propE: {
      type: Object,
      // 对象或数组默认值必须从一个工厂函数获取
      default: function () {
        return { message: 'hello' }
      }
    },
    // 自定义验证函数
    propF: {
      validator: function (value) {
        // 这个值必须匹配下列字符串中的一个
        return ['success', 'warning', 'danger'].indexOf(value) !== -1
      }
    }
  }
})
#注意那些 prop 会在一个组件实例创建之前进行验证,所以实例的 property (如 data、computed 等) 在 default 或 validator 函数中是不可用的。
props 的使用
- 与 data 一样,props 可以用在模板中
- 可以在 vm 实例中像 this.message 这样使用
- 与组件data函数return的数据区别
- props的数据来自父级
- data中数据是组件自己的数据
1.6 单向数据流
所有的 prop 都使得其父子 prop 之间形成了一个单向下行绑定:父级 prop 的更新会向下流动到子组件中,但是反过来则不行。这样会防止从子组件意外变更父级组件的状态,从而导致你的应用的数据流向难以理解。
父组件===>子组件:vue允许的,会主动触发的,也叫正向传递。
子组件===>父组件:vue允许的,不会主动触发,需要手动(被动)触发,叫做逆向传递。
额外的,每次父级组件发生变更时,子组件中所有的 prop 都将会刷新为最新的值。这意味着你不应该在一个子组件内部改变 prop。如果你这样做了,Vue 会在浏览器的控制台中发出警告。也就是说props属性接收到的数据是只读的不能随意修改
这里有两种常见的试图变更一个 prop 的情形:
#这个 prop 用来传递一个初始值;这个子组件接下来希望将其作为一个本地的 prop 数据来使用。在这种情况下,最好定义一个本地的 data property 并将这个 prop 用作其初始值:
props: ['initialCounter'],
data: function () {
  return {
    counter: this.initialCounter
  }
}

#这个 prop 以一种原始的值传入且需要进行转换。在这种情况下,最好使用这个 prop 的值来定义一个计算属性:
props: ['size'],
computed: {
  normalizedSize: function () {
    return this.size.trim().toLowerCase()
  }
}
注意:在 JavaScript 中对象和数组是通过引用传入的,所以对于一个数组或对象类型的 prop 来说,在子组件中改变变更这个对象或数组本身将会影响到父组件的状态。
1.7 自定义事件监听:实现子向父传值
自定义事件:click dblclick blur focus aaa bbb ccc ddd 自已起事件名字
自定义函数:function(){}
1、父组件将值传递给子组件,叫做正向传值,子组件将值传递给父组件,叫做逆向传值;需要借助 自定义事件
2、vue.js 中允许正向传值,所以正向传值不需要条件触发,是主动的;逆向传值,也是允许的,但是需要主动(手动)触发
使用:
#子组件中
this.$emit(‘event’,val);
//$emit:实例方法,用来触发事件监听
//参数
event:自定义事件名称
val:通过自定义事件传递的值(val为可选参数)
#子组件主动触发事件监听 (抛)
<button @click="go">向父组件传值</button>
methods:{
    go(){
        this.$emit('自定义事件名',事件传递的可选参数);
    }
}

#父组件中接收自定义事件监听 (接)
<component @自定义事件名='事件处理函数/fn'></component>
methods:{
    fn(v){
        v//自定义事件传递的值,会作为fn的参数来传递
    }
}
案例:接收来自子组件的数据。
-
先定义两个父子组件
<!DOCTYPE html> <html lang="en"> <head> <meta charset="UTF-8"> <meta http-equiv="X-UA-Compatible" content="IE=edge"> <meta name="viewport" content="width=device-width, initial-scale=1.0"> <title>Document</title> <script src="../js/vue.js"></script> </head> <body> <div id="app"> <father></father> </div> <template id="father"> <div> <h1>{{fmsg}}</h1> 接收来自子组件的数据:{{sonData}} <son ></son> </div> </template> <template id="son"> <div> <h3>{{smsg}}</h3> </div> </template> </body> <script> new Vue({ el:'#app', data:{}, components: { //父组件 father:{ template:'#father', data(){ return { fmsg:'父亲组件数据', sonData:'' } }, components:{ son:{ template:'#son', data(){ return { smsg:'儿子组件的数据' } } } } } } }) </script> </html> -
在子组件的模板中添加一个按钮触发给父组件传递数据的方法
<template id="son"> <div> <h3>{{smsg}}</h3> 在子组件中添加一个按钮触发给父组件传递数据的方法 <button @click="sonEvent">给父组件传值</button> </div> </template> -
在子组件中添加方法sonEvent
methods:{ //子组件上定义方法 sonEvent(){ //$emit专门用来监听 @aaa事件 此时的aaa就表示一种新的事件类型 是我们自己定义的事件 //从这里把我们自己定义的事件传递到父组件,再由父组件调用这个事件。就可以接收到子组件传递去的参数 this.$emit('aaa', this.smsg) } } -
在父组件调用子组件的位置添加监听事件
<template id="father"> <div> <h1>{{fmsg}}</h1> 接收来自子组件的数据:{{sonData}} <!-- 在父组件调用子组件的位置 添加@事件名 此处的事件名是子组件中定义好的名字 --> <son @aaa="fatherEvent"></son> </div> </template> -
在父组件中定义方法 fatherEvent
 methods:{
     //次数的val就是子组件中的$emit实例方法传递来的数据
 	fatherEvent(val){
 		console.log(val);
 		//把子组件传递来的数据 赋值给父组件的属性
 		this.sonData = val;
 	}
 }
这样一来,我们以后就可以在父组件中来使用子组件传递来的数据了。
小结: 子向父传递数据
- 先在子组件中定义函数,函数中定义代码 this.$emit(‘自定义事件名’ ,要传递的数据);
- 在父组件中 调用子组件 < son @自定义事件名 = ‘fn’> fn函数中的参数就是 传递来的数据。
二、总结与作业
-
总结今日知识点 今日课堂案例 5遍以上。
-
分页器
一般常用在后台管理系统。

<!doctype html>
<html lang="en">
<head>
<script src="../js/vue.js" type="text/javascript" charset="utf-8"></script>
<title>vue分页</title>
<style type="text/css">
ul {
list-style: none;
margin: 0;
}
.pagetation_info {
width: 100%;
height: 24px;
padding: 20px 0;
}
ul.pagetation_box {
float: right;
height: 100%;
padding: 0 60px;
}
ul.pagetation_box li {
float: left;
height: 100%;
border: 1px solid #e6ecef;
background-color: #f8f8f8;
margin: 0 5px;
padding: 0 10px;
color: #263238;
cursor: pointer;
text-align: center;
line-height: 22px;
}
ul.pagetation_box li a {
text-decoration: none;
color: #263238;
font-size: 12px;
}
ul.pagetation_box li.active {
background-color: #FF4646;
border-color: #FF4646;
}
ul.pagetation_box li.active a {
color: #fff;
}
ul.pagetation_box li.prev,
ul.pagetation_box li.next {
width: 7px;
}
ul.pagetation_box li:hover {
background-color: #FF4646;
border-color: #FF4646;
}
ul.pagetation_box li:hover a {
color: #fff;
}
ul.pagetation_box li.more {
width: 24px;
padding: 0;
background: url(../img/public/page_more.png) no-repeat center center;
border: none;
}
.num_total {
float: right;
height: 100%;
line-height: 22px;
padding-top: 3px;
padding-bottom: 3px;
}
.num_total>span {
color: #FC5B27;
}
</style>
</head>
<body id="">
<div id="app-body">
<div class="pagetation_info clearfix">
<ul class="pagetation_box">
<li class="firstPage" @click="page.currentPage=1"><a href="javascript:;">首页</a></li>
<li class="prev" v-show="page.currentPage != 1"
@click="page.currentPage-- && _gotoPage(page.currentPage)"><a href="javascript:;"><</a></li>
<li v-for="item in pages" @click="_gotoPage(item)" :class="{'active':page.currentPage == item}">
<a href="javascript:;">{{item}}</a></li>
<li class="next" v-show="page.allPages != page.currentPage && page.allPages != 0 "
@click="page.currentPage++ && _gotoPage(page.currentPage)"><a href="javascript:;">></a></li>
<li class="lastPage" @click="page.currentPage=page.allPages"><a href="javascript:;">尾页</a></li>
</ul>
<div class="num_total">
共 <span>{{page.allRecords}}</span> 条信息,共 <span>{{page.allPages}}</span> 页
</div>
</div>
</div>
<script>
new Vue({
el: "#app-body",
data: {
//定义页码对象
page: {
//当前页
"currentPage": 1,
//每页的条数
"pagesize": 10,
//总数据条数
"allRecords": 150,
//总页码
"allPages": 15,
//展示的所有页码数
"showItem": 5,
}
},
computed: {
//通过计算属性计算 中间显示的页码数
pages() {
//var _this = this;
//定义一个空数组 用来存储页面中需要显示的页码数
var p = [];
//如果当前页码数 小于 展示的页码数
if (this.page.currentPage <= this.page.showItem) {
//就从 当前选中的页码数 和当前所有的页码数 取出较小的值
var i = Math.min(this.page.showItem, this.page.allPages);
//将得到的较小的数据做循环 得到一个页码组成的数组
while (i>0) {
p.unshift(i--);
}
} else {//如果当前页码数 > 显示的页码数
//取中间数 使用当前页 - 选中页/2
var middle =this.page.currentPage - Math.floor(this.page.showItem / 2);
//把当前展示的页码的总数赋值给 i
let i = this.page.showItem;
console.log(middle, i);
//如果页码的中间数 大于 页码总数-展示的页码数
//相当于剩余 最终的两页的时候 页码的数组就不再发生变化了
if (middle > (this.page.allPages - this.page.showItem)) {
//中间数 = 页码总数-展示页码数+1
middle = (this.page.allPages - this.page.showItem) + 1
}
while (i-->0) {
p.push(middle++);
}
						//不取中间数的方法
						/* let i = this.page.currentPage;
						while(i> (this.page.currentPage - this.page.showItem)){
							p.unshift(i--)
						} */
					}
					return p;
				},
			},
			methods: {
				_gotoPage(i) {
					//var _this = this;
					if (i == this.page.currentPage) return;
					this.page.currentPage = i;
				},
			}
		});
	</script>

</body>
</html>
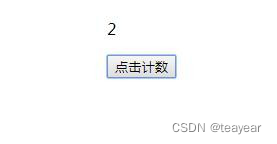
- 计数器-见作业 2的数据显示是父组件 点击计数按钮在子组件中。

le = (this.page.allPages - this.page.showItem) + 1
}
while (i–>0) {
p.push(middle++);
}
//不取中间数的方法
/* let i = this.page.currentPage;
while(i> (this.page.currentPage - this.page.showItem)){
p.unshift(i--)
} */
}
return p;
},
},
methods: {
_gotoPage(i) {
//var _this = this;
if (i == this.page.currentPage) return;
this.page.currentPage = i;
},
}
});
</script>
</body>
3. 计数器-见作业 2的数据显示是父组件 点击计数按钮在子组件中。
最后
以上就是踏实白昼最近收集整理的关于vue3.0快速上手教程之vue--组件02第六章:组件高级的全部内容,更多相关vue3内容请搜索靠谱客的其他文章。


![oracle数据库触发器怎么查询后插入,[求助][Oracle][ORA-00604][ORA-02067]触发器被触发时向远程数据库插入数据...](https://www.shuijiaxian.com/files_image/reation/bcimg4.png)

发表评论 取消回复