sensor直接连接到应用处理器,并有linuxkernel管理。本文涉及到kernel驱动,sensor HAL以及SensorService。
sensor架构
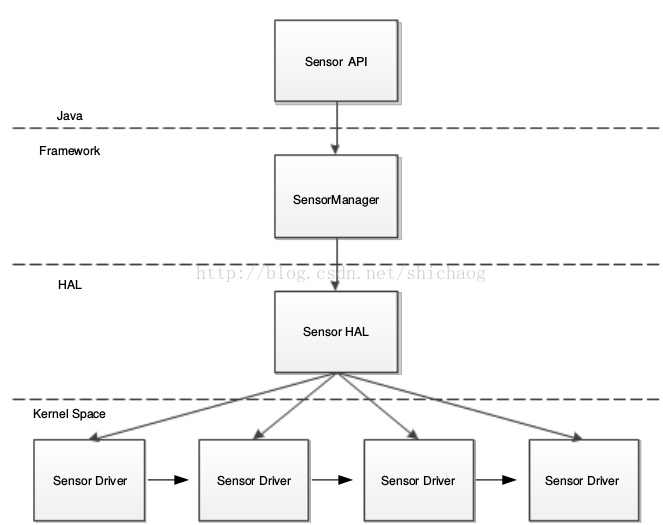
安卓提供Sensor API和SensorManager,然而没有提供Sensor HAL和sensor驱动。
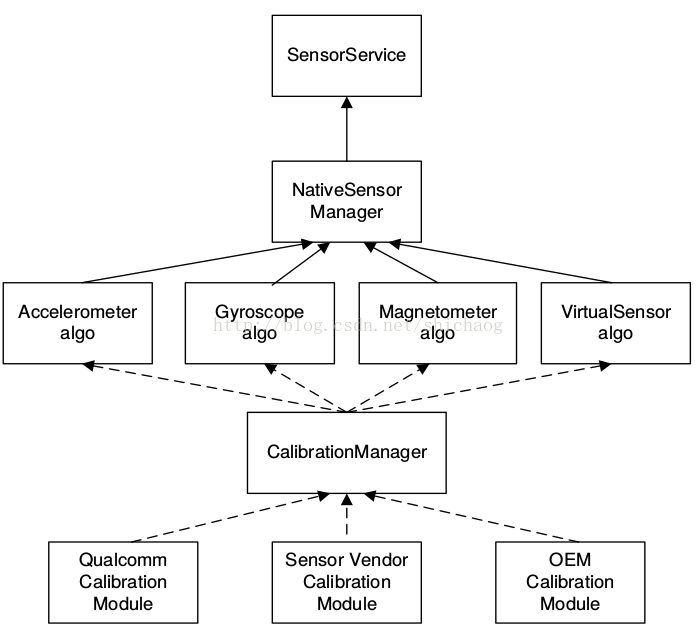
电源管理和管脚功能设置在设备树中应当设置好,Sensor类用于支持一些新特性。增加了一些sensor新特性,如:NativeSensorManager,,CalibrationManager,虚拟传感器支持,
传感器驱动
内核sensor驱动,包括电源,pin脚,传感器类,通常传感器驱动位于drivers/input/misc/。
传感器的电源
设备树配置
传感器芯片的驱动由sensor的probe驱动设置,mmc3416xpj的配置驱动如下:
memsic@30 { /* Magnetic field sensor */
compatible = "memsic,mmc3416x";
reg = <0x30>;
vdd-supply = <&pm8916_l17>;
vio-supply = <&pm8916_l6>;
memsic,dir = "obverse-x-axis-forward";
memsic,auto-report;
};vio-supply:IO和I2C需要的数字电源,pm8916_l6是电源管理器
arch/arm/boot/dts/qcom/xxxx-regulator.dtsikernel/Documentation/bindings/input/misc/ .regulator
在操作sensor chip之前需要初始化该芯片,regulator_get,regualator_count_voltages,regulator_set_voltages , regulator_enable ,以及regulator_disable。
管脚控制
设备树配置
akm@c {
compatible = "ak,ak09911";
reg = <0x0c>;
pinctrl-names = "default","sleep";
pinctrl-0 = <&akm_default>;
pinctrl-1 = <&akm_sleep>;
vdd-supply = <&pm8916_l17>;
vio-supply = <&pm8916_l6>;
akm,layout = <0x3>;
akm,gpio_rstn = <&msm_gpio 36 0x0>;
akm,auto-report;
};
akm_reset_pin {
qcom,pins = <&gp 36>;
qcom,pin-func = <0>;
qcom,num-grp-pins = <1>;
label = "akm_reset_pin";
akm_default: akm_default {
drive-strength = <6>;
bias-pull-up;
};
akm_sleep: akm_sleep {
drive-strength = <2>;
bias-pull-down;
};
};
pinctrl初始化
在probe是被调用。
pinctrl_get()--获得设备的pinctrl
pinctrl_lookup_state()--获取管脚状态
pinctrl_select_state()--设置硬件管脚状态
可以参考drivers/input/misc/akm09911.c提供的pin脚相关详细信息。
Sensor 类支持
这个是sensor类框架如下:
为了支持这一通用架构,需要按增加一些callback支持。
1.添加头文件
#include <linux/sensors.h>static struct sensors_classdev sensors_cdev;
struct sensor_data {
... ...
struct sensors_classdev cdev;
}sensors_classdev_register(&client->dev, &sensor_data->cdev);4.在注册设备之前填充结构体相关字段
.name = "kxtj9-accel",
.vendor = "Kionix",
.version = 1,
.handle = 0,
.type = 1,
.max_range = "19.6",
.resolution = "0.01",
.sensor_power = "0.2",
.min_delay = 2000,
.fifo_reserved_event_count = 0,
.fifo_max_event_count = 0,
.enabled = 0
.delay_msec = 200,
.sensors_enable = NULL,
.sensors_poll_delay = NULL,
}data->cdev.sensors_enable = sensor_enable_set;
data->cdev.sensors_poll_delay = sensor_poll_delay_set;推荐使用cdev name注册到sensor类。
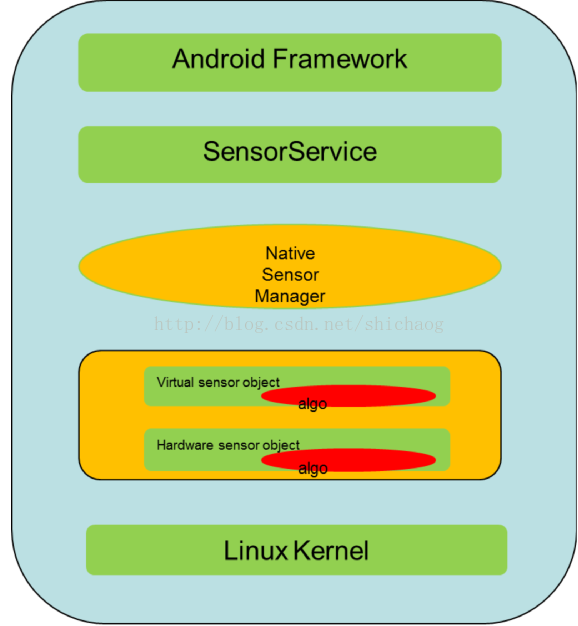
Native sensor HAL
其定义于
hardware/libhardware/include/hardware/sensors.hCalibrationManager
数据结构
CalibrationManager加载第三方校正库,calibration 模块数据被用于HAL和第三方库,定义于:
hardware/qcom/sensors/CalibrationModule.hstruct sensor_cal_algo_t;
struct sensor_cal_module_t;
struct sensor_algo_args {
int enable;
int delay_ms;
struct sensor_t sensor;
int (*store_calibrate_params)(struct sensor_t *sensor, struct
sensors_event_t *bias);
};
struct compass_algo_args {
struct sensor_algo_args common;
uint32_t reserved[16];
};
struct gyro_algo_args {
struct sensor_algo_args common;
float bias[3];
};
struct sensor_algo_methods_t {
  int (*convert)(sensors_event_t *raw, sensors_event_t *result,
  struct sensor_algo_args *args);
  /* Note that the config callback is called from a different
  thread as convert */
  int (*config)(int cmd, struct sensor_algo_args *args);
};
struct sensor_cal_methods_t {
int (*init)(const struct sensor_cal_module_t* module, struct
sensor_algo_args *args);
void (*deinit)();
/* Return 0 on success */
int (*get_algo_list)(const struct sensor_cal_algo_t **algo);
};
struct sensor_cal_algo_t {
/* Tag of the algo */
int tag;
/* Version of the algo */
int version;
/* Type of sensor this algo supported*/
int type;
/* The compatible sensors */
const char **compatible;
/* Sensor calibration module */
struct sensor_cal_module_t *module;
/* Sensor algo methods */
struct sensor_algo_methods_t *methods;
};
struct sensor_cal_module_t {
/* Tag of the module */
uint32_t tag;
/* Id of the module */
char *id;
/* Version of the calibration module */
uint32_t version;
/* Vendor of the calibration lib */
char *vendor;
/* Point to the handle of this module */
void *dso;
/* Number of algos */
uint32_t number;
/* Callbacks of the calibration lib provided */
struct sensor_cal_methods_t *methods;
/* The compatible sensors list for this library */
int reserved[6];
};
struct sensor_algo_methods_t {
int (*convert)(sensors_event_t *raw, sensors_event_t *result,
struct sensor_algo_args *args);
/* Note that the config callback is called from a different
thread as convert */
int (*config)(int cmd, struct sensor_algo_args *args);
};校正库
校正库可以放在安卓代码库的任何地方,校正库应当被编译成一个共享库,该库位于system/vendor/lib,Sensor HAL使用兼容表选择校正算法,所以兼容表必须被正确设置,
hardware/qcom/sensors/algo/common/common_wrapper.cNativeSensorManager
NativeSensorManager的源代码位于hardware/qcom/sensors/;
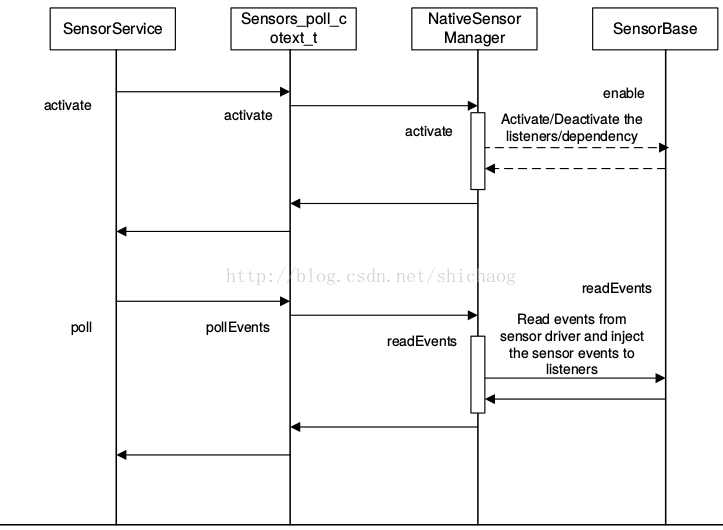
图:call和poll流程
NativeSensorManager初始化
NativeSensorManager也许会在open_sensors之前被调用。
初始化过程如下:
1.扫描/dev/input目录,并获得传感器的路径名和设备名
2.通过/sys/class/sensors获得sensor list。
3.将sensor list和设备节点路径相关联
4.初始化硬件驱动(sensorBase 子类)
5.初始化虚拟sensor
命令和数据流管理
NativeSensorManager接收所有的命令和数据。
虚拟设备管理
NativeSensorManager管理,支持的设备是Orientation, Linear Acceleration, Gravity, Rotation Vector, Pseudo Gyroscope, and Uncalibrated Magnetic Field。
最后
以上就是甜美棉花糖最近收集整理的关于android sensor移植的全部内容,更多相关android内容请搜索靠谱客的其他文章。


发表评论 取消回复