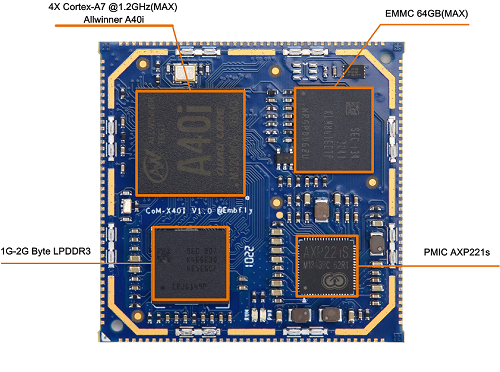
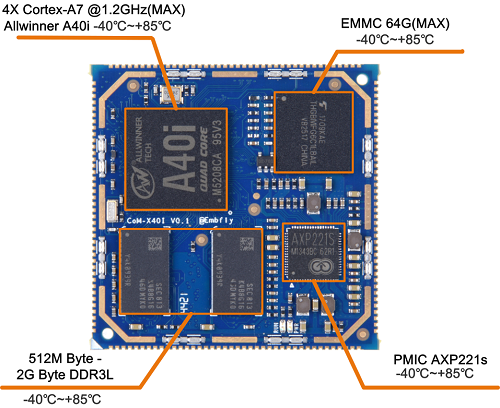
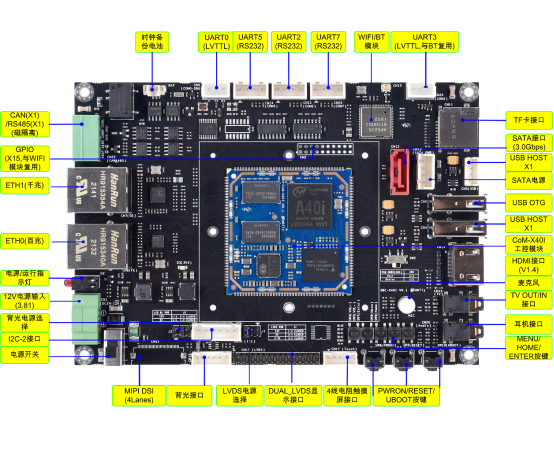
以下技术在盈鹏飞嵌入式的A40I/T3核心板(CoM-X40I)和主控板(SBC-X40I)上经过验证,欢迎 交流! CoM-X40I核心板和SBC-X40I主板见下图:


1. 前言
因为需要适配4G模块,这里总结下整个调试过程;
2. linux部分
linux 部分主要是硬件识别,当拿到模块后,插入板子上,打印如下:
-
[
185.120132] usb
3-
1:
new high-speed USB device number
2
using xhci-hcd
-
[
185.141610] usb
3-
1:
New USB device found, idVendor=
12d1, idProduct=
15c1
-
[
185.149447] usb
3-
1:
New USB device strings: Mfr=
1, Product=
2, SerialNumber=
3
-
[
185.157830] usb
3-
1: Product: HUAWEI Mobile V7R11
-
[
185.164667] usb
3-
1: Manufacturer: Huawei Technologies Co., Ltd.
-
[
185.171450] usb
3-
1: SerialNumber:
0123456789ABCDEF
-
[
185.251621] cdc_ether
3-
1:
2.0 usb0: register
'cdc_ether' at usb-xhci-hcd.0.auto-1, CDC Ethernet Device, 02:1e:10:1f:00:00
-
[
185.271723]
option
3-
1:
2.2: GSM modem (
1-port) converter detected
-
[
185.286827] usb
3-
1: GSM modem (
1-port) converter now attached
to ttyUSB0
-
[
185.295963]
option
3-
1:
2.3: GSM modem (
1-port) converter detected
-
[
185.304478] usb
3-
1: GSM modem (
1-port) converter now attached
to ttyUSB1
-
[
185.313672]
option
3-
1:
2.4: GSM modem (
1-port) converter detected
-
[
185.320886] CPU1: Booted secondary processor
-
[
185.320886] CPU1: update cpu_power
1024
-
[
185.332151] usb
3-
1: GSM modem (
1-port) converter now attached
to ttyUSB2
-
[
185.341133]
option
3-
1:
2.5: GSM modem (
1-port) converter detected
-
[
185.350048] usb
3-
1: GSM modem (
1-port) converter now attached
to ttyUSB3
-
[
185.358760]
option
3-
1:
2.6: GSM modem (
1-port) converter detected
-
[
185.367116] usb
3-
1: GSM modem (
1-port) converter now attached
to ttyUSB4
从打印可以看出如下信息: (1)USB串口驱动正常工作,设备加载正常。 (2)CDC ECM驱动正常工作。 (3)一共生成了5个虚拟的串口。
3. android部分
3.1 RIL库的移植
在init.rc中添加服务如下:service ril-daemon /system/bin/rild -l libhuawei-ril.so
其中rild源码在/hardware/ril/rild/目录下, 然后将libhuawei-ril.so放到system/lib/目录中,在device/softwinner/common/目录下,新建文件夹LTE/,在该目录中添加文件firmware-LTE.mk, 然后将libhuawei-ril.so文件放入该目录,在firmware-LTE.mk中添加内容如下:

修改device/softwinner/petrel-p1,添加内容如下:

3.2 修改使用的USB或者PCM端口的权限
device/softwinner/petrel-p1目录中,添加如下内容:

3.3 手动测试模组拨号过程
(1)这时候可以借用SDK中PPP源码(对应目录为external/ppp)编译出来的pppoe可执行程序。 首先将部分linux-ppp-script中的相关文件拷贝到SDK中的对应目录,如下:

(2)同时,需要修改huawei-ppp-on脚本,内容如下:
-
#!/bin/sh
-
#
-
# Script to initiate a ppp connection. This is the first part of the
-
# pair of scripts. This is not a secure pair of scripts as the codes
-
# are visible with the 'ps' command. However, it is simple.
-
# Modify: fangxiaozhi <huananhu@huawei.com>
-
programName=
${0##*/}
-
# These are the parameters. Change as needed.
-
#DEVICE=/dev/usb/tts/0
-
#DEVICE=/dev/ttyACM0 #The modem file name of the data card
-
DEVICE=/dev/ttyUSB0
#The modem file name of the data card
-
TELEPHONE=*99
# # The telephone number for the connection, by default, it will be *99#
-
ACCOUNT=
""
# The account name for logon, by default, it will be null
-
PASSWORD=
""
# The password for this account, by default, it will be null
-
AUTH=
""
# Authentic protocol,byi default, it will be null
-
APN=1234
-
STR_USER=
"user "card""
-
STR_PASSWD=
"password "card""
-
-
show_usage(){
-
echo
"usage:"
-
echo
" $programName [--usr=username] [--pwd=password] [--pn=phonenumber][--apn=apn][--auth=authentic protocol]"
-
echo
" [--local_ip=local_ip] [--remote_ip=remote_ip] [--usepeernds=usepeernds]"
-
echo
"username: The account name get from your ISP, by default, it will be null"
-
echo
"password: The password for your account, by default, it will be null"
-
echo
"phonenumber: The phone number for dialing up, by default, it will be *99#"
-
echo
"apn: access point name"
-
echo
"auth: chap/pap. for example: --auth=chap"
-
exit 0
-
}
-
-
PID=`ps -ef | grep -v grep | grep
"huawei-dial" | grep
"pppd" | busybox awk
'{ print $2; exit }'`
-
-
if
test
$PID;
then
-
echo
"PPP link is active"
-
exit 1
-
fi
-
-
if [
$# -eq 1 -a
"$1" =
"--help" ]
-
then
-
show_usage
-
fi
-
-
for i
in
"$@"
-
do
-
case
$i
in
-
--device=*)
-
echo
"--device*=$i"
-
DEVICE=
${i#--device=}
-
;;
-
--usr=*)
-
echo
"--usr*=$i"
-
ACCOUNT=
${i#--usr=}
-
;;
-
--
pwd=*)
-
echo
"--pwd*=$i"
-
PASSWORD=
${i#--pwd=}
-
;;
-
--pn=*)
-
echo
"--pn*$i"
-
TELEPHONE=
${i#--pn=}
-
;;
-
--apn=*)
-
echo
"--apn*=$i"
-
APN=
${i#--apn=}
-
;;
-
--auth=*)
-
echo
"--auth*=$i"
-
AUTH=
${i#--auth=}
-
if [
"$AUTH" =
"chap" ];
then
-
AUTH=-pap
-
fi
-
if [
"$AUTH" =
"pap" ];
then
-
AUTH=-chap
-
fi
-
;;
-
--local_ip=*)
-
echo
"--local_ip*=$i"
-
PAR_LOCAL=
${i#--local_ip=}
-
;;
-
--remote_ip=*)
-
echo
"--remote_ip*=$i"
-
PAR_REMOTE=
${i#--remote_ip=}
-
;;
-
--usepeernds=*)
-
echo
"--usepeernds*=$i"
-
PAR_USEERDNS=
${i#--usepeernds=}
-
;;
-
*)
-
echo
"*=$i"
-
esac
-
-
done
-
-
if [
"$PAR_LOCAL" =
"" ];
then
-
LOCAL_IP=0.0.0.0
-
else
-
LOCAL_IP=
$PAR_LOCAL
-
fi
-
-
if [
"$PAR_REMOTE" =
"" ];
then
-
REMOTE_IP=0.0.0.0
-
else
-
REMOTE_IP=
$PAR_REMOTE
-
fi
-
-
if [ !
"$PAR_USEERDNS" =
"" ];
then
-
USEPEERDNS=
''
-
for NAMESERVER
in `
echo
$PAR_USEERDNS | awk -F:
'{for (i=1;i<=NF;i++) print $i}'`
-
do
-
echo
"nameserver $NAMESERVER" >> /etc/ppp/resolv.conf
-
done
-
else
-
USEPEERDNS=
'usepeerdns'
-
fi
-
-
NETMASK=255.255.255.0
# The proper netmask if needed
-
-
#
-
# Export them so that they will be available at 'ppp-on-dialer' time.
-
export TELEPHONE APN ACCOUNT PASSWORD
-
#
-
# This is the location of the script which dials the phone and logs
-
# in. Please use the absolute file name as the $PATH variable is not
-
# used on the connect option. (To do so on a 'root' account would be
-
# a security hole so don't ask.)
-
#
-
# Initiate the connection
-
#
-
# I put most of the common options on this command. Please, don't
-
# forget the 'lock' option or some programs such as mgetty will not
-
# work. The asyncmap and escape will permit the PPP link to work with
-
# a telnet or rlogin connection. You are welcome to make any changes
-
# as desired. Don't use the 'defaultroute' option if you currently
-
# have a default route to an ethernet gateway.
-
#
-
-
if [ ! -d
"/data/ppp" ]
-
then
-
mkdir /data/ppp
-
fi
-
-
if [ -f
"/data/ppp/options" ]
-
then
-
echo
"" > /data/ppp/options
-
fi
-
-
if [ -f
"/data/ppp/pap-secrets" ]
-
then
-
chmod 700 /data/ppp/pap-secrets
-
fi
-
-
if [ -f
"/data/ppp/chap-secrets" ]
-
then
-
chmod 700 /data/ppp/chap-secrets
-
fi
-
-
if [ !
"$ACCOUNT" =
"" ]
-
then
-
echo
"$ACCOUNT * $PASSWORD *" > /data/ppp/pap-secrets
-
echo
"$ACCOUNT * $PASSWORD *" > /data/ppp/chap-secrets
-
STR_USER=
"user "$ACCOUNT""
-
STR_PASSWD=
"password "$PASSWORD""
-
else
-
echo
"* * * *" > /data/ppp/pap-secrets
-
echo
"* * * *" > /data/ppp/chap-secrets
-
fi
-
-
chmod 400 /data/ppp/pap-secrets
-
chmod 400 /data/ppp/chap-secrets
-
-
if [
"$TELEPHONE" =
"*99#" ];
then
-
echo
" ABORT "NO CARRIER"
-
ABORT "NO DIALTONE"
-
ABORT "ERROR"
-
ABORT "NO ANSWER"
-
ABORT "BUSY"
-
ABORT "Username/Password Incorrect"
-
"" AT
-
"OK-+++c-OK" ATH0
-
OK AT+CGDCONT=1,"IP","$APN"
-
OK ATDT$TELEPHONE
-
CONNECT ""
-
" > /data/ppp/huawei-chat
-
fi
-
-
if [
"$TELEPHONE" =
"#777" ];
then
-
-
echo -e
"at^pppcfg="$ACCOUNT","$PASSWORD"rn" >
$DEVICE
-
echo
" ABORT "NO CARRIER"
-
ABORT "NO DIALTONE"
-
ABORT "ERROR"
-
ABORT "NO ANSWER"
-
ABORT "BUSY"
-
TIMEOUT 120
-
ABORT "Username/Password Incorrect"
-
"" AT
-
OK ATDT#777
-
CONNECT ""
-
" > /data/ppp/huawei-chat
-
fi
-
-
if [ ! -d
"/data/ppp/peers" ]
-
then
-
mkdir /data/ppp/peers
-
fi
-
-
echo
"$DEVICE
-
115200
-
crtscts
-
modem
-
debug
-
nodetach
-
usepeerdns
-
noipdefault
-
defaultroute
-
$LOCAL_IP:$REMOTE_IP
-
$STR_USER
-
$STR_PASSWD
-
noauth
-
$AUTH
-
-mschap
-
-mschap-v2
-
ipcp-accept-local
-
ipcp-accept-remote
-
connect '/system/bin/chat -s -v -f /data/ppp/huawei-chat'
-
" > /data/ppp/peers/huawei-dial
-
-
#/bin/cp ./ip-up /etc/ppp/ip-up
-
#/bin/cp ./ip-down /etc/ppp/ip-down
-
-
exec /system/bin/pppoe call huawei-dial&
-
-
exit 0
(3)需要修改external/pppd/pathname.h文件
-
#define _PATH_PEERFILES _ROOT_PATH "/etc/ppp/peers/"
-
改成
-
#define _PATH_PEERFILES _ROOT_PATH "/data/ppp/peers/"
4. 修改ip-up脚本
-
#!/system/bin/sh
-
-
PPPD_PID_FILE=/data/system/
${PHYINTERFACE}_pppd.pid
-
-
case
$1
in
-
ppp[1-9])
-
/android/bin/iptables --flush;
-
/android/bin/iptables --table nat --flush;
-
/android/bin/iptables --delete-chain;
-
/android/bin/iptables --table nat --append POSTROUTING --out-interface ppp0 -j MASQUERADE;
-
/android/bin/iptables --append FORWARD --in-interface
$1 -j ACCEPT;
-
echo 0 > /proc/sys/net/ipv4/ip_forward;
-
echo 1 > /proc/sys/net/ipv4/ip_forward;
-
;;
-
ppp0)
-
/system/bin/setprop
"net.interfaces.defaultroute"
"gprs";
-
;;
-
esac
-
-
#just for debug ...............shuge@allwinnertech.com
-
#/system/bin/log -t aw-pppoe "0: $0"
-
#/system/bin/log -t aw-pppoe "1: $1"
-
#/system/bin/log -t aw-pppoe "2: $2"
-
#/system/bin/log -t aw-pppoe "3: $3"
-
#/system/bin/log -t aw-pppoe "4: $4"
-
#/system/bin/log -t aw-pppoe "5: $5"
-
#/system/bin/log -t aw-pppoe "6: $6"
-
#
-
#/system/bin/log -t aw-pppoe "LINKNAME: $LINKNAME"
-
#/system/bin/log -t aw-pppoe "IFNAME: $IFNAME"
-
#/system/bin/log -t aw-pppoe "DEVICE: $DEVICE"
-
#/system/bin/log -t aw-pppoe "PPPLOGNAME: $PPPLOGNAME"
-
#/system/bin/log -t aw-pppoe "PPPD_PID: $PPPD_PID"
-
#/system/bin/log -t aw-pppoe "PEERNAME: $PEERNAME"
-
#/system/bin/log -t aw-pppoe "SPEED: $SPEED"
-
#/system/bin/log -t aw-pppoe "USEPEERDNS: $USEPEERDNS"
-
#/system/bin/log -t aw-pppoe "LINKINTERFACE: $LINKINTERFACE"
-
-
# Use interface name if linkname is not available
-
NAME=
"$PHYINTERFACE-"
$1
""
-
-
/system/bin/setprop
"net.$NAME.dns1"
"$DNS1"
-
/system/bin/setprop
"net.$NAME.dns2"
"$DNS2"
-
/system/bin/setprop
"net.$NAME.local-ip"
"$IPLOCAL"
-
/system/bin/setprop
"net.$NAME.remote-ip"
"$IPREMOTE"
-
/system/bin/setprop
"net.${PHYINTERFACE}-pppoe.phyif"
"$1"
-
/system/bin/setprop
"net.${PHYINTERFACE}-pppoe.status"
"started"
5. 运行huawei-ppp-on脚本
sh ./huawei-ppp-on --user=card --pwd=card --pn=*99# --auth=chap --apn=1234 正常情况下打印为:
-
-
er
=card
--pwd=card --pn=*99# --auth=chap --apn=1234 <
-
*
=
--user=card
-
--pwd*=--pwd=card
-
--pn*--pn=*99#
-
--auth*=--auth=chap
-
--apn*=--apn=1234
-
root
@petrel
-p1:
/
system
/etc
/ppp # abort
on (
NO CARRIER)
-
abort
on (
NO DIALTONE)
-
abort
on (ERROR)
-
abort
on (
NO ANSWER)
-
abort
on (BUSY)
-
abort
on (Username
/Password Incorrect)
-
send (
AT
^M)
-
expect (OK)
-
AT
^M
^M
-
OK
-
-- got it
-
send (ATH0
^M)
-
expect (OK)
-
^M
-
ATH0
^M
^M
-
OK
-
-- got it
-
-
send (
AT
+CGDCONT
=
1,"IP","1234"
^M)
-
expect (OK)
-
^M
-
AT
+CGDCONT
=
1,"IP","1234"
-
OK
-
-- got it
-
-
send (ATDT
*
99#
^M)
-
expect (
CONNECT)
-
-
ATDT
*
99#
^M
^M
-
CONNECT
-
-- got it
-
send
6. 查看虚拟网卡
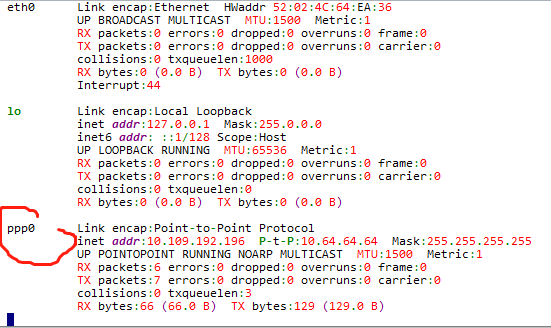
执行命令busybox ifconfig,可以看到生成了ppp0网口,如下:

但是此时是无法连接互联网的,因为没有配置dns
7. 查看dns
首先看下通过pppoe报文交互获得dns是什么,利用命令获取如下:getprop | grep dns
-
[
net.-ppp0.dns1]: [
211.136
.20
.203]
-
[
net.-ppp0.dns2]: [
211.136
.17
.107]
8. 配置dsn
-
root@petrel-p1:
/system/etc/ppp
# setprop net.dns1 211.136.20.203
-
root@petrel-p1:
/system/etc/ppp
# setprop net.dns2 211.136.17.107
-
root@petrel-p1:
/system/etc/ppp
# ndc resolver setifdns ppp0 "" 211.136.20.203
-
200
0 Resolver command succeeded
-
root@petrel-p1:
/system/etc/ppp
# ndc resolver setdefaultif ppp0
9. ping百度
ping www.baidu.com
-
PING www.a.shifen.com (
183.232
.231
.173)
56(
84)
bytes of data.
-
64
bytes
from
183.232
.231
.173: icmp_seq=
1 ttl=
55 time=
49.2 ms
-
64
bytes
from
183.232
.231
.173: icmp_seq=
2 ttl=
55 time=
31.4 ms
-
64
bytes
from
183.232
.231
.173: icmp_seq=
3 ttl=
55 time=
30.6 ms
-
64
bytes
from
183.232
.231
.173: icmp_seq=
4 ttl=
55 time=
29.7 ms
-
64
bytes
from
183.232
.231
.173: icmp_seq=
5 ttl=
55 time=
25.6 ms
-
64
bytes
from
183.232
.231
.173: icmp_seq=
6 ttl=
55 time=
32.8 ms
-
64
bytes
from
183.232
.231
.173: icmp_seq=
7 ttl=
55 time=
32.6 ms
-
64
bytes
from
183.232
.231
.173: icmp_seq=
8 ttl=
55 time=
28.5 ms
-
64
bytes
from
183.232
.231
.173: icmp_seq=
9 ttl=
55 time=
27.5 ms
-
64
bytes
from
183.232
.231
.173: icmp_seq=
10 ttl=
55 time=
33.8 ms
-
64
bytes
from
183.232
.231
.173: icmp_seq=
11 ttl=
55 time=
32.2 ms
-
64
bytes
from
183.232
.231
.173: icmp_seq=
12 ttl=
55 time=
31.3 ms
-
64
bytes
from
183.232
.231
.173: icmp_seq=
13 ttl=
55 time=
27.2 ms
-
64
bytes
from
183.232
.231
.173: icmp_seq=
14 ttl=
55 time=
33.6 ms
-
64
bytes
from
183.232
.231
.173: icmp_seq=
15 ttl=
55 time=
29.4 ms
-
64
bytes
from
183.232
.231
.173: icmp_seq=
16 ttl=
55 time=
31.2 ms
-
64
bytes
from
183.232
.231
.173: icmp_seq=
17 ttl=
55 time=
28.7 ms
-
64
bytes
from
183.232
.231
.173: icmp_seq=
18 ttl=
55 time=
33.5 ms
-
64
bytes
from
183.232
.231
.173: icmp_seq=
19 ttl=
55 time=
32.4 ms
-
64
bytes
from
183.232
.231
.173: icmp_seq=
20 ttl=
55 time=
30.1 ms
-
64
bytes
from
183.232
.231
.173: icmp_seq=
21 ttl=
55 time=
26.7 ms
-
64
bytes
from
183.232
.231
.173: icmp_seq=
22 ttl=
55 time=
33.5 ms
-
64
bytes
from
183.232
.231
.173: icmp_seq=
23 ttl=
55 time=
33.5 ms
-
64
bytes
from
183.232
.231
.173: icmp_seq=
24 ttl=
55 time=
28.5 ms
-
64
bytes
from
183.232
.231
.173: icmp_seq=
25 ttl=
55 time=
30.8 ms
-
64
bytes
from
183.232
.231
.173: icmp_seq=
26 ttl=
55 time=
33.6 ms
-
64
bytes
from
183.232
.231
.173: icmp_seq=
27 ttl=
55 time=
31.8 ms
-
64
bytes
from
183.232
.231
.173: icmp_seq=
28 ttl=
55 time=
29.5 ms
-
64
bytes
from
183.232
.231
.173: icmp_seq=
29 ttl=
55 time=
33.6 ms
表明手动测试,可以连接网络了。
10. 通过init.rc进行拨号
device/softwinner/petrel-p1/init.rc中可以修改如下

串口中输入setprop persist.has_LTE 1,即可进行拨号。
最后
以上就是孝顺香水最近收集整理的关于全志平台华为4G模块开发调试记录1. 前言2. linux部分3. android部分4. 修改ip-up脚本5. 运行huawei-ppp-on脚本6. 查看虚拟网卡7. 查看dns8. 配置dsn9. ping百度10. 通过init.rc进行拨号的全部内容,更多相关全志平台华为4G模块开发调试记录1.内容请搜索靠谱客的其他文章。


发表评论 取消回复