本博客的目的是学习uboot中链表的使用
前提
因为uboot和内核中使用链表的方式基本一致,所以我们先学习uboot中链表是如何使用的。因为链表的大小是变化的,所以我们不能使用栈来存放,这里就需要使用堆内存。
堆内存的申请和使用
(1)链表的内存要求比较灵活,不能用栈,也不能用data数据段。只能用堆内存。
(2)使用堆内存来创建一个链表节点的步骤:
1、申请堆内存,大小为一个节点的大小(检查申请结果是否正确);
2、清理申请到的堆内存;
3、把申请到的堆内存当作一个新节点;
4、填充这个新节点的有效数据和指针区域。
使用思路
内核链表中自己实现了一个纯链表(纯链表就是没有数据区域,只有前后向指针)的封装,以及纯链表的各种操作函数(节点创建、插入、删除、遍历······)。这个纯链表本身自己没有任何用处,它的用法是给我们具体链表作为核心来调用。
几个重要的纯链表的理解
1. list_head
struct list_head {
	struct list_head *next, *prev;
};
构建一个结构体list_head里面包含两个元素,这两个元素next和prev是指向list_head类型的指针。这也构成了我们链表节点的前向指针和后向指针。
2. 节点的初始化
方法1 :LIST_HEAD_INIT(name)
#define LIST_HEAD_INIT(name) { &(name), &(name) }

#define LIST_HEAD(name)
	struct list_head name = LIST_HEAD_INIT(name)
方法2:INIT_LIST_HEAD(ptr)
#define INIT_LIST_HEAD(ptr) do {
	(ptr)->next = (ptr); (ptr)->prev = (ptr);
} while (0)
这两种方法都是让节点的前向指针和后向指针指向自己节点本身。这样生成的链表就是双向循环链表。
3.给链表添加新节点
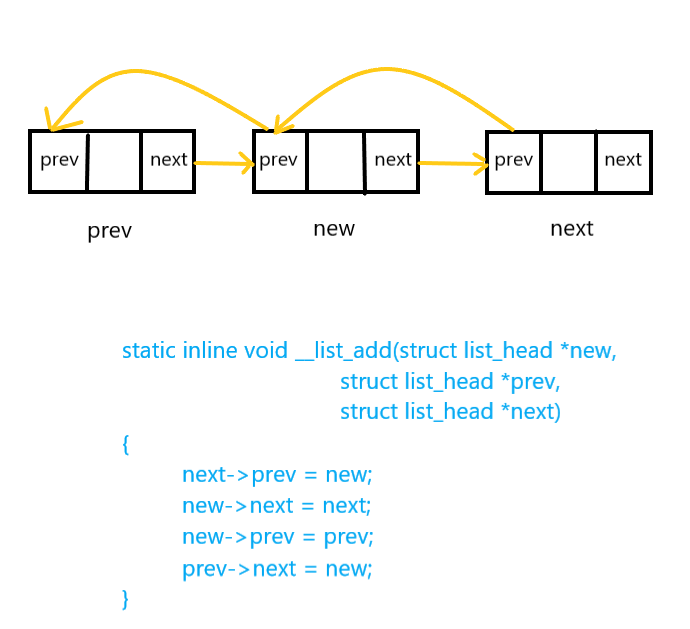
__list_add函数实现的功能是在节点prev和next中间添加新节点new,我们使用示意图来说明

static inline void __list_add(struct list_head *new,
			      struct list_head *prev,
			      struct list_head *next)
{
	next->prev = new;
	new->next = next;
	new->prev = prev;
	prev->next = new;
}
我们的头部插入和尾部插入也是通过调用__list_add这一个函数来实现的,唯一的区别就是插入的新节点new的位置不同。
我们以头结点head为界,头插入则将new放置在head和head->next之间
如果是尾插入,则将new放置在 head->prev和head之间(因为我们的head->prev就是双向循环链表的尾节点)
static inline void list_add(struct list_head *new, struct list_head *head)
{
	__list_add(new, head, head->next);
}

static inline void list_add_tail(struct list_head *new, struct list_head *head)
{
	__list_add(new, head->prev, head);
}
4. 删除节点
删除节点我们使用到的是list_del函数,我们的传参为要删除的节点指针entry
下来我们调用__list_del函数,这个函数的传参为待删除节点的前一个节点和后一个节点的地址,实现的功能就是删除了节点entry。
最后我们删除的节点指向NULL,目的是为了防止产生野指针。
static inline void __list_del(struct list_head *prev, struct list_head *next)
{
	next->prev = prev;
	prev->next = next;
}


static inline void list_del(struct list_head *entry)
{
	__list_del(entry->prev, entry->next);
	entry->next = (void *) 0;
	entry->prev = (void *) 0;
}
5. 节点的移动
我们有时需要将之前链表上的某个节点拿出来放置到其他的链表上
list_move是实现将拿出来的节点头插入到新的链表上。
list_move_tail是实现将新拿出来的节点尾插入到新的链表中。
static inline void list_move(struct list_head *list, struct list_head *head)
{
	__list_del(list->prev, list->next);
	list_add(list, head);
}

static inline void list_move_tail(struct list_head *list,
				  struct list_head *head)
{
	__list_del(list->prev, list->next);
	list_add_tail(list, head);
}
6.链表的拼接
链表的拼接函数list_splice,第一个参数表示我们要插入的新链表list,第二个参数表示我们要插入的位置在哪里。
函数执行过程,如果list为头节点,则不进行拼接,因为头节点没有数据,如果不是头节点则调用__list_splice函数进行拼接。
实现过程为先定义list_head 类型的结构体变量分别存放要插入链表的头节点和尾节点以及母链表插入位置的下一个节点。
然后挂载待插入链表的头节点(first)到到母链表的插入位置处(head)
最后将待插入链表的尾节点(last)和母链表插入位置的下一个节点(at)挂载
static inline void __list_splice(struct list_head *list,
				 struct list_head *head)
{
	struct list_head *first = list->next;
	struct list_head *last = list->prev;
	struct list_head *at = head->next;

	first->prev = head;
	head->next = first;

	last->next = at;
	at->prev = last;
}

static inline int list_empty(struct list_head *head)
{
	return head->next == head;
}

static inline void list_splice(struct list_head *list, struct list_head *head)
{
	if (!list_empty(list))
		__list_splice(list, head);
}
7. 根据链表成员member获取结构体类型type的指针
我们知道我们的链表是一个纯链表,那么在实际使用中是作为type类型结构体的成员存在的,也就是说链表是我们让多个type类型结构体联系起来的桥梁。
但是我们在实际使用中,不单单只是让其连接起来就好,我们有时会去获取特定的某一个type类型的结构体指针,并且这个时候我们只有结构体中成员member的地址,这个时候就需要list_entry了。
从一个结构的成员指针找到其容器的指针
参数说明
- list_entry -获取这个条目的结构体
- @ptr: struct list_head指针。
- @type:嵌入这个结构体的类型。
- @member:member为结构type中的一个域,类型为list_head。
#define list_entry(ptr, type, member)
	((type *)((char *)(ptr)-(unsigned long)(&((type *)0)->member)))
分析:((type *)0):把“0”强制转化为指针类型,则该指针一定指向“0”(数据段基址)
(&((type )0)->member) :表示member相对于结构体type的偏移量
(char)ptr:是为了计算字节偏移,ptr表示struct list_head指针
(char *)(ptr)-(unsigned long)(&((type *)0)->member) :ptr指向的member到该member所在结构体基地址的偏移字节数。二者一减便得出该结构体的地址
因为我们最开始的成员member的地址我们是知道的,所以我们得到其在结构体中的偏移量后直接相减,就得到了我们结构体的地址了。
8.链表的遍历
首先我们可以看到list_for_each是一个封装成宏定义的函数,支持传递两个参数,函数的功能实现是一个for循环
初始化部分为:pos = (head)->next, prefetch(pos->next),获取第一个节点到pos
条件判断:pos != (head) ,如果这个节点不等于头节点,说明还没遍历完,因为我们是双向循环链表,所以整个遍历结束可以使用head判断。
更新循环变量:pos = pos->next, prefetch(pos->next) ,指向下一个节点
循环体为空
static inline void prefetch(const void *x) {;}
#define list_for_each(pos, head)
	for (pos = (head)->next, prefetch(pos->next); pos != (head);
		pos = pos->next, prefetch(pos->next))
实际应用
我们以struct mmc 为例
第一步:内核中核心纯链表的实现在include/linux/list.h文件中,我们定义链表mmc时,直接包含该头文件,就可以对其进行调用了。
#include <linux/list.h>

//包含的纯链表
struct list_head {
	struct list_head *next, *prev;
};

//定义一个宏定义函数,使其的next和ptr指向自己
#define INIT_LIST_HEAD(ptr) do {
	(ptr)->next = (ptr); (ptr)->prev = (ptr);
} while (0)
第二步:定义我们的结构体类型mmc,我们可以看到调用了纯链表list_head,这里面包含了一个next指针,一个prev指针,都指向的是一个list_head类型的结构体。
mmc中其他的内容都是结构体mmc的“data”,包含了一个mmc设备所包含的各种信息,以及使用到的函数指针。
定义的struct mmc只是一个结构体,本身并没有变量生成,也不占用内存。结构体定义相当于为链表节点定义了一个模板,但是还没有一个节点,将来在实际创建链表时需要一个节点时用这个模板来复制一个即可。
struct mmc {
	struct list_head link;
	char name[32];
	void *priv;
	uint voltages;
	uint version;
	uint f_min;
	uint f_max;
	int high_capacity;
	uint bus_width;
	uint clock;
	uint card_caps;
	uint host_caps;
	uint ocr;
	uint scr[2];
	uint csd[4];
	uint cid[4];
	ushort rca;
	uint tran_speed;
	uint read_bl_len;
	uint write_bl_len;
	u32 capacity;
	struct mmc_ext_csd	ext_csd;	/* mmc v4 extended card specific */
	block_dev_desc_t block_dev;
	int (*send_cmd)(struct mmc *mmc,
			struct mmc_cmd *cmd, struct mmc_data *data);
	void (*set_ios)(struct mmc *mmc);
	int (*init)(struct mmc *mmc);
};

//我们的mmc中有包含这个结构体用来获取设备的描述信息
typedef struct block_dev_desc {
	int		if_type;	/* type of the interface */
	int		dev;		/* device number */
	unsigned char	part_type;	/* partition type */
	unsigned char	target;		/* target SCSI ID */
	unsigned char	lun;		/* target LUN */
	unsigned char	type;		/* device type */
	unsigned char	removable;	/* removable device */
#ifdef CONFIG_LBA48
	unsigned char	lba48;		/* device can use 48bit addr (ATA/ATAPI v7) */
#endif
	lbaint_t		lba;		/* number of blocks */
	unsigned long	blksz;		/* block size */
	char		vendor [40+1];	/* IDE model, SCSI Vendor */
	char		product[20+1];	/* IDE Serial no, SCSI product */
	char		revision[8+1];	/* firmware revision */
	unsigned long	(*block_read)(int dev,
				      unsigned long start,
				      lbaint_t blkcnt,
				      void *buffer);
	unsigned long	(*block_write)(int dev,
				       unsigned long start,
				       lbaint_t blkcnt,
				       const void *buffer);
	void		*priv;		/* driver private struct pointer */
}block_dev_desc_t;
第三步:定义结构体变量mmc并初始化
struct mmc *mmc;
	mmc = &mmc_channel[channel];
	sprintf(mmc->name, "S3C_HSMMC%d", channel);
	mmc->priv = &mmc_host[channel];
	mmc->send_cmd = s3c_hsmmc_send_command;
	mmc->set_ios = s3c_hsmmc_set_ios;
	mmc->init = s3c_hsmmc_init;
	mmc->voltages = MMC_VDD_32_33 | MMC_VDD_33_34;
	mmc->host_caps = MMC_MODE_4BIT | MMC_MODE_HS_52MHz | MMC_MODE_HS;
	mmc->host_caps |= MMC_MODE_8BIT;
	mmc->f_min = 400000;
	mmc->f_max = 52000000;
第四步:这一步的目的是将我们定义的结构体mmc添加到mmc_devices链表中
//注册我们定义的mmc
return mmc_register(mmc);

int mmc_register(struct mmc *mmc)
{
	/* Setup the universal parts of the block interface just once */
	mmc->block_dev.if_type = IF_TYPE_MMC;
	mmc->block_dev.dev = cur_dev_num++;
	mmc->block_dev.removable = 1;
	mmc->block_dev.block_read = mmc_bread;
	mmc->block_dev.block_write = mmc_bwrite;

//创建一个链表节点,使其指向自己
	INIT_LIST_HEAD(&mmc->link);

//从尾部插入将这个节点挂到到mmc_devices链表上
	list_add_tail(&mmc->link, &mmc_devices);

	return 0;
}
第五步:我们用来判断相应设备号的mmc设备是否在mmc_devices中
//遍历mmc_devices这个链表
	list_for_each(entry, &mmc_devices) {
//获取成员为link的结构体mmc的指针
		m = list_entry(entry, struct mmc, link);
//判断编号为dev_num的mmc设备是否在链表中
		if (m->block_dev.dev == dev_num)
			return m;
	}
最后
以上就是执着心情最近收集整理的关于C语言学习之uboot中链表的使用的全部内容,更多相关C语言学习之uboot中链表内容请搜索靠谱客的其他文章。


发表评论 取消回复