知识图谱如火如荼,首先推荐在python下进行社交网络分析networkx
建立图网络
无向图
import networkx as nx
G = nx.Graph()                                        #建立一个空的无向图G
G.add_node(1)                                        #添加一个节点1
G.add_edge(2,3)                                     #添加一条边2-3(隐含着添加了两个节点2、3)
G.add_edge(3,2)                                     #对于无向图,边3-2与边2-3被认为是一条边
print (G.nodes())                                       #输出全部的节点: [1, 2, 3]
print (G.edges())                                       #输出全部的边:[(2, 3)]
print (G.number_of_edges()) #输出边的数量:1[1, 2, 3]
[(2, 3)]
1有向图
将G = nx.Graph() 改为 G = nx.DiGraph()即进行有向图,表示不同的边
import networkx as nx
G = nx.DiGraph()                                        #建立一个空的无向图G
G.add_node(1)                                        #添加一个节点1
G.add_edge(2,3)                                     #添加一条边2-3(隐含着添加了两个节点2、3)
G.add_edge(3,2)                                     #对于无向图,边3-2与边2-3被认为是一条边
print (G.nodes())                                       #输出全部的节点: [1, 2, 3]
print (G.edges())                                       #输出全部的边:[(2, 3), (3, 2)]
print (G.number_of_edges())                    #输出边的数量:

[1, 2, 3]
[(2, 3), (3, 2)]
2
同时,有向图和无向图是可以相互转化的,分别用到Graph.to_undirected() 和 Graph.to_directed()两个方法。
带权图
有向图和无向图都可以给边赋予权重,用到的方法是add_weighted_edges_from,它接受1个或多个三元组[u,v,w]作为参数,其中u是起点,v是终点,w是权重。例如:
G.add_weighted_edges_from([(0,1,3.0),(1,2,7.5)])添加0-1和1-2两条边,权重分别是3.0和7.5。
如果想读取权重,可以使用get_edge_data方法,它接受两个参数u和v,即边的起讫点。例如:
import networkx as nx
G = nx.DiGraph()
G.add_node(1)
G.add_edge(2,3)
G.add_edge(3,2)
G.add_weighted_edges_from([(0,1,3.0),(1,2,7.5)])
print (G.nodes())
print (G.edges())
print (G.number_of_edges())

print (G.get_edge_data(1,2))
[1, 2, 3, 0]
[(1, 2), (2, 3), (3, 2), (0, 1)]
4
{‘weight’: 7.5}
NetworkX提供了常用的图论经典算法,例如DFS、BFS、最短路、最小生成树、最大流等等
#调用多源最短路径算法,计算图G所有节点间的最短路径
path=dict(nx.all_pairs_shortest_path(G))
print (path[0][2])
[0, 1, 2]
一个完整官方小案例
 import networkx as nx
 G = nx.Graph()
G.add_edge('A', 'B', weight=4)
 G.add_edge('B', 'D', weight=2)
 G.add_edge('A', 'C', weight=3)
 G.add_edge('C', 'D', weight=4)
nx.shortest_path(G, 'A', 'D', weight='weight')
[‘A’, ‘B’, ‘D’]
图数据的保存与绘图
import networkx as nx
import matplotlib.pyplot as plt
G = nx.DiGraph()
G.add_node(1)
G.add_edge(2,3)
G.add_edge(3,2)
nx.write_edgelist(G, path="grid.edgelist", delimiter=":")
# write edgelist to grid.edgelist
nx.write_edgelist(G, path="grid.edgelist", delimiter=":")
# read edgelist from grid.edgelist
H = nx.read_edgelist(path="grid.edgelist", delimiter=":")

nx.draw(H)
plt.show()
数据库基本统计
!usr/bin/env python
* coding:utf-8 *
import matplotlib.pyplot as plt
from networkx import nx
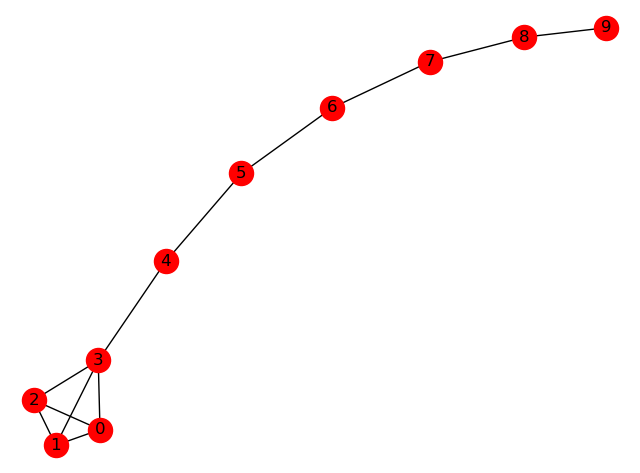
G = nx.lollipop_graph(4, 6)
pathlengths = []
print(“source vertex {target:length, }”)
for v in G.nodes():
spl = dict(nx.single_source_shortest_path_length(G, v))
print(‘{} {} ‘.format(v, spl))
for p in spl:
pathlengths.append(spl[p])
print(”)
print(“average shortest path length %s” % (sum(pathlengths) / len(pathlengths)))
histogram of path lengths
dist = {}
for p in pathlengths:
    if p in dist:
        dist[p] += 1
    else:
        dist[p] = 1

print('')
print("length #paths")
verts = dist.keys()
for d in sorted(verts):
    print('%s %d' % (d, dist[d]))

print("radius: %d" % nx.radius(G))
print("diameter: %d" % nx.diameter(G))
print("eccentricity: %s" % nx.eccentricity(G))
print("center: %s" % nx.center(G))
print("periphery: %s" % nx.periphery(G))
print("density: %s" % nx.density(G))

nx.draw(G, with_labels=True)
plt.show()
source vertex {target:length, }
0 {0: 0, 1: 1, 2: 1, 3: 1, 4: 2, 5: 3, 6: 4, 7: 5, 8: 6, 9: 7}
1 {1: 0, 0: 1, 2: 1, 3: 1, 4: 2, 5: 3, 6: 4, 7: 5, 8: 6, 9: 7}
2 {2: 0, 0: 1, 1: 1, 3: 1, 4: 2, 5: 3, 6: 4, 7: 5, 8: 6, 9: 7}
3 {3: 0, 0: 1, 1: 1, 2: 1, 4: 1, 5: 2, 6: 3, 7: 4, 8: 5, 9: 6}
4 {4: 0, 5: 1, 3: 1, 6: 2, 0: 2, 1: 2, 2: 2, 7: 3, 8: 4, 9: 5}
5 {5: 0, 4: 1, 6: 1, 3: 2, 7: 2, 0: 3, 1: 3, 2: 3, 8: 3, 9: 4}
6 {6: 0, 5: 1, 7: 1, 4: 2, 8: 2, 3: 3, 9: 3, 0: 4, 1: 4, 2: 4}
7 {7: 0, 6: 1, 8: 1, 5: 2, 9: 2, 4: 3, 3: 4, 0: 5, 1: 5, 2: 5}
8 {8: 0, 7: 1, 9: 1, 6: 2, 5: 3, 4: 4, 3: 5, 0: 6, 1: 6, 2: 6}
9 {9: 0, 8: 1, 7: 2, 6: 3, 5: 4, 4: 5, 3: 6, 0: 7, 1: 7, 2: 7}
average shortest path length 2.86
length #paths
0 10
1 24
2 16
3 14
4 12
5 10
6 8
7 6
radius: 4
diameter: 7
eccentricity: {0: 7, 1: 7, 2: 7, 3: 6, 4: 5, 5: 4, 6: 4, 7: 5, 8: 6, 9: 7}
center: [5, 6]
periphery: [0, 1, 2, 9]
density: 0.26666666666666666

中心性
关于常用中心性的可以参考直通车
此处翻译来源与网络,如果错误请批评指正
Degree centrality measures.(点度中心性)
degree_centrality(G) Compute the degree centrality for nodes.
in_degree_centrality(G) Compute the in-degree centrality for nodes.
out_degree_centrality(G) Compute the out-degree centrality for nodes.
Closeness centrality measures.(接近中心性)
closeness_centrality(G[, v, weighted_edges]) Compute closeness centrality for nodes.
Betweenness centrality measures.(中介中心性)
betweenness_centrality(G[, normalized, …]) Compute betweenness centrality for nodes.
edge_betweenness_centrality(G[, normalized, …]) Compute betweenness centrality for edges.
Current-flow closeness centrality measures.(流紧密中心性)
current_flow_closeness_centrality(G[, …]) Compute current-flow closeness centrality for nodes.
Current-Flow Betweenness
Current-flow betweenness centrality measures.(流介数中心性)
current_flow_betweenness_centrality(G[, …]) Compute current-flow betweenness centrality for nodes.
edge_current_flow_betweenness_centrality(G) Compute current-flow betweenness centrality for edges.
Eigenvector centrality.(特征向量中心性)
eigenvector_centrality(G[, max_iter, tol, …]) Compute the eigenvector centrality for the graph G.
eigenvector_centrality_numpy(G) Compute the eigenvector centrality for the graph G.
Load centrality.(不知道)
load_centrality(G[, v, cutoff, normalized, …]) Compute load centrality for nodes.
edge_load(G[, nodes, cutoff]) Compute edge load.
参看文献:
http://networkx.github.io/
https://github.com/networkx/networkx
https://networkx.github.io/documentation/stable/tutorial/index.html
https://bigdata-ny.github.io/2016/08/12/graph-of-thrones-neo4j-social-network-analysis/
https://blog.csdn.net/nnnnnnnnnnnny/article/details/53701277
最后
以上就是高大台灯最近收集整理的关于知识图谱之社交网络分析(SNA)之python处理!usr/bin/env python* coding:utf-8 *histogram of path lengths的全部内容,更多相关知识图谱之社交网络分析(SNA)之python处理!usr/bin/env内容请搜索靠谱客的其他文章。


发表评论 取消回复