物联网平台搭建系列内容前两节介绍的都是功能性的描述,今天以一个小例子,介绍具体的设备接入、订阅、发布的操作,例子的名字为:学生成绩录入平台,例子的界面如下图所示。

功能描述:当在阿里云物联网平台内下发学生姓名的时候,“学生姓名”后边会显示这个学生的名字。当在数学、语文后边的输入框内输入分数,并且点“发送”按钮时,会将这两个分数发送到物联网平台。
为了方便更多读者,本例以公共实例为例,通信方式为MQTT,企业实例与此大同小异。阿里云官方网站给的物联网Android sdk示例,其中一整套功能都具备了,程序非常复杂,对于入门级的小白来说,简直就是天书。本例只给出了最基本的设备接入、订阅、发布三个功能的示例。设备接入给出了旧版公共实例(新版的可以在此基础上改动)和企业实例两种方式;订阅功能还给出来数据解析,可以从payload解析出物模型的每一项数据显示在Textview内;发布动能给出了可以从EditText输入数据,并且打包成json格式数据包。
下边对具体操作过程做一介绍:
目录
一、阿里云物联网平台的操作
1、学会参考官网的技术文档
2、创建产品
3、添加物模型
4、添加设备
5、确定host
二、Android studio平台的操作
1、AndroidManifest的设置
(1)开权限
(2)在application内注册service
2、build.gradle(Module:app)
(1)Android下增加
(2)dependencies下的所有依赖
3、layout设计
4、自定义类
5、MainActivity.class
(1)AliyunTopicHostSet(int IotInstanceType)函数
(2)subscribeTopic(String topic)
(3)publishMessage(String payload)
(4)onCreate(Bundle savedInstanceState)
三、源代码
一、阿里云物联网平台的操作
1、学会参考官网的技术文档
(1)进入物联网平台后,选择华东2(上海)服务器
(2)点击公共实例

(3)点“文档与工具”
(4)点“物联网设备接入与管理”
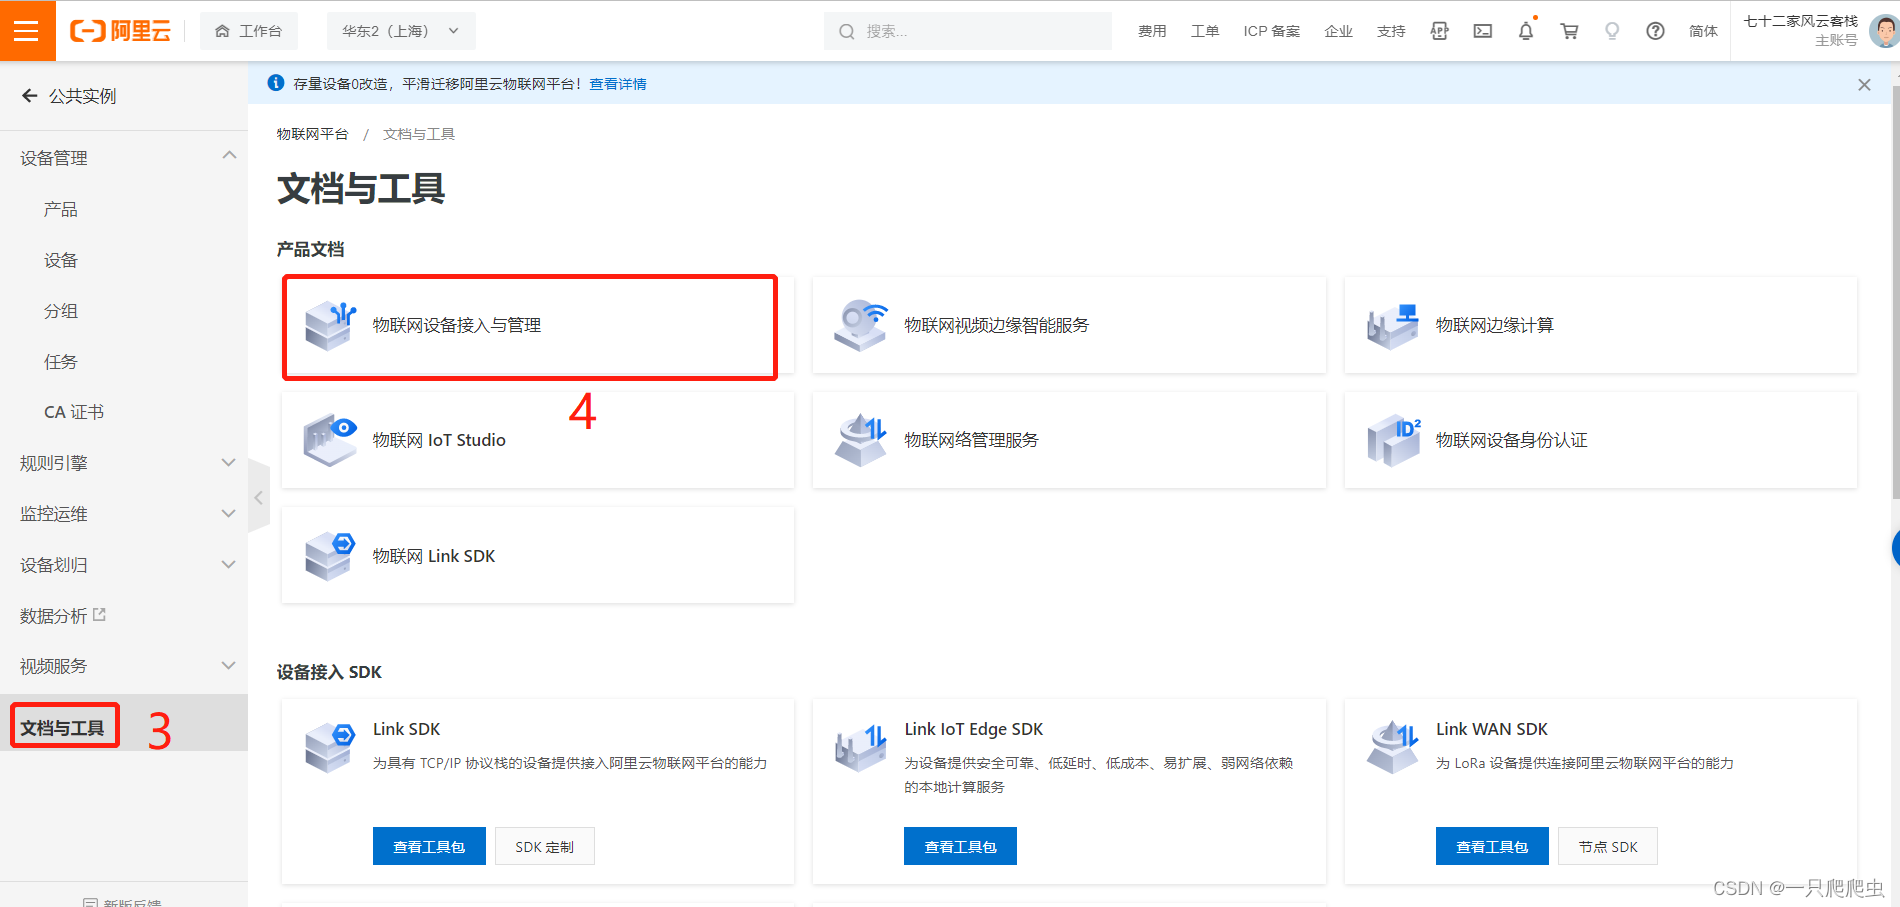
(5)点“设备接入”
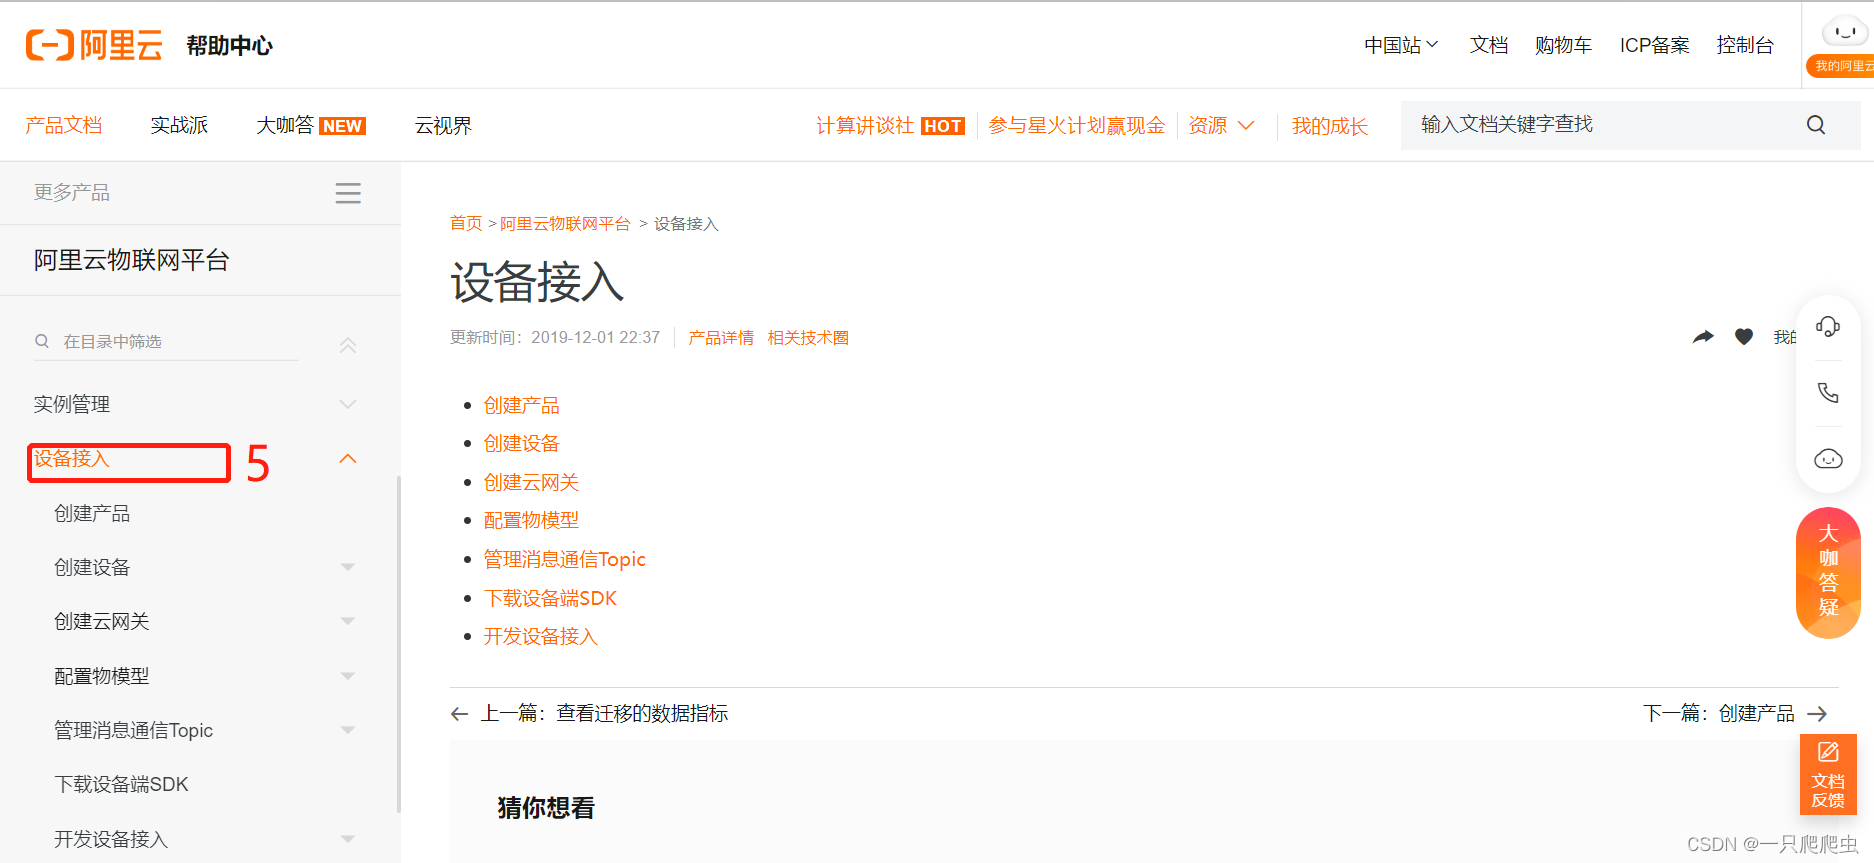
设备接入的文档都在这里,具体链接:设备接入 (aliyun.com)
2、创建产品
具体操作步骤见:创建产品 (aliyun.com)
3、添加物模型
具体操作步骤见:单个添加物模型 (aliyun.com)
本例创建产品和添加物模型的结果如图所示,产品名称为“学生成绩录入平台”。
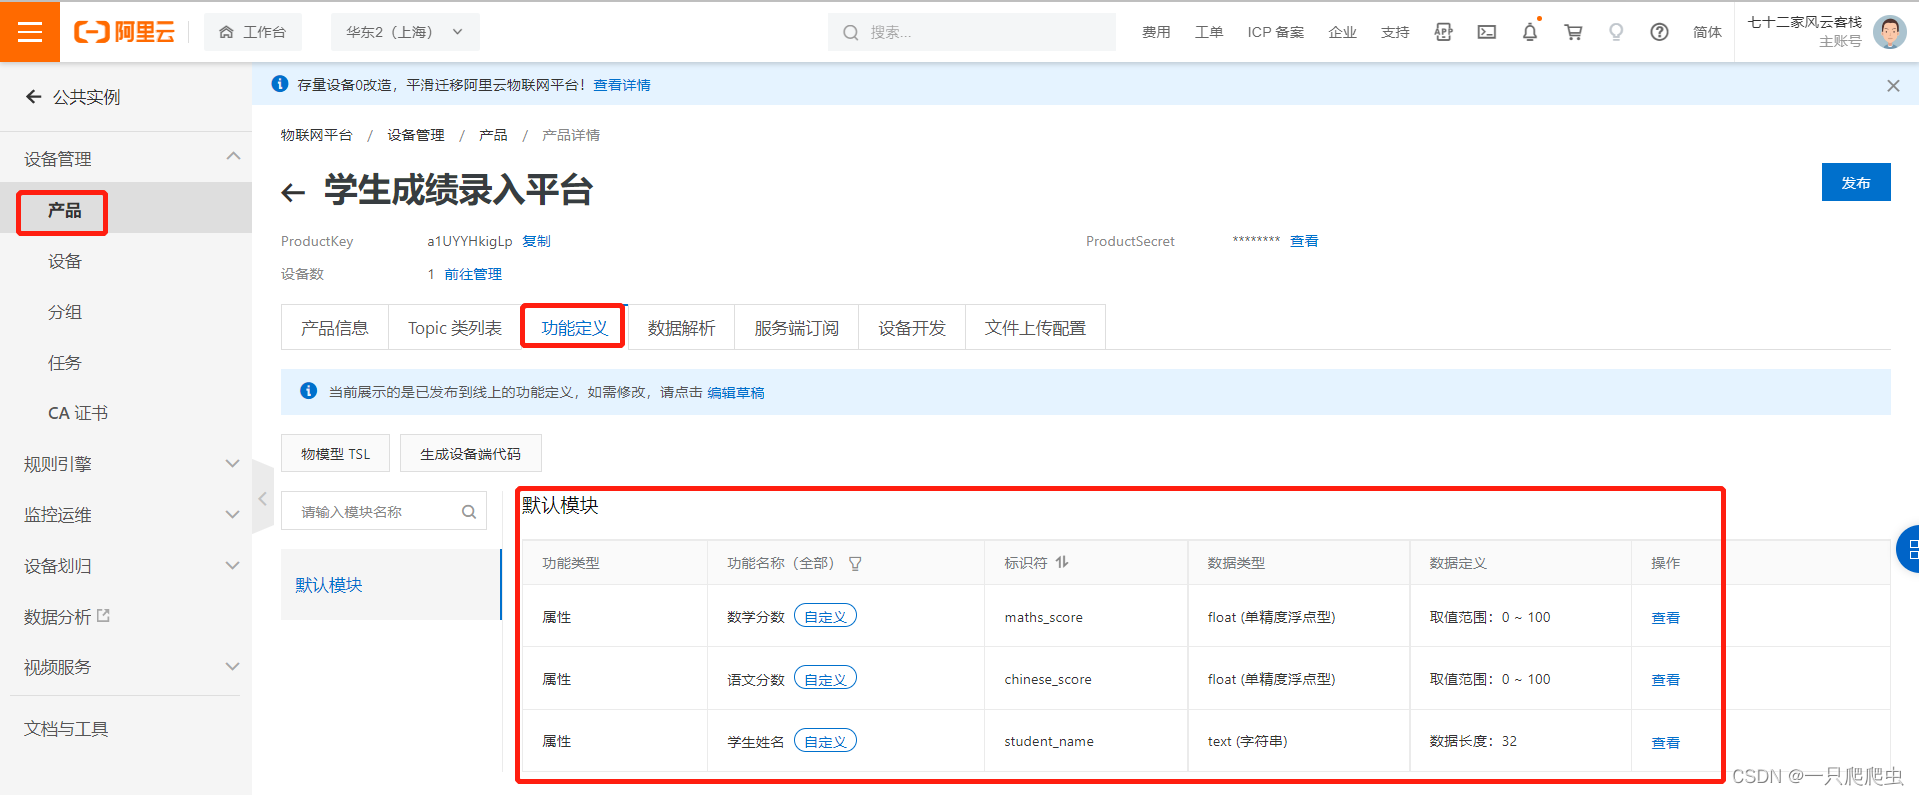
物模型有三个自定义功能:
序号 功能名称 标识符 数据类型 数据定义 1 学生姓名 student_name text (字符串) 数据长度:32 2 语文分数 chinese_score float (单精度浮点型) 取值范围:0 ~ 100 3 数学分数 maths_score float (单精度浮点型) 取值范围:0 ~ 100
4、添加设备
具体操作步骤见:单个创建设备 (aliyun.com)
也可以批量添加设备,操作步骤见:批量创建设备 (aliyun.com)
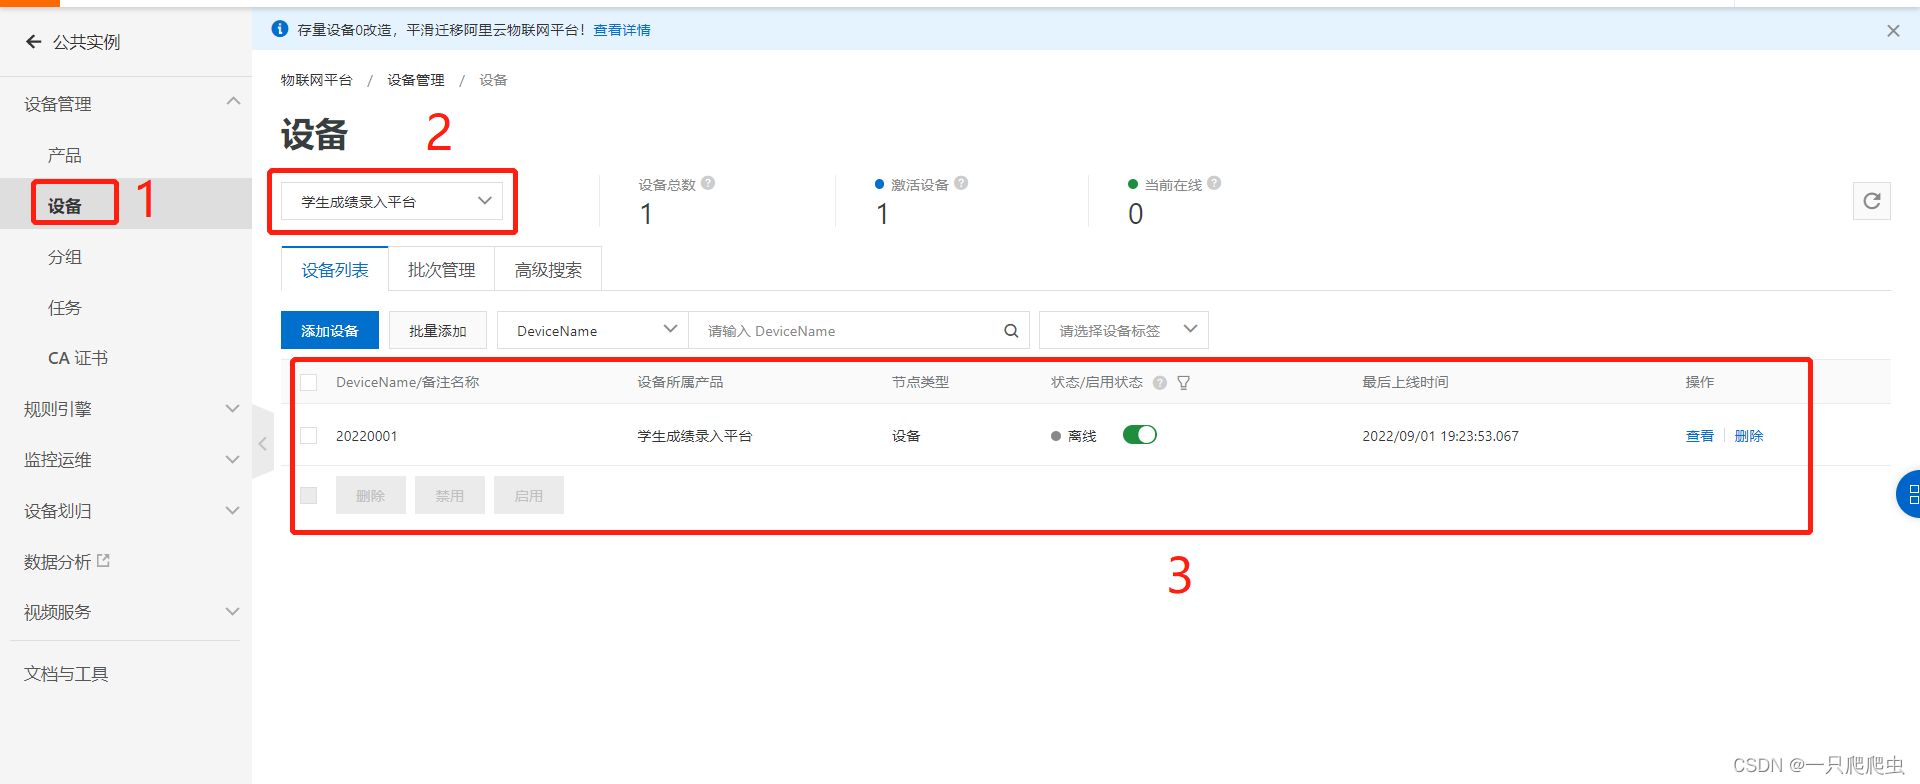
在“学生成绩录入平台”内添加一个设备,设备名称为20220001,结果如下图所示:
点设备页面某个设备所在行最后的“查看”,可进入设备详情页,如下图所示。
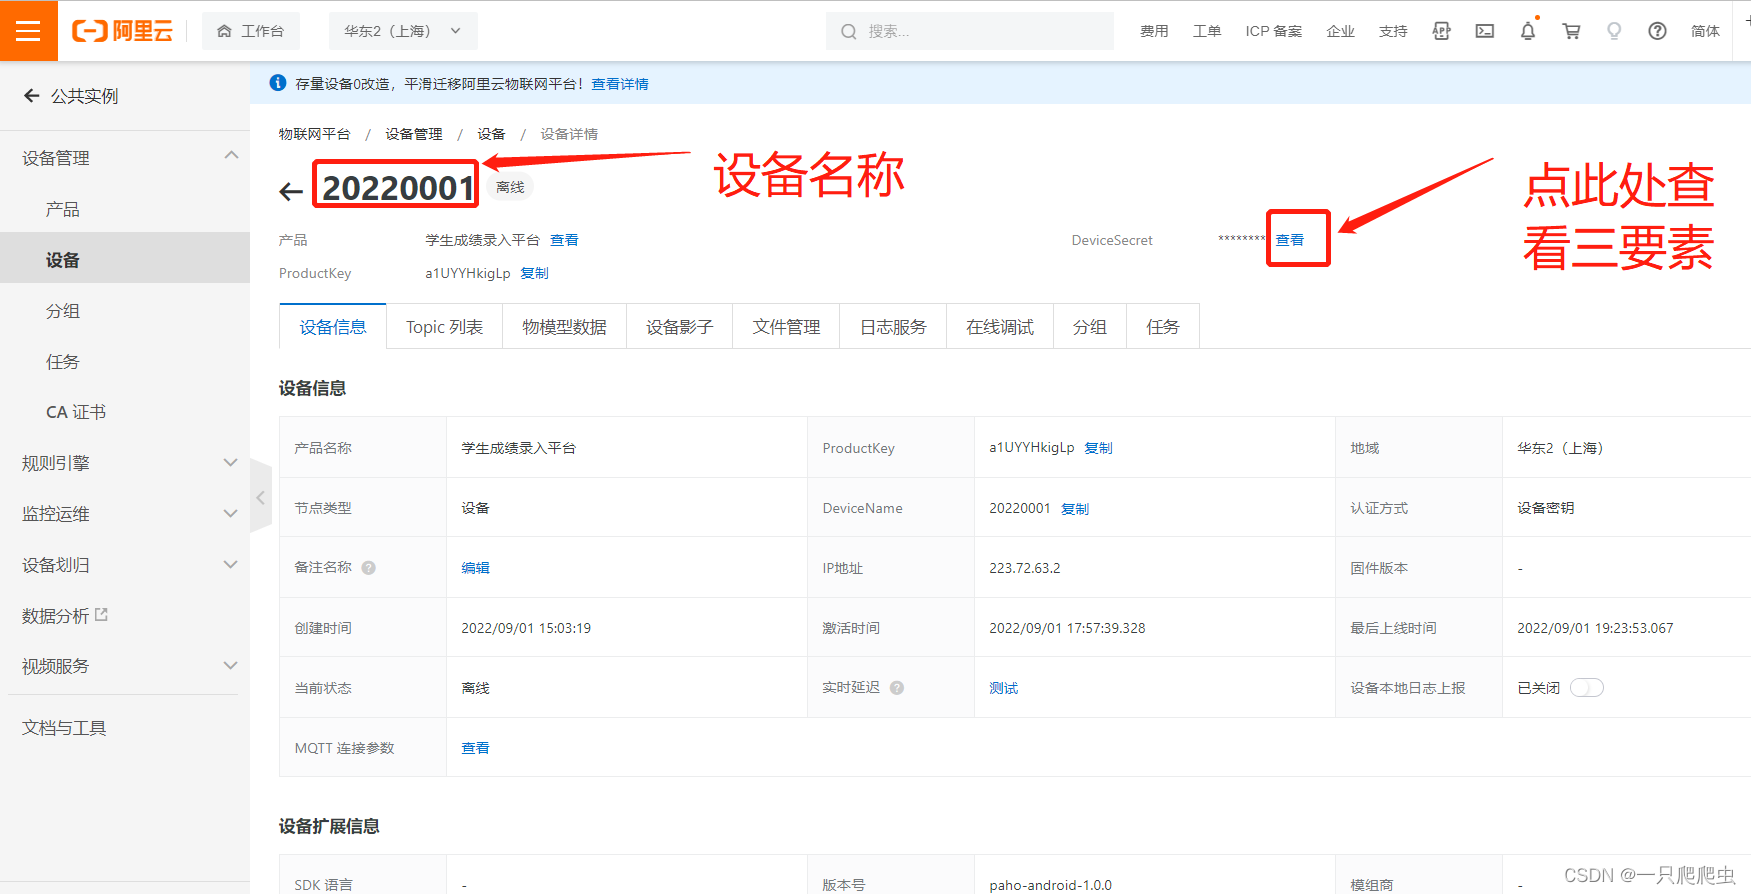
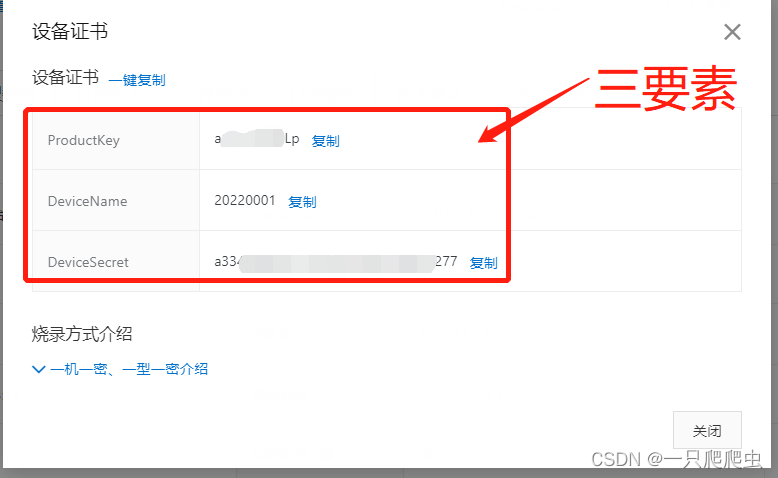
在设备详情页面,点DeviceSecret后边的“查看”,可以查看设备的三要素,如下图所示。
5、确定host
阿里云物联网设备三要素和host是设备接入的必须设置的,host的确定见:查看实例终端节点 (aliyun.com)
本例为旧版公共实例,MQTT的host的格式为:
${YourProductKey}.iot-as-mqtt.${YourRegionId}.aliyuncs.com:1883。
把${YourProductKey}替换为本产品的ProductKey:a1*****igLp,把${YourRegionId}替换为公共实例的所在区域,本例为华东2(上海),所以为:cn-shanghai。区域代码详见:支持的地域 (aliyun.com)
所以最终的结果:
host="a1*****igLp.iot-as-mqtt.cn-shanghai.aliyuncs.com:1883"
二、Android studio平台的操作
1、AndroidManifest的设置
(1)开权限
<uses-permission android:name="android.permission.WAKE_LOCK" />
<uses-permission android:name="android.permission.ACCESS_NETWORK_STATE" />
<uses-permission android:name="android.permission.INTERNET" />
<uses-permission android:name="android.permission.READ_PHONE_STATE" />
<uses-permission android:name="android.permission.WRITE_EXTERNAL_STORAGE" />
<uses-permission android:name="android.permission.ACCESS_NETWORK_STATE" />
<uses-permission android:name="android.permission.ACCESS_WIFI_STATE" />
(2)在application内注册service
<service android:name="org.eclipse.paho.android.service.MqttService">
</service>
2、build.gradle(Module:app)
(1)Android下增加
packagingOptions {
exclude 'META-INF/DEPENDENCIES'
exclude 'META-INF/NOTICE'
exclude 'META-INF/LICENSE'
exclude 'META-INF/LICENSE.txt'
exclude 'META-INF/NOTICE.txt'
}
(2)dependencies下的所有依赖
implementation fileTree(dir: 'libs', include: ['*.jar'])
androidTestImplementation('com.android.support.test.espresso:espresso-core:2.2.2', {
exclude group: 'com.android.support', module: 'support-annotations'
})
implementation 'androidx.appcompat:appcompat:1.1.0'
implementation 'androidx.constraintlayout:constraintlayout:1.1.3'
testImplementation 'junit:junit:4.12'
androidTestImplementation 'androidx.test.ext:junit:1.1.1'
androidTestImplementation 'androidx.test.espresso:espresso-core:3.2.0'
implementation 'org.eclipse.paho:org.eclipse.paho.client.mqttv3:1.2.0'
implementation 'org.eclipse.paho:org.eclipse.paho.android.service:1.1.1'
implementation 'com.android.support:support-v4:28.1.1'
3、layout设计
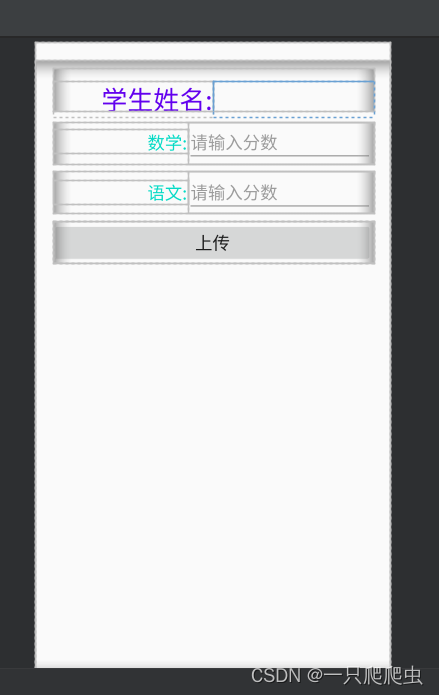
一共有7个控件:4个TextView,分别显示学生姓名、数学、语文的标签,以及学生姓名的具体内容。2个EditText,用来输入数学和语文的分数。1个Button,标签为“上传”,点击后进行publish的功能,将语文、数学的两个分数发送到物联网平台。
layout的代码如下:
<?xml version="1.0" encoding="utf-8"?>
<androidx.constraintlayout.widget.ConstraintLayout xmlns:android="http://schemas.android.com/apk/res/android"
xmlns:app="http://schemas.android.com/apk/res-auto"
xmlns:tools="http://schemas.android.com/tools"
android:layout_width="match_parent"
android:layout_height="match_parent"
tools:context=".MainActivity">
<LinearLayout
android:layout_width="match_parent"
android:layout_height="match_parent"
android:layout_marginTop="20dp"
android:layout_marginBottom="0dp"
android:orientation="vertical">
<LinearLayout
android:layout_width="match_parent"
android:layout_height="wrap_content"
android:layout_marginTop="10dp"
android:layout_marginLeft="20dp"
android:layout_marginRight="20dp"
android:gravity="center"
android:orientation="horizontal"
>
<TextView
android:id="@+id/student_name_lable"
android:layout_width="50dp"
android:layout_height="wrap_content"
android:layout_weight="1"
android:layout_marginTop="10dp"
android:gravity="right"
android:textColor="@color/colorPrimary"
android:textSize="30dp"
android:text="学生姓名:"/>
<TextView
android:id="@+id/student_name_content"
android:layout_width="50dp"
android:layout_height="wrap_content"
android:layout_weight="1"
android:gravity="center"
android:layout_marginTop="10dp"
android:textColor="@color/colorPrimary"
android:textSize="30dp"
/>
</LinearLayout>
<LinearLayout
android:layout_width="match_parent"
android:layout_height="wrap_content"
android:layout_marginTop="10dp"
android:layout_marginLeft="20dp"
android:layout_marginRight="20dp"
android:gravity="center"
android:orientation="horizontal"
>
<TextView
android:id="@+id/maths_lable"
android:layout_width="50dp"
android:layout_height="wrap_content"
android:layout_weight="1"
android:layout_marginTop="0dp"
android:gravity="right"
android:textColor="@color/colorAccent"
android:textSize="20dp"
android:text="数学:"/>
<EditText
android:id="@+id/maths_score"
android:layout_width="wrap_content"
android:layout_height="wrap_content"
android:layout_weight="1"
android:textSize="20dp"
android:hint="请输入分数"
/>
</LinearLayout>
<LinearLayout
android:layout_width="match_parent"
android:layout_height="wrap_content"
android:layout_marginTop="10dp"
android:layout_marginLeft="20dp"
android:layout_marginRight="20dp"
android:gravity="center"
android:orientation="horizontal"
>
<TextView
android:id="@+id/chinese_lable"
android:layout_width="50dp"
android:layout_height="wrap_content"
android:layout_weight="1"
android:layout_marginTop="0dp"
android:gravity="right"
android:textColor="@color/colorAccent"
android:textSize="20dp"
android:text="语文:"/>
<EditText
android:id="@+id/chinese_score"
android:layout_width="wrap_content"
android:layout_height="wrap_content"
android:layout_weight="1"
android:textSize="20dp"
android:hint="请输入分数"
/>
</LinearLayout>
<LinearLayout
android:layout_width="match_parent"
android:layout_height="wrap_content"
android:layout_marginTop="10dp"
android:layout_marginLeft="20dp"
android:layout_marginRight="20dp"
android:gravity="center"
android:orientation="horizontal"
>
<Button
android:id="@+id/btn_publish"
android:layout_width="20dp"
android:layout_height="wrap_content"
android:layout_margin="0dp"
android:layout_weight="1"
android:textSize="20dp"
android:text="上传" />
</LinearLayout>
</LinearLayout>
</androidx.constraintlayout.widget.ConstraintLayout>
4、自定义类
本例程定义了一个类AiotMqttOption,作用就是根据物联网平台的设备三元组productKey, deviceName和deviceSecret, 生成Mqtt建连参数clientId,username和password。用到的加密算法是HmacSHA256。
package com.example.mybasicaliyun;
import java.math.BigInteger;
import javax.crypto.Mac;
import javax.crypto.spec.SecretKeySpec;
/**
* MQTT建连选项类,输入设备三元组productKey, deviceName和deviceSecret, 生成Mqtt建连参数clientId,username和password.
*/
class AiotMqttOption {
private String username = "";
private String password = "";
private String clientId = "";
String getUsername() { return this.username;}
String getPassword() { return this.password;}
String getClientId() { return this.clientId;}
/**
* 获取Mqtt建连选项对象
* @param productKey 产品秘钥
* @param deviceName 设备名称
* @param deviceSecret 设备机密
* @return AiotMqttOption对象或者NULL
*/
public AiotMqttOption getMqttOption(String productKey, String deviceName, String deviceSecret) {
if (productKey == null || deviceName == null || deviceSecret == null) {
return null;
}
try {
String timestamp = Long.toString(System.currentTimeMillis());
// clientId
this.clientId = productKey + "." + deviceName + "|timestamp=" + timestamp +
",_v=paho-android-1.0.0,securemode=2,signmethod=hmacsha256|";
// userName
this.username = deviceName + "&" + productKey;
// password
String macSrc = "clientId" + productKey + "." + deviceName + "deviceName" +
deviceName + "productKey" + productKey + "timestamp" + timestamp;
String algorithm = "HmacSHA256";
Mac mac = Mac.getInstance(algorithm);
SecretKeySpec secretKeySpec = new SecretKeySpec(deviceSecret.getBytes(), algorithm);
mac.init(secretKeySpec);
byte[] macRes = mac.doFinal(macSrc.getBytes());
password = String.format("%064x", new BigInteger(1, macRes));
} catch (Exception e) {
e.printStackTrace();
return null;
}
return this;
}
}
5、MainActivity.class
MainActivity.class由三个自定义函数和一个方法组成:
三个自定义函数:AliyunTopicHostSet(int IotInstanceType)函数、subscribeTopic(String topic)函数、publishMessage(String payload)函数;
一个方法:onCreate(Bundle savedInstanceState)方法组成。在onCreate方法中会调用三个自定义函数。
(1)AliyunTopicHostSet(int IotInstanceType)函数
此函数的作用是根据阿里云物联网设备三要素生成SUB_TOPIC、PUB_TOPIC和host。
此函数有一个参量,为实例的类型,如果为旧版公共实例,参数为0,如果为新版公共实例或者企业版实例,参数为1。
/**
* 根据阿里云物联网设备三要素生成subtopic、pubtopic和host
* @param IotInstanceType 实例类型,0:华东2(上海)服务器公共实例;1:企业实例
*/
public void AliyunTopicHostSet(int IotInstanceType) {
SUB_TOPIC ="/sys/" + PRODUCTKEY + "/" + DEVICENAME + "/thing/service/property/set";
PUB_TOPIC = "/sys/"+ PRODUCTKEY + "/" + DEVICENAME + "/user/update";
if(IotInstanceType==0)
{
host="tcp://" + PRODUCTKEY + ".iot-as-mqtt.cn-shanghai.aliyuncs.com:1883";//适用于公共实例华东2(上海)
}
else
{
host="tcp://" + IotInstanceId + ".mqtt.iothub.aliyuncs.com:1883";//试用于企业实例
}
}
(2)subscribeTopic(String topic)
此函数的作用是订阅物联网平台的topic,当物联网平台下发这个topic的数据时,可以接收。
此函数有一个参量,就是SUB_TOPIC。
 /**
* 订阅特定的主题
* @param topic mqtt主题
*/
public void subscribeTopic(String topic) {
try {
mqttAndroidClient.subscribe(topic, 0, null, new IMqttActionListener() {
@Override
public void onSuccess(IMqttToken asyncActionToken) {
Log.i(TAG, "subscribed succeed");
}
@Override
public void onFailure(IMqttToken asyncActionToken, Throwable exception) {
Log.i(TAG, "subscribed failed");
}
});
} catch (MqttException e) {
e.printStackTrace();
}
}
(3)publishMessage(String payload)
此函数的作用是把设备要发送的数据打包成json格式,根据PUB_TOPIC的规则,发送到物联网平台上对应的设备上。此函数有一个参量,为payload,即按照json格式把要发送的数据打成的包。
 /**
* 向默认的主题/user/update发布消息
* @param payload 消息载荷
*/
public void publishMessage(String payload) {
try {
if (!mqttAndroidClient.isConnected()) {
mqttAndroidClient.connect();
}
MqttMessage message = new MqttMessage();
message.setPayload(payload.getBytes());
message.setQos(0);
mqttAndroidClient.publish(PUB_TOPIC, message,null, new IMqttActionListener() {
@Override
public void onSuccess(IMqttToken asyncActionToken) {
Log.i(TAG, "publish succeed!");
}
@Override
public void onFailure(IMqttToken asyncActionToken, Throwable exception) {
Log.i(TAG, "publish failed!");
}
});
} catch (MqttException e) {
Log.e(TAG, e.toString());
e.printStackTrace();
}
}
(4)onCreate(Bundle savedInstanceState)
此方法完整代码如下所示:
@Override
protected void onCreate(Bundle savedInstanceState) {
super.onCreate(savedInstanceState);
setContentView(R.layout.activity_main);
tv_student_name=this.findViewById(R.id.student_name_content);
et_maths_score=this.findViewById(R.id.maths_score);
et_chinese_score=this.findViewById(R.id.chinese_score);
btn_publish= findViewById(R.id.btn_publish);
//根据阿里云三要素构建subtopic、pubtopic、host
AliyunTopicHostSet(0);
//MQTT建连选项类,输入设备三元组productKey, deviceName和deviceSecret, 生成Mqtt建连参数clientId,username和password
AiotMqttOption aiotMqttOption = new AiotMqttOption().getMqttOption(PRODUCTKEY, DEVICENAME, DEVICESECRET);
if (aiotMqttOption == null) {
Log.e(TAG, "device info error");
} else {
clientId = aiotMqttOption.getClientId();
userName = aiotMqttOption.getUsername();
passWord = aiotMqttOption.getPassword();
}
/* Mqtt建连 */
try {
/* 创建MqttConnectOptions对象并配置username和password */
final MqttConnectOptions mqttConnectOptions = new MqttConnectOptions();
mqttConnectOptions.setUserName(userName);
mqttConnectOptions.setPassword(passWord.toCharArray());
/* 创建MqttAndroidClient对象, 并设置回调接口 */
//String plstring;
mqttAndroidClient = new MqttAndroidClient(getApplicationContext(), host, clientId);
mqttAndroidClient.connect(mqttConnectOptions,null, new IMqttActionListener() {
//连接成功方法
@Override
public void onSuccess(IMqttToken asyncActionToken) {
Log.i(TAG, "connect succeed");
subscribeTopic(SUB_TOPIC);
}
//连接失败方法
@Override
public void onFailure(IMqttToken asyncActionToken, Throwable exception) {
Log.i(TAG, "connect failed");
}
});
} catch (MqttException e) {
e.printStackTrace();
}
/**
* mqtt回调类,此类内包含三个方法:connectionLost(掉线),messageArrived(订阅消息到达),deliveryComplete(发布消息送达)
*/
mqttAndroidClient.setCallback(new MqttCallback() {
//连接中断方法
@Override
public void connectionLost(Throwable cause) {
Log.i(TAG, "connection lost");
}
@SuppressLint("SetTextI18n")
@Override
//订阅消息后,消息到达时方法
public void messageArrived(String topic, MqttMessage message) throws Exception {
Log.i(TAG, "topic: " + topic + ", msg: " + new String(message.getPayload()));
String payload = new String(message.getPayload());
JSONObject Jobj_payload = new JSONObject(payload);
JSONObject Jobj_params=new JSONObject(Jobj_payload.getString("params"));
String student_name=Jobj_params.getString("student_name");
if( (Jobj_params.has("student_name")))
{
System.out.println(student_name);
tv_student_name.setText(student_name);
}
}// messageArrived类结束标志
//发布消息后,消息投递成功后返回方法
@Override
public void deliveryComplete(IMqttDeliveryToken token) {
Log.i(TAG, "msg delivered");
}
});//mqttAndroidClient.setCallback类结束标志
/**
* 点"上传"按钮后,将数学、语文分数发送到阿里云物联网平台
*/
btn_publish.setOnClickListener((view)-> {
int maths_score=Integer.parseInt(et_maths_score.getText().toString());
int chinese_score=Integer.parseInt(et_chinese_score.getText().toString());
//发布消息的payload数据包生成方法一:利用JSONObject,分两层将params内的数学、语文分数,和params外的id,version打成一个json数据包
JSONObject Jobj_payload = new JSONObject();
JSONObject Jobj_params = new JSONObject();
try {
Jobj_params.put("maths_score",maths_score);
Jobj_params.put("chinese_score",chinese_score);
Jobj_payload.put("id", DEVICENAME);
Jobj_payload.put("version", "1.0");
Jobj_payload.put("params", Jobj_params);
} catch (JSONException e) {
e.printStackTrace();
}
publishMessage(Jobj_payload.toString());
发布消息的payload数据包生成方法二:利用构建字符串的方法,按照json格式把字符和变量连接起来,形成一个json数据字符串。
//
String Jobj_payload_string="{"id":""
+DEVICENAME+
"", "version":"1.0"" + ","params":{"maths_score":"+ et_maths_score.getText().toString() +","chinese_score":"+chinese_score+"}}";
//
publishMessage(Jobj_payload_string);
});
}//oncreat结束标志
此方法包含七部分:
第一部分:关联layout、TextView、EditText和Button。
setContentView(R.layout.activity_main);
tv_student_name=this.findViewById(R.id.student_name_content);
et_maths_score=this.findViewById(R.id.maths_score);
et_chinese_score=this.findViewById(R.id.chinese_score);
btn_publish= findViewById(R.id.btn_publish);
第二部分:AliyunTopicHostSet(int IotInstanceType)函数,旧版公共实例,IotInstanceType为0;
//根据阿里云三要素构建subtopic、pubtopic、host
AliyunTopicHostSet(0);
第三部分:新建AiotMqttOption对象,为mqtt的联网做准备。
//MQTT建连选项类,输入设备三元组productKey, deviceName和deviceSecret, 生成Mqtt建连参数clientId,username和password
AiotMqttOption aiotMqttOption = new AiotMqttOption().getMqttOption(PRODUCTKEY, DEVICENAME, DEVICESECRET);
if (aiotMqttOption == null) {
Log.e(TAG, "device info error");
} else {
clientId = aiotMqttOption.getClientId();
userName = aiotMqttOption.getUsername();
passWord = aiotMqttOption.getPassword();
}第四部分:创建MqttConnectOptions对象和mqttAndroidClient对象,利用mqttAndroidClient.connect的方法进行mqtt连网操作。mqttAndroidClient.connect方法中还包含mqtt连网成功onSuccess方法和mqtt连网失败onFailure方法。本例的订阅函数就是在onSuccess方法中调用的。
 /* Mqtt建连 */
try {
/* 创建MqttConnectOptions对象并配置username和password */
final MqttConnectOptions mqttConnectOptions = new MqttConnectOptions();
mqttConnectOptions.setUserName(userName);
mqttConnectOptions.setPassword(passWord.toCharArray());
/* 创建MqttAndroidClient对象, 并设置回调接口 */
//String plstring;
mqttAndroidClient = new MqttAndroidClient(getApplicationContext(), host, clientId);
mqttAndroidClient.connect(mqttConnectOptions,null, new IMqttActionListener() {
//连接成功方法
@Override
public void onSuccess(IMqttToken asyncActionToken) {
Log.i(TAG, "connect succeed");
subscribeTopic(SUB_TOPIC);
}
//连接失败方法
@Override
public void onFailure(IMqttToken asyncActionToken, Throwable exception) {
Log.i(TAG, "connect failed");
}
});
} catch (MqttException e) {
e.printStackTrace();
}第五部分:mqttAndroidClient的回调方法setCallback,此方法又包含两个方法。其中messageArrived方法为订阅的消息到达时触发,deliveryComplete方法为发布消息送达时触发。本例在messageArrived方法里对接收到的下发消息进行joson解析并提取。
/**
* mqtt回调类,此类内包含三个方法:connectionLost(掉线),messageArrived(订阅消息到达),deliveryComplete(发布消息送达)
*/
mqttAndroidClient.setCallback(new MqttCallback() {
//连接中断方法
@Override
public void connectionLost(Throwable cause) {
Log.i(TAG, "connection lost");
}
@SuppressLint("SetTextI18n")
@Override
//订阅消息后,消息到达时方法
public void messageArrived(String topic, MqttMessage message) throws Exception {
Log.i(TAG, "topic: " + topic + ", msg: " + new String(message.getPayload()));
String payload = new String(message.getPayload());
JSONObject Jobj_payload = new JSONObject(payload);
JSONObject Jobj_params=new JSONObject(Jobj_payload.getString("params"));
String student_name=Jobj_params.getString("student_name");
if( (Jobj_params.has("student_name")))
{
System.out.println(student_name);
tv_student_name.setText(student_name);
}
}// messageArrived类结束标志
//发布消息后,消息投递成功后返回方法
@Override
public void deliveryComplete(IMqttDeliveryToken token) {
Log.i(TAG, "msg delivered");
}
});//mqttAndroidClient.setCallback类结束标志第六部分:btn_publish.setOnClickListener方法,“发送”按钮被按下后触发,此方法内将数学、语文分数按照物模型的规则打包成json数据包,并且调用publishMessage方法把数据发送到物联网平台。阿里云物联网要求的发送到物联网平台的数据json格式的物模型如下所示:
{
"id":"20210001",
"version":"1.0",
"params":
{
"maths_score":maths_score,
"chinese_score":chinese_score
}
}所以按照上述格式,程序中首先把maths_score、chinese_score以键值对的形式放进里层的parms数据包里,然后再把id、version、params放进外层的数据包里,程序如下图所示:
 /**
* 点"上传"按钮后,将数学、语文分数发送到阿里云物联网平台
*/
btn_publish.setOnClickListener((view)-> {
int maths_score=Integer.parseInt(et_maths_score.getText().toString());
int chinese_score=Integer.parseInt(et_chinese_score.getText().toString());
//发布消息的payload数据包生成方法一:利用JSONObject,分两层将params内的数学、语文分数,和params外的id,version打成一个json数据包
JSONObject Jobj_payload = new JSONObject();
JSONObject Jobj_params = new JSONObject();
try {
Jobj_params.put("maths_score",maths_score);
Jobj_params.put("chinese_score",chinese_score);
Jobj_payload.put("id", DEVICENAME);
Jobj_payload.put("version", "1.0");
Jobj_payload.put("params", Jobj_params);
} catch (JSONException e) {
e.printStackTrace();
}
publishMessage(Jobj_payload.toString());
发布消息的payload数据包生成方法二:利用构建字符串的方法,按照json格式把字符和变量连接起来,形成一个json数据字符串。
//
String Jobj_payload_string="{"id":""
+DEVICENAME+
"", "version":"1.0"" + ","params":{"maths_score":"+ et_maths_score.getText().toString() +","chinese_score":"+chinese_score+"}}";
//
publishMessage(Jobj_payload_string);
});
第七部分:声明变量部分,这部分比较简单,不再介绍,程序如下所示。
/* 设备三元组信息 */
private String IotInstanceId="";
private String PRODUCTKEY="a1********p";
private String DEVICENAME="20220001";
private String DEVICESECRET="a3**************************7277";
/* 自动Topic, 用于上报消息 */
private String PUB_TOPIC;
/* 自动Topic, 用于接受消息 */
private String SUB_TOPIC;
/* 阿里云Mqtt服务器域名 */
String host;
/*Mqtt建连参数*/
private String clientId;
private String userName;
private String passWord;
//设置log.e的TAG
private final String TAG = "AiotMqtt";
MqttAndroidClient mqttAndroidClient;
//ui相关变量
TextView tv_student_name;
EditText et_maths_score,et_chinese_score;
Button btn_publish;
三、源代码
本例完整源代码请点击下载
最后
以上就是飘逸滑板最近收集整理的关于物联网平台搭建的全过程介绍(三)阿里云物联网设备接入订阅发布之Android studio例程一、阿里云物联网平台的操作二、Android studio平台的操作三、源代码的全部内容,更多相关物联网平台搭建的全过程介绍(三)阿里云物联网设备接入订阅发布之Android内容请搜索靠谱客的其他文章。


发表评论 取消回复