多节点安装
在生产环境中,由于单节点集群资源有限、计算能力不足,无法满足大部分需求,因此不建议在处理大规模数据时使用单节点集群。此外,单节点集群只有一个节点,因此也不具有高可用性。相比之下,在应用程序部署和分发方面,多节点架构是最常见的首选架构。
本节概述了单主节点式多节点安装,包括概念、KubeKey 和操作步骤。有关高可用安装的信息,请参考高可用配置、在公有云上安装和在本地环境中安装。
目录
多节点安装
一、概念
步骤 1:准备 Linux 主机
系统要求
二、搭建部署
2.1 服务器挂载磁盘
2.2 打通各服务器之前的ssh免登录
2.3 使用KubeKey搭建k8s集群
容器运行时
依赖项要求
网络和 DNS 要求
步骤 1:下载 KubeKey
1. 使用配置文件创建集群配置文件
该配置文件内容说明可参考:kubekey/config-example.md at release-1.2 · kubesphere/kubekey · GitHub
3.创建集群前安装依赖
3. 使用配置文件创建集群
一、概念
多节点集群由至少一个主节点和一个工作节点组成。您可以使用任何节点作为任务机来执行安装任务,也可以在安装之前或之后根据需要新增节点(例如,为了实现高可用性)。
- Master:主节点,通常托管控制平面,控制和管理整个系统。
- Worker:工作节点,运行部署在工作节点上的实际应用程序。
步骤 1:准备 Linux 主机
请参见下表列出的硬件和操作系统要求。在本教程所演示多节点安装示例中,您需要按照下列要求准备至少三台主机。如果您节点的资源充足,也可以将 KubeSphere 容器平台安装在两个节点上。
系统要求
| 系统 | 最低要求(每个节点) |
|---|---|
| Ubuntu 16.04,18.04 | CPU:2 核,内存:4 G,硬盘:40 G |
| Debian Buster,Stretch | CPU:2 核,内存:4 G,硬盘:40 G |
| CentOS 7.x | CPU:2 核,内存:4 G,硬盘:40 G |
| Red Hat Enterprise Linux 7 | CPU:2 核,内存:4 G,硬盘:40 G |
| SUSE Linux Enterprise Server 15 /openSUSE Leap 15.2 | CPU:2 核,内存:4 G,硬盘:40 G |
本示例包括以下三台主机,其中主节点充当任务机。
| 主机 IP | 主机名 | 角色 |
|---|---|---|
| 192.168.100.2 | master | master, etcd |
| 192.168.100.3 | node1 | worker |
| 192.168.100.4 | node2 | worker |
二、搭建部署
2.1 服务器挂载磁盘
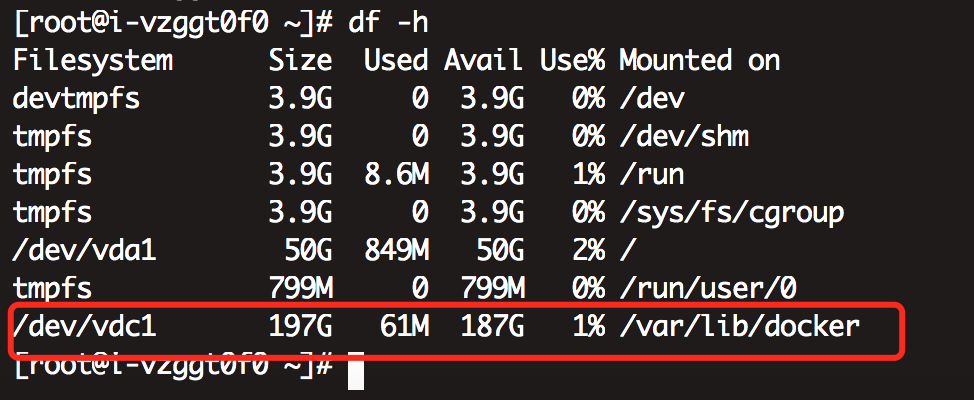
/var/lib/docker 路径主要用于存储容器数据,在使用和操作过程中数据量会逐渐增加。因此,在生产环境中,建议为 /var/lib/docker 单独挂载一个硬盘。
1、登录192.168.100.2服务器进行挂载200G磁盘到服务器
2、查看磁盘
fdisk -l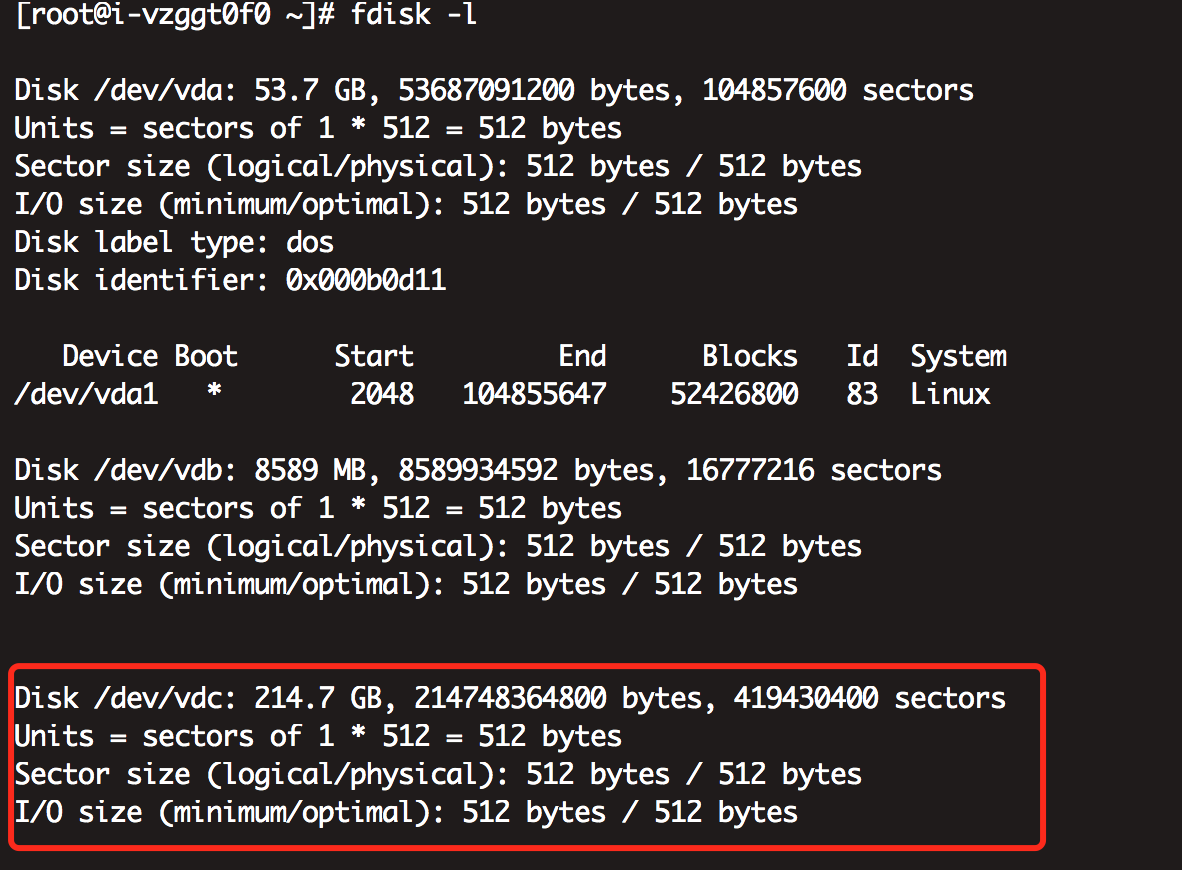
3、查看已挂载磁盘的状况
df -h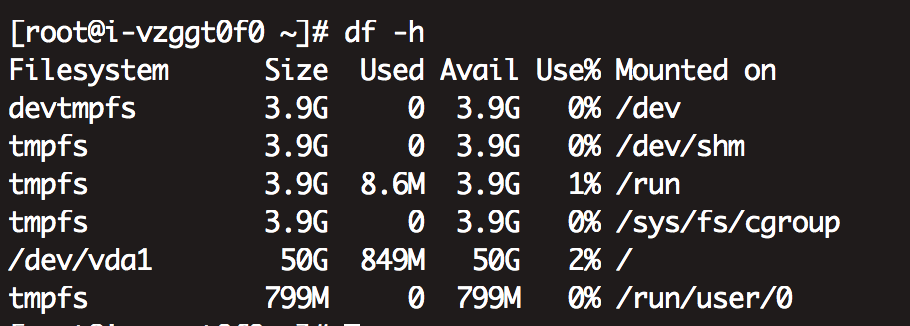
4、格式化磁盘
命令:fdisk /dev/vdb
注意:图中箭头标注处续手动键入,有二处是直接回车
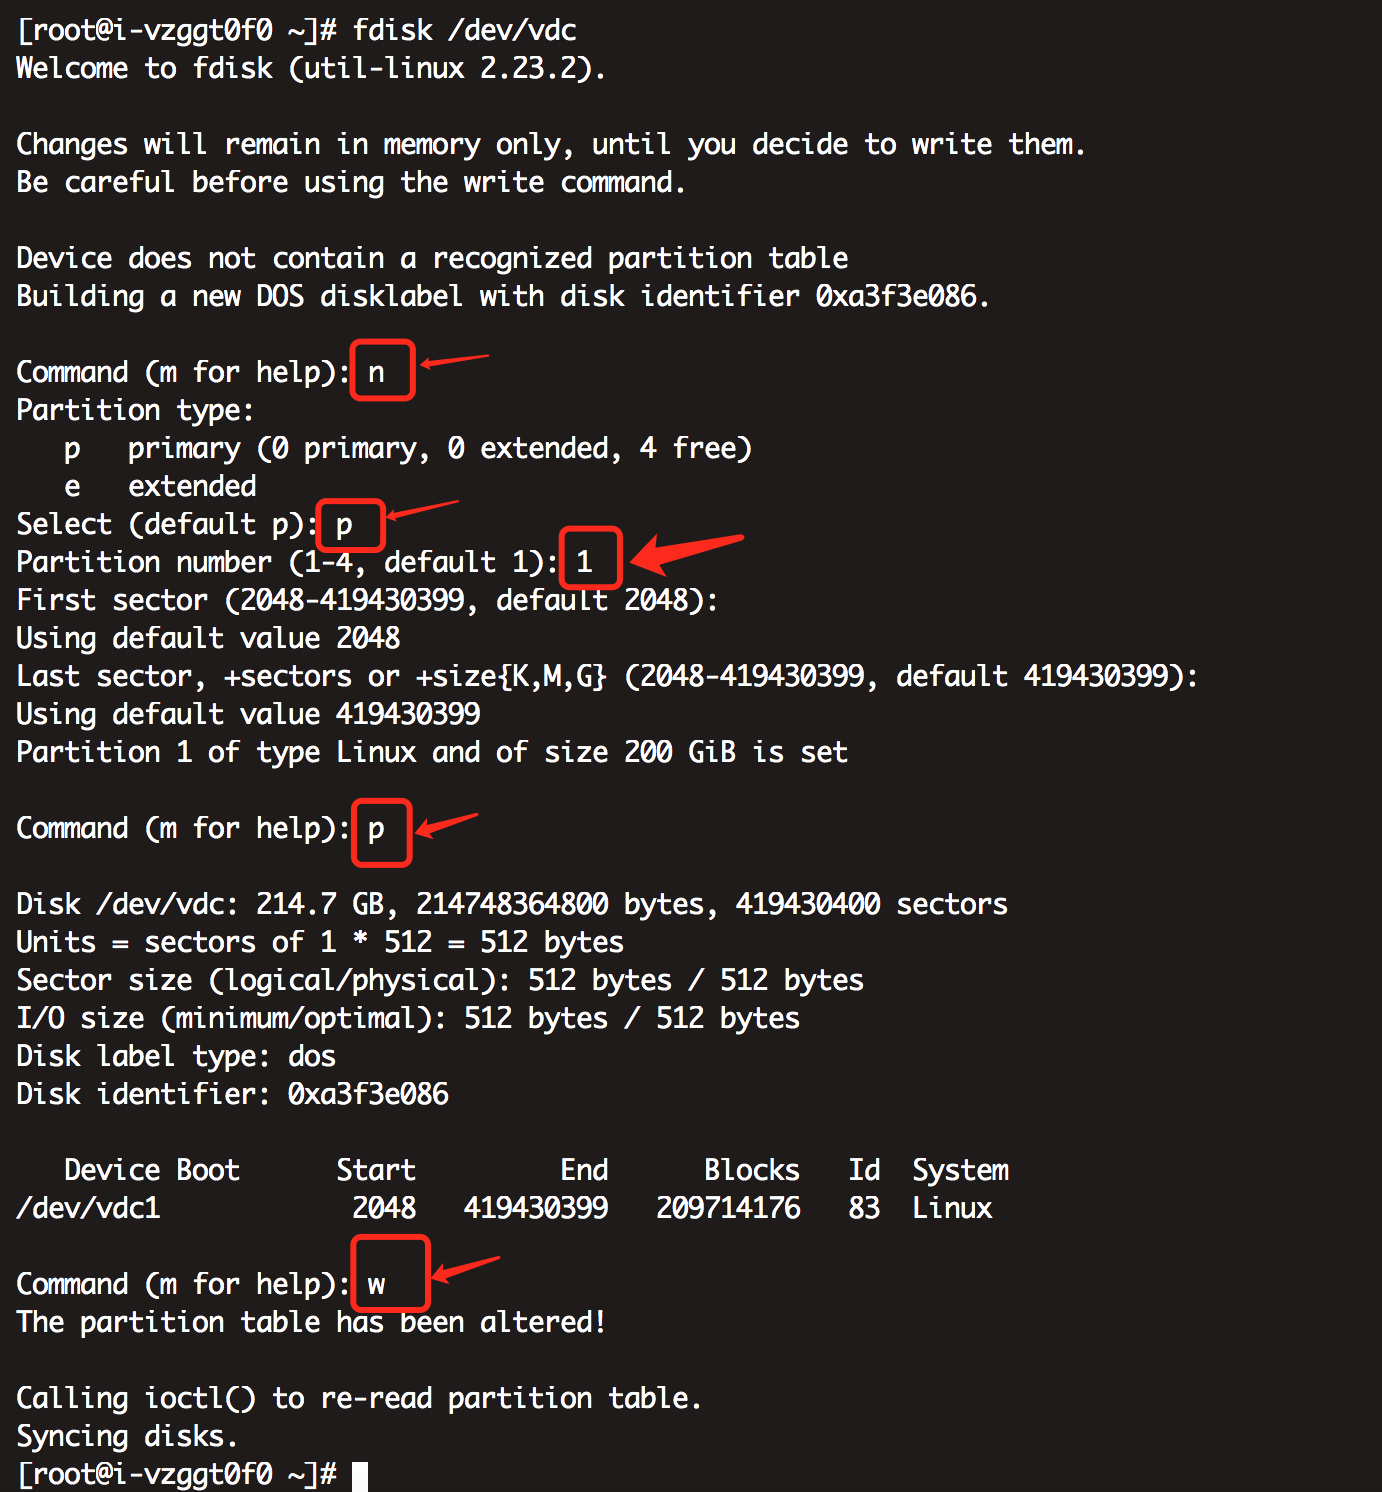
5、执行下partprobe 分区信息尚未到分区表里
partprobe 6、创建分区
命令:mkfs.ext4 /dev/vdc1
mkfs.ext4 /dev/vdc1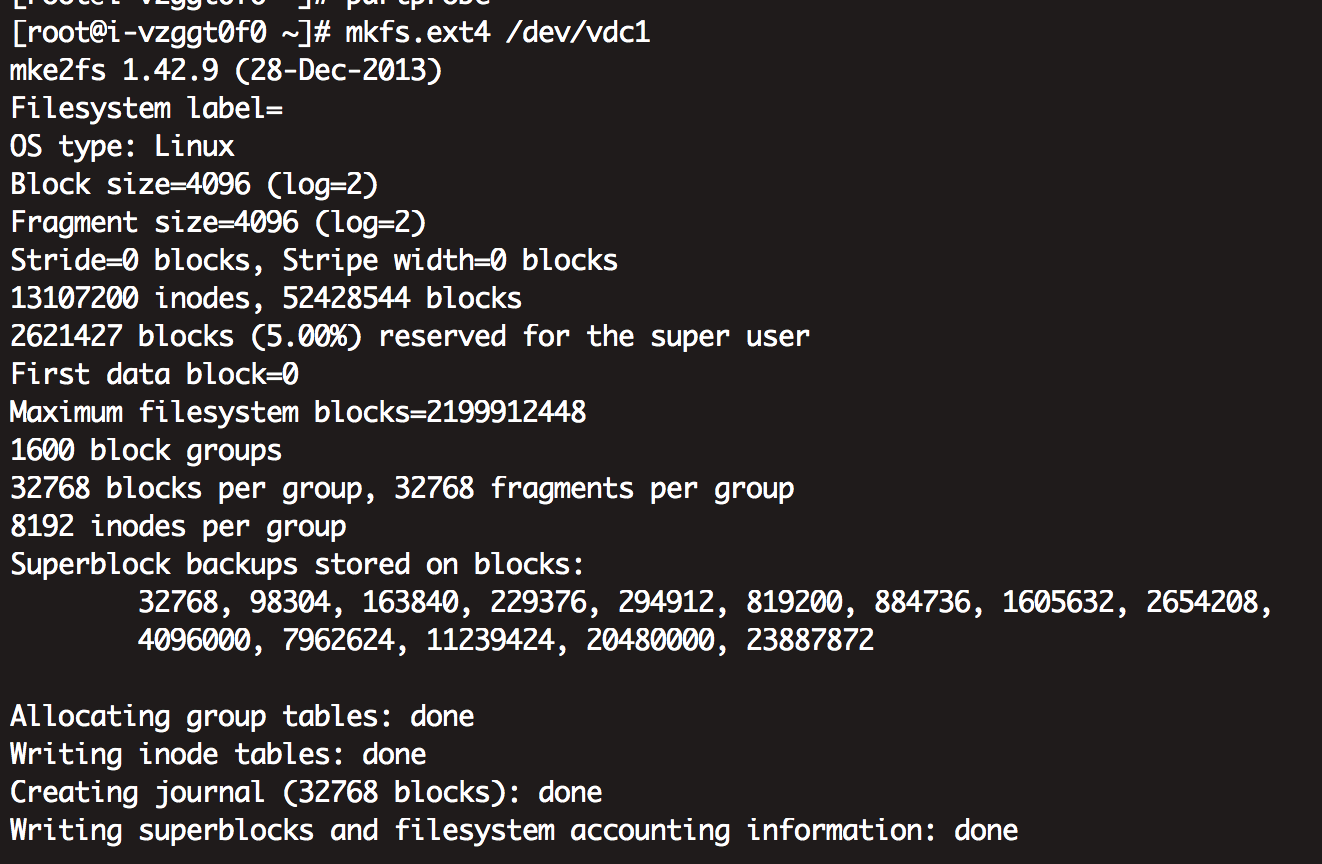
7、挂载分区
mkdir /var/lib/docker
mount /dev/vdc1 /var/lib/docker
df -h
如下图:新增了200G的磁盘
8、把信息写入fstab,如果系统重启磁盘自动挂载。
通过blkid查看uuid写入到 /etc/fstab
blkid
编辑配置文件
vim /etc/fstab新增
UUID=20b30a84-98ff-4f81-a974-0df6de54ac7a /var/lib/docker ext4 defaults 0 0
9、最后,最重要的一步,重启服务器reboot验证配置是否生效
10、其它服务器也进行如上操作,三台服务器都完成新增外挂磁盘
2.2 打通各服务器之前的ssh免登录
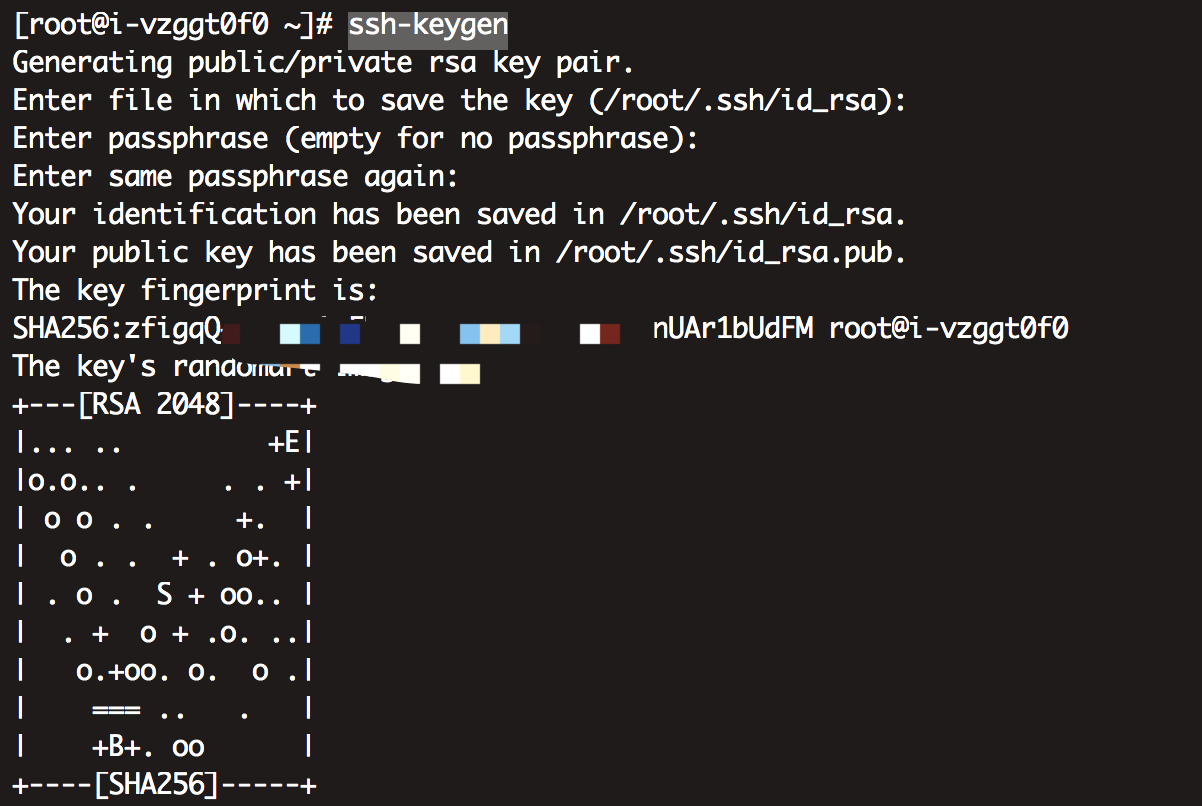
a、在192.168.100.2服务器上生成登录密钥,使用命令ssh-keygen,如果没有特殊要求,中间一直回车就好
b、其它两台服务器登录后操作如上
c、登录192.168.100.2把/root/.ssh/id_rsa.pub 中的内容添加到其他两台服务器的/root/.ssh/authorized_keys中
d、然后使用ssh root@192.168.100.3 和ssh root@192.168.100.4如果能正常免密登录就代表主节点的ssh免密正常了
e、接下去把登录192.168.100.3把/root/.ssh/id_rsa.pub 中的内容添加到其他两台服务器的/root/.ssh/authorized_keys中
把登录192.168.100.4把/root/.ssh/id_rsa.pub 中的内容添加到其他两台服务器的/root/.ssh/authorized_keys中
f、再进行验证
2.3 使用KubeKey搭建k8s集群
容器运行时
您的集群必须有一个可用的容器运行时。如果您使用 KubeKey 搭建集群,KubeKey 会默认安装最新版本的 Docker。或者,您也可以在创建集群前手动安装 Docker 或其他容器运行时。
| 支持的容器运行时 | 版本 |
|---|---|
| Docker | 19.3.8+ |
| containerd(试验版,未经充分测试) | 最新版 |
| CRI-O(试验版,未经充分测试) | 最新版 |
| iSula(试验版,未经充分测试) | 最新版 |
备注
如果您想在离线环境中部署 KubeSphere,请务必提前安装一个容器运行时。
依赖项要求
KubeKey 可以一同安装 Kubernetes 和 KubeSphere。根据要安装的 Kubernetes 版本,需要安装的依赖项可能会不同。您可以参考下表,查看是否需要提前在节点上安装相关依赖项。
| 依赖项 | Kubernetes 版本 ≥ 1.18 | Kubernetes 版本 < 1.18 |
|---|---|---|
socat | 必须 | 可选,但建议安装 |
conntrack | 必须 | 可选,但建议安装 |
ebtables | 可选,但建议安装 | 可选,但建议安装 |
ipset | 可选,但建议安装 | 可选,但建议安装 |
网络和 DNS 要求
- 请确保
/etc/resolv.conf中的 DNS 地址可用,否则,可能会导致集群中的 DNS 出现问题。 - 如果您的网络配置使用防火墙规则或安全组,请务必确保基础设施组件可以通过特定端口相互通信。建议您关闭防火墙。有关更多信息,请参见端口要求。
- 支持的 CNI 插件:Calico 和 Flannel。其他插件也适用(例如 Cilium 和 Kube-OVN 等),但请注意它们未经充分测试。
提示
- 建议您使用干净的操作系统(即不安装任何其他软件)。否则,可能会产生冲突。
- 如果您从
dockerhub.io下载镜像时遇到问题,建议提前准备仓库的镜像地址(即加速器)。请参见为安装配置加速器或为 Docker Daemon 配置仓库镜像。
步骤 1:下载 KubeKey
请按照以下步骤下载 KubeKey。
- 如果您能正常访问 GitHub/Googleapis
- 如果您访问 GitHub/Googleapis 受限
先执行以下命令以确保您从正确的区域下载 KubeKey。
export KKZONE=cn执行以下命令下载 KubeKey:
curl -sfL https://get-kk.kubesphere.io | VERSION=v1.2.1 sh -
备注
下载 KubeKey 后,如果您将其传输至访问 Googleapis 同样受限的新机器,请您在执行以下步骤之前务必再次执行 export KKZONE=cn 命令。
备注
执行以上命令会下载最新版 KubeKey (v1.2.1),您可以修改命令中的版本号下载指定版本。
为 kk 添加可执行权限:
chmod +x kk
步骤 3:创建集群
1. 使用配置文件创建集群配置文件
命令如下:
./kk create config --with-kubernetes v1.21.5 --with-kubesphere v3.2.1 -f /root/kk-k8s-config.yaml安装 KubeSphere 3.2.1 的建议 Kubernetes 版本:v1.19.x、v1.20.x、v1.21.x 或 v1.22.x(实验性支持)。如果不指定 Kubernetes 版本,KubeKey 将默认安装 Kubernetes v1.21.5。有关受支持的 Kubernetes 版本的更多信息,请参见支持矩阵。
-
如果您在此步骤的命令中不添加标志
--with-kubesphere,则不会部署 KubeSphere,只能使用配置文件中的addons字段安装,或者在您后续使用./kk create cluster命令时再次添加这个标志。 -
如果您添加标志
--with-kubesphere时不指定 KubeSphere 版本,则会安装最新版本的 KubeSphere。
默认配置文件如下:
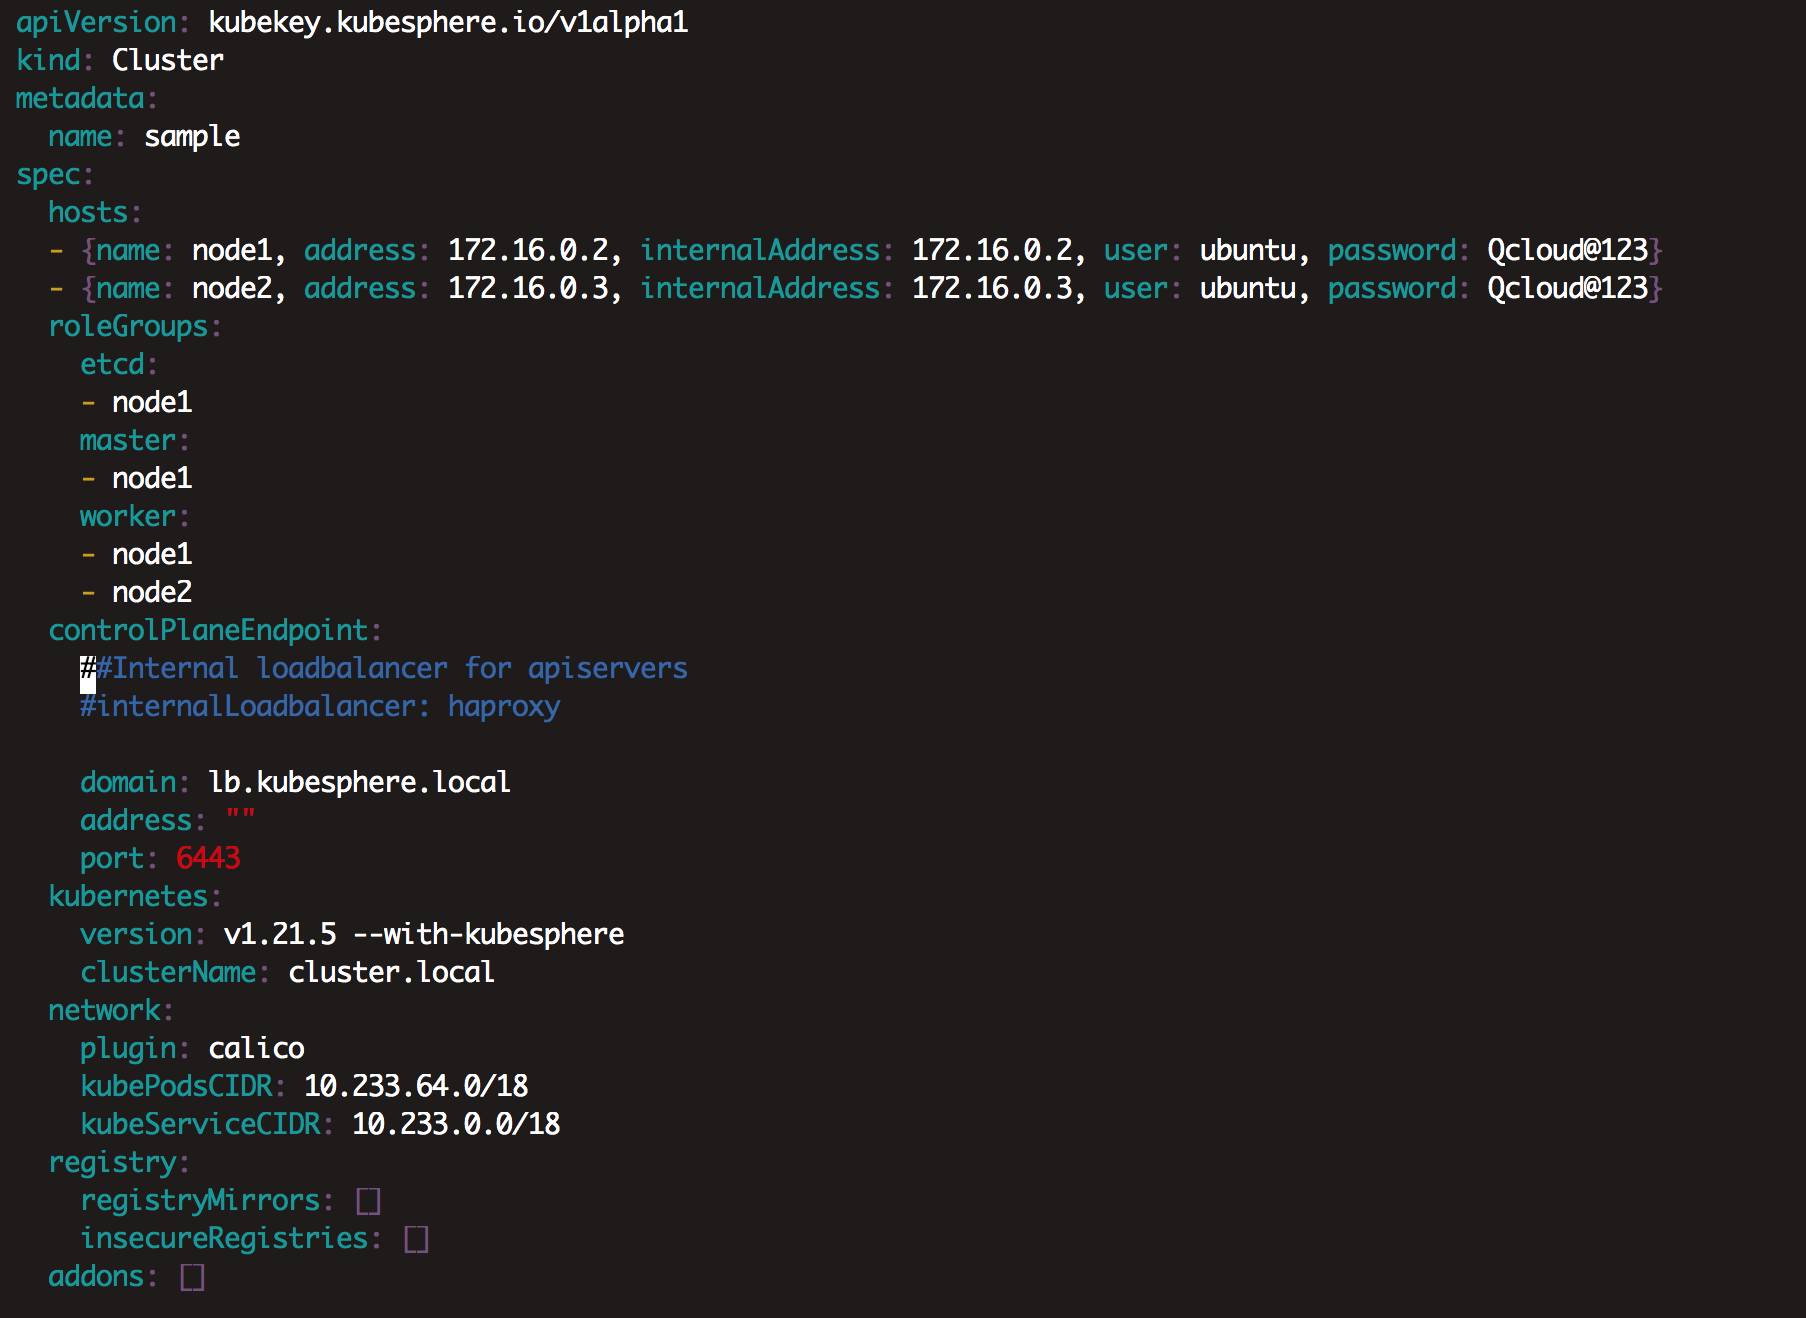
2.修改配置文件, 主要设置hosts和roleGroups配置
vim kk-k8s-config.yaml
apiVersion: kubekey.kubesphere.io/v1alpha1
kind: Cluster
metadata:
  name: sample
spec:
  hosts:
  - {name: master, address: 192.168.100.2, internalAddress: 192.168.100.2, privateKeyPath: "~/.ssh/id_rsa"}
  - {name: node1, address: 192.168.100.3, internalAddress: 192.168.100.3,privateKeyPath: "~/.ssh/id_rsa"}
  - {name: node2, address: 192.168.100.4, internalAddress: 192.168.100.4,privateKeyPath: "~/.ssh/id_rsa"}
  roleGroups:
    etcd:
    - master
    master:
    - master
    worker:
    - node1
    - node2
  controlPlaneEndpoint:
    ##Internal loadbalancer for apiservers
    #internalLoadbalancer: haproxy

    domain: lb.kubesphere.local
    address: ""
    port: 6443
  kubernetes:
    version: v1.21.5
    clusterName: cluster.local
  network:
    plugin: calico
    kubePodsCIDR: 10.233.64.0/18
    kubeServiceCIDR: 10.233.0.0/18
  registry:
    registryMirrors: []
    insecureRegistries: []
  addons: []


---
apiVersion: installer.kubesphere.io/v1alpha1
kind: ClusterConfiguration
metadata:
  name: ks-installer
  namespace: kubesphere-system
  labels:
    version: v3.2.1
spec:
  persistence:
    storageClass: ""
  authentication:
    jwtSecret: ""
  local_registry: ""
  # dev_tag: ""
  etcd:
    monitoring: false
    endpointIps: localhost
    port: 2379
    tlsEnable: true
  common:
    core:
      console:
        enableMultiLogin: true
        port: 30880
        type: NodePort
    # apiserver:
    #  resources: {}
    # controllerManager:
    #  resources: {}
    redis:
      enabled: false
      volumeSize: 2Gi
    openldap:
      enabled: false
      volumeSize: 2Gi
    minio:
      volumeSize: 20Gi
    monitoring:
      # type: external
      endpoint: http://prometheus-operated.kubesphere-monitoring-system.svc:9090
      GPUMonitoring:
        enabled: false
    gpu:
      kinds:
      - resourceName: "nvidia.com/gpu"
        resourceType: "GPU"
        default: true
    es:
      # master:
      #   volumeSize: 4Gi
      #   replicas: 1
      #   resources: {}
      # data:
      #   volumeSize: 20Gi
      #   replicas: 1
      #   resources: {}
      logMaxAge: 7
      elkPrefix: logstash
      basicAuth:
        enabled: false
        username: ""
        password: ""
      externalElasticsearchHost: ""
      externalElasticsearchPort: ""
  alerting:
    enabled: false
    # thanosruler:
    #   replicas: 1
    #   resources: {}
  auditing:
    enabled: false
    # operator:
    #   resources: {}
    # webhook:
    #   resources: {}
  devops:
    enabled: false
    jenkinsMemoryLim: 2Gi
    jenkinsMemoryReq: 1500Mi
    jenkinsVolumeSize: 8Gi
    jenkinsJavaOpts_Xms: 512m
    jenkinsJavaOpts_Xmx: 512m
    jenkinsJavaOpts_MaxRAM: 2g
  events:
    enabled: false
    # operator:
    #   resources: {}
    # exporter:
    #   resources: {}
    # ruler:
    #   enabled: true
    #   replicas: 2
    #   resources: {}
  logging:
    enabled: false
    containerruntime: docker
    logsidecar:
      enabled: true
      replicas: 2
      # resources: {}
  metrics_server:
    enabled: false
  monitoring:
    storageClass: ""
    # kube_rbac_proxy:
    #   resources: {}
    # kube_state_metrics:
    #   resources: {}
    # prometheus:
    #   replicas: 1
    #   volumeSize: 20Gi
    #   resources: {}
    #   operator:
    #     resources: {}
    #   adapter:
    #     resources: {}
    # node_exporter:
    #   resources: {}
    # alertmanager:
    #   replicas: 1
    #   resources: {}
    # notification_manager:
    #   resources: {}
    #   operator:
    #     resources: {}
    #   proxy:
    #     resources: {}
    gpu:
      nvidia_dcgm_exporter:
        enabled: false
        # resources: {}
  multicluster:
    clusterRole: none
  network:
    networkpolicy:
      enabled: false
    ippool:
      type: none
    topology:
      type: none
  openpitrix:
    store:
      enabled: false
  servicemesh:
    enabled: false
  kubeedge:
    enabled: false
    cloudCore:
      nodeSelector: {"node-role.kubernetes.io/worker": ""}
      tolerations: []
      cloudhubPort: "10000"
      cloudhubQuicPort: "10001"
      cloudhubHttpsPort: "10002"
      cloudstreamPort: "10003"
      tunnelPort: "10004"
      cloudHub:
        advertiseAddress:
          - ""
        nodeLimit: "100"
      service:
        cloudhubNodePort: "30000"
        cloudhubQuicNodePort: "30001"
        cloudhubHttpsNodePort: "30002"
        cloudstreamNodePort: "30003"
        tunnelNodePort: "30004"
    edgeWatcher:
      nodeSelector: {"node-role.kubernetes.io/worker": ""}
      tolerations: []
      edgeWatcherAgent:
        nodeSelector: {"node-role.kubernetes.io/worker": ""}
        tolerations: []
该配置文件内容说明可参考:kubekey/config-example.md at release-1.2 · kubesphere/kubekey · GitHub
提示:
- 您可以编辑配置文件,启用多集群功能。有关更多信息,请参见多集群管理。
- 您也可以选择要安装的组件。有关更多信息,请参见启用可插拔组件。有关完整的
config-sample.yaml文件的示例,请参见此文件。
3.创建集群前安装依赖
yum install socat conntrack ebtables ipset -y3. 使用配置文件创建集群
注意,因为我的kk是放在100.2这台服务器,如果kk脚本ssh到100.2服务器的话需要再执行一下这个命令
cat .ssh/id_rsa.pub >> .ssh/authorized_keys./kk create cluster -f kk-k8s-config.yaml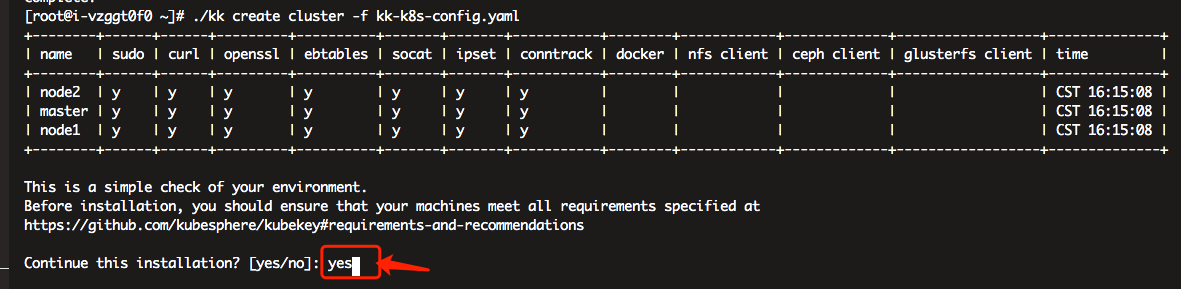
安装的时候报错啦,报错信息如下:
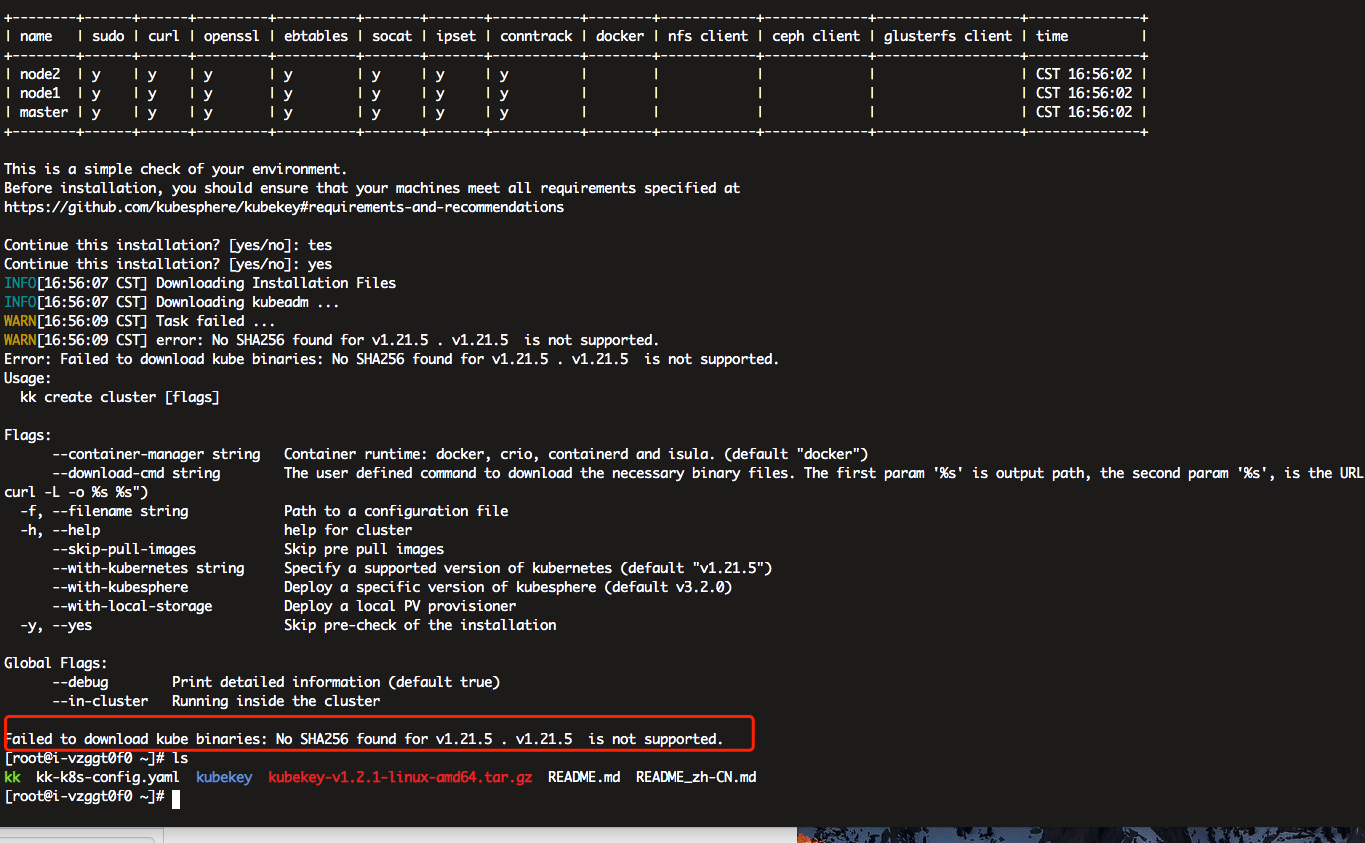
那我尝试删除kubekey文件夹,重新安装,还是失败,原来是kk-k8s-config.yaml配置文件内容有误导致,后来重新生成了该配置文件就可以正常安装
安装日志如下:
[root@i-vzggt0f0 ~]# ./kk create cluster -f kk-k8s-config.yaml
+--------+------+------+---------+----------+-------+-------+-----------+--------+------------+-------------+------------------+--------------+
| name   | sudo | curl | openssl | ebtables | socat | ipset | conntrack | docker | nfs client | ceph client | glusterfs client | time         |
+--------+------+------+---------+----------+-------+-------+-----------+--------+------------+-------------+------------------+--------------+
| node1  | y    | y    | y       | y        | y     | y     | y         |        |            |             |                  | CST 18:06:22 |
| master | y    | y    | y       | y        | y     | y     | y         |        |            |             |                  | CST 18:06:22 |
| node2  | y    | y    | y       | y        | y     | y     | y         |        |            |             |                  | CST 18:06:22 |
+--------+------+------+---------+----------+-------+-------+-----------+--------+------------+-------------+------------------+--------------+

This is a simple check of your environment.
Before installation, you should ensure that your machines meet all requirements specified at
https://github.com/kubesphere/kubekey#requirements-and-recommendations

Continue this installation? [yes/no]: yes
INFO[18:06:24 CST] Downloading Installation Files
INFO[18:06:24 CST] Downloading kubeadm ...
INFO[18:06:27 CST] Downloading kubelet ...
INFO[18:06:32 CST] Downloading kubectl ...
INFO[18:06:34 CST] Downloading helm ...
INFO[18:06:38 CST] Downloading kubecni ...
INFO[18:06:43 CST] Downloading etcd ...
INFO[18:06:46 CST] Downloading docker ...
INFO[18:06:48 CST] Downloading crictl ...
INFO[18:06:52 CST] Configuring operating system ...
[node2 192.168.100.4] MSG:
net.ipv6.conf.eth0.accept_dad = 0
net.ipv6.conf.eth0.accept_ra = 1
net.ipv6.conf.eth0.accept_ra_defrtr = 1
net.ipv6.conf.eth0.accept_ra_rtr_pref = 1
net.ipv6.conf.eth0.accept_ra_rt_info_max_plen = 1
net.ipv4.ip_forward = 1
net.bridge.bridge-nf-call-arptables = 1
net.bridge.bridge-nf-call-ip6tables = 1
net.bridge.bridge-nf-call-iptables = 1
net.ipv4.ip_local_reserved_ports = 30000-32767
vm.max_map_count = 262144
vm.swappiness = 1
fs.inotify.max_user_instances = 524288
no crontab for root
[master 192.168.100.2] MSG:
net.ipv6.conf.eth0.accept_dad = 0
net.ipv6.conf.eth0.accept_ra = 1
net.ipv6.conf.eth0.accept_ra_defrtr = 1
net.ipv6.conf.eth0.accept_ra_rtr_pref = 1
net.ipv6.conf.eth0.accept_ra_rt_info_max_plen = 1
net.ipv4.ip_forward = 1
net.bridge.bridge-nf-call-arptables = 1
net.bridge.bridge-nf-call-ip6tables = 1
net.bridge.bridge-nf-call-iptables = 1
net.ipv4.ip_local_reserved_ports = 30000-32767
vm.max_map_count = 262144
vm.swappiness = 1
fs.inotify.max_user_instances = 524288
no crontab for root
[node1 192.168.100.3] MSG:
net.ipv6.conf.eth0.accept_dad = 0
net.ipv6.conf.eth0.accept_ra = 1
net.ipv6.conf.eth0.accept_ra_defrtr = 1
net.ipv6.conf.eth0.accept_ra_rtr_pref = 1
net.ipv6.conf.eth0.accept_ra_rt_info_max_plen = 1
net.ipv4.ip_forward = 1
net.bridge.bridge-nf-call-arptables = 1
net.bridge.bridge-nf-call-ip6tables = 1
net.bridge.bridge-nf-call-iptables = 1
net.ipv4.ip_local_reserved_ports = 30000-32767
vm.max_map_count = 262144
vm.swappiness = 1
fs.inotify.max_user_instances = 524288
no crontab for root
INFO[18:06:54 CST] Get cluster status
INFO[18:06:54 CST] Installing Container Runtime ...
Push /root/kubekey/v1.21.5/amd64/docker-20.10.8.tgz to 192.168.100.4:/tmp/kubekey/docker-20.10.8.tgz   Done
Push /root/kubekey/v1.21.5/amd64/docker-20.10.8.tgz to 192.168.100.3:/tmp/kubekey/docker-20.10.8.tgz   Done
Push /root/kubekey/v1.21.5/amd64/docker-20.10.8.tgz to 192.168.100.2:/tmp/kubekey/docker-20.10.8.tgz   Done
INFO[18:06:59 CST] Start to download images on all nodes
[node2] Downloading image: kubesphere/pause:3.4.1
[master] Downloading image: kubesphere/pause:3.4.1
[node1] Downloading image: kubesphere/pause:3.4.1
[node2] Downloading image: kubesphere/kube-proxy:v1.21.5
[node1] Downloading image: kubesphere/kube-proxy:v1.21.5
[master] Downloading image: kubesphere/kube-apiserver:v1.21.5
[node2] Downloading image: coredns/coredns:1.8.0
[node1] Downloading image: coredns/coredns:1.8.0
[master] Downloading image: kubesphere/kube-controller-manager:v1.21.5
[node2] Downloading image: kubesphere/k8s-dns-node-cache:1.15.12
[node1] Downloading image: kubesphere/k8s-dns-node-cache:1.15.12
[master] Downloading image: kubesphere/kube-scheduler:v1.21.5
[node2] Downloading image: calico/kube-controllers:v3.20.0
[master] Downloading image: kubesphere/kube-proxy:v1.21.5
[node1] Downloading image: calico/kube-controllers:v3.20.0
[node2] Downloading image: calico/cni:v3.20.0
[node1] Downloading image: calico/cni:v3.20.0
[master] Downloading image: coredns/coredns:1.8.0
[master] Downloading image: kubesphere/k8s-dns-node-cache:1.15.12
[node2] Downloading image: calico/node:v3.20.0
[node1] Downloading image: calico/node:v3.20.0
[master] Downloading image: calico/kube-controllers:v3.20.0
[node1] Downloading image: calico/pod2daemon-flexvol:v3.20.0
[node2] Downloading image: calico/pod2daemon-flexvol:v3.20.0
[master] Downloading image: calico/cni:v3.20.0
[master] Downloading image: calico/node:v3.20.0
[master] Downloading image: calico/pod2daemon-flexvol:v3.20.0
INFO[18:08:48 CST] Getting etcd status
[master 192.168.100.2] MSG:
Configuration file will be created
INFO[18:08:48 CST] Generating etcd certs
INFO[18:08:49 CST] Synchronizing etcd certs
INFO[18:08:49 CST] Creating etcd service
Push /root/kubekey/v1.21.5/amd64/etcd-v3.4.13-linux-amd64.tar.gz to 192.168.100.2:/tmp/kubekey/etcd-v3.4.13-linux-amd64.tar.gz   Done
INFO[18:08:50 CST] Starting etcd cluster
INFO[18:08:50 CST] Refreshing etcd configuration
[master 192.168.100.2] MSG:
Created symlink from /etc/systemd/system/multi-user.target.wants/etcd.service to /etc/systemd/system/etcd.service.
INFO[18:08:51 CST] Backup etcd data regularly
INFO[18:08:57 CST] Installing kube binaries
Push /root/kubekey/v1.21.5/amd64/kubeadm to 192.168.100.2:/tmp/kubekey/kubeadm   Done
Push /root/kubekey/v1.21.5/amd64/kubeadm to 192.168.100.4:/tmp/kubekey/kubeadm   Done
Push /root/kubekey/v1.21.5/amd64/kubeadm to 192.168.100.3:/tmp/kubekey/kubeadm   Done
Push /root/kubekey/v1.21.5/amd64/kubelet to 192.168.100.2:/tmp/kubekey/kubelet   Done
Push /root/kubekey/v1.21.5/amd64/kubectl to 192.168.100.2:/tmp/kubekey/kubectl   Done
Push /root/kubekey/v1.21.5/amd64/helm to 192.168.100.2:/tmp/kubekey/helm   Done
Push /root/kubekey/v1.21.5/amd64/cni-plugins-linux-amd64-v0.9.1.tgz to 192.168.100.2:/tmp/kubekey/cni-plugins-linux-amd64-v0.9.1.tgz   Done
Push /root/kubekey/v1.21.5/amd64/kubelet to 192.168.100.4:/tmp/kubekey/kubelet   Done
Push /root/kubekey/v1.21.5/amd64/kubelet to 192.168.100.3:/tmp/kubekey/kubelet   Done
Push /root/kubekey/v1.21.5/amd64/kubectl to 192.168.100.4:/tmp/kubekey/kubectl   Done
Push /root/kubekey/v1.21.5/amd64/kubectl to 192.168.100.3:/tmp/kubekey/kubectl   Done
Push /root/kubekey/v1.21.5/amd64/helm to 192.168.100.4:/tmp/kubekey/helm   Done
Push /root/kubekey/v1.21.5/amd64/helm to 192.168.100.3:/tmp/kubekey/helm   Done
Push /root/kubekey/v1.21.5/amd64/cni-plugins-linux-amd64-v0.9.1.tgz to 192.168.100.4:/tmp/kubekey/cni-plugins-linux-amd64-v0.9.1.tgz   Done
Push /root/kubekey/v1.21.5/amd64/cni-plugins-linux-amd64-v0.9.1.tgz to 192.168.100.3:/tmp/kubekey/cni-plugins-linux-amd64-v0.9.1.tgz   Done
INFO[18:09:04 CST] Initializing kubernetes cluster
[master 192.168.100.2] MSG:
W0303 18:09:04.608374    4074 utils.go:69] The recommended value for "clusterDNS" in "KubeletConfiguration" is: [10.233.0.10]; the provided value is: [169.254.25.10]
[init] Using Kubernetes version: v1.21.5
[preflight] Running pre-flight checks
[preflight] Pulling images required for setting up a Kubernetes cluster
[preflight] This might take a minute or two, depending on the speed of your internet connection
[preflight] You can also perform this action in beforehand using 'kubeadm config images pull'
[certs] Using certificateDir folder "/etc/kubernetes/pki"
[certs] Generating "ca" certificate and key
[certs] Generating "apiserver" certificate and key
[certs] apiserver serving cert is signed for DNS names [kubernetes kubernetes.default kubernetes.default.svc kubernetes.default.svc.cluster.local lb.kubesphere.local localhost master master.cluster.local node1 node1.cluster.local node2 node2.cluster.local] and IPs [10.233.0.1 192.168.100.2 127.0.0.1 192.168.100.3 192.168.100.4]
[certs] Generating "apiserver-kubelet-client" certificate and key
[certs] Generating "front-proxy-ca" certificate and key
[certs] Generating "front-proxy-client" certificate and key
[certs] External etcd mode: Skipping etcd/ca certificate authority generation
[certs] External etcd mode: Skipping etcd/server certificate generation
[certs] External etcd mode: Skipping etcd/peer certificate generation
[certs] External etcd mode: Skipping etcd/healthcheck-client certificate generation
[certs] External etcd mode: Skipping apiserver-etcd-client certificate generation
[certs] Generating "sa" key and public key
[kubeconfig] Using kubeconfig folder "/etc/kubernetes"
[kubeconfig] Writing "admin.conf" kubeconfig file
[kubeconfig] Writing "kubelet.conf" kubeconfig file
[kubeconfig] Writing "controller-manager.conf" kubeconfig file
[kubeconfig] Writing "scheduler.conf" kubeconfig file
[kubelet-start] Writing kubelet environment file with flags to file "/var/lib/kubelet/kubeadm-flags.env"
[kubelet-start] Writing kubelet configuration to file "/var/lib/kubelet/config.yaml"
[kubelet-start] Starting the kubelet
[control-plane] Using manifest folder "/etc/kubernetes/manifests"
[control-plane] Creating static Pod manifest for "kube-apiserver"
[control-plane] Creating static Pod manifest for "kube-controller-manager"
[control-plane] Creating static Pod manifest for "kube-scheduler"
[wait-control-plane] Waiting for the kubelet to boot up the control plane as static Pods from directory "/etc/kubernetes/manifests". This can take up to 4m0s
[apiclient] All control plane components are healthy after 15.002706 seconds
[upload-config] Storing the configuration used in ConfigMap "kubeadm-config" in the "kube-system" Namespace
[kubelet] Creating a ConfigMap "kubelet-config-1.21" in namespace kube-system with the configuration for the kubelets in the cluster
[upload-certs] Skipping phase. Please see --upload-certs
[mark-control-plane] Marking the node master as control-plane by adding the labels: [node-role.kubernetes.io/master(deprecated) node-role.kubernetes.io/control-plane node.kubernetes.io/exclude-from-external-load-balancers]
[mark-control-plane] Marking the node master as control-plane by adding the taints [node-role.kubernetes.io/master:NoSchedule]
[bootstrap-token] Using token: gsmfy9.hn1okkh8ygjifjoh
[bootstrap-token] Configuring bootstrap tokens, cluster-info ConfigMap, RBAC Roles
[bootstrap-token] configured RBAC rules to allow Node Bootstrap tokens to get nodes
[bootstrap-token] configured RBAC rules to allow Node Bootstrap tokens to post CSRs in order for nodes to get long term certificate credentials
[bootstrap-token] configured RBAC rules to allow the csrapprover controller automatically approve CSRs from a Node Bootstrap Token
[bootstrap-token] configured RBAC rules to allow certificate rotation for all node client certificates in the cluster
[bootstrap-token] Creating the "cluster-info" ConfigMap in the "kube-public" namespace
[kubelet-finalize] Updating "/etc/kubernetes/kubelet.conf" to point to a rotatable kubelet client certificate and key
[addons] Applied essential addon: CoreDNS
[addons] Applied essential addon: kube-proxy

Your Kubernetes control-plane has initialized successfully!

To start using your cluster, you need to run the following as a regular user:

  mkdir -p $HOME/.kube
  sudo cp -i /etc/kubernetes/admin.conf $HOME/.kube/config
  sudo chown $(id -u):$(id -g) $HOME/.kube/config

Alternatively, if you are the root user, you can run:

  export KUBECONFIG=/etc/kubernetes/admin.conf

You should now deploy a pod network to the cluster.
Run "kubectl apply -f [podnetwork].yaml" with one of the options listed at:
  https://kubernetes.io/docs/concepts/cluster-administration/addons/

You can now join any number of control-plane nodes by copying certificate authorities
and service account keys on each node and then running the following as root:

  kubeadm join lb.kubesphere.local:6443 --token gsmfy9.hn1okkh8ygjifjoh
        --discovery-token-ca-cert-hash sha256:6e4c0ef86d60af9f5e52368545fc29d1d207c63d8f9cfb58effe6b70014abbf0
        --control-plane

Then you can join any number of worker nodes by running the following on each as root:

kubeadm join lb.kubesphere.local:6443 --token gsmfy9.hn1okkh8ygjifjoh
        --discovery-token-ca-cert-hash sha256:6e4c0ef86d60af9f5e52368545fc29d1d207c63d8f9cfb58effe6b70014abbf0
[master 192.168.100.2] MSG:
service "kube-dns" deleted
[master 192.168.100.2] MSG:
service/coredns created
Warning: resource clusterroles/system:coredns is missing the kubectl.kubernetes.io/last-applied-configuration annotation which is required by kubectl apply. kubectl apply should only be used on resources created declaratively by either kubectl create --save-config or kubectl apply. The missing annotation will be patched automatically.
clusterrole.rbac.authorization.k8s.io/system:coredns configured
[master 192.168.100.2] MSG:
serviceaccount/nodelocaldns created
daemonset.apps/nodelocaldns created
[master 192.168.100.2] MSG:
configmap/nodelocaldns created
INFO[18:09:47 CST] Get cluster status
INFO[18:09:48 CST] Joining nodes to cluster
[node1 192.168.100.3] MSG:
[preflight] Running pre-flight checks
[preflight] Reading configuration from the cluster...
[preflight] FYI: You can look at this config file with 'kubectl -n kube-system get cm kubeadm-config -o yaml'
W0303 18:09:48.664815    3518 utils.go:69] The recommended value for "clusterDNS" in "KubeletConfiguration" is: [10.233.0.10]; the provided value is: [169.254.25.10]
[kubelet-start] Writing kubelet configuration to file "/var/lib/kubelet/config.yaml"
[kubelet-start] Writing kubelet environment file with flags to file "/var/lib/kubelet/kubeadm-flags.env"
[kubelet-start] Starting the kubelet
[kubelet-start] Waiting for the kubelet to perform the TLS Bootstrap...

This node has joined the cluster:
* Certificate signing request was sent to apiserver and a response was received.
* The Kubelet was informed of the new secure connection details.

Run 'kubectl get nodes' on the control-plane to see this node join the cluster.
[node2 192.168.100.4] MSG:
[preflight] Running pre-flight checks
[preflight] Reading configuration from the cluster...
[preflight] FYI: You can look at this config file with 'kubectl -n kube-system get cm kubeadm-config -o yaml'
W0303 18:09:48.683836    3516 utils.go:69] The recommended value for "clusterDNS" in "KubeletConfiguration" is: [10.233.0.10]; the provided value is: [169.254.25.10]
[kubelet-start] Writing kubelet configuration to file "/var/lib/kubelet/config.yaml"
[kubelet-start] Writing kubelet environment file with flags to file "/var/lib/kubelet/kubeadm-flags.env"
[kubelet-start] Starting the kubelet
[kubelet-start] Waiting for the kubelet to perform the TLS Bootstrap...

This node has joined the cluster:
* Certificate signing request was sent to apiserver and a response was received.
* The Kubelet was informed of the new secure connection details.

Run 'kubectl get nodes' on the control-plane to see this node join the cluster.
[node1 192.168.100.3] MSG:
node/node1 labeled
[node2 192.168.100.4] MSG:
node/node2 labeled
INFO[18:09:56 CST] Deploying network plugin ...
[master 192.168.100.2] MSG:
configmap/calico-config created
customresourcedefinition.apiextensions.k8s.io/bgpconfigurations.crd.projectcalico.org created
customresourcedefinition.apiextensions.k8s.io/bgppeers.crd.projectcalico.org created
customresourcedefinition.apiextensions.k8s.io/blockaffinities.crd.projectcalico.org created
customresourcedefinition.apiextensions.k8s.io/clusterinformations.crd.projectcalico.org created
customresourcedefinition.apiextensions.k8s.io/felixconfigurations.crd.projectcalico.org created
customresourcedefinition.apiextensions.k8s.io/globalnetworkpolicies.crd.projectcalico.org created
customresourcedefinition.apiextensions.k8s.io/globalnetworksets.crd.projectcalico.org created
customresourcedefinition.apiextensions.k8s.io/hostendpoints.crd.projectcalico.org created
customresourcedefinition.apiextensions.k8s.io/ipamblocks.crd.projectcalico.org created
customresourcedefinition.apiextensions.k8s.io/ipamconfigs.crd.projectcalico.org created
customresourcedefinition.apiextensions.k8s.io/ipamhandles.crd.projectcalico.org created
customresourcedefinition.apiextensions.k8s.io/ippools.crd.projectcalico.org created
customresourcedefinition.apiextensions.k8s.io/kubecontrollersconfigurations.crd.projectcalico.org created
customresourcedefinition.apiextensions.k8s.io/networkpolicies.crd.projectcalico.org created
customresourcedefinition.apiextensions.k8s.io/networksets.crd.projectcalico.org created
clusterrole.rbac.authorization.k8s.io/calico-kube-controllers created
clusterrolebinding.rbac.authorization.k8s.io/calico-kube-controllers created
clusterrole.rbac.authorization.k8s.io/calico-node created
clusterrolebinding.rbac.authorization.k8s.io/calico-node created
daemonset.apps/calico-node created
serviceaccount/calico-node created
deployment.apps/calico-kube-controllers created
serviceaccount/calico-kube-controllers created
Warning: policy/v1beta1 PodDisruptionBudget is deprecated in v1.21+, unavailable in v1.25+; use policy/v1 PodDisruptionBudget
poddisruptionbudget.policy/calico-kube-controllers created
[master 192.168.100.2] MSG:
storageclass.storage.k8s.io/local created
serviceaccount/openebs-maya-operator created
clusterrole.rbac.authorization.k8s.io/openebs-maya-operator created
clusterrolebinding.rbac.authorization.k8s.io/openebs-maya-operator created
deployment.apps/openebs-localpv-provisioner created
INFO[18:09:58 CST] Deploying KubeSphere ...
v3.2.1
[master 192.168.100.2] MSG:
namespace/kubesphere-system created
namespace/kubesphere-monitoring-system created
[master 192.168.100.2] MSG:
secret/kube-etcd-client-certs created
[master 192.168.100.2] MSG:
namespace/kubesphere-system unchanged
serviceaccount/ks-installer unchanged
customresourcedefinition.apiextensions.k8s.io/clusterconfigurations.installer.kubesphere.io unchanged
clusterrole.rbac.authorization.k8s.io/ks-installer unchanged
clusterrolebinding.rbac.authorization.k8s.io/ks-installer unchanged
deployment.apps/ks-installer unchanged
clusterconfiguration.installer.kubesphere.io/ks-installer created
Please wait for the installation to complete:     >>--->
#####################################################
###              Welcome to KubeSphere!           ###
#####################################################

Console: http://192.168.100.2:30880
Account: admin
Password: P@88w0rd

NOTES:
  1. After you log into the console, please check the
     monitoring status of service components in
     "Cluster Management". If any service is not
     ready, please wait patiently until all components
     are up and running.
  2. Please change the default password after login.

#####################################################
https://kubesphere.io             2022-03-03 18:14:42
#####################################################
INFO[18:14:47 CST] Installation is complete.

Please check the result using the command:

       kubectl logs -n kubesphere-system $(kubectl get pod -n kubesphere-system -l app=ks-install -o jsonpath='{.items[0].metadata.name}') -f
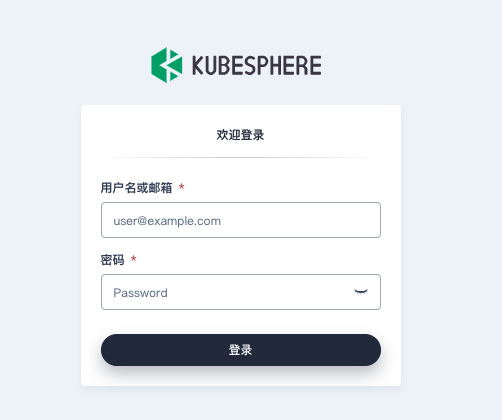
网页登录查看:
Console: http://192.168.100.2:30880
Account: admin
Password: P@88w0rd
最后
以上就是听话鸡最近收集整理的关于记录kubesphere和k8s非常详细安装手册多节点安装一、概念二、搭建部署的全部内容,更多相关记录kubesphere和k8s非常详细安装手册多节点安装一、概念二、搭建部署内容请搜索靠谱客的其他文章。


发表评论 取消回复