#视频人脸检测
#coding:utf-8
import pytesseract as pyact
import cv2
import dlib
import datetime
# 获取人脸关键点检测器
predictor = dlib.shape_predictor(r"D:modelslydirectxmlfilesshape_predictor_68_face_landmarks.dat")
# 使用默认 人脸识别器模型
detector = dlib.get_frontal_face_detector()
def get_time():
return datetime.datetime.now().strftime('%Y-%m-%d-%H-%M-%S-%f')
def ocr_rec():
path = r"C:UserslyDesktopshortcut.png"
src=cv2.imread(path)
text=pyact.image_to_string(src)
print(text)
#opencv 版本的人脸检测
def face_rec():
filepath = r"C:UserslyDesktoppictimg.jpg"
img=cv2.imread(filepath)
gray = cv2.cvtColor(img,cv2.COLOR_BGR2GRAY)
classifer = cv2.CascadeClassifier(r"D:modelslydirectxmlfileslbpcascade_frontalface.xml")
color = (0,255,0)
faceRects = classifer.detectMultiScale(gray,scaleFactor=1.2,minNeighbors=3,minSize=(32,32))
if(len(faceRects)):
for faceRect in faceRects:
x,y,w,h = faceRect
cv2.rectangle(img,(x,y),(x+w,y+h),color,2)
cv2.imshow("image", img) # 显示图像
c = cv2.waitKey(0)
#dlib版本的人脸检测 68个特征点的检测 single pic
def dlib_face_recogn():
# filepath = r"D:modelslydirectpics2008_001322.jpg "
filepath = r"D:modelslydirectpicstimg.jpg "
img=cv2.imread(filepath)
gray = cv2.cvtColor(img,cv2.COLOR_BGR2GRAY)
# 人脸的识别器模型
detector = dlib.get_frontal_face_detector()
# 先通过分类器判断人脸个数
start = datetime.datetime.now()
dets = detector(gray,1)
end = datetime.datetime.now()
print("识别时间:", end - start)
for face in dets:
# 取出一张人脸 跌入检测器找到标记点
# print(face.left(),face.top(),face.right(),face.bottom())
pt1 = (face.left(),face.top())
pt2 = (face.right(),face.bottom())
cv2.rectangle(img,pt1,pt2,(255,0,0),1)
start = datetime.datetime.now()
shape = predictor(img, face)
end = datetime.datetime.now()
print("关键点时间:", end - start)
for pt in shape.parts():
pt_pos = (pt.x,pt.y)
cv2.circle(img,pt_pos,1,(0,255,0),1)
# cv2.imshow("image",img)
# cv2.waitKey(0)
pass
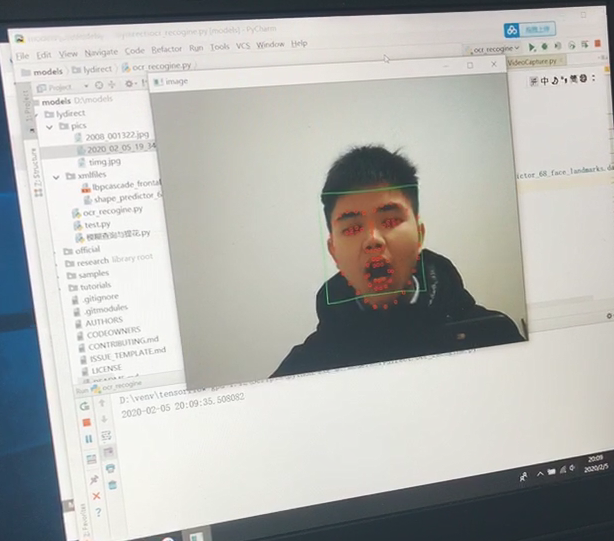
#视频版dlib 人脸检测
def video_dlib_face_recogn(img):
gray=cv2.cvtColor(img,cv2.COLOR_BGR2GRAY)
dets = detector(gray,1)
for face in dets:
left = face.left()
top = face.top()
right = face.right()
bottom = face.bottom()
if(right-left>100):
cv2.rectangle(img,(left,top),(right,bottom),(0,255,0),1)
points=predictor(img,face)
for point in points.parts():
per_point = (point.x,point.y)
cv2.circle(img,per_point,3,(0,0,255),1)
cv2.imshow("image",img)
cv2.waitKey(1)
pass
def start_video_detect():
video_path = ""
# cap = cv2.VideoCapture(r"D:modelslydirectpics2020_02_05_19_34_IMG_2936.MP4")
cap = cv2.VideoCapture(0)
# video_len = cap.get(7)
while(1):
ret,img = cap.read()
video_dlib_face_recogn(img)
# if(ret>=video_len):
# break
# if(cv2.waitKey()=='q'):
# break
if __name__ == '__main__':
start=datetime.datetime.now()
print(start)
# dlib_face_recogn()
# 开启检测
start_video_detect()
end = datetime.datetime.now()
print(end)
print("总体时间:",end-start)
# face_rec()
效果
最后
以上就是大胆太阳最近收集整理的关于人脸视频检测效果的全部内容,更多相关人脸视频检测效果内容请搜索靠谱客的其他文章。
本图文内容来源于网友提供,作为学习参考使用,或来自网络收集整理,版权属于原作者所有。


发表评论 取消回复