我是靠谱客的博主 含糊斑马,这篇文章主要介绍PyQt5学习笔记--基于face_recognition实现实时视频流人脸检测与识别1--基于Qt Designer设计ui窗口2--基于face_recognition实现人脸3--主函数4--结果展示5--参考,现在分享给大家,希望可以做个参考。
目录
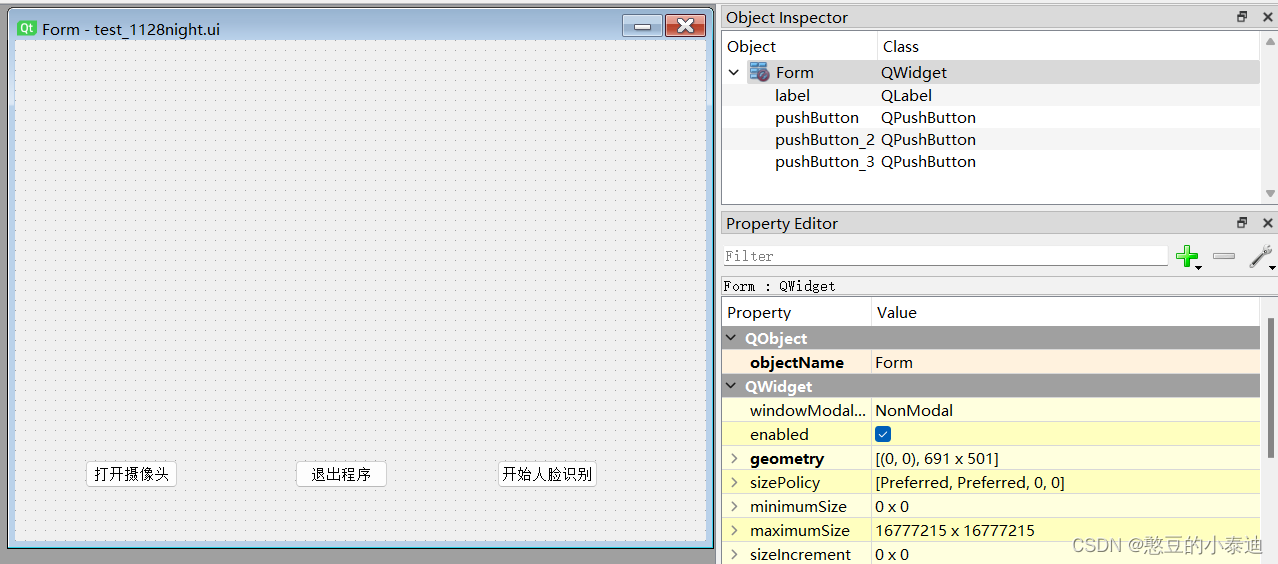
1--基于Qt Designer设计ui窗口
2--基于face_recognition实现人脸
3--主函数
4--结果展示
5--参考
1--基于Qt Designer设计ui窗口
2--基于face_recognition实现人脸
① 代码:(命名为face_rec.py,后面主函数会调用)
import face_recognition
import cv2
import numpy as np

class face_rec():
    def __init__(self):
        # 导入图片库、进行编码
        self.load_database()

        # 初始化
        self.face_locations = []
        self.face_encodings = []
        self.face_names = []


    def load_database(self): # 导入图片库、进行编码
        self.dbpath = "./database/"
        obama_image = face_recognition.load_image_file(self.dbpath + "obama.jpg")
        biden_image = face_recognition.load_image_file(self.dbpath + "biden.jpg")
        kobe_image = face_recognition.load_image_file(self.dbpath + "kobe.jpg")
        liujinfu_image = face_recognition.load_image_file(self.dbpath + "liujinfu.jpg")
        obama_face_encoding = face_recognition.face_encodings(obama_image)[0]
        biden_face_encoding = face_recognition.face_encodings(biden_image)[0]
        kobe_face_encoding = face_recognition.face_encodings(kobe_image)[0]
        liujinfu_face_encoding = face_recognition.face_encodings(liujinfu_image)[0]

        # 记录编码及标签
        self.known_face_encodings = [
            obama_face_encoding,
            biden_face_encoding,
            kobe_face_encoding,
            liujinfu_face_encoding
        ]
        self.known_face_names = [
            "Barack Obama",
            "Joe Biden",
            "kobe",
            "liujinfu"
        ]

    def rec(self, frame):
        self.frame = frame

        # Resize
        small_frame = cv2.resize(self.frame, (0, 0), fx=0.25, fy=0.25)
        # BGR -> RGB
        rgb_small_frame = small_frame[:, :, ::-1]

        # 当前帧与图片库进行匹配
        face_locations = face_recognition.face_locations(rgb_small_frame)
        face_encodings = face_recognition.face_encodings(rgb_small_frame, face_locations)
        face_names = []
        for face_encoding in face_encodings:
            # 判断是否匹配
            matches = face_recognition.compare_faces(self.known_face_encodings, face_encoding)
            name = "Unknown"
            # 计算距离
            face_distances = face_recognition.face_distance(self.known_face_encodings, face_encoding)
            best_match_index = np.argmin(face_distances)
            if matches[best_match_index]:
                name = self.known_face_names[best_match_index]

            face_names.append(name)

        # 可视化结果
        for (top, right, bottom, left), name in zip(face_locations, face_names):
            top *= 4
            right *= 4
            bottom *= 4
            left *= 4
            # 框出
            cv2.rectangle(self.frame, (left, top), (right, bottom), (0, 0, 255), 2)
            cv2.rectangle(self.frame, (left, bottom - 35), (right, bottom), (0, 0, 255), cv2.FILLED)
            font = cv2.FONT_HERSHEY_DUPLEX
            # label
            cv2.putText(self.frame, name, (left + 6, bottom - 6), font, 1.0, (255, 255, 255), 1)

        return self.frame
注:增加人脸库需要修改load_database()函数;
3--主函数
代码:
import sys
import cv2

from PyQt5 import QtCore, QtGui, QtWidgets, uic
from PyQt5.QtGui import QImage
from PyQt5.QtWidgets import *

from face_rec import face_rec

class MyWindow(QtWidgets.QWidget):
    def __init__(self, parent=None):
        super(MyWindow, self).__init__(parent)

        self.timer_camera = QtCore.QTimer()  # 初始化定时器
        self.cap = cv2.VideoCapture()  # 初始化摄像头
        self.cam_idx = 0 # 初始化摄像头索引
        self.set_ui() # 初始化ui
        self.slot_init() # 初始化槽函数连接

        # 初始化模型
        self.face_rec = face_rec()

    def set_ui(self): # 初始化ui界面
        self.ui = uic.loadUi("./mainWidget.ui")
        self.button_open_camera = self.ui.pushButton
        self.button_close = self.ui.pushButton_2
        self.button_rec = self.ui.pushButton_3
        self.label_show_camera = self.ui.label

        self.button_rec.setCheckable(True) # 设置为开关状态

    def slot_init(self):  # 建立信号与槽函数的通信连接
        self.button_open_camera.clicked.connect(self.button_open_camera_click)
        self.timer_camera.timeout.connect(self.show_camera)
        self.button_close.clicked.connect(self.close)

    def button_open_camera_click(self):
        if self.timer_camera.isActive() == False:
            self.cap.open(self.cam_idx)
            self.timer_camera.start(30) # 30ms 刷新一次定时器
            self.button_open_camera.setText(u'关闭摄像头')
        else:
            self.timer_camera.stop()
            self.cap.release()
            self.label_show_camera.clear()
            self.button_open_camera.setText(u'打开摄像头')

    # 显示图像
    def show_camera(self):
        flag, self.frame = self.cap.read()
        if self.button_rec.isChecked():
            '''
            这里调用人脸识别识别函数,传入当前帧的图片,返回人脸识别后的图片;
            这里的人脸识别函数可以自由定义,因为face_recognition发行时间太久了,导致识别效果较差;
            可以采用yolo+deepface进行人脸识别;
            '''
            img = self.face_rec.rec(self.frame)

            frame = QImage(img, img.shape[1], img.shape[0], img.strides[0], QImage.Format_RGB888).rgbSwapped()
            self.label_show_camera.setPixmap(QtGui.QPixmap.fromImage(frame))
            self.button_rec.setText(u'结束人脸识别')
        else:
            frame = QtGui.QImage(self.frame, self.frame.shape[1], self.frame.shape[0], self.frame.strides[0],
                             QtGui.QImage.Format_RGB888).rgbSwapped()
            self.label_show_camera.setPixmap(QtGui.QPixmap.fromImage(frame))
            self.button_rec.setText(u'开始人脸识别')

    # 重写closeEvent
    def closeEvent(self, event):
        ok = QtWidgets.QPushButton()
        cancel = QtWidgets.QPushButton()
        msg = QtWidgets.QMessageBox(QtWidgets.QMessageBox.Warning, u'关闭', u'是否关闭!')
        msg.addButton(ok, QtWidgets.QMessageBox.ActionRole)
        msg.addButton(cancel, QtWidgets.QMessageBox.RejectRole)
        ok.setText(u'确定')
        cancel.setText(u'取消')
        if msg.exec_() == QtWidgets.QMessageBox.RejectRole:
            event.ignore()
        else:
            if self.cap.isOpened():
                self.cap.release()
            if self.timer_camera.isActive():
                self.timer_camera.stop()
            event.accept()

if __name__ == '__main__':
    # 创建对象
    app = QApplication(sys.argv)

    # 创建窗口、展示窗口
    w = MyWindow()
    w.ui.show()

    # 程序进行循环等待状态
    app.exec_()
几点需要说明的地方:
① 在主函数中定义了一个开关按钮,即 self.button_rec.setCheckable(True),点击按钮可以切换开和关两种状态,通过 self.button_rec.isChecked() 可以判断当前按钮处于的开关状态;
② 在逐帧读取视频流的时候,采取了基于定时器的方法,并把定时器间隔设置为30ms,对应常规视频流的帧间隔,即(1 / fps)* 1000;
4--结果展示
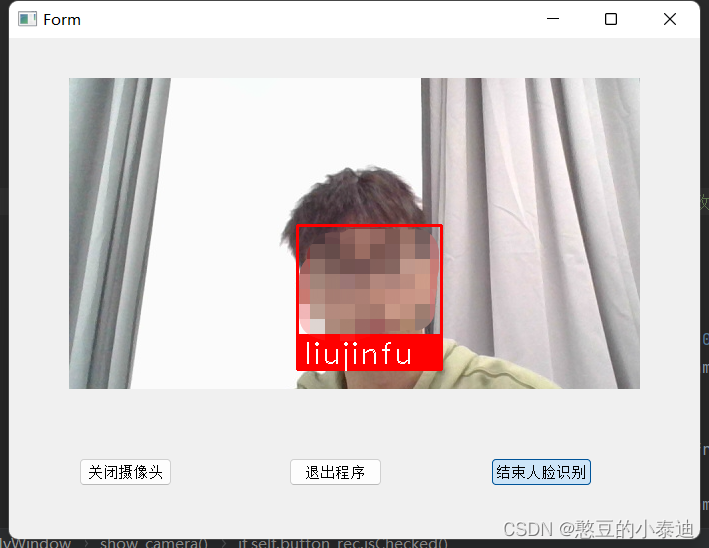
不足之处:
① Qt采用的是单线程处理视频帧,不利于后续项目的进一步扩展;
② 采用的人脸识别模型是基于face_recognition,其发行时间较长,识别准确率不算特别高;
5--参考
QT开关按钮的使用
QT使用定时器显示实时视频流
基于face_recognition进行实时视频流的人脸识别
最后
以上就是含糊斑马最近收集整理的关于PyQt5学习笔记--基于face_recognition实现实时视频流人脸检测与识别1--基于Qt Designer设计ui窗口2--基于face_recognition实现人脸3--主函数4--结果展示5--参考的全部内容,更多相关PyQt5学习笔记--基于face_recognition实现实时视频流人脸检测与识别1--基于Qt内容请搜索靠谱客的其他文章。
本图文内容来源于网友提供,作为学习参考使用,或来自网络收集整理,版权属于原作者所有。


发表评论 取消回复