我是靠谱客的博主 干净小刺猬,这篇文章主要介绍resultMap嵌套结果和嵌套查询准备工作嵌套结果(返回多表数据,一对一)嵌套结果(返回多表数据,一对多)嵌套查询(一对一)嵌套查询(一对多),现在分享给大家,希望可以做个参考。
最近我们在学习result嵌套结果和嵌套查询。今天就来总结一下。
准备工作
首先呢,我们要 做好准备工作。
1.在数据库中创建两个表。
2.准备好我们需要的jar包
3.准备好我们要的配置文件
4.创建好两个表的pojo包
创建表
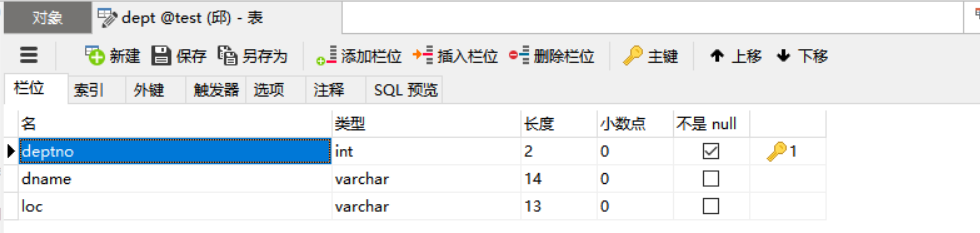
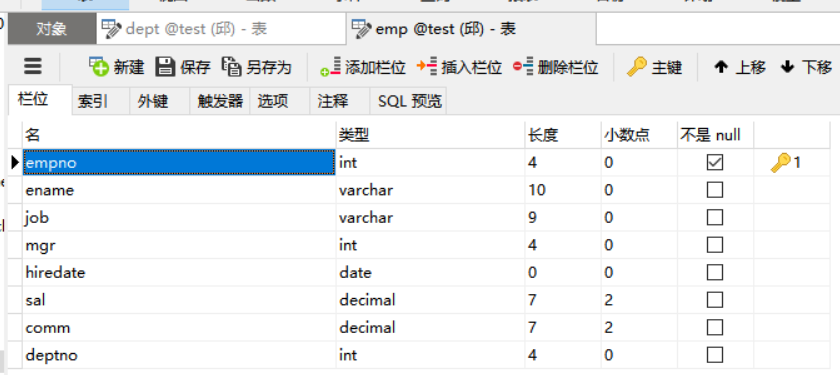
这两个表是相互关联的,通过deptno。
准备jar包
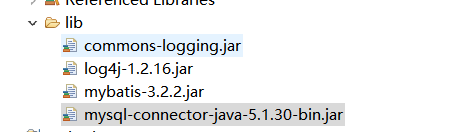
准备好这四个jar包,前两个用于日志,第三个是mybatis的,第四个JDBC的。导入jar包后,还要确定是否加入项目中。
配置文件
mybatis.xml配置文件
<!DOCTYPE configuration PUBLIC "-//mybatis.org//DTD Config 3.0//EN"
"http://mybatis.org/dtd/mybatis-3-config.dtd">

<configuration>
<!-- 引入性文件 -->
<properties resource="db.properties"></properties>
<settings>
	<setting name="autoMappingBehavior" value="FULL"/>
</settings>
<!-- typeAliases不能放在properties前面 -->
<typeAliases>
	<!-- type:你需要给那个路径 设置别名-->
	<!-- <typeAlias type="pojo.Emp" alias="emp"/> -->
	<!-- 默认是pojo名称,首字母大小写无关 -->
	<package name="pojo"/>
</typeAliases>

<environments default="development">
	<environment id="development">
		<transactionManager type="JDBC" />
		<dataSource type="POOLED">
			<property name="driver" value="${mysql.driver}" />
			<property name="url" value="${mysql.url}" />
			<property name="username" value="${mysql.username}" />
			<property name="password" value="${mysql.password}" />
		</dataSource>
	</environment>
</environments>

<!-- //映射文件的路径 -->
<mappers>
	<package name="mapper"/>
</mappers>

</configuration>
db.properties引入性文件
#key=value
mysql.driver=com.mysql.jdbc.Driver
mysql.url=jdbc:mysql://localhost:3306/test?useUnicode=true&characterEncoding=utf8
mysql.username=root
mysql.password=

oracle.driver=com.mysql.jdbc.Driver
oracle.url=jdbc:mysql://localhost:3306/test?useUnicode=true&characterEncoding=utf8
oracle.username=root
oracle.password=
log4.properties 日志配置文件
log4j.rootLogger=debug,cons
log4j.appender.cons=org.apache.log4j.ConsoleAppender
log4j.appender.cons.layout=org.apache.log4j.PatternLayout
log4j.appender.cons.layout.ConversionPattern=%5p [%t] - %m%n
记得配置文件后面都不要加空格,不然可能会报错哦~
pojo包
Dept.java
public class Dept {

private int deptno;
private String dname;
private String loc;
//有参构造函数
public Dept(int deptno, String dname, String loc) {
	super();
	this.deptno = deptno;
	this.dname = dname;
	this.loc = loc;
}
//无参构造函数
public Dept() {
	super();
	// TODO Auto-generated constructor stub
}
//get、set方法
public int getDeptno() {
	return deptno;
}
public void setDeptno(int deptno) {
	this.deptno = deptno;
}
public String getDname() {
	return dname;
}
public void setDname(String dname) {
	this.dname = dname;
}
public String getLoc() {
	return loc;
}
public void setLoc(String loc) {
	this.loc = loc;
}
//打印函数
@Override
public String toString() {
	return "Dept [deptno=" + deptno + ", dname=" + dname + ", loc=" + loc + "]";
}
}
Emp.java
public class Emp {

private int empno;
private String ename;
private String job;
private int mgr;
private Date hiredate; //java.sql.Date只包含年月日,java.util.Date包含年月日,时分秒
private int sal;
private int comm;
private int deptno;


public int getEmpno() {
	return empno;
}
public void setEmpno(int empno) {
	this.empno = empno;
}
public String getEname() {
	return ename;
}
public void setEname(String ename) {
	this.ename = ename;
}
public String getJob() {
	return job;
}
public void setJob(String job) {
	this.job = job;
}
public int getMgr() {
	return mgr;
}
public void setMgr(int mgr) {
	this.mgr = mgr;
}
public Date getHiredate() {
	return hiredate;
}
public void setHiredate(Date hiredate) {
	this.hiredate = hiredate;
}
public int getSal() {
	return sal;
}
public void setSal(int sal) {
	this.sal = sal;
}
public int getComm() {
	return comm;
}
public void setComm(int comm) {
	this.comm = comm;
}
public int getDeptno() {
	return deptno;
}
public void setDeptno(int deptno) {
	this.deptno = deptno;
}

@Override
public String toString() {
	return "Emp [empno=" + empno + ", ename=" + ename + ", job=" + job + ", mgr=" + mgr + ", hiredate=" + hiredate
			+ ", sal=" + sal + ", comm=" + comm + ", deptno=" + deptno + "]";
}

public Emp(int empno, String ename, String job, int mgr, Date hiredate, int sal, int comm, int deptno) {
	super();
	this.empno = empno;
	this.ename = ename;
	this.job = job;
	this.mgr = mgr;
	this.hiredate = hiredate;
	this.sal = sal;
	this.comm = comm;
	this.deptno = deptno;
}
public Emp() {
	super();
}
}
函数大部分都是可以自己生成的哦~
到这里我们的准备工作就已经做完了,接下来我们进入主题吧~
嵌套结果(返回多表数据,一对一)
修改Emp.java代码
public class Emp {

private int empno;
private String ename;
private String job;
private int mgr;
private Date hiredate; //java.sql.Date只包含年月日,java.util.Date包含年月日,时分秒
private int sal;
private int comm;
private int deptno;
private Dept depts;//一对一(新加的属性)


public Dept getDepts() {
	return depts;
}
public void setDepts(Dept depts) {
	this.depts = depts;
}
public int getEmpno() {
	return empno;
}
public void setEmpno(int empno) {
	this.empno = empno;
}
public String getEname() {
	return ename;
}
public void setEname(String ename) {
	this.ename = ename;
}
public String getJob() {
	return job;
}
public void setJob(String job) {
	this.job = job;
}
public int getMgr() {
	return mgr;
}
public void setMgr(int mgr) {
	this.mgr = mgr;
}
public Date getHiredate() {
	return hiredate;
}
public void setHiredate(Date hiredate) {
	this.hiredate = hiredate;
}
public int getSal() {
	return sal;
}
public void setSal(int sal) {
	this.sal = sal;
}
public int getComm() {
	return comm;
}
public void setComm(int comm) {
	this.comm = comm;
}
public int getDeptno() {
	return deptno;
}
public void setDeptno(int deptno) {
	this.deptno = deptno;
}

@Override
public String toString() {
	return "Emp [empno=" + empno + ", ename=" + ename + ", job=" + job + ", mgr=" + mgr + ", hiredate=" + hiredate
			+ ", sal=" + sal + ", comm=" + comm + ", deptno=" + deptno + ", depts=" + depts + "]";
}
public Emp(int empno, String ename, String job, int mgr, Date hiredate, int sal, int comm, int deptno) {
	super();
	this.empno = empno;
	this.ename = ename;
	this.job = job;
	this.mgr = mgr;
	this.hiredate = hiredate;
	this.sal = sal;
	this.comm = comm;
	this.deptno = deptno;
}
public Emp() {
	super();
}

}
EmpMapper.java接口文件
package mapper;

import org.apache.ibatis.annotations.Result;
import org.apache.ibatis.annotations.Results;
import org.apache.ibatis.annotations.Select;
import pojo.Emp;

public interface EmpMapper {

//嵌套结果一对一
@Results({
	@Result(column="empno",property="empno"),
	@Result(column="ename",property="ename"),
	@Result(column="deptno",property="depts.deptno"),
	@Result(column="dname",property="depts.dname"),
	@Result(column="loc",property="depts.loc"),
})
@Select("select * from emp e,dept d where e.deptno=d.deptno and empno=#{empno}")
Emp selectEmp(int empno);

}
运行代码
public class demo01 {

public static void main(String[] args) throws Exception {
	SqlSession session = null;
	  try{
	   SqlSessionFactory build = new SqlSessionFactoryBuilder().build(
	    Resources.getResourceAsReader("mybatis.xml"));
	   session = build.openSession();
	   // 创建接口的实现类getMapper(Class<T> c)参数是告诉我们创建哪个接口的实现类
	   EmpMapper mapper = session.getMapper(EmpMapper.class);
	   Emp emp =  mapper.selectEmp(8500);
	   session.commit();
	   System.out.println(emp);

	  }catch(IOException e){
	   e.printStackTrace();
	  }finally {
	   if(session != null){
	    session.close();
	   }
	  }
	 }


}
现在我们就可以运行一下了。
效果就如下图:

嵌套结果(返回多表数据,一对多)
修改Dept.java代码
public class Dept {

private int deptno;
private String dname;
private String loc;
private List<Emp> emps;//一对多(新加的属性)


public Dept() {
	super();
}
public Dept(int deptno, String dname, String loc) {
	super();
	this.deptno = deptno;
	this.dname = dname;
	this.loc = loc;
}


@Override
public String toString() {
	return "Dept [deptno=" + deptno + ", dname=" + dname + ", loc=" + loc + ", emps=" + emps + "]";
}
public List<Emp> getEmps() {
	return emps;
}
public void setEmps(List<Emp> emps) {
	this.emps = emps;
}
public int getDeptno() {
	return deptno;
}
public void setDeptno(int deptno) {
	this.deptno = deptno;
}
public String getDname() {
	return dname;
}
public void setDname(String dname) {
	this.dname = dname;
}
public String getLoc() {
	return loc;
}
public void setLoc(String loc) {
	this.loc = loc;
}

}
DeptMapper.xml配置文件
<mapper namespace="mapper.DeptMapper">

<resultMap type="dept" id="selectDeptMap">
	<id column="deptno" property="deptno" />
	<collection property="emps" ofType="emp">
		<id column="empno" property="empno" />
	</collection>
</resultMap>
</mapper>
DeptMapper.java接口文件
public interface DeptMapper {

//嵌套结果一对多
@ResultMap("mapper.DeptMapper.selectDeptMap")
@Select("select * from emp,dept where emp.deptno=dept.deptno and dept.deptno=#{deptno}")
Dept selectDept(int deptno);
}
运行代码
public class demo02 {

public static void main(String[] args){
	SqlSession session = null;
	  try{
	   SqlSessionFactory build = new SqlSessionFactoryBuilder().build(
	    Resources.getResourceAsReader("mybatis.xml"));
	   session = build.openSession();
	   // 创建接口的实现类getMapper(Class<T> c)参数是告诉我们创建哪个接口的实现类
	   DeptMapper mapper = session.getMapper(DeptMapper.class);
	   Dept dept = mapper.selectDept(20);
	   session.commit();
	   System.out.println(dept);

	  }catch(IOException e){
	   e.printStackTrace();
	  }finally {
	   if(session != null){
	    session.close();
	   }
	  }
	 }
}
代码就完成了,可以运行一下代码
结果如下:

嵌套查询(一对一)
@Select: 执行查询语句
@Results:结果映射的列表,相当于<resultMap>
@Result: 在列和属性或字段之间的单独结果映射,相当于resultMap 元素中的<id> 和<result>属性
@Many: 复杂类型的集合属性映射,相等于<collection>
@One:  单独属性值映射,相当于<association>
两个pojo包不用做修改,和上面的一样。
EmpMapper.java接口文件
public interface EmpMapper {

/**
 * column 关联字段
 * property 属性名称
 * one=@One 表示一对一
 * select:需要去执行的另一条sql路径
 * @param empno
 * @return
 */
//嵌套查询一对一
@Results({
	@Result(column="empno",property="empno"),
	@Result(column="deptno",property="depts",
	one=@One(select="mapper.DeptMapper.selectDept"))
})
@Select("select * from emp where empno=#{empno}")
Emp selectEmp(int empno);

}
DeptMapper.java接口文件
public interface DeptMapper {

@Select("Select * from dept Where deptno=#{deptno}")
Dept selectDept(int deptno);

}
运行代码
	SqlSession session = null;
	  try{
	   SqlSessionFactory build = new SqlSessionFactoryBuilder().build(
	    Resources.getResourceAsReader("mybatis.xml"));
	   session = build.openSession();
	   // 创建接口的实现类getMapper(Class<T> c)参数是告诉我们创建哪个接口的实现类
	   EmpMapper mapper = session.getMapper(EmpMapper.class);
	   Emp emp =  mapper.selectEmp(8500);
	   session.commit();
	   System.out.println(emp);

	  }catch(IOException e){
	   e.printStackTrace();
	  }finally {
	   if(session != null){
	    session.close();
	   }
运行下代码,结果如下:

嵌套查询(一对多)
DeptMapper.java代码
public interface DeptMapper {
//嵌套查询一对多
@Select("select * from dept where deptno=#{id}")
@Results({
	@Result(property="deptno",column="deptno"),
	@Result(property="emps",column="deptno", many=@Many(select="mapper.EmpMapper.selectEmp1"))
})
Dept selectDept1(int deptno);
}
EmpMapper.java代码
public interface EmpMapper {

@Select("select * from emp where deptno = #{id}")
Emp selectEmp1(int deptno);
}
运行代码
SqlSession session = null;
	  try{
	   SqlSessionFactory build = new SqlSessionFactoryBuilder().build(
	    Resources.getResourceAsReader("mybatis.xml"));
	   session = build.openSession();
	   // 创建接口的实现类getMapper(Class<T> c)参数是告诉我们创建哪个接口的实现类
	   DeptMapper mapper = session.getMapper(DeptMapper.class);
		Dept dept = mapper.selectDept1(20);
	   session.commit();
	   System.out.println(dept);

	  }catch(IOException e){
	   e.printStackTrace();
	  }finally {
	   if(session != null){
	    session.close();
	   }
	  }
就可以运行一下代码了,结果如下:

最后
以上就是干净小刺猬最近收集整理的关于resultMap嵌套结果和嵌套查询准备工作嵌套结果(返回多表数据,一对一)嵌套结果(返回多表数据,一对多)嵌套查询(一对一)嵌套查询(一对多)的全部内容,更多相关resultMap嵌套结果和嵌套查询准备工作嵌套结果(返回多表数据内容请搜索靠谱客的其他文章。
本图文内容来源于网友提供,作为学习参考使用,或来自网络收集整理,版权属于原作者所有。


![Mybatis高级结果映射 [一对一, 一对多]](https://www.shuijiaxian.com/files_image/reation/bcimg27.png)


发表评论 取消回复