前言:Android开发中,自定义View实现自己想要的效果已成为一项必备的技能,当然自定义View也是Android开发中比较难的部分,涉及到的知识有Canvas(画布),Paint(画笔)等,自定义控件分为三种:一是直接继承自View,完全的自定义;二是在原有控件的基础上进行改造,达到自己想要的效果;还有一种就是自定义组合控件,将已有的控件根据自己的需要进行组合实现的效果。本人对自定义View也是一知半解,简单记录下自己学习自定义View(继承自View)的过程,方便日后翻阅。
技术实现
1.ArcView继承自View
2.Canvas(画布)
3.Paint(画笔)
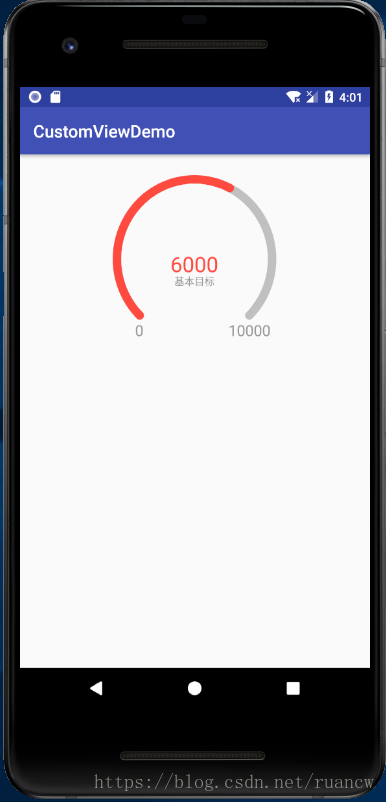
效果图:类似于QQ的计步效果
1.继承自View
(1)重写3个构造方法(新的API中的构造方法是4个)
public ArcView(Context context) {
 this(context,null);
}

public ArcView(Context context, @Nullable AttributeSet attrs) {
 this(context, attrs,0);
}

public ArcView(Context context, @Nullable AttributeSet attrs, int defStyleAttr) {
 super(context, attrs, defStyleAttr);
 //init();
}
(2)重写View的OnDraw方法
@SuppressLint("DrawAllocation")
@Override
protected void onDraw(Canvas canvas) {
 super.onDraw(canvas);
 centerX=getWidth()/2;
 centerY=getHeight()/2;
 //初始化paint
 initPaint();
 //绘制弧度
 drawArc(canvas);
 //绘制文本
 drawText(canvas);
}
注:这里的paint初始化我放在了onDraw方法中进行的,当然你也可以放在有三个参数的构造方法中初始化。
2.Paint初始化
(1)圆弧的画笔mArcPaint
//圆弧的paint
mArcPaint=new Paint(Paint.ANTI_ALIAS_FLAG);
//抗锯齿
mArcPaint.setAntiAlias(true);
mArcPaint.setColor(Color.parseColor("#666666"));
//设置透明度(数值为0-255)
mArcPaint.setAlpha(100);
//设置画笔的画出的形状
mArcPaint.setStrokeJoin(Paint.Join.ROUND);
mArcPaint.setStrokeCap(Paint.Cap.ROUND);
//设置画笔类型
mArcPaint.setStyle(Paint.Style.STROKE);
mArcPaint.setStrokeWidth(dp2px(mStrokeWith));
(2)文字的画笔mTextPaint
//中心文字的paint
mTextPaint=new Paint();
mTextPaint.setAntiAlias(true);
mTextPaint.setColor(Color.parseColor("#FF4A40"));
//设置文本的对齐方式
mTextPaint.setTextAlign(Paint.Align.CENTER);
//mTextPaint.setTextSize(getResources().getDimensionPixelSize(R.dimen.dp_12));
mTextPaint.setTextSize(dp2px(25));
3.Canvas绘制
(1)圆弧的绘制
/**
 * 绘制圆弧
 * @param canvas
 */
private void drawArc(Canvas canvas) {
 //绘制圆弧背景
 RectF mRectF=new RectF(mStrokeWith+dp2px(5),mStrokeWith+dp2px(5),getWidth()-mStrokeWith-dp2px(5),getHeight()-mStrokeWith);
 canvas.drawArc(mRectF,startAngle,mAngle,false,mArcPaint);
 //绘制当前数值对应的圆弧
 mArcPaint.setColor(Color.parseColor("#FF4A40"));
 //根据当前数据绘制对应的圆弧
 canvas.drawArc(mRectF,startAngle,mIncludedAngle,false,mArcPaint);
}
(2)文本的绘制
/**
 * 绘制文本
 * @param canvas
 */
private void drawText(Canvas canvas) {
 Rect mRect=new Rect();
 String mValue=String.valueOf(mAnimatorValue);
 //绘制中心的数值
 mTextPaint.getTextBounds(mValue,0,mValue.length(),mRect);
 canvas.drawText(String.valueOf(mAnimatorValue),centerX,centerY+mRect.height(),mTextPaint);

 //绘制中心文字描述
 mTextPaint.setColor(Color.parseColor("#999999"));
 mTextPaint.setTextSize(dp2px(12));
 mTextPaint.getTextBounds(mDes,0,mDes.length(),mRect);
 canvas.drawText(mDes,centerX,centerY+2*mRect.height()+dp2px(10),mTextPaint);

 //绘制最小值
 String minValue=String.valueOf(mMinValue);
 String maxValue=String.valueOf(mMaxValue);
 mTextPaint.setTextSize(dp2px(18));
 mTextPaint.getTextBounds(minValue,0,minValue.length(),mRect);
 canvas.drawText(minValue, (float) (centerX-0.6*centerX-dp2px(5)), (float) (centerY+0.75*centerY+mRect.height()+dp2px(5)),mTextPaint);
 //绘制最大值
 mTextPaint.getTextBounds(maxValue,0,maxValue.length(),mRect);
 canvas.drawText(maxValue, (float) (centerX+0.6*centerX+dp2px(5)), (float) (centerY+0.75*centerY+mRect.height()+dp2px(5)),mTextPaint);
}
4.添加动画效果及数据
(1)动画效果
/**
 * 为绘制弧度及数据设置动画
 *
 * @param startAngle 开始的弧度
 * @param currentAngle 需要绘制的弧度
 * @param currentValue 需要绘制的数据
 * @param time 动画执行的时长
 */
private void setAnimation(float startAngle, float currentAngle,int currentValue, int time) {
 //绘制当前数据对应的圆弧的动画效果
 ValueAnimator progressAnimator = ValueAnimator.ofFloat(startAngle, currentAngle);
 progressAnimator.setDuration(time);
 progressAnimator.setTarget(mIncludedAngle);
 progressAnimator.addUpdateListener(new ValueAnimator.AnimatorUpdateListener() {
  @Override
  public void onAnimationUpdate(ValueAnimator animation) {
   mIncludedAngle = (float) animation.getAnimatedValue();
   //重新绘制,不然不会出现效果
   postInvalidate();
  }
 });
 //开始执行动画
 progressAnimator.start();

 //中心数据的动画效果
 ValueAnimator valueAnimator = ValueAnimator.ofInt(mAnimatorValue, currentValue);
 valueAnimator.setDuration(2500);
 valueAnimator.setInterpolator(new LinearInterpolator());
 valueAnimator.addUpdateListener(new ValueAnimator.AnimatorUpdateListener() {

  @Override
  public void onAnimationUpdate(ValueAnimator valueAnimator) {

   mAnimatorValue = (int) valueAnimator.getAnimatedValue();
   postInvalidate();
  }
 });
 valueAnimator.start();
}
(2)数据添加
/**
 * 设置数据
 * @param minValue 最小值
 * @param maxValue 最大值
 * @param currentValue 当前绘制的值
 * @param des 描述信息
 */
public void setValues(int minValue,int maxValue, int currentValue,String des) {
 mDes=des;
 mMaxValue=maxValue;
 mMinValue=minValue;
 //完全覆盖背景弧度
 if (currentValue > maxValue) {
  currentValue = maxValue;
 }
 //计算弧度比重
 float scale = (float) currentValue / maxValue;
 //计算弧度
 float currentAngle = scale * mAngle;
 //开始执行动画
 setAnimation(0, currentAngle, currentValue,2500);
完整代码:
/**
 * Created by ruancw on 2018/6/13.
 * 自定义的圆弧形view
 */

public class ArcView extends View {

 //根据数据显示的圆弧Paint
 private Paint mArcPaint;
 //文字描述的paint
 private Paint mTextPaint;
 //圆弧开始的角度
 private float startAngle=135;
 //圆弧结束的角度
 private float endAngle=45;
 //圆弧背景的开始和结束间的夹角大小
 private float mAngle=270;
 //当前进度夹角大小
 private float mIncludedAngle=0;
 //圆弧的画笔的宽度
 private float mStrokeWith=10;
 //中心的文字描述
 private String mDes="";
 //动画效果的数据及最大/小值
 private int mAnimatorValue,mMinValue,mMaxValue;
 //中心点的XY坐标
 private float centerX,centerY;

 public ArcView(Context context) {
  this(context,null);
 }

 public ArcView(Context context, @Nullable AttributeSet attrs) {
  this(context, attrs,0);
 }

 public ArcView(Context context, @Nullable AttributeSet attrs, int defStyleAttr) {
  super(context, attrs, defStyleAttr);
  //init();
 }

 private void initPaint() {
  //圆弧的paint
  mArcPaint=new Paint(Paint.ANTI_ALIAS_FLAG);
  //抗锯齿
  mArcPaint.setAntiAlias(true);
  mArcPaint.setColor(Color.parseColor("#666666"));
  //设置透明度(数值为0-255)
  mArcPaint.setAlpha(100);
  //设置画笔的画出的形状
  mArcPaint.setStrokeJoin(Paint.Join.ROUND);
  mArcPaint.setStrokeCap(Paint.Cap.ROUND);
  //设置画笔类型
  mArcPaint.setStyle(Paint.Style.STROKE);
  mArcPaint.setStrokeWidth(dp2px(mStrokeWith));

  //中心文字的paint
  mTextPaint=new Paint();
  mTextPaint.setAntiAlias(true);
  mTextPaint.setColor(Color.parseColor("#FF4A40"));
  //设置文本的对齐方式
  mTextPaint.setTextAlign(Paint.Align.CENTER);
  //mTextPaint.setTextSize(getResources().getDimensionPixelSize(R.dimen.dp_12));
  mTextPaint.setTextSize(dp2px(25));

 }

 @SuppressLint("DrawAllocation")
 @Override
 protected void onDraw(Canvas canvas) {
  super.onDraw(canvas);
  centerX=getWidth()/2;
  centerY=getHeight()/2;
  //初始化paint
  initPaint();
  //绘制弧度
  drawArc(canvas);
  //绘制文本
  drawText(canvas);
 }

 /**
  * 绘制文本
  * @param canvas
  */
 private void drawText(Canvas canvas) {
  Rect mRect=new Rect();
  String mValue=String.valueOf(mAnimatorValue);
  //绘制中心的数值
  mTextPaint.getTextBounds(mValue,0,mValue.length(),mRect);
  canvas.drawText(String.valueOf(mAnimatorValue),centerX,centerY+mRect.height(),mTextPaint);

  //绘制中心文字描述
  mTextPaint.setColor(Color.parseColor("#999999"));
  mTextPaint.setTextSize(dp2px(12));
  mTextPaint.getTextBounds(mDes,0,mDes.length(),mRect);
  canvas.drawText(mDes,centerX,centerY+2*mRect.height()+dp2px(10),mTextPaint);

  //绘制最小值
  String minValue=String.valueOf(mMinValue);
  String maxValue=String.valueOf(mMaxValue);
  mTextPaint.setTextSize(dp2px(18));
  mTextPaint.getTextBounds(minValue,0,minValue.length(),mRect);
  canvas.drawText(minValue, (float) (centerX-0.6*centerX-dp2px(5)), (float) (centerY+0.75*centerY+mRect.height()+dp2px(5)),mTextPaint);
  //绘制最大指
  mTextPaint.getTextBounds(maxValue,0,maxValue.length(),mRect);
  canvas.drawText(maxValue, (float) (centerX+0.6*centerX+dp2px(5)), (float) (centerY+0.75*centerY+mRect.height()+dp2px(5)),mTextPaint);
 }

 /**
  * 绘制当前的圆弧
  * @param canvas
  */
 private void drawArc(Canvas canvas) {
  //绘制圆弧背景
  RectF mRectF=new RectF(mStrokeWith+dp2px(5),mStrokeWith+dp2px(5),getWidth()-mStrokeWith-dp2px(5),getHeight()-mStrokeWith);
  canvas.drawArc(mRectF,startAngle,mAngle,false,mArcPaint);
  //绘制当前数值对应的圆弧
  mArcPaint.setColor(Color.parseColor("#FF4A40"));
  //根据当前数据绘制对应的圆弧
  canvas.drawArc(mRectF,startAngle,mIncludedAngle,false,mArcPaint);
 }

 /**
  * 为绘制弧度及数据设置动画
  *
  * @param startAngle 开始的弧度
  * @param currentAngle 需要绘制的弧度
  * @param currentValue 需要绘制的数据
  * @param time 动画执行的时长
  */
 private void setAnimation(float startAngle, float currentAngle,int currentValue, int time) {
  //绘制当前数据对应的圆弧的动画效果
  ValueAnimator progressAnimator = ValueAnimator.ofFloat(startAngle, currentAngle);
  progressAnimator.setDuration(time);
  progressAnimator.setTarget(mIncludedAngle);
  progressAnimator.addUpdateListener(new ValueAnimator.AnimatorUpdateListener() {
   @Override
   public void onAnimationUpdate(ValueAnimator animation) {
    mIncludedAngle = (float) animation.getAnimatedValue();
    //重新绘制,不然不会出现效果
    postInvalidate();
   }
  });
  //开始执行动画
  progressAnimator.start();

  //中心数据的动画效果
  ValueAnimator valueAnimator = ValueAnimator.ofInt(mAnimatorValue, currentValue);
  valueAnimator.setDuration(2500);
  valueAnimator.setInterpolator(new LinearInterpolator());
  valueAnimator.addUpdateListener(new ValueAnimator.AnimatorUpdateListener() {

   @Override
   public void onAnimationUpdate(ValueAnimator valueAnimator) {

    mAnimatorValue = (int) valueAnimator.getAnimatedValue();
    postInvalidate();
   }
  });
  valueAnimator.start();
 }

 /**
  * 设置数据
  * @param minValue 最小值
  * @param maxValue 最大值
  * @param currentValue 当前绘制的值
  * @param des 描述信息
  */
 public void setValues(int minValue,int maxValue, int currentValue,String des) {
  mDes=des;
  mMaxValue=maxValue;
  mMinValue=minValue;
  //完全覆盖
  if (currentValue > maxValue) {
   currentValue = maxValue;
  }
  //计算弧度比重
  float scale = (float) currentValue / maxValue;
  //计算弧度
  float currentAngle = scale * mAngle;
  //开始执行动画
  setAnimation(0, currentAngle, currentValue,2500);
 }

 public float dp2px(float dp) {
  DisplayMetrics metrics = Resources.getSystem().getDisplayMetrics();
  return dp * metrics.density;
 }
}
总结:设置Paint的画笔形状(Cap和Join设置为弧形);使用Canvas的drawArc方法绘制圆弧及drawText绘制文本信息等;ValueAnimator设置数据及当前圆弧进度的动画效果。
以上就是本文的全部内容,希望对大家的学习有所帮助,也希望大家多多支持靠谱客。
最后
以上就是光亮可乐最近收集整理的关于Android自定义View实现圆弧进度效果的全部内容,更多相关Android自定义View实现圆弧进度效果内容请搜索靠谱客的其他文章。


发表评论 取消回复